图计算库 igraph 在 windows 10 上的编译安装
Posted 车斗
tags:
篇首语:本文由小常识网(cha138.com)小编为大家整理,主要介绍了图计算库 igraph 在 windows 10 上的编译安装相关的知识,希望对你有一定的参考价值。
图计算库 igraph 在 windows 10 上的编译安装
参考:https://igraph.org/c/doc/igraph-Installation.html#igraph-Installation-general-build-instructions
前提
win10 家庭版 + vs2017 社区免费版 (C/C++)
cmake-3.20.2 (https://github.com/Kitware/CMake/releases/download/v3.20.2/cmake-3.20.2-windows-x86_64.msi)
flex_bison (https://github.com/lexxmark/winflexbison/releases/download/v2.5.24/win_flex_bison-2.5.24.zip)
libxml2 (http://xmlsoft.org/)
igraph (https://github.com/igraph/igraph)
编译 libxml2 还是有点麻烦的。我编译好的放在下面的地址:
https://github.com/pepstack/convd.git
注意:libxml2 依赖 iconv,所以 libiconv.zip, libxml2.zip 都需要。并且要将 libiconv/include/ 目录下的3个头文件复制到目录:igraph/include/。
编译
配置环境变量:
Path=你的原来配置;C:\\DEVPACK\\win_flex_bison-2.5.24
编译 igraph:
git clone git@github.com:igraph/igraph.git
cd igraph
mkdir build
cd build
cmake ..
cmake --build . --config Release
配置
上面编译成功,说明默认地配置可以了。但是,还需要配置:
cmd
cmake-gui
配置项如下:

重要:由于依赖 LIBXML2,而LIBXML2并没有包含在代码库里,需要使用外部的代码。必须配置下面2个变量:

其中路径检验:
%LIBXML2_INCLUDE_DIR%\\libxml\\parser.h
LIBXML2_LIBRARY 指向 libxml2.lib 文件而不是目录。
然后按 configure 按钮,无错误后编译即可:
cmake --build . --config Release
按上面方法编译出来的是32位的静态库。为了编译64位的,上面过程重新来做一遍:
cd igraph
mkdir build64
cd build64
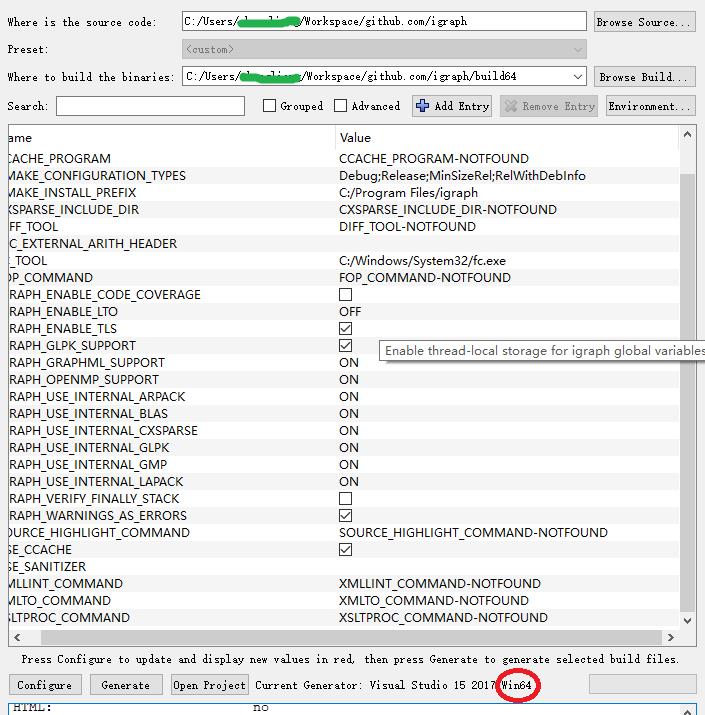
cmake -G"Visual Studio 15 2017 Win64" ..
然后打开cmd, 输入 cmake-gui,和上面的配置相同(重点是 ),如下图。
然后按 configure 按钮,无错误后编译即可:
cmake --build . --config Debug
cmake --build . --config Release
示例
下面开发一个VC程序做下测试。用 vs2017 新建一个VC++控制台空项目。然后手动加入一个文件:main.c,全部代码如下:
/**
 * main.c
 *
 * My first igraph test app
 */
#include <stdio.h>
#include <igraph.h>

int main(int argc, char *argv[])

    igraph_t graph;
    igraph_vector_t edges;
    igraph_real_t data[] = 0,1,0,2,0,5,1,2,1,4,2,4,1,3,3,5;
    igraph_vector_view(&edges, data, sizeof(data)/sizeof(double));

    igraph_empty(&graph, 6, IGRAPH_UNDIRECTED);
    igraph_add_edges(&graph, &edges, 0);

    igraph_add_vertices(&graph, 2, 0);
    igraph_add_edge(&graph, 6,4);
    igraph_add_edge(&graph, 6,5);
    igraph_add_edge(&graph, 7,5);
    igraph_add_edge(&graph, 7,3);

    printf("vertices: %d, edges: %d\\n", (int)igraph_vcount(&graph), (int)igraph_ecount(&graph));

    igraph_destroy(&graph);

    return 0;
项目64位Debug属性配置(MyWorkPath 由实际目录代替):
VC++目录->包含目录:MyWorkPath\\igraph\\build64\\include;MyWorkPath\\igraph\\include;$(IncludePath)
链接器->常规->附加库目录:MyWorkPath\\igraph\\build64\\src\\Debug;%(AdditionalLibraryDirectories)
链接器->输入->附加依赖项:igraph.lib;%(AdditionalDependencies)
Release仿此配置。编译运行。成功!
以上过程太繁琐,所以我将已经编译好了的包(32位和64位)放在:
https://github.com/pepstack/win32-libs
示例代码在:
https://github.com/pepstack/igraph-samples
git clone 之后,将 win32-libs 目录放到 igraph-samples 目录下面(并将win32-libs目录里面的zip解压),然后使用vs2017打开:
igraph-samples/samples/hello_ig/hello_ig.sln
编译即可!
以上是关于图计算库 igraph 在 windows 10 上的编译安装的主要内容,如果未能解决你的问题,请参考以下文章
图计算库 igraph 在 windows 10 上的编译安装