IOS开发之切除你心中的那个图案
Posted iOS的美丽岁月
tags:
篇首语:本文由小常识网(cha138.com)小编为大家整理,主要介绍了IOS开发之切除你心中的那个图案相关的知识,希望对你有一定的参考价值。
前言
切除你心中的那个图案,主要是为了更好地复合产品需求。就是有美工的配合,有的模块出来的也不是太符合要求,这就需要抛弃美工,自己处理。
1、呼朋唤友
群的特点:
1、iOS 开发交流群,每周都有更新新的内容。
2、群里有3~5年的资深开发者。
3、群员在App开发过程中遇到什么问题,可以在群里提问。
4、群员在App开发中,如果遇到难实现的功能或者模块,可以在群里提出,有人员帮助你实现。
5、加入群后,可以get到App 开发中的一些小功能模块。
群号是:185341804 群名字:成功QQ吧
群主号:1542100658 (qq)
2、效果展示

3、本demo 可以绘制的类型
typedef enum CutFigureType
ArrowBtn=0, // 箭头按钮
HalfAngleBtn,// 半圆角按钮
Pentagram, // 五角星
Stamps, // 邮票
Heart, // 心形
Bat , // 蝙蝠
Glass // 酒杯
CutFigureType;
更多功能等你来扩展4、功能介绍 本功能主要使用了 UIview 对象的 layer 层的一个 mask 属性。这个属性的功能是:切除多余的模块。就是在这个路径内的是为显性,否则,为隐性。 5、代码片段
1》尖角和半圆角按钮
#pragma mark 箭头按钮
-(void)arrowButtonTager:(UIView*)tagerView
CAShapeLayer * shareLayer = [CAShapeLayerlayer];
/**
创建动态可变的路径
*/
CGMutablePathRef pathRef =CGPathCreateMutable();
/**
获取按钮的宽度&高度
*/
CGFloat weightBtn = tagerView.bounds.size.width;
CGFloat heightBtn = tagerView.bounds.size.height;
/**
开始设置路径的走向
*/
CGPathMoveToPoint(pathRef,NULL, 0,0);
/**
开始添加路径
*/
CGPathAddLineToPoint(pathRef,NULL, weightBtn- heightBtn *0.5, 0.0);
CGPathAddLineToPoint(pathRef,NULL, weightBtn, heightBtn *0.5);
CGPathAddLineToPoint(pathRef,NULL, weightBtn- heightBtn *0.5, heightBtn);
CGPathAddLineToPoint(pathRef,NULL, 0.0, heightBtn);
CGPathAddLineToPoint(pathRef,NULL, 0.0,0.0);
/**
闭合路径
*/
CGPathCloseSubpath(pathRef);
/**
进行路径的渲染
*/
shareLayer.path = pathRef;
tagerView.layer.mask = shareLayer;
/**
从新绘制
*/
[tagerView setNeedsDisplay];
#pragma mark 半角型按钮
-(void)halfAngleBtn:(UIView*)tagerView
CAShapeLayer * shareLayer = [CAShapeLayerlayer];
/**
创建动态可变的路径
*/
CGMutablePathRef pathRef =CGPathCreateMutable();
/**
获取按钮的宽度&高度
*/
CGFloat weightBtn = tagerView.bounds.size.width;
CGFloat heightBtn = tagerView.bounds.size.height;
/**
开始设置路径的走向
*/
CGPathMoveToPoint(pathRef,NULL, 0,0);
/**
开始添加路径
*/
CGPathAddLineToPoint(pathRef,NULL, weightBtn- heightBtn *0.5, 0.0);
/**
进行弧度变形
*/
CGPathAddArc(pathRef,NULL, weightBtn-heightBtn *0.5, heightBtn * 0.5, heightBtn *0.5,M_PI_2, M_PI_2 *3, YES);
CGPathAddLineToPoint(pathRef,NULL, weightBtn- heightBtn *0.5, heightBtn);
CGPathAddLineToPoint(pathRef,NULL, 0.0, heightBtn);
/**
闭合路径
*/
CGPathCloseSubpath(pathRef);
/**
进行路径的渲染
*/
shareLayer.path = pathRef;
tagerView.layer.mask = shareLayer;
/**
从新绘制
*/
[tagerView setNeedsDisplay];
2》五角星的绘制
#pragma mark 五角星
-(void)pentagram:(UIView*)tagerView
/**
创建一个显示层
*/
CAShapeLayer * shapeLayer = [CAShapeLayerlayer];
/**
创建可变路径
*/
CGMutablePathRef pathRef =CGPathCreateMutable();
/**
获取按钮的宽度&高度
*/
CGFloat weightBtn = tagerView.bounds.size.width;
CGFloat heightBtn = tagerView.bounds.size.height;
/**
选择最小的
*/
CGFloat minValue =MIN(weightBtn, heightBtn);
/**
圆的半径
*/
CGFloat radiusValue = minValue *0.5;
/**
五角星内接圆半径
*/
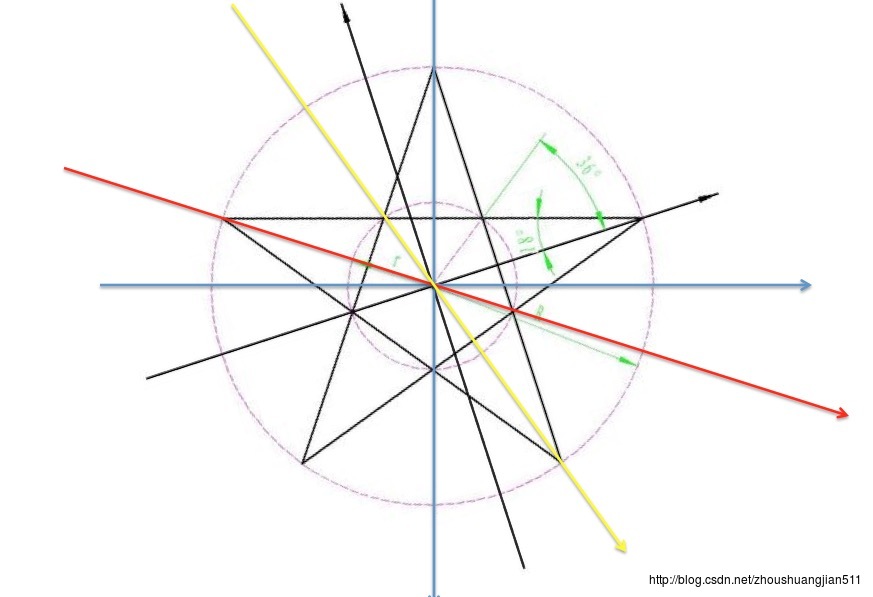
CGFloat inscribedRadiusValue = radiusValue *sinf(18*M_PI/180 )/sinf(54*M_PI/180 );
/**
起始点
*/
CGPathMoveToPoint(pathRef,NULL, weightBtn * 0.5, heightBtn*0.5 - radiusValue);
/**
第二个点
*/
CGPathAddLineToPoint(pathRef,NULL, weightBtn* 0.5 +sinf(36*M_PI/180)*inscribedRadiusValue, heightBtn*0.5 -cosf(36*M_PI/180)* inscribedRadiusValue);
/**
第三个点
*/
CGPathAddLineToPoint(pathRef,NULL, weightBtn * 0.5+cosf(18 *M_PI/180)*radiusValue, heightBtn*0.5 -sinf(18 *M_PI/180)*radiusValue);
/**
第四个点
*/
CGPathAddLineToPoint(pathRef,NULL, weightBtn* 0.5 +cosf(18 *M_PI/180)* inscribedRadiusValue, heightBtn*0.5 +sinf(18*M_PI/180)*inscribedRadiusValue);
/**
第五个点
*/
CGPathAddLineToPoint(pathRef,NULL, weightBtn * 0.5+cosf(54*M_PI/180)*radiusValue, heightBtn*0.5 + sinf(54*M_PI/180)* radiusValue);
/**
插入点
*/
CGPathAddLineToPoint(pathRef,NULL, weightBtn * 0.5, heightBtn*0.5 + inscribedRadiusValue);
/**
第六个点
*/
CGPathAddLineToPoint(pathRef,NULL, weightBtn * 0.5-cosf(54*M_PI/180)*radiusValue, heightBtn*0.5 + sinf(54*M_PI/180)* radiusValue);
/**
第七个点
*/
CGPathAddLineToPoint(pathRef,NULL, weightBtn* 0.5 -cosf(18 *M_PI/180)* inscribedRadiusValue, heightBtn*0.5 +sinf(18*M_PI/180)*inscribedRadiusValue);
/**
第八个点
*/
CGPathAddLineToPoint(pathRef,NULL, weightBtn * 0.5-cosf(18 *M_PI/180)*radiusValue, heightBtn*0.5 -sinf(18 *M_PI/180)*radiusValue);
/**
第九个点
*/
CGPathAddLineToPoint(pathRef,NULL, weightBtn* 0.5 - sinf(36*M_PI/180)*inscribedRadiusValue, heightBtn*0.5 -cosf(36*M_PI/180)* inscribedRadiusValue);
/**
闭合路径
*/
CGPathCloseSubpath(pathRef);
/**
进行渲染
*/
shapeLayer.path = pathRef;
tagerView.layer.mask = shapeLayer;
/**
绘制
*/
[tagerView setNeedsDisplay];
切割时的参考图

3》心形
#pragma mark 心形绘制
-(void)heart:(UIView*)tagerView
/**
创建一个显示层
*/
CAShapeLayer * shapeLayer = [CAShapeLayerlayer];
/**
创建可变路径
*/
CGMutablePathRef pathRef =CGPathCreateMutable();
/**
获取按钮的宽度&高度
*/
CGFloat weightBtn = tagerView.bounds.size.width;
CGFloat heightBtn = tagerView.bounds.size.height;
/**
曲线路径
*/
UIBezierPath * bezierPath = [UIBezierPathbezierPath];
bezierPath.lineWidth =0.5;
/**
起始点
*/
[bezierPath moveToPoint:CGPointMake(weightBtn*0.5, heightBtn*0.5-5)];
/**
绘制曲线
*/
[bezierPath addCurveToPoint:CGPointMake(weightBtn*0.5, heightBtn*0.5+60)controlPoint1:CGPointMake(weightBtn*0.5+15,heightBtn*0.5-40)controlPoint2:CGPointMake(weightBtn*0.5+80,heightBtn * 0.5+10)];
CGPathAddPath(pathRef,NULL, bezierPath.CGPath);
/**
曲线路径
*/
UIBezierPath * bezierPath2 = [UIBezierPathbezierPath];
bezierPath2.lineWidth =0.5;
/**
起始点
*/
[bezierPath2 moveToPoint:CGPointMake(weightBtn*0.5, heightBtn*0.5+60)];
/**
绘制曲线
*/
[bezierPath2 addCurveToPoint:CGPointMake(weightBtn*0.5, heightBtn*0.5-5)controlPoint1:CGPointMake(weightBtn*0.5-80, heightBtn * 0.5+10)controlPoint2:CGPointMake(weightBtn*0.5-15,heightBtn*0.5-40)];
CGPathAddPath(pathRef,NULL, bezierPath2.CGPath);
/**
闭合路径
*/
CGPathCloseSubpath(pathRef);
/**
进行渲染
*/
shapeLayer.path = pathRef;
tagerView.layer.mask = shapeLayer;