opencv 5 -- 图像阈值
Posted wust小吴
tags:
篇首语:本文由小常识网(cha138.com)小编为大家整理,主要介绍了opencv 5 -- 图像阈值相关的知识,希望对你有一定的参考价值。
这章将说,二值化的问题
二值图像占有非常重要的地位,图像的二值化使图像中数据量大为减少,从而能凸显出目标的轮廓
将图像黑白化,是很多图像处理技术的必要一步
目的:使得图像的像素值更单一、图像更简单
阈值可以分为全局性质的阈值,也可以分为局部性质的阈值,可以是单阈值的也可以是多阈值的
一、简单阈值–cv2.threshhold()
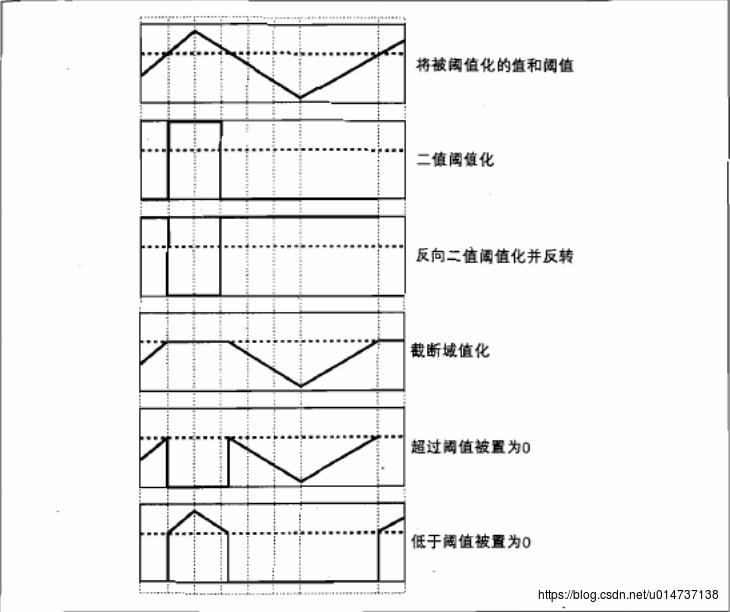
像素值高于阈值时,我们给这个像素 赋予一个新值(可能是白色),否则我们给它赋予另外一种颜色(也许是黑色)。 这个函数就是 cv2.threshhold()
简单阈值,采用的是全局阈值,把整幅图像分成了非黑即白的二值图像
函数说明:
diff = cv2.threshold(diff, 25, 255, cv2.THRESH_BINARY)[1] # 二值化阈值处理四个参数,第一个原图像,即灰度图;
第二个进行分类的阈值,
第三个是高于(低于)阈值时赋予的新值,
第四个是一个方法选择参数,常用的有:
• cv2.THRESH_BINARY(黑白二值)
• cv2.THRESH_BINARY_INV(黑白二值反转)
• cv2.THRESH_TRUNC (得到的图像为多像素值)
• cv2.THRESH_TOZERO
• cv2.THRESH_TOZERO_INV

该函数有两个返回值,
第一个retVal(得到的阈值值),
第二个就是阈值化后的图像
import cv2
import numpy as np
from matplotlib import pyplot as plt

img = cv2.imread('person_454.bmp',0)

ret,thresh1=cv2.threshold(img,127,255,cv2.THRESH_BINARY)
ret,thresh2=cv2.threshold(img,127,255,cv2.THRESH_BINARY_INV)
ret,thresh3=cv2.threshold(img,127,255,cv2.THRESH_TRUNC)
ret,thresh4=cv2.threshold(img,127,255,cv2.THRESH_TOZERO)
ret,thresh5=cv2.threshold(img,127,255,cv2.THRESH_TOZERO_INV)
titles = ['Original Image','BINARY','BINARY_INV','TRUNC','TOZERO','TOZERO_INV']
images = [img, thresh1, thresh2, thresh3, thresh4, thresh5]

for i in xrange(6):
  plt.subplot(2,3,i+1)
  plt.imshow(images[i],'gray')
  plt.title(titles[i])
  plt.xticks([])
  plt.yticks([])

plt.show()
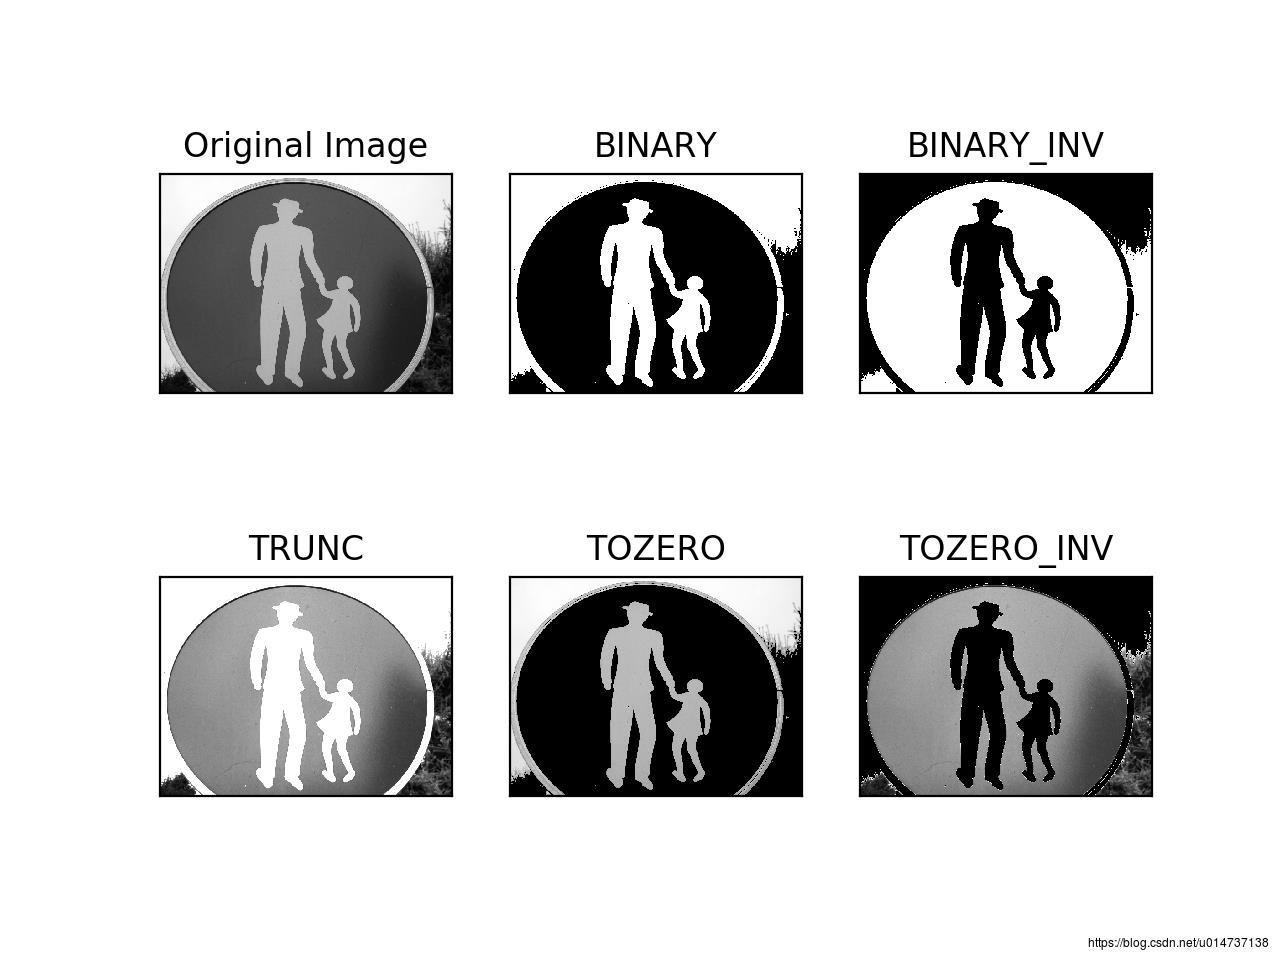
结果:

可以看到这里把阈值设置成了127(中灰色),对于BINARY方法,
当图像中的灰度值大于127的重置像素值为255
二、自适应阈值
自适应阈值可以看成一种局部性的阈值,通过规定一个区域大小,比较这个点与区域大小里面像素点的平均值(或者其他特征)的大小关系确定这个像素点是属于黑或者白(如果是二值情况)。使用的函数为:cv2.adaptiveThreshold()
th2 = cv2.adaptiveThreshold(img,255,cv2.ADAPTIVE_THRESH_MEAN_C, cv2.THRESH_BINARY,11,2)该函数需要填6个参数:
第一个原始图像(灰度图)
第二个像素值上限
第三个自适应方法Adaptive Method:
— cv2.ADAPTIVE_THRESH_MEAN_C :领域内均值
— cv2.ADAPTIVE_THRESH_GAUSSIAN_C :领域内像素点加权和,权重为一个高斯窗口
第四个值的赋值方法:只有cv2.THRESH_BINARY 和cv2.THRESH_BINARY_INV
第五个Block size:规定领域大小(一个正方形的领域)
第六个常数C,阈值等于均值或者加权值减去这个常数(为0相当于阈值 就是求得领域内均值或者加权值)
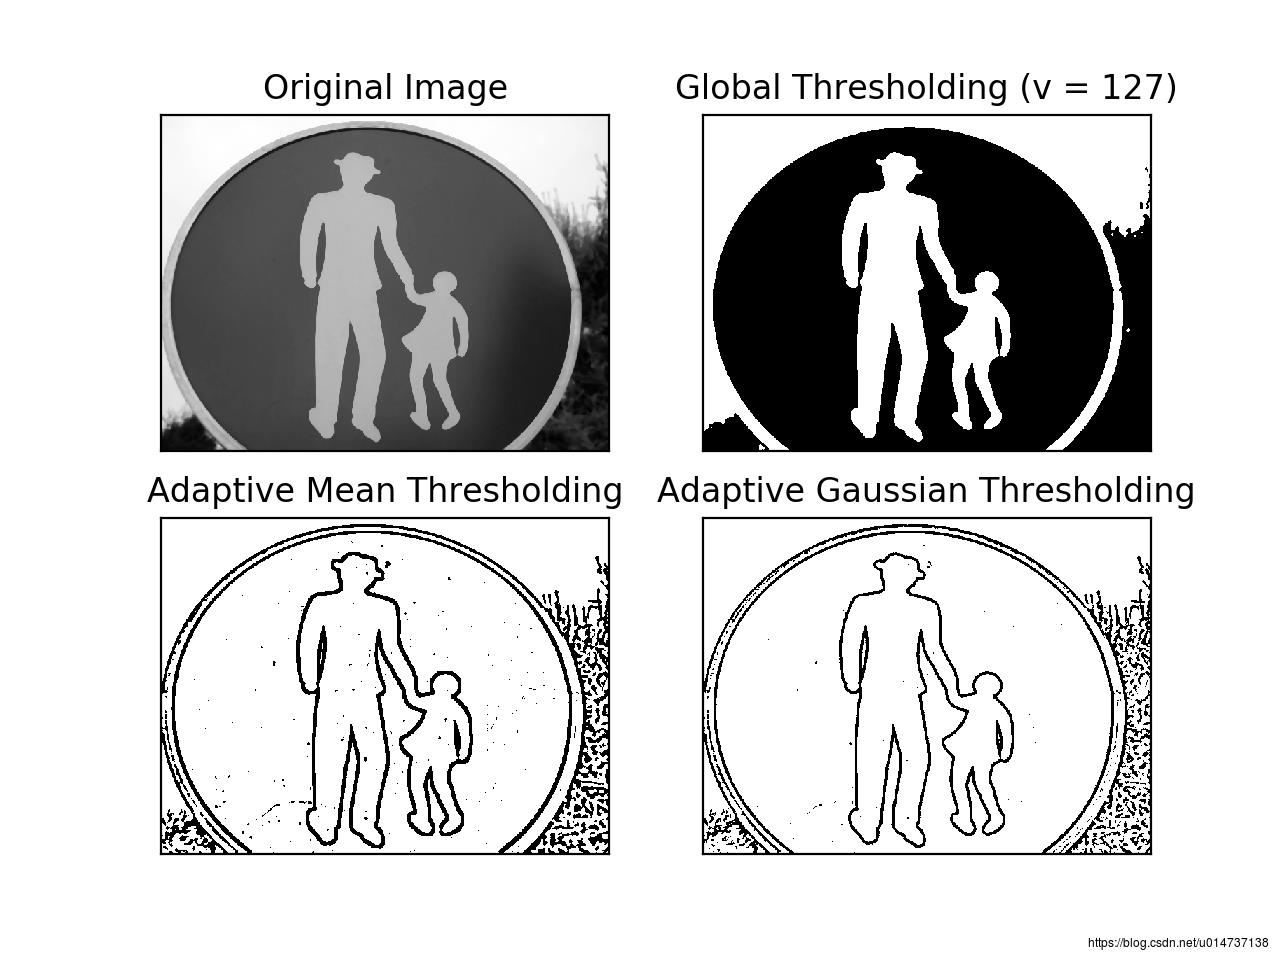
这种方法理论上得到的效果更好,相当于在动态自适应的调整属于自己像素点的阈值,而不是整幅图像都用一个阈值
import cv2
import numpy as np
from matplotlib import pyplot as plt

img = cv2.imread('person_454.bmp',0)

img = cv2.medianBlur(img,5)
ret,th1 = cv2.threshold(img,127,255,cv2.THRESH_BINARY)
th2 = cv2.adaptiveThreshold(img,255,cv2.ADAPTIVE_THRESH_MEAN_C,cv2.THRESH_BINARY,11,2)
th3 = cv2.adaptiveThreshold(img,255,cv2.ADAPTIVE_THRESH_GAUSSIAN_C,cv2.THRESH_BINARY,11,2)
titles = ['Original Image', 'Global Thresholding (v = 127)','Adaptive Mean Thresholding', 'Adaptive Gaussian Thresholding']
images = [img, th1, th2, th3]
for i in xrange(4):
    plt.subplot(2,2,i+1),plt.imshow(images[i],'gray')
    plt.title(titles[i])
    plt.xticks([]),plt.yticks([])
plt.show()
结果:

三、Otsu’s Binarization: 基于直方图的二值化
Otsu’s Binarization是一种基于直方图的二值化方法,它需要和threshold函数配合使用。
配合简单阈值threshold函数,在第一部分中提到过 retVal,当我们使用 Otsu 二值化时会用到它
在使用全局阈值时,我们就是随便给了一个数来做阈值,那我们怎么知道 我们选取的这个数的好坏呢?答案就是不停的尝试。如果是一副双峰图像(简单来说双峰图像是指图像直方图中存在两个峰)呢?我们岂不是应该在两个峰 之间的峰谷选一个值作为阈值?这就是 Otsu 二值化要做的。简单来说就是对一副双峰图像自动根据其直方图计算出一个阈值。(对于非双峰图像,这种方法得到的结果可能会不理想)
这里用到到的函数还是 cv2.threshold(),但是需要多传入一个参数 (flag):cv2.THRESH_OTSU。这时要把阈值设为 0。然后算法会找到最 优阈值,这个最优阈值就是返回值 retVal。如果不使用 Otsu 二值化,返回的retVal 值与设定的阈值相等
import cv2
import numpy as np
from matplotlib import pyplot as plt

img = cv2.imread('person_454.bmp',0)

# global thresholding
ret1,th1 = cv2.threshold(img,127,255,cv2.THRESH_BINARY) # Otsu's thresholding
ret2,th2 = cv2.threshold(img,0,255,cv2.THRESH_BINARY+cv2.THRESH_OTSU)
# Otsu's thresholding after Gaussian filtering #(5,5)为高斯核的大小,0 为标准差
blur = cv2.GaussianBlur(img,(5,5),0)
# 阈值一定要设为 0!
ret3,th3 = cv2.threshold(blur,0,255,cv2.THRESH_BINARY+cv2.THRESH_OTSU)
# plot all the images and their histograms
images = [img, 0, th1,
          img, 0, th2,
          blur, 0, th3]
titles = ['Original Noisy Image','Histogram','Global Thresholding (v=127)',
          'Original Noisy Image','Histogram',"Otsu's Thresholding",
          'Gaussian filtered Image','Histogram',"Otsu's Thresholding"]
# 这里使用了 pyplot 中画直方图的方法,plt.hist, 要注意的是它的参数是一维数组
# 所以这里使用了(numpy)ravel 方法,将多维数组转换成一维,也可以使用 flatten 方法
#ndarray.flat 1-D iterator over an array.
#ndarray.flatten 1-D array copy of the elements of an array in row-major order.
for i in xrange(3):
    plt.subplot(3,3,i*3+1),plt.imshow(images[i*3],'gray')
    plt.title(titles[i*3]), plt.xticks([]), plt.yticks([])
    plt.subplot(3,3,i*3+2),plt.hist(images[i*3].ravel(),256)
    plt.title(titles[i*3+1]), plt.xticks([]), plt.yticks([])
    plt.subplot(3,3,i*3+3),plt.imshow(images[i*3+2],'gray')
    plt.title(titles[i*3+2]), plt.xticks([]), plt.yticks([])
plt.show()
结果:

Otsu过程:
1. 计算图像直方图;
2. 设定一阈值,把直方图强度大于阈值的像素分成一组,把小于阈值的像素分成另外一组;
3. 分别计算两组内的偏移数,并把偏移数相加;
4. 把0~255依照顺序多为阈值,重复1-3的步骤,直到得到最小偏移数,其所对应的值即为结果阈值
import cv2
import numpy as np
from matplotlib import pyplot as plt
# 在两个峰之间找到一个阈值 t,将这两个峰分开,并且使每一个 峰内的方差最小
img = cv2.imread('person_454.bmp',0)
# 高斯模糊处理
blur = cv2.GaussianBlur(img,(5,5),0)
# find normalized_histogram, and its cumulative distribution function
# 计算归一化直方图
#CalcHist(image, accumulate=0, mask=NULL)
hist = cv2.calcHist([blur],[0],None,[256],[0,256])
hist_norm = hist.ravel()/hist.max()
Q = hist_norm.cumsum()

bins = np.arange(256)

fn_min = np.inf
thresh = -1

for i in xrange(1,256):
    p1,p2 = np.hsplit(hist_norm,[i]) # probabilities
    q1= Q[i]
    q2 = Q[255]-Q[i] # cum sum of classes
    b1,b2 = np.hsplit(bins,[i]) # weights
    # finding means and variances
    m1 = np.sum(p1*b1)/q1
    m2 = np.sum(p2*b2)/q2
    v1 = np.sum(((b1-m1)**2)*p1)/q1
    v2 = np.sum(((b2-m2)**2)*p2)/q2
    # calculates the minimization function
    fn = v1 * q1 + v2 * q2
    if fn < fn_min:
        fn_min = fn
        thresh = i
# find otsu's threshold value with OpenCV function
ret, otsu = cv2.threshold(blur,0,255,cv2.THRESH_BINARY+cv2.THRESH_OTSU)
print thresh,ret
结果:
136 135.0
以上是关于opencv 5 -- 图像阈值的主要内容,如果未能解决你的问题,请参考以下文章