从零开始搭建CDH6.2操作手册(离线版)
Posted 总要冲动一次
tags:
篇首语:本文由小常识网(cha138.com)小编为大家整理,主要介绍了从零开始搭建CDH6.2操作手册(离线版)相关的知识,希望对你有一定的参考价值。
前言:
安装教程以三台服务器为例,主节点master,从节点worker1、worker2。
一、预备阶段
1、集群机器

2、安装包
jdk:
oracle-j2sdk1.8-1.8.0+update181-1.x86_64.rpm
mysql:
mysql-5.7.28.zip
mysql-connector-java-5.1.47.tar.gz
cloudera-repos-6.2.0:
cloudera-manager-agent-6.2.0-968826.el7.x86_64.rpm
cloudera-manager-daemons-6.2.0-968826.el7.x86_64.rpm
cloudera-manager-server-6.2.0-968826.el7.x86_64.rpm
parcel-6.2.0:
CDH-6.2.0-1.cdh6.2.0.p0.967373-el7.parcel
CDH-6.2.0-1.cdh6.2.0.p0.967373-el7.parcel.sha
PHOENIX-1.0.jar
PHOENIX-5.0.0-cdh6.2.0.p0.1308267-el7.parcel
PHOENIX-5.0.0-cdh6.2.0.p0.1308267-el7.parcel.sha
manifest.json
安装包下载地址:
链接:https://pan.baidu.com/s/1iTUcWvsiCaRAOTGM8__yww
提取码:90go
二、环境安装
1、关闭防火墙(所有节点)
关闭防火墙可以省去很多麻烦:如ntp服务、clouderaManagerWeb访问等。
systemctl stop firewalld.service
2、修改hostname和hosts(所有节点)
修改主机名:
hostnamectl --transient set-hostname master
hostnamectl --static set-hostname master  # --static可以省略
修改ip映射:
vim /etc/hosts
3、SSH免密(所有节点)
在~/下生成.ssh隐藏文件夹及公钥私钥:
ssh-keygen
然后敲(三个回车),就会生成两个文件id_rsa(私钥)、id_rsa.pub(公钥)
将公钥拷贝到要免密登录的目标机器上:
ssh-copy-id master
ssh-copy-id worker1
ssh-copy-id worker2
测试连接:

4、配置NTP服务(所有节点)
(1)下载ntp的安装包:
链接:https://pan.baidu.com/s/15yJV9A9zn2KBvy08A080Kw
提取码:cdjz
(2)安装命令:
rpm -ivh ntp-4.2.6p5-29.el7.centos.2.x86_64.rpm
安装说明:

直接安装ntp-4.2.6p5-29.el7.centos.2.x86_64.rpm如果不提示缺少依赖就不用再安装另外两个了。
如果提示缺少安装相应的rpm包,也是rpm -ivh …
(3)配置:
首先设置ntp服务器(master)
编辑配置文件(vim /etc/ntp.conf),注释默认ntp服务地址,具体修改部分突出显示,如下:
# For more information about this file, see the man pages
# ntp.conf(5), ntp_acc(5), ntp_auth(5), ntp_clock(5), ntp_misc(5), ntp_mon(5).

driftfile /var/lib/ntp/drift

# Permit time synchronization with our time source, but do not
# permit the source to query or modify the service on this system.
restrict default nomodify notrap nopeer noquery

# Permit all access over the loopback interface.  This could
# be tightened as well, but to do so would effect some of
# the administrative functions.
restrict 127.0.0.1
restrict ::1

# Hosts on local network are less restricted.
#restrict 192.168.1.0 mask 255.255.255.0 nomodify notrap
restrict 192.168.79.2 mask 255.255.255.0 nomodify notrap #集群所在网段的网关(Gateway),子网掩码(Genmask)

# Use public servers from the pool.ntp.org project.
# Please consider joining the pool (http://www.pool.ntp.org/join.html).
#server 0.centos.pool.ntp.org iburst
#server 1.centos.pool.ntp.org iburst
#server 2.centos.pool.ntp.org iburst
#server 3.centos.pool.ntp.org iburst
server 127.0.0.1
fudge 127.0.0.1 stratum 10

#broadcast 192.168.1.255 autokey	# broadcast server
#broadcastclient			# broadcast client
#broadcast 224.0.1.1 autokey		# multicast server
#multicastclient 224.0.1.1		# multicast client
#manycastserver 239.255.254.254		# manycast server
#manycastclient 239.255.254.254 autokey # manycast client

# Enable public key cryptography.
#crypto

includefile /etc/ntp/crypto/pw

# Key file containing the keys and key identifiers used when operating
# with symmetric key cryptography.
keys /etc/ntp/keys

# Specify the key identifiers which are trusted.
#trustedkey 4 8 42

# Specify the key identifier to use with the ntpdc utility.
#requestkey 8

# Specify the key identifier to use with the ntpq utility.
#controlkey 8

# Enable writing of statistics records.
#statistics clockstats cryptostats loopstats peerstats

# Disable the monitoring facility to prevent amplification attacks using ntpdc
# monlist command when default restrict does not include the noquery flag. See
# CVE-2013-5211 for more details.
# Note: Monitoring will not be disabled with the limited restriction flag.
disable monitor
修改完成后保存退出,并重启ntp(systemctl restart ntpd)。
设置ntp客户端(以worker1为例,其余相同,略)
编辑配置文件(vim /etc/ntp.conf),注释掉默认ntp服务,使用我们自己配置的ntp服务器(即 192.168.79.100),具体修改部分突出显示,如下:
# For more information about this file, see the man pages
# ntp.conf(5), ntp_acc(5), ntp_auth(5), ntp_clock(5), ntp_misc(5), ntp_mon(5).

driftfile /var/lib/ntp/drift

# Permit time synchronization with our time source, but do not
# permit the source to query or modify the service on this system.
restrict default nomodify notrap nopeer noquery

# Permit all access over the loopback interface.  This could
# be tightened as well, but to do so would effect some of
# the administrative functions.
restrict 127.0.0.1
restrict ::1

restrict 192.168.79.100 nomodify notrap noquery

# Hosts on local network are less restricted.
#restrict 192.168.1.0 mask 255.255.255.0 nomodify notrap

# Use public servers from the pool.ntp.org project.
# Please consider joining the pool (http://www.pool.ntp.org/join.html).
#server 0.centos.pool.ntp.org iburst
#server 1.centos.pool.ntp.org iburst
#server 2.centos.pool.ntp.org iburst
#server 3.centos.pool.ntp.org iburst
server 192.168.79.100
Fudge 192.168.79.100 stratum 10

#broadcast 192.168.1.255 autokey	# broadcast server
#broadcastclient			# broadcast client
#broadcast 224.0.1.1 autokey		# multicast server
#multicastclient 224.0.1.1		# multicast client
#manycastserver 239.255.254.254		# manycast server
#manycastclient 239.255.254.254 autokey # manycast client

# Enable public key cryptography.
#crypto

includefile /etc/ntp/crypto/pw

# Key file containing the keys and key identifiers used when operating
# with symmetric key cryptography.
keys /etc/ntp/keys

# Specify the key identifiers which are trusted.
#trustedkey 4 8 42

# Specify the key identifier to use with the ntpdc utility.
#requestkey 8

# Specify the key identifier to use with the ntpq utility.
#controlkey 8

# Enable writing of statistics records.
#statistics clockstats cryptostats loopstats peerstats

# Disable the monitoring facility to prevent amplification attacks using ntpdc
# monlist command when default restrict does not include the noquery flag. See
# CVE-2013-5211 for more details.
# Note: Monitoring will not be disabled with the limited restriction flag.
disable monitor
修改完成后保存退出并重启ntp(systemctl restart ntpd)。
(4)查看状态:
1)启动ntp服务
systemctl start ntpd
2)查看ntp服务器有无和上层ntp连通
ntpstat
3)查看ntp服务器与上层ntp的状态
ntpq -p
(5)设置开机自启动:
systemctl enable ntpd.service
查看从ntp服务状态可能会有如下错误
inappropriate address 192.168.79.100 for the fudge command, line ignored
经测试改了fudge的首字母为F就可以修复上述错误,看网上也都是小写的,很奇怪。
几分钟后查看主从ntp主机的时间就同步了,同步较慢稍等即可。
5、安装JDK(所有节点)
检查是否安装过java
rpm -qa | grep java
如果有,则先卸载
yum remove java*
安装jdk
rpm -ivh oracle-j2sdk1.8-1.8.0+update181-1.x86_64.rpm
配置环境变量
vim /etc/profile
#JDK1.8--添加
export JAVA_HOME=/usr/java/jdk1.8.0_181-cloudera
export PATH=$JAVA_HOME/bin:$PATH
刷新环境变量
source /etc/profile
检查是否安装成功
java -version
java version “1.8.0_181”
Java™ SE Runtime Environment (build 1.8.0_181-b13)
Java HotSpot™ 64-Bit Server VM (build 25.181-b13, mixed mode)
6、安装MySql(主节点)
创建目录、上传:
mkdir -p /usr/share/java
mv mysql-connector-java-5.1.47.tar.gz /usr/share/java/mysql-connector-java.jar

安装:
1、解压:unzip mysql-5.7.28.zip -d /root
2、执行mysql_auto_install.sh脚本:sh mysql_auto_install.sh
注:由于服务器本身依赖包存在差别,可能会报如下错误:
error: Failed dependencies:
libaio.so.1()(64bit) is needed by mysql-community-server-5.7.28-1.el7.x86_64
libaio.so.1(LIBAIO_0.1)(64bit) is needed by mysql-community-server-5.7.28-1.el7.x86_64
libaio.so.1(LIBAIO_0.4)(64bit) is needed by mysql-community-server-5.7.28-1.el7.x86_64
解决:yum -y install libaio
重新登录(用户名root,密码root),并创建以下数据库:
create database cmserver default charset utf8 collate utf8_general_ci;
grant all on cmserver.* to 'cmserveruser'@'%' identified by 'root';

create database metastore default charset utf8 collate utf8_general_ci;
grant all on metastore.* to 'hiveuser'@'%' identified by 'root';

create database amon default charset utf8 collate utf8_general_ci;
grant all on amon.* to 'amonuser'@'%' identified by 'root';

create database rman default charset utf8 collate utf8_general_ci;
grant all on rman.* to 'rmanuser'@'%' identified by 'root';
7、修改系统参数(所有节点)
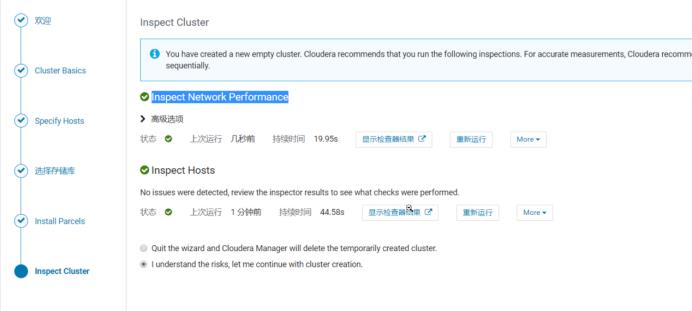
具体含义没了解,但是如果不配置在进行目录11集群检测会报错,当然也可以那时候再修改这些配置。
sysctl vm.swappiness=10

echo 'vm.swappiness=10' >> /etc/sysctl.conf

echo never > /sys/kernel/mm/transparent_hugepage/defrag

echo never > /sys/kernel/mm/transparent_hugepage/enabled

echo 'echo never > /sys/kernel/mm/transparent_hugepage/defrag'  >> /etc/rc.local

echo 'echo never > /sys/kernel/mm/transparent_hugepage/enabled'  >> /etc/rc.local
8、安装CM组件(所有节点)
上传所需安装包(注意保持一致)
master:
worker1、worker2:

安装(master 安装三个,worker1和worker2安装两个)
yum localinstall -y cloudera-manager-daemons-6.2.0-968826.el7.x86_64.rpm
yum localinstall -y cloudera-manager-agent-6.2.0-968826.el7.x86_64.rpm
yum localinstall -y cloudera-manager-server-6.2.0-968826.el7.x86_64.rpm
9、CDH6.2.0(主节点)
检查所需要的离线资源包:

全部上传之后,将不同的包移动到对应的目录下:
mv CDH-6.2.0-1.cdh6.2.0.p0.967373-el7.parcel* /opt/cloudera/parcel-repo/
mv PHOENIX-5.0.0-cdh6.2.0.p0.1308267-el7.parcel* /opt/cloudera/parcel-repo/
mv manifest.json /opt/cloudera/parcel-repo/
mv PHOENIX-1.0.jar /opt/cloudera/csd/
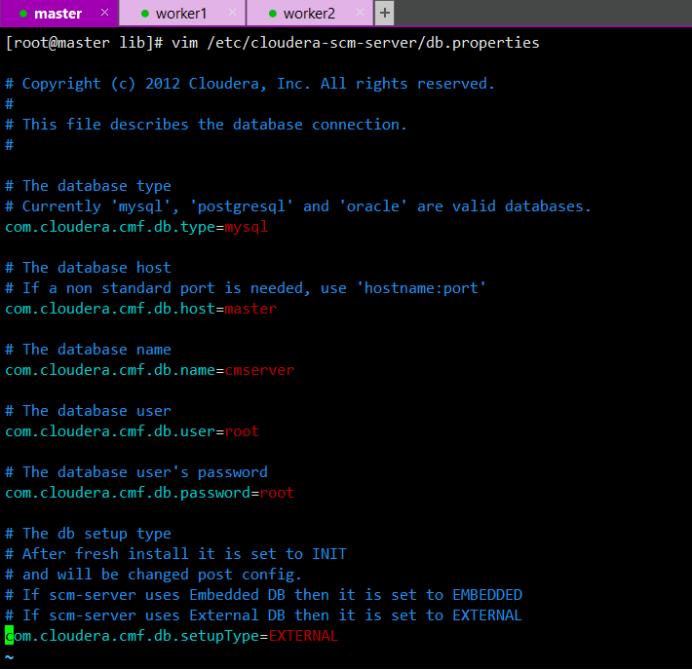
修改配置:
master节点
vim /etc/cloudera-scm-server/db.properties
所有节点:
vim /etc/cloudera-scm-agent/config.ini

10、启动CM服务
1)启动server(master):
systemctl start cloudera-scm-server
systemctl status cloudera-scm-server

监控cloudera-scm-server启动是否成功:
#另开一个窗口,查看相关日志。有异常就解决异常
tail -200f /var/log/cloudera-scm-server/cloudera-scm-server.log
#当在 master上 netstat -tunlp | grep 7180 有内容时,说明我们可以访问web页面了
2)启动agent(所有节点):
systemctl start cloudera-scm-agent
systemctl status cloudera-scm-agent

监控cloudera-scm-agent启动是否成功:
#另开一个窗口,查看相关日志。有异常就解决异常
tail -200f /var/log/cloudera-scm-agent/cloudera-scm-agent.log
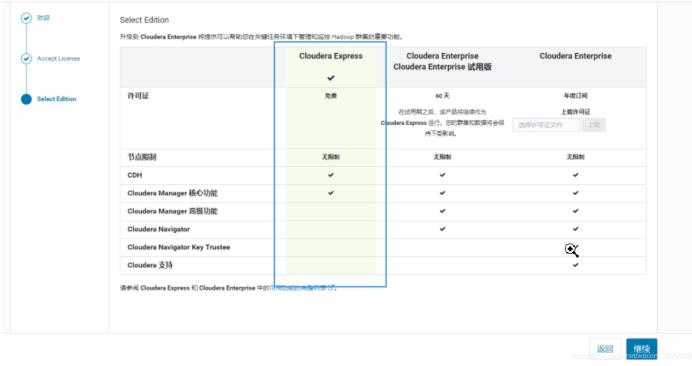
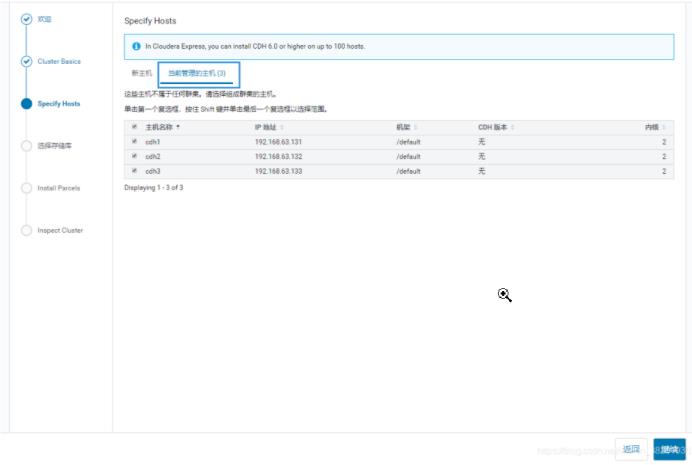
11、开始安装CDH集群
这里着重展示需要注意的地方!
192.168.79.100:7180
admin/admin



自定义角色分配
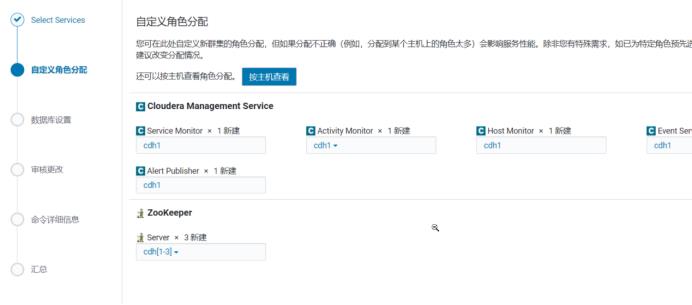


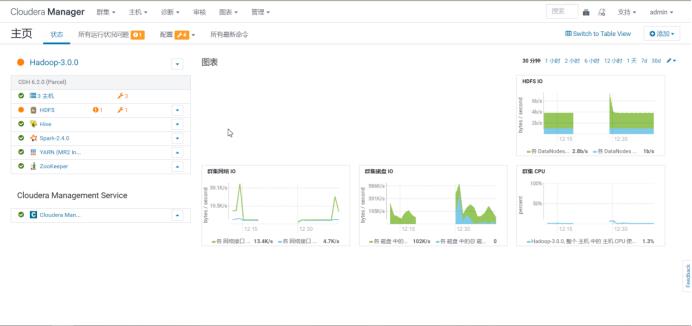
还有许多服务自己按需添加安装
第一次安装完成进入,可能很多都没启动成功爆红。根据提示错误信息,修正配置,重启即可!!
以上是关于从零开始搭建CDH6.2操作手册(离线版)的主要内容,如果未能解决你的问题,请参考以下文章