koa-router-tree 源码解析
Posted 小平果118
tags:
篇首语:本文由小常识网(cha138.com)小编为大家整理,主要介绍了koa-router-tree 源码解析相关的知识,希望对你有一定的参考价值。
npm包:https://www.npmjs.com/package/koa-tree-router
1.基数树
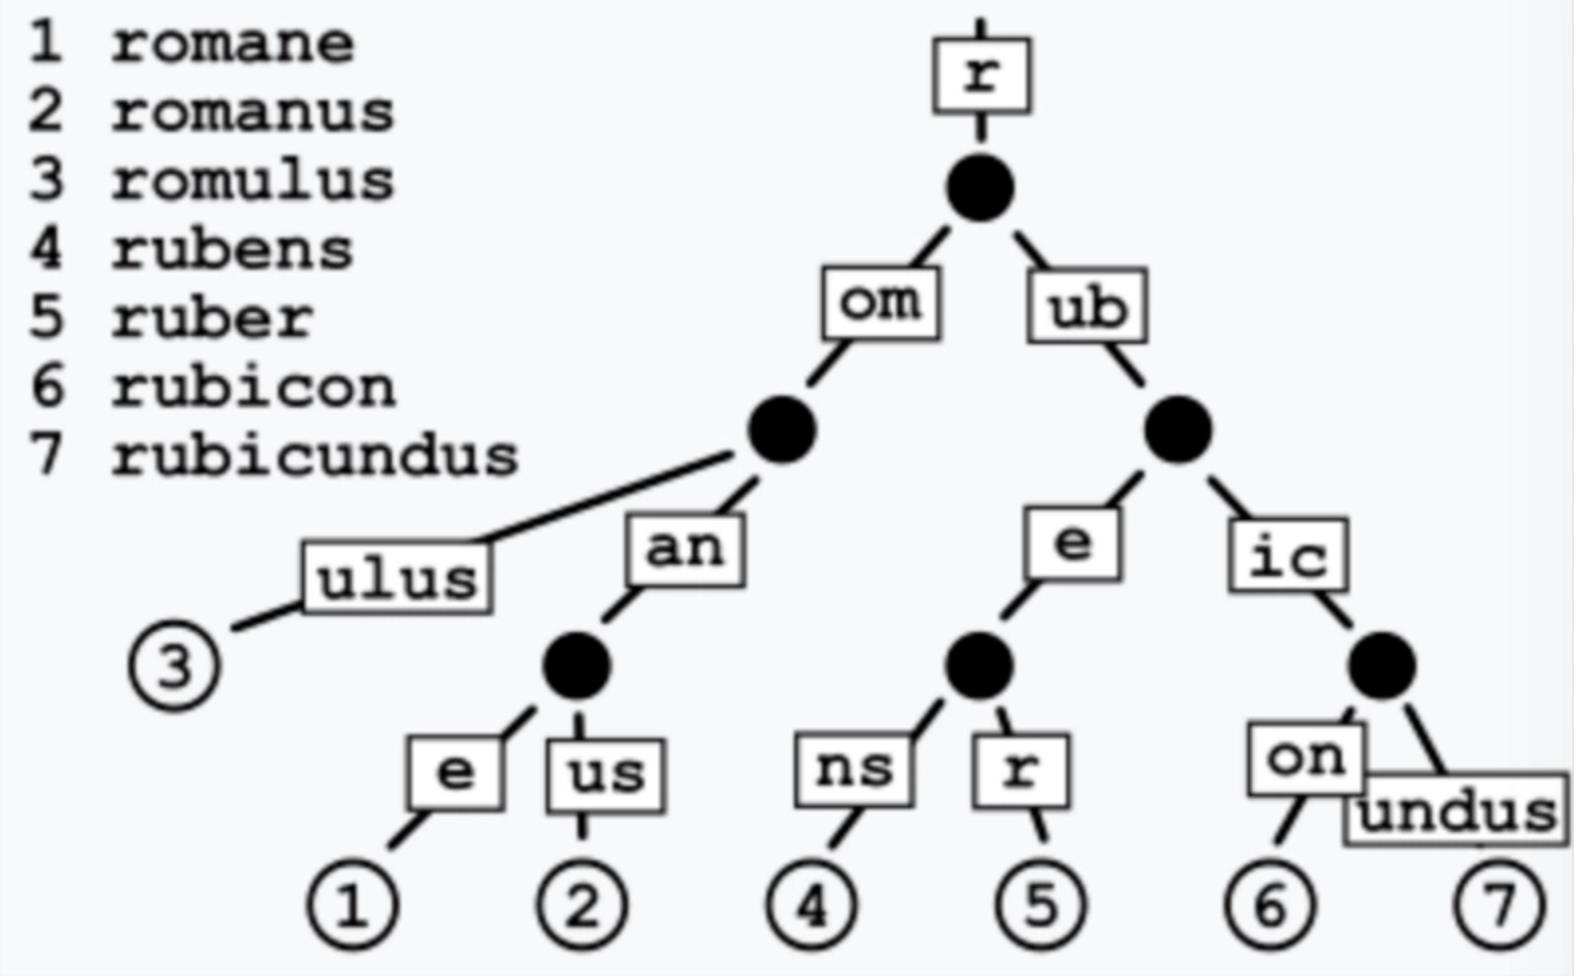
这次学习的是koa-router-tree中的路由,在学习源码一种我们看到了koa-router-tree的路由是它的特色。然而基础数据使用了基数树也提供了性能的保障。因为路由这部分比较独立而且逻辑相对复杂,所以需要单独学习。首先我们需要了解的是基数树,百度百科中的解释
其中有一个图可以让我们更加直观的看到数据是如何存储的。

基数树,相当于是一种前缀树。对于基数树的每个节点,如果该节点是确定的子树的话,就和父节点合并。基数树可用来构建关联数组。在上面的图里也可以看到,基数树数据结构会把所有相同前缀都提取,剩余的都作为子节点。
2. 基数树在koa-router-tree中的应用
从上面可以看到基数树是一个前缀树,图中也可以看到数据结构。那基数树在koa-router-tree中是如何应用的呢?举一个例子其实就能看得出来
2.1 koa-router-tree使用分析
const Router = require("koa-tree-router");
const router = new Router();

router.GET("/support", handler1)
router.GET("/search", handler2)
router.GET("/contact", handler3)
router.GET("/group/user/", handler4)
router.GET("/group/user/test", handler5)
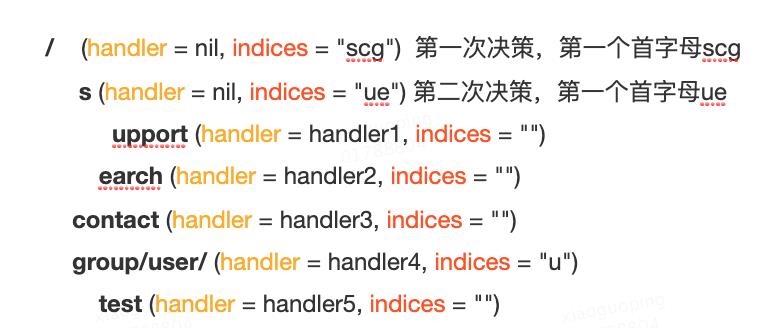
最终的内存结构为:

可以看到 router使用get方法添加了5个路由,实际存储结果就是上面显示的。我特地在后面加上了每个节点中的handler和indices。
indices是有序保存所有子节点的第一个字符形成的字符串。为什么要特意突出这个字段,因为在查找子节点下面是否包含path的时候不需要循环子节点,只需要循环这个字段就可以知道是否包含。这样的操作也可以提升一些效率。
2.2 再举个栗子分析下
从根节点遍历到叶子节点我们就能得到完整的路由表,如果项目实现了以下路由:
GET("/", func1)
GET("/search/", func2)
GET("/support/", func3)
GET("/blog/", func4)
GET("/blog/:blogid/", func5)
GET("/about-us/", func6)
GET("/about-us/team/", func7)
GET("/contact/", func8)
对应的路由树的结构:
Priority   Path             Handle
9          /                func1
3          ├s               null
2          |├earch/         func2
1          |└upport/        func3
2          ├blog/           func4
1          |    └:blogid      null
1          |         └/     func5
2          ├about-us/       func6
1          |        └team/  func7
1          └contact/        func8
:blogid是一个占位符(就是一个参数)。
这里体现了radix tree相较于hash-map的一个优点,树结构允许我们的路径中存在动态的部分(参数),因为我们匹配的是路由的模式而不是hash值
为了更具扩展性,每一层的节点按照priority排序,priority是节点的子节点(儿子节点,孙子节点等)注册的handler的数量,这样做有两个好处:
被最多路径包含的节点会被最先评估。这样可以让尽量多的路由快速被定位。
有点像成本补偿。最长的路径可以被最先评估,补偿体现在最长的路径需要花费更长的时间来定位,如果最长路径的节点能被优先评估(即每次拿子节点都命中),那么所花时间不一定比短路径的路由长。下面展示了节点(每个-可以看做一个节点)评估的路径:从左到右,从上到下
├------------
├---------
├-----
├----
├--
├--
└-
- 源码查看
在的路由koa-router-tree中,每一个Http Method(GET, PUT, POST…)都对应了一棵 radix tree
class Router
  constructor(opts = )
    this.trees = ;
    this.opts = opts;

  // 注册路由,生成 radix tree
  on(method, path, ...handle)
    // 获取method对应的树,如果没有就创建,只有根节点
    if (!this.trees[method])
      this.trees[method] = new Node();

    if (this.opts.prefix)
      path = this.opts.prefix + path;
      if (path[path.length - 1] === '/')
        path = path.slice(0, path.length - 1);


    // 增加树的路由节点
    this.trees[method].addRoute(path, handle);
    return this;
trees 是个数组,数组里会有不同请求方法的路由树。

先看一下节点Node的对象的定义和如何调用的,需要注意的是indices这个字段 上面已经提到了它的作用
3.1 数据结构
const STATIC = 0; // 普通节点,默认
const ROOT = 1; // 根节点
const PARAM = 2; // 参数路由,比如 /user/:id
const CATCH_ALL = 3; // 匹配所有内容的路由,比如 /article/*key

/**
 * 根据path计算 params
 * @param string path
 */
function countParams(path)
  let n = 0;
  for (let i = 0; i < path.length; i++)
    if (path[i] !== ":" && path[i] !== "*")
      continue;

    n++;


  return n;


class Node
  /**
   * 保存这个节点上的URL路径, 例如上图中的search和support, 共同的parent节点的path="s",后面两个节点的path分别是"earch"和"upport"
   * @param string path
   *
   * 判断当前节点路径是不是参数节点, 例如path中包含,:shopId部分就是wildChild节点
   * @param boolean wildChild
   *
   * 节点类型包括static, root, param, catchAll
   * static: 静态节点, 例如上面分裂出来作为parent的s
   * root: 如果插入的节点是第一个, 那么是root节点
   * catchAll: 有*匹配的节点
   * param: 除上面外的节点
   * @param number type
   *
   * 和children[]对应, 保存的是分裂的分支的第一个字符
   * 例如search和support, 那么s节点的indices对应的"eu"
   * 代表有两个分支, 分支的首字母分别是e和u
   * @param string indices
   *
   * 保存孩子节点
   * @param Node[] children
   *
   * hadle的actions
   * @param function[]= handle
   *
   * 优先级,子节点注册的handler数量
   * @param number priority
   */
  constructor(
    path = "",
    wildChild = false,
    type = STATIC,
    indices = "",
    children = [],
    handle = null,
    priority = 0
  )
    this.path = path;
    this.wildChild = wildChild;
    this.type = type;
    this.indices = indices;
    this.children = children;
    this.handle = handle;
    this.priority = priority;

  /**
   *
   * @param number pos
   */
  addPriority(pos)
    const children = this.children;
    children[pos].priority++;
    const prio = children[pos].priority;

    // Adjust position (move to fron)
    let newPos = pos;
    while (newPos > 0 && children[newPos - 1].priority < prio)
      const temp = children[newPos];
      children[newPos] = children[newPos - 1];
      children[newPos - 1] = temp;
      newPos--;


    // Build new index char string
    if (newPos !== pos)
      this.indices =
        this.indices.slice(0, newPos) +
        this.indices[pos] +
        this.indices.slice(newPos, pos) +
        this.indices.slice(pos + 1);


    return newPos;
type定义了四种节点类型:
param 与 catchAll 使用的区别就是:与*的区别。*会把路由后面的所有内容赋值给参数key;但 :可以多次使用。比如:/user/:id/:no是合法的,但 /user/*id/:no是非法的,因为 *后面所有内容会赋值给参数 id。
wildChild
如果孩子节点是通配符(*或者:),则该字段为 true。
3.2 路由注册
接下来我们需要看的是addRoute这个方法了,方法体比较长。其实大多的逻辑都在处理带参数的节点,真正核心的逻辑其实并不多。我把主要的逻辑都写上了注释应该还是比较容易理解的。如果看不懂其实一步步debug几次也能帮助理解。
  /**
   * 将path对应的handler添加到路由中
   * @param string path
   * @param function[] handle
   */
  addRoute(path, handle)
    let n = this;
    //记录原始path
    let fullPath = path;
    n.priority++;
    //统计path中包含多少参数 就是判断`:`,`*`的数量 最多255个
    let numParams = countParams(path);

    // 判断节点是否为空
    if (n.path.length > 0 || n.children.length > 0)
      walk: while (true)
        // Find the longest common prefix
        // This also implies that the common prefix contains no ':' or '*'
        // since the existing key can't contain those chars.
        let i = 0;
        const max = Math.min(path.length, n.path.length); // 找到相同前缀 循环次数 是取 path 和 n.path 长度的小那个长度
        while (i < max && path[i] === n.path[i])  //循环判断是否字符相同,相同则i++ 直到最后
          i++;


        // Split edge
        //判断是否有前缀相同,如果有相同的则把目前这个节点提取出来作为子节点
        //再把相同前缀的path部分作为 父节点
        //比如n的path = romaned 现在新增路由的path = romanus 相同前缀为 roman
        //步骤为:
        //1. 提取ed 新建一个child节点 把原来n的属性都复制过去
        //2. 把原来的n的path改为相同前缀:roman 为indices添加 子节点的第一个字符:e
        if (i < n.path.length)
          const child = new Node(
            n.path.slice(i), // 不匹配的部分作为child节点
            n.wildChild,
            STATIC,
            n.indices,
            n.children,
            n.handle,
            n.priority - 1 // 降级成子节点,priority减1
          );

          // 当前节点的子节点变成刚刚分裂的出来的节点
          n.children = [child];
          n.indices = n.path[i];
          n.path = path.slice(0, i);
          n.handle = null;
          n.wildChild = false;


          //原先的节点n现在已经分成2个节点了 结构为:
          //roman 父节点
          //    ed    子节点[0]
          //那么现在需要把传入的路由添加到这个父节点中
          //最终结构为
          //roman 父节点
          //    ed 子节点[0]
          //    us 子节点[1]
          // 其中还有一些情况需要自调用 相当于递归 举例说明:
          //roman
          //    ed
          //    uie
          //当判断父节点n 本来就有一个uie子节点 这时候uie和us 又有相同前缀u 这个时候需要把这个u再次提取出来作为父节点 所以需要递归调用walk
          //最终结果为 三层结构
          //roman
          //    ed
          //    u
          //        ie
          //        s
          //还有一种情况是如果是带有参数的路由 则也会再次调用walk
        // Make new node a child of this node
        if (i < path.length)
          path = path.slice(i);

          if (n.wildChild) // 如果是参数节点(包含:或*)
            n = n.children[0];
            n.priority++;

            numParams--;

            // Check if the wildcard matches, // 例如:/blog/:pp 和 /blog/:ppp,需要检查更长的通配符
            if ( path.length >= n.path.length && n.path === path.slice(0, n.path.length) && (n.path.length >= path.length || path[n.path.length] === "/"))
              continue walk;
             else
              // Wildcard conflict
              let pathSeg = "";
              if (n.type === CATCH_ALL)
                pathSeg = path;
               else
                pathSeg = path.split("/")[0];

              const prefix = fullPath.slice(0, fullPath.indexOf(pathSeg)) + n.path;
              throw new Error(
                `'$pathSeg' in new path '$fullPath' conflicts with existing wildcard '$
                  n.path
                ' in existing prefix '$prefix'`
              );


          const c = path[0];// 首字母,用来与indices做比较

          // Slash after param
          if (n.type === PARAM && c === "/" && n.children.length === 1)
            n = n.children[0];
            n.priority++;
            continue walk;


          // Check if a child with the next path char exists
          // 判断子节点中是否有和当前path有匹配的,只需要查看子节点path的第一个字母即可,即indices
           // 比如s的子节点现在是earch和upport,indices为eu
           // 如果新来的路由为super,那么就是和upport有匹配的部分u,将继续分类现在的upport节点
          for (let j = 0; j < n.indices.length; j++)
            if (c === n.indices[j])
              j = n.addPriority(j);
              n = n.children[j];
              continue walk;


          // Otherwise insert it
          if (c !== ":" && c !== "*")
             // 记录第一个字符,放在indices中
            n.indices += c;
            const child = new Node(
              "",
              false,
              STATIC
            );
            // 增加子节点
            n.children.push(child);
            n.addPriority(n.indices.length - 1);
            n = child;

          n.insertChild(numParams, path, fullPath, handle);
          return;
         else if (i === path.length)
          // Make node a (in-path leaf)
          // 路径相同,如果已有handler就报错,没有就赋值
          if (n.handle !== null)
            throw new Error(
              "A handle is already registered for path '" + fullPath + "'"
            );

          n.handle = handle;

        return;

     else
      // 节点为空,直接添加直接添加路由,节点种类是root
      n.insertChild(numParams, path, fullPath, handle);
      n.type = ROOT;
3.3 插入子节点
insertChild函数是根据path本身进行分割, 将/分开的部分分别作为节点保存, 形成一棵树结构. 注意参数匹配中的:和*的区别, 前者是匹配一个字段, 后者是匹配后面所有的路径
/**
   * 添加节点函数 主要处理包含参数节点
   * @param number numParams 参数个数
   * @param string path 路径
   * @param string fullPath 完整路径
   * @param function[] handle 处理函数
   */
  insertChild(numParams, path, fullPath, handle)
    let n = this;
    let offset = 0; // Already handled chars of the path

    // 循环查找前缀为':' 或者 '*' 通配符,只要匹配到wildcard
    for (let i = 0, max = path.length; numParams > 0; i++)
      const c = path[i];
      if (c !== ":" && c !== "*")
        continue;


      // 判断在*参数之后不能再有*或者: 否则则报错 除非到了下一个/
      let end = i + 1;
      while (end < max && path[end] !== "/")
        if (path[end] === ":" || path[end] === "*")
          throw new Error(
            "only one wildcard per path segment is allowed, has: '" +
              path.slice(i) +
              "' in path '" +
              fullPath +
              "'"
          );
         else
          end++;


      // 检查这个节点是否存在子节点,如果我们在这里插入通配符,子节点将是不可访问的
      if (n.children.length > 0)
        throw new Error(
          "wildcard route '" +
            path.slice(i, end) +
            "' conflicts with existing children in path '" +
            fullPath +
            "'"
        );


      // check if the wildcard has a name
      if (end - i < 2)
        throw new Error(
          "wildcards must be named with a non-empty name in path '" +
            fullPath +
            "'"
        );


      // 参数类型 相当于注册路由时候带有:
      if (c === ":")
        // Split path at the beginning of the wildcard
        if (i > 0)
          n.path = path.slice(offset, i);
          offset = i;


        const child = new Node("", false, PARAM);
        n.children = [child];
        n.wildChild = true;
        n = child;
        n.priority++;
        numParams--;
        if (end < max)
          n.path = path.slice(offset, end);
          offset = end;

          const staticChild = new Node(
            "",
            false,
            STATIC,
            "",
            [],
            null,
            1
          );
          n.children = [staticChild];
          n = staticChild; // 下次循环这个新的child节点

       else
         // 如果是通配符*
        if (end !== max || numParams > 1)
          throw new Error(
 以上是关于koa-router-tree 源码解析的主要内容,如果未能解决你的问题,请参考以下文章