android知识要点整理(14)----Volley(HTTP请求框架)
Posted znapast
tags:
篇首语:本文由小常识网(cha138.com)小编为大家整理,主要介绍了android知识要点整理(14)----Volley(HTTP请求框架)相关的知识,希望对你有一定的参考价值。
Volley是一个HTTP库,用于为android应用提供更见便捷快速的网络请求。Volley有以下特点:
- 自动调度网络请求
- 支持并发网络连接
- 屏蔽响应缓存细节
- 支持设置请求的优先级
- 支持取消单个或一组请求
- 容易定制请求
- 网络请求结果按请求顺序返回,这样更加方便控制UI的显示
- 提供调试和跟踪工具
但是,Volley**不适用于下载大文件和处理数据流**,因为Volley会将响应数据保存在内存中以方便解析。如果要下载大文件,建议使用DownloadManager.
我们使用Volley时,首先要创建请求队列(RequestQueue),然后构造请求(Request)添加到请求队列。RequestQueue维护一组工作线程用来处理这些请求,读写缓存以及解析响应数据。Request完成对原始响应数据的解析,然后通过Volley将结果传递给主线程。
使用Volley需要声明使用INTERNET权限。
发送简单请求
先看一个例子:
// 实例化请求队列
RequestQueue queue = Volley.newRequestQueue(this);
String url ="http://www.google.com";

// 构造请求,要求返回字符串形式的响应数据.
StringRequest stringRequest = new StringRequest(Request.Method.GET, url,
            new Response.Listener<String>()
    @Override
    public void onResponse(String response)
        // 展示响应结果
        mTextView.setText("Response is: "+ response.substring(0,500));

, new Response.ErrorListener()
    @Override
    public void onErrorResponse(VolleyError error)
        //提示错误
        mTextView.setText("That didn't work!");

);
//将请求添加到队列
queue.add(stringRequest);
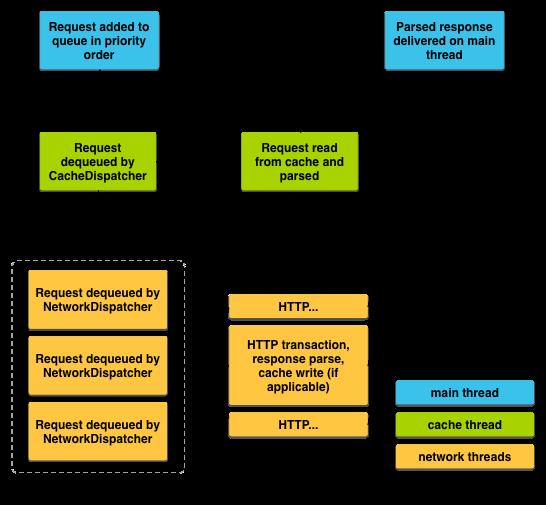
当请求被添加到队列时,Volley运行一个缓存处理线程(cache processing thread)和一个处理网络请求的线程池来处理该请求。首先,请求会被缓存处理线程处理,如果缓存中有该请求的响应数据,直接读取缓存结果返回给主线程,否则网络请求处理线程会接手该请求,开始建立网络连接,获取网络数据并解析,然后将解析后的数据写入缓存并返回给主线程。所有的耗时操作都是在工作线程中完成。
它的流程图如下:

取消请求
使用canel方法可以取消还没返回结果的请求,调用取消方法后响应数据不会再被传递给主线程。我们可以取消单个请求,也可以通过标签(TAG)来取消一组请求。实例如下:
public static final String TAG = "MyTag";
RequestQueue mRequestQueue;

...

public void addRequest(Request request)
    // 设置标签
    stringRequest.setTag(TAG);

    // 将请求添加到队列
    mRequestQueue.add(stringRequest);


@Override
protected void onStop ()
    super.onStop();
    //在onStop中取消标签对应的所有请求
    if (mRequestQueue != null)
        mRequestQueue.cancelAll(TAG);
定制RequestQueue
Volley提供了一个简单的方法newRequestQueue()来创建请求队列,该方法使用默认的缓存、默认的http client。当然,我们可以自定定制缓存大小,决定使用什么样的http client。下面讲讲如何定制RequestQueue。
创建请求队列需要2种要素:网络(客户端)和缓存。网络用来传输请求,缓存用来处理缓存数据。Volley 工具箱提供这两者的标准试下:DiskBasedCache和BasicNetwork,前者提供缓存策略,针对每个响应都创建一个缓存文件,并在内存中保存该文件的索引,后者提供基于http client的网络传输,通常是基于HttpUrlConnection。
实例代码:
RequestQueue mRequestQueue;

// 创建缓存
Cache cache = new DiskBasedCache(getCacheDir(), 1024 * 1024); // 1MB 容量

// 使用HttpUrlConnection作为客户端来创建传输网络。
// HurStack 是基于HttpURLConnection 的HttpStack
Network network = new BasicNetwork(new HurlStack());

// 使用定制的缓存和网络栈构造请求队列
mRequestQueue = new RequestQueue(cache, network);

// 启动队列的线程
mRequestQueue.start();

String url ="http://www.example.com";

// ...

// Add the request to the RequestQueue.
mRequestQueue.add(stringRequest);

// ...
创建单例模式的RequestQueue
如果应用中经常要用到网络,将RequestQueue设计成单例模式会是个很好的选择。这样能够确保在整个应用生命周期中,RequestQueue都是可用的,并且可以避免RequestQueue的重复创建和销毁,要做到这一点还要注意:应该使用Application Context 而不是Activity context。
下面是一个单例模式的实例:
public class MySingleton
    private static MySingleton mInstance;
    private RequestQueue mRequestQueue;
    private ImageLoader mImageLoader;
    private static Context mCtx;

    private MySingleton(Context context)
        mCtx = context;
        mRequestQueue = getRequestQueue();
        //提供加载图片的功能
        mImageLoader = new ImageLoader(mRequestQueue,
                new ImageLoader.ImageCache()
            private final LruCache<String, Bitmap>
                    cache = new LruCache<String, Bitmap>(20);

            @Override
            public Bitmap getBitmap(String url)
                return cache.get(url);


            @Override
            public void putBitmap(String url, Bitmap bitmap)
                cache.put(url, bitmap);

        );


    public static synchronized MySingleton getInstance(Context context)
        if (mInstance == null)
            mInstance = new MySingleton(context);

        return mInstance;


    public RequestQueue getRequestQueue()
        if (mRequestQueue == null)
            // 注意使用Applicaton context,
            //避免传进来的Activity context 导致 Activity 无法被回收
            mRequestQueue = Volley.newRequestQueue(mCtx.getApplicationContext());

        return mRequestQueue;


    public <T> void addToRequestQueue(Request<T> req)
        getRequestQueue().add(req);


    public ImageLoader getImageLoader()
        return mImageLoader;
加载图片
Volley提供了直接加载网络图片的功能。它提供了三种方式:
- ImageRequest.使用图片Url构造ImageRequest,响应回调函数会返回Bitmap对象。这种方法可以设置目标图片的尺寸。
示例:
   ImageView mImageView;
String url = "http://i.imgur.com/7spzG.png";
mImageView = (ImageView) findViewById(R.id.myImage);
...

// 构造请求
ImageRequest request = new ImageRequest(url,
    new Response.Listener<Bitmap>()
        @Override
        public void onResponse(Bitmap bitmap)
            //在回调中将图片设置给ImageView
            mImageView.setImageBitmap(bitmap);

    , 0, 0, null,
    new Response.ErrorListener()
        public void onErrorResponse(VolleyError error)
            mImageView.setImageResource(R.drawable.image_load_error);

    );
MySingleton.getInstance(this).addToRequestQueue(request);- Imageloader.Volley提供的辅助类,用于加载和缓存网络图片。ImageLoader适用于需要构造大量ImageRequest请求的场景。它提供内存缓存,从而可以避免在屏幕旋转时因为图片重新加载而发生闪烁的情况。同时它可以缓存响应,在一定时候后将所有的响应同时返回给主线程,这样主线程可以集中处理图片的显示,避免UI重复layout,以提升性能体验。
ImageLoader mImageLoader;
ImageView mImageView;
private static final String IMAGE_URL =
    "http://developer.android.com/images/training/system-ui.png";
//...
mImageView = (ImageView) findViewById(R.id.regularImageView);

mImageLoader = MySingleton.getInstance(this).getImageLoader();
//加载图片到指定ImageView
//同时指定默认图片和出错时的图片
mImageLoader.get(IMAGE_URL, ImageLoader.getImageListener(mImageView,
R.drawable.def_image, R.drawable.err_image));- NetworkImageView.基于ImageLoader的控件,用于替换ImageView来负责加载网络图片,同时在控件销毁时负责取消网络图片请求。
ImageLoader mImageLoader;
NetworkImageView mNetworkImageView;
private static final String IMAGE_URL =
    "http://developer.android.com/images/training/system-ui.png";
...

// 实例化NetworkImageView
mNetworkImageView = (NetworkImageView) findViewById(R.id.networkImageView);

mImageLoader = MySingleton.getInstance(this).getImageLoader();

//直接指定图片url
//当然还要给出ImageLoader
mNetworkImageView.setImageUrl(IMAGE_URL, mImageLoader);
请求JSON数据
Volley提供两个类用于发送JSON请求:JsonArrayRequest和JsonObJectRequest,它俩都是继承自JsonRequest。下面是个简单的例子:
TextView mTxtDisplay;
ImageView mImageView;
mTxtDisplay = (TextView) findViewById(R.id.txtDisplay);
String url = "http://my-json-feed";

JsonObjectRequest jsObjRequest = new JsonObjectRequest
        (Request.Method.GET, url, null, new Response.Listener<JSONObject>()

    @Override
    public void onResponse(JSONObject response)
        mTxtDisplay.setText("Response: " + response.toString());

, new Response.ErrorListener()

    @Override
    public void onErrorResponse(VolleyError error)
        // TODO Auto-generated method stub


);
MySingleton.getInstance(this).addToRequestQueue(jsObjRequest);
自定义Request实现
除了使用Volley提供的一些Request(比如ImageRequest)之外,我们还可以自己实现特殊的Request,步骤如下:
1.继承Request<T>,T代表响应数据要解析成的类型。比如ImageRequest 即是继承自Request<Bitmap>。
2.实现抽象方法parseNetworkResponse()和DeliverResponse()。具体方法如下:
parseNetworkResponse实现示例:(来自ImageRequest类)
 @Override
    protected Response<Bitmap> parseNetworkResponse(NetworkResponse response)
        // Serialize all decode on a global lock to reduce concurrent heap usage.
        synchronized (sDecodeLock)
            try
                return doParse(response);
             catch (OutOfMemoryError e)
                VolleyLog.e("Caught OOM for %d byte image, url=%s", response.data.length, getUrl());
                return Response.error(new ParseError(e));


    /**
     * The real guts of parseNetworkResponse. Broken out for readability.
     */
    private Response<Bitmap> doParse(NetworkResponse response)
        byte[] data = response.data;
        BitmapFactory.Options decodeOptions = new BitmapFactory.Options();
        Bitmap bitmap = null;
        if (mMaxWidth == 0 && mMaxHeight == 0)
            decodeOptions.inPreferredConfig = mDecodeConfig;
            bitmap = BitmapFactory.decodeByteArray(data, 0, data.length, decodeOptions);
         else
            // If we have to resize this image, first get the natural bounds.
            decodeOptions.inJustDecodeBounds = true;
            BitmapFactory.decodeByteArray(data, 0, data.length, decodeOptions);
            int actualWidth = decodeOptions.outWidth;
            int actualHeight = decodeOptions.outHeight;

            // Then compute the dimensions we would ideally like to decode to.
            int desiredWidth = getResizedDimension(mMaxWidth, mMaxHeight,
                    actualWidth, actualHeight, mScaleType);
            int desiredHeight = getResizedDimension(mMaxHeight, mMaxWidth,
                    actualHeight, actualWidth, mScaleType);

            // Decode to the nearest power of two scaling factor.
            decodeOptions.inJustDecodeBounds = false;
            // TODO(ficus): Do we need this or is it okay since API 8 doesn't support it?
            // decodeOptions.inPreferQualityOverSpeed = PREFER_QUALITY_OVER_SPEED;
            decodeOptions.inSampleSize =
                findBestSampleSize(actualWidth, actualHeight, desiredWidth, desiredHeight);
            Bitmap tempBitmap =
                BitmapFactory.decodeByteArray(data, 0, data.length, decodeOptions);

            // If necessary, scale down to the maximal acceptable size.
            if (tempBitmap != null && (tempBitmap.getWidth() > desiredWidth ||
                    tempBitmap.getHeight() > desiredHeight))
                bitmap = Bitmap.createScaledBitmap(tempBitmap,
                        desiredWidth, desiredHeight, true);
                tempBitmap.recycle();
             else
                bitmap = tempBitmap;


        if (bitmap == null)
            return Response.error(new ParseError(response));
         else
            return Response.success(bitmap, HttpHeaderParser.parseCacheHeaders(response));
deliverResponse实现
 @Override
    protected void deliverResponse(Bitmap response)
        mListener.onResponse(response);
以上是关于android知识要点整理(14)----Volley(HTTP请求框架)的主要内容,如果未能解决你的问题,请参考以下文章
Android 知识要点整理(12)----Animation(动画)