SpringBoot工作开发场景实践
Posted 野生java研究僧
tags:
篇首语:本文由小常识网(cha138.com)小编为大家整理,主要介绍了SpringBoot工作开发场景实践相关的知识,希望对你有一定的参考价值。
SpringBoot开发
- 前言
- 1.springBoot入门案例
- 2.springBoot配置文件
- 3.springBoot自动配置原理
- 4.SpringBootweb开发
- 5.数据访问开发
- 6.5 集成Redis
- 7 springboot日志处理
- 8 springboot文档配置
前言
结合自己的工作经验和日常的使用springboot的熟练度整合的一篇文章,写这篇文章也是花了一个星期左右,干货满满,希望不要错过。
springboot的特性主要有
- 简化 Spring 应用程序的创建和开发过程
- 抛弃了繁琐的 xml 配置过程,采用大量的默认配置简化以及注解反射
- 直接使用 java main 方法启动内嵌的 Tomcat 服务器运行 Spring Boot 程序,不需要部署 war 包文件
四大核心分别为自动配置、起步依赖、Actuator和命令行界面
Spring Boot 是由 Pivotal 团队提供的全新框架,其设计目的是用来简化新 Spring 应用的初始搭建以及开发过程。
学习顺序挺重要的,建议不要一上手就学 Spring Boot,只有先学习下自己整合框架的方法,才能帮你理解 SpringBoot 解决的问题,感受到它的方便和高效。
说明:在后面的内容中使用的是idea开发工具,需要使用到lombok,idea需要额外安装lombok插件,并且需要在pom文件中引入lombok依赖,idea插件安装不再赘述,这个网上一搜一大把,maven坐标如下:
        <dependency>
            <groupId>org.projectlombok</groupId>
            <artifactId>lombok</artifactId>
            <optional>true</optional>
        </dependency>
1.springBoot入门案例
使用springBoot非常方便,引入对应的stater即可,不在像使用ssm一样需要做很多的配置文件,只需要引入依赖添加相关注解即可。
1.直接使用 idea 创建一个spring initalizr项目即可
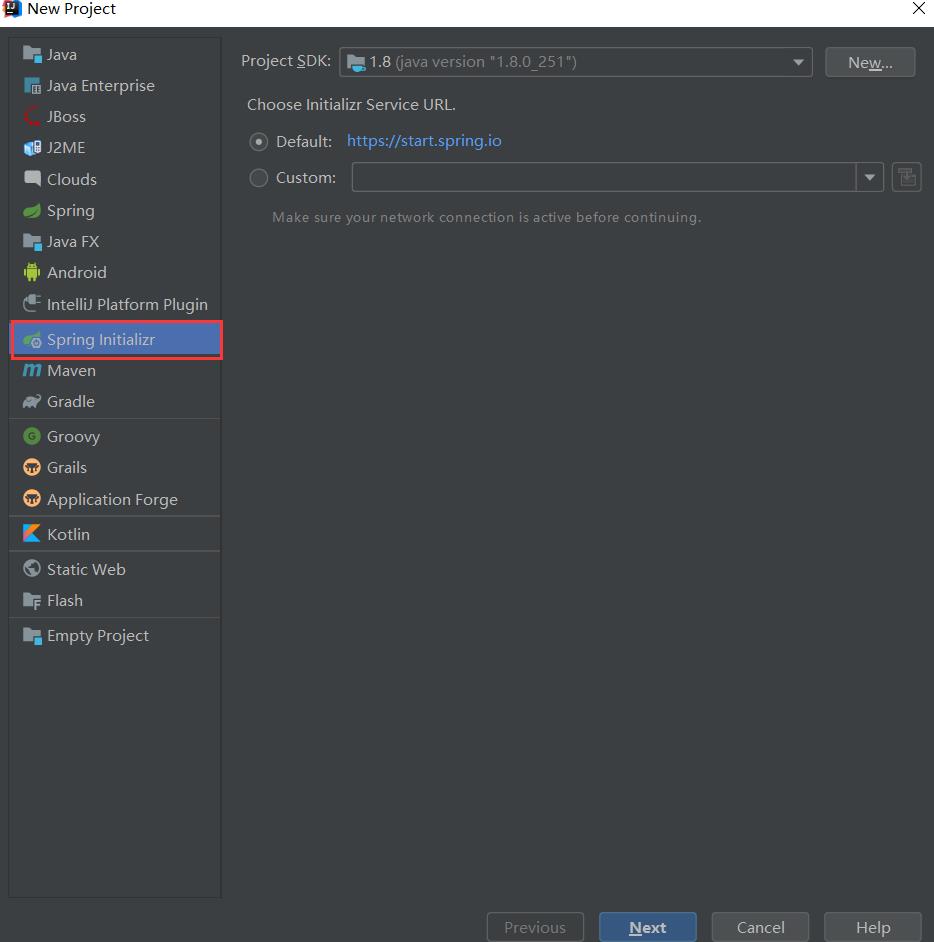
2.项目基本信息配置

3.项目依赖选择

4.选择项目保存路径

5.创建完毕,等待maven依赖下载完毕后,就可以得到下面这样一个干净的项目

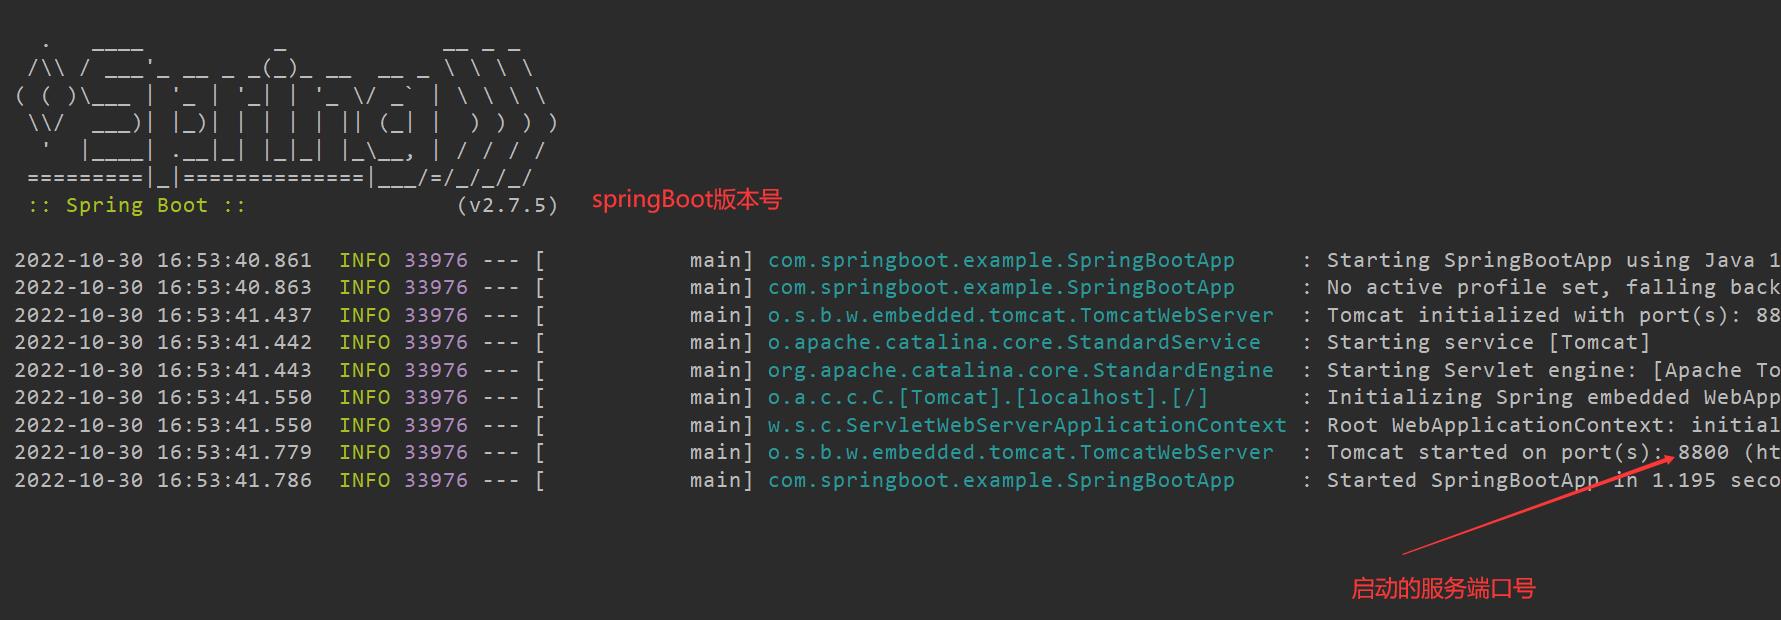
6.在application.properties中配置项目启动端口号
server.port=8800
然后在maven依赖中添加web相关依赖,以及后所需的公用依赖
        <dependency>
            <groupId>org.springframework.boot</groupId>
            <artifactId>spring-boot-starter-web</artifactId>
        </dependency>
       <dependency>
            <groupId>org.apache.commons</groupId>
            <artifactId>commons-lang3</artifactId>
            <version>3.1</version>
        </dependency>
      <dependency>
            <groupId>cn.hutool</groupId>
            <artifactId>hutool-all</artifactId>
            <version>5.3.8</version>
        </dependency>
    <dependency>
            <groupId>org.springframework.boot</groupId>
            <artifactId>spring-boot-starter-aop</artifactId>
        </dependency>
 <!--httpclient 因为HttpUtils里面会有用到-->
		<dependency>
            <groupId>org.apache.httpcomponents</groupId>
            <artifactId>httpclient</artifactId>
            <version>4.5.13</version>
        </dependency>
在com.springboot.example 下新建一个包叫controller,在此包下新增如下类:TestController
package com.springboot.example.controller;

import org.springframework.web.bind.annotation.GetMapping;
import org.springframework.web.bind.annotation.RequestMapping;
import org.springframework.web.bind.annotation.RestController;

@RestController
@RequestMapping("/example/test")
public class TestController

    @GetMapping("/hello")
    public String hello()
        return "Welcome to SpringBoot App ";
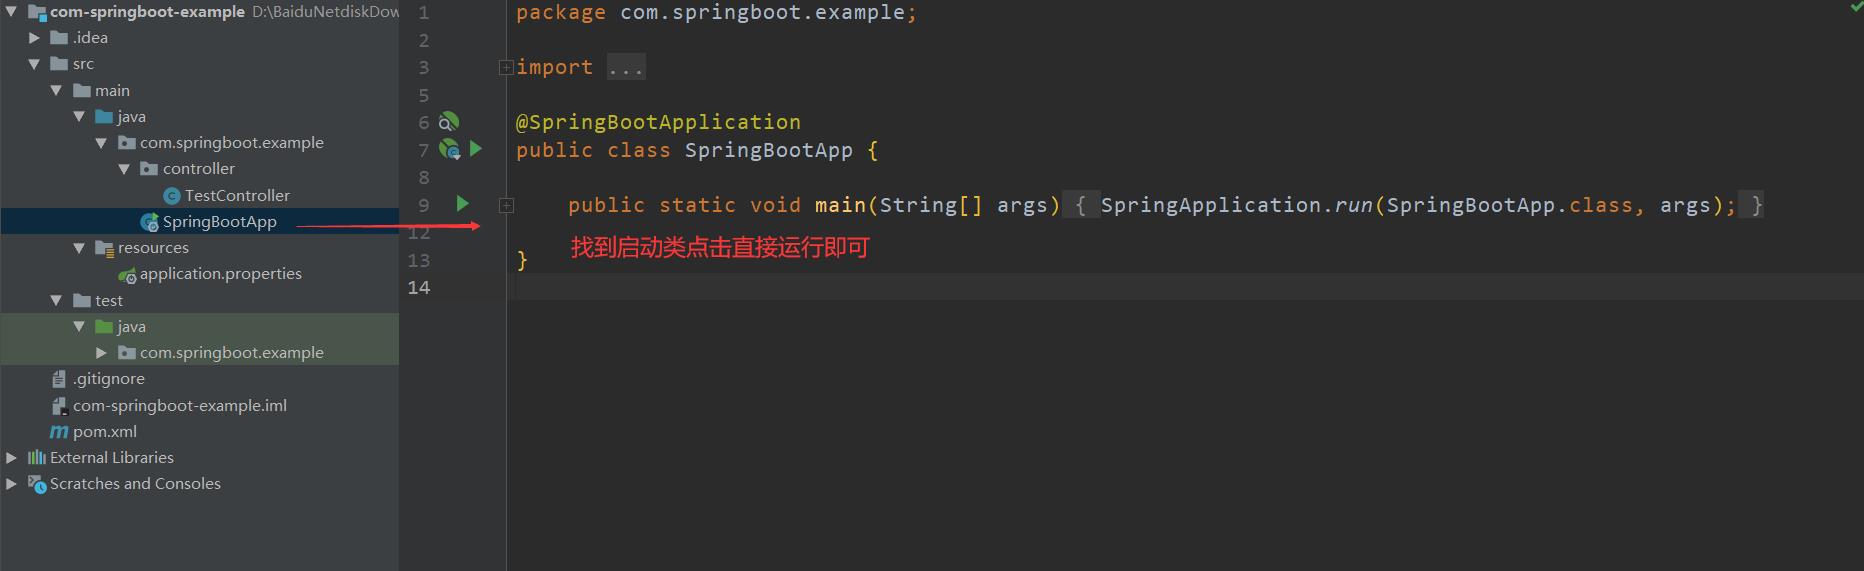
// 主启动类默认会扫描 com.springboot.example包下所有的类
可以看到服务启动成功:
在浏览器中输入访问:http://localhost:8800/example/test/hello 即可得到我们我们返回的信息:Welcome to SpringBoot App
到这里入门就算完毕了,可以看到,开发速度非常快,springBoot是一个java程序开发脚手架,大大减少配置量。
2.springBoot配置文件
2.1 springBoot配置文件简介
SpringBoot项目是一个标准的Maven项目,它的配置文件需要放在src/main/resources/下,其文件名必须为application,其存在两种文件形式,分别是properties和yaml(或者yml)文件。
| properties | yaml | |
|---|---|---|
| 语法结构 | key=value | key: value(:和value之间需要空格) |
| 文件后缀 | .properties | .yaml或者.yml |
我们现在把 application.properties 换成 application.yml ,内容如下:
server:
  port: 8800
config:
  host: 127.0.0.1
  password: admin
  maxConnect: 20
2.1 如何获取配置文件中配置的值
第一种: 使用spring的El表达式直接注入:在TestController中添加如下内容
import org.springframework.beans.factory.annotation.Value;
import org.springframework.web.bind.annotation.GetMapping;
import org.springframework.web.bind.annotation.RequestMapping;
import org.springframework.web.bind.annotation.RestController;

import java.util.HashMap;
import java.util.Map;

@RestController
@RequestMapping("/example/test")
public class TestController

    @Value("$config.host")
    private String host;

    @Value("$config.host")
    private String password;

    @Value("$config.host")
    private String maxConnect;

    @GetMapping("/configYaml")
    public Map<String,String> configYaml()
        HashMap<String, String> hashMap = new HashMap<>();
        hashMap.put("host",host);
        hashMap.put("password",password);
        hashMap.put("maxConnect",maxConnect);
        return hashMap;
访问:http://localhost:8800/example/test/configYaml 即可得到: “password”:“127.0.0.1”,“host”:“127.0.0.1”,“maxConnect”:“127.0.0.1”
第二种: 使用ConfigurationProperties注解注入:新建一个包 config,在该包中新建一个类:RedisConfigBean
内如如下:
import lombok.Data;
import org.springframework.boot.context.properties.ConfigurationProperties;
import org.springframework.boot.context.properties.EnableConfigurationProperties;
import org.springframework.stereotype.Component;

@Data
//将当前类对象放在IOC容器中
@Component
//表示与配置文件中前缀为student的数据相对应
@ConfigurationProperties(prefix = "config")
public class RedisConfigBean
    private String host;
    private String password;
    private String maxConnect;
然后在maven中引入
<!--使用ConfigurationProperties注解需要该依赖-->
<dependency>
    <groupId>org.springframework.boot</groupId>
    <artifactId>spring-boot-configuration-processor</artifactId>
    <optional>true</optional>
</dependency>
然后在TestController中添加如下内容即可:
import com.springboot.example.config.RedisConfigBean;
import org.springframework.beans.factory.annotation.Value;
import org.springframework.web.bind.annotation.GetMapping;
import org.springframework.web.bind.annotation.RequestMapping;
import org.springframework.web.bind.annotation.RestController;

import javax.annotation.Resource;
import java.util.HashMap;
import java.util.Map;

@RestController
@RequestMapping("/example/test")
public class TestController


    @Resource
    private RedisConfigBean redisConfigBean;


    @GetMapping("/configYamlEntity")
    public RedisConfigBean configYamlEntity()
        return redisConfigBean;
浏览器访问: http://localhost:8800/example/test/configYamlEntity 即可得到:“host”:“127.0.0.1”,“password”:“admin”,“maxConnect”:“20”
需要注意的是使用yml以实体类注入的时候 key不用使用驼峰的命名方式,比如把config换成 redisConfigBean 这样会报错
第三种: 就是可以这个配置类的实体,是第三方依赖里面的,写了配置文件的读取规则,但是没有注入到容器中,我们可以使用,@EnableConfigurationProperties + @ConfigureationProperties来进行导入
我们先在:application-api.yml中配置内容如下:
invoke:
  returnType: com.springboot.example.bean.UserInfo
  invokeId: 52d09385190d4c5bb05c43639fd4630d
  methodName: getUserInfoById
  params:
    - '101'
    - '2'
  paramsType:
    - 'java.lang.String'
    - 'java.lang.String'
然后老规矩,在 com.springboot.example.config 包下新建一个类 InvokeConfigBean
import lombok.Data;
import org.springframework.boot.context.properties.ConfigurationProperties;

import java.util.List;

@Data
@ConfigurationProperties(prefix = "invoke")
public class InvokeConfigBean
    private String returnType;
    private String invokeId;
    private String methodName;
    private List<Object> params;
    private List<String> paramsType;
然后在 com.springboot.example.config 包下新建一个配置类 WebAppConfig
import org.springframework.boot.context.properties.EnableConfigurationProperties;
import org.springframework.context.annotation.Configuration;

@Configuration
@EnableConfigurationProperties(InvokeConfigBean.class)
public class WebAppConfig
最后我们在TestController中添加如下内容进行测试
import com.springboot.example.config.ApiConfigBean;
import com.springboot.example.config.InvokeConfigBean;
import com.springboot.example.config.RedisConfigBean;
import org.springframework.beans.factory.annotation.Value;
import org.springframework.web.bind.annotation.GetMapping;
import org.springframework.web.bind.annotation.RequestMapping;
import org.springframework.web.bind.annotation.RestController;

import javax.annotation.Resource;
import java.util.HashMap;
import java.util.Map;

@RestController
@RequestMapping("/example/test")
public class TestController


    @Resource
    private InvokeConfigBean invokeConfigBean;


    @GetMapping("/getInvokeConfigBeanContent")
    public InvokeConfigBean getInvokeConfigBeanContent()
        return invokeConfigBean;
访问接口: http://localhost:8800/example/test/getInvokeConfigBeanContent 即可得到如下内容
    "returnType": "com.springboot.example.bean.UserInfo",
    "invokeId": "52d09385190d4c5bb05c43639fd4630d",
    "methodName": "getUserInfoById",
    "params": [
        "101",
        "2"
    ],
    "paramsType": [
        "java.lang.String",
        "java.lang.String"
    ]
2.3 springBoot配置文件优先级
项目外部配置文件:
(1)命令行参数:
在命令行中通过 java -jar 命令启动项目时,可以使用连续的两个减号 – 对配置文件中的属性值进行赋值,则命令行设置的属性会覆盖配置文件中属性的值。
java -jar xx.jar --server.port=8081,会覆盖配置文件中的端口。
(2)外置配置文件:
还可以指定配置文件的路径或者目录,则系统会使用指定的配置文件,或者目录下所有的配置文件。
java -jar xxx.jar --spring.config.location=/opt/servicex/config/application.yml
java -jar xxx.jar --spring.config.location=/opt/servicex/config/
项目内部配置文件:
(1)在同一级目录下(除后缀外其他部分都相同)配置文件的优先级:properties(最高) > yml > yaml(最低), 优先级高的配置会覆盖优先级低的配置。
(2)项目中优先级如下(从上往下优先级逐级降低,优先级高的配置会覆盖优先级低的配置):
项目名/config/XXX配置文件 (优先级最高)
项目名/XXX配置文件
项目名/src/main/resources/config/XXX配置文件
项目名/src/main/resources/XXX配置文件 (优先级最低)
配置文件
在 Spring Boot 中有两种上下文,一种是 bootstrap另外一种是 application, bootstrap 是应用程序的父上下文,bootstrap用于应用程序上下文的引导阶段,由父Spring ApplicationContext加载。bootstrap 的加载优先于 applicaton,所以优先级从大到小如下:
bootstrap.properties -> bootstrap.yml -> application.properties -> application.yml
2.4 多环境配置文件
在 application.yml 中添加如下内如:表示我们激活的是 pro这个配置文件
spring:
  profiles:
    active: pro
在resources目录下新建2个配置文件:
application-dev.yml内容:
server:
  port: 8800
config:
  host: 127.0.0.1
  password: admin
  maxConnect: 20
  environment: dev

application-pro.yml内容:
server:
  port: 8800
config:
  host: 127.0.0.1
  password: admin
  maxConnect: 20
  environment: dev
然后在RedisConfigBean中添加属性 environment
然后我们访问: http://localhost:8888/example/test/configYamlEntity 就可以得到 “host”:“127.0.0.1”,“password”:“admin”,“maxConnect”:“20”,“environment”:“pro”,可以看到我们的配置生效了。
他的一个多环境配置生效了。使用规则 : application-环境名称.ym
2.5 配置文件抽离
我们总不能把所有配置文件都写在一个配置文件里面,这样的话未免看起来复杂了,而且不太好阅读,配置多了以后都不太好找。写在我们单独写一个配置文件,然后在 application.yml 导入即可
比如我们现在需要配置一个调用第三方接口的配置文件 application-api.yml ,这个配置文件中,专门调用第三方接口的一个配置文件,内容如下:
inventory:
  module: order
  businessType: query
  serviceCode: f09543d4c8284aa1858def3da9aec1bd
  interfaceDesc: 根据商品id查询订单服务库存剩余量
还是同样的配方,我们在 config包下新建一个 类叫做 ApiConfigBean,内容如下
import lombok.Data;
import org.springframework.boot.context.properties.ConfigurationProperties;
import org.springframework.boot.context.properties.EnableConfigurationProperties;
import org.springframework.stereotype.Component;

@Data
//将当前类对象放在IOC容器中
@Component
//表示与配置文件中前缀为student的数据相对应
@ConfigurationProperties(prefix = "inventory")
public class ApiConfigBean

    private String module;
    private String businessType;
    private String serviceCode;
    private String interfaceDesc;
然后在TestController中添加测试接口,内容如下
import com.springboot.example.config.ApiConfigBean;
import com.springboot.example.config.RedisConfigBean;
import org.springframework.beans.factory.annotation.Value;
import org.springframework.web.bind.annotation.GetMapping;
import org.springframework.web.bind.annotation.RequestMapping;
import org.springframework.web.bind.annotation.RestController;

import javax.annotation.Resource;
import java.util.HashMap;
import java.util.Map;

@RestController
@RequestMapping("/example/test")
public class TestController


    @Resource
    private ApiConfigBean apiConfigBean;


    @GetMapping("/getApiConfigContent")
    public ApiConfigBean getApiConfigContent()
        return apiConfigBean;
最后我们只需要在 application.yml 中把刚刚的配置文件导入进去就行:如果需要导入多个,请使用英文逗号进行分割
server:
  port: 8800
spring:
  profiles:
    active: pro
    include: api
config:
  host: 127.0.0.1
  password: admin
  maxConnect: 20
访问接口: http://localhost:8888/example/test/getApiConfigContent
即可获得如下内容:
    "module": "order",
    "businessType": "query",
    "serviceCode": "f09543d4c8284aa1858def3da9aec1bd",
    "interfaceDesc": "根据商品id查询订单服务库存剩余量"
2.6 引入原生配置文件
有时候我们做项目升级的时候,原先是用xml配置文件配置的bean,我们可以直接导入该配置文件,然后将这些bean注入到springBoot的容器中。
在 com.springboot.example.bean 包下新建一个类 UserInfo,内如如下
@Data
public class UserInfo
    private String id;
    private String username;
    private String password;
    private String phone;
    private String email;
    private String sex;
    private String userType;
然后在 resources 下 新建一个 beans.xml 内如如下
<?xml version="1.0" encoding="UTF-8"?>
<beans xmlns="http://www.springframework.org/schema/beans"
       xmlns:xsi="http://www.w3.org/2001/XMLSchema-instance"
       xmlns:context="http://www.springframework.org/schema/context"
       xsi:schemaLocation="http://www.springframework.org/schema/beans http://www.springframework.org/schema/beans/spring-beans.xsd http://www.springframework.org/schema/context https://www.springframework.org/schema/context/spring-context.xsd">

    <bean id="userInfo以上是关于SpringBoot工作开发场景实践的主要内容,如果未能解决你的问题,请参考以下文章