总结git的基本使用(上传+分支+回滚+免密)
Posted 爱敲代码的三毛
tags:
篇首语:本文由小常识网(cha138.com)小编为大家整理,主要介绍了总结git的基本使用(上传+分支+回滚+免密)相关的知识,希望对你有一定的参考价值。
文章目录
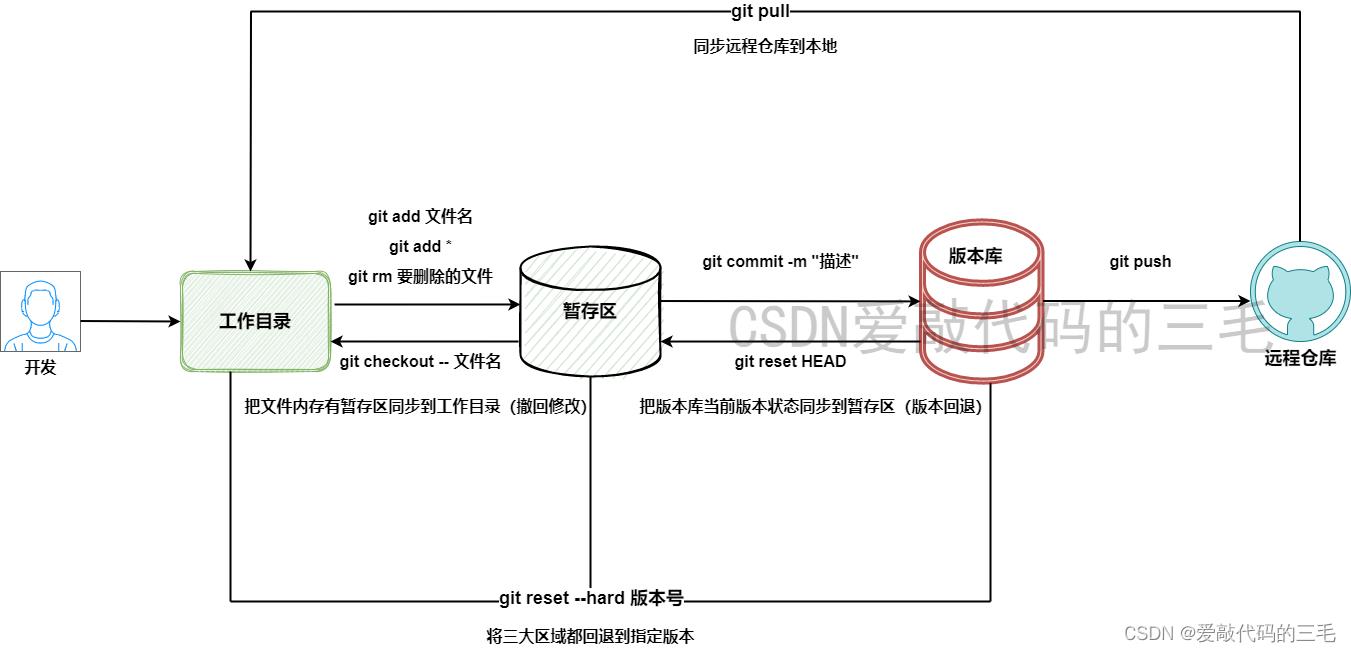
一、git的基本应用
查看帮助命令
# git --help
1. git身份设置
因为git是分布式版本控制系统,不同的人提交代码需要区分,所以每个人都要设置一个身份标识。
# git config --global user.name "HeHanYu" # 用户名
# git config --global user.email "913861123@qq.com" #邮箱
# git config --global color.ui true # 有颜色显示

[root@client ~]# git config --list
user.name=HeHanYu
user.email=913861123@qq.com
color.ui=true
2. 创建本地仓库
- 工作目录:也叫工作区,是存放项目代码的一个目录
- 仓库:也可以角版本库,在git init命令初始化工作目录后产生一个隐藏的子目录.get**,可以将其理解为git的仓库或者版本库
- 仓库分为本地仓库和远程仓库
创建本地仓库步骤
1.创建工作目录(windows上随便找个目录就好)
$ mkdir /git_test
2.在对应目录创建本地仓库
$ git init


$ ls .git
HEAD  config  description  hooks/  info/  objects/  refs/
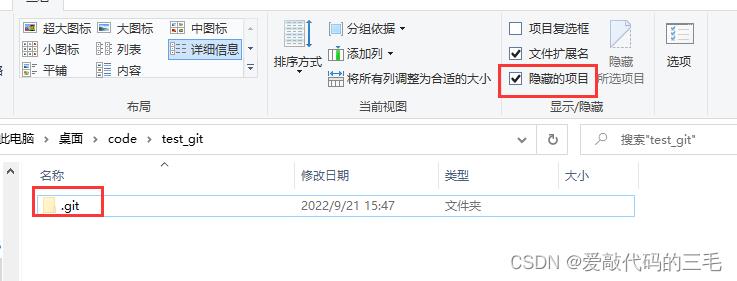
会产生一个.git子目录,所有除代码数据外的相关数据都在此目录,不要修改它.(它就是仓库或叫版本库)
3. 添加文件到缓存区(暂存区)
1.创建一个测试文件
$ touch test.c
$ cat test.c
#include <stdio.h>
int main()

        printf("hello world
                        ");

        return 0;
.2.使用git add命令提交到缓存区
$ git add test.c
3.提交第一个文件后,版本库.git子目录里就多了一个index
$ ls .git
HEAD  config  description  hooks/  index  info/  objects/  refs/
4.在Linux中使用strings命令查看可以看到git add的文件列表
# strings .git/index
DIRC
test.
4.git版本控制
1) 提交文件(第1个版本)
代码文件需要commit提交后才能纳入版本控制。
1.可以使用git status查看工作目录里有哪些文件需要提交
$ git status
On branch master

No commits yet

Changes to be committed:
  (use "git rm --cached <file>..." to unstage)
        new file:   test.c
2.使用git commit提交; -m 后接提交的说明信息
$ git commit -m "提交测试文件"
[master (root-commit) 837d07c] 提交测试文件
 1 file changed, 9 insertions(+)
 create mode 100644 test.c
3.再次git status查看状态,没有需要提交的文件了
$ git status
On branch master
nothing to commit, working tree clean
2) 修改再提交(第2个版本)
1.修改test.c文件,加上一句打印你好世界
$ cat test.c
#include <stdio.h>
int main()

        printf("hello world");
        printf("你好世界");

        return 0;
2.使用git status查看,信息告诉我们1.py被修改了
$ git status
On branch master
Changes not staged for commit:
  (use "git add <file>..." to update what will be committed)
  (use "git restore <file>..." to discard changes in working directory)
        modified:   test.c

no changes added to commit (use "git add" and/or "git commit -a")
3.使用git diff查看修改了什么
$ git diff test.c
warning: LF will be replaced by CRLF in test.c.
The file will have its original line endings in your working directory
diff --git a/test.c b/test.c
index 2daed15..f0de473 100644
--- a/test.c
+++ b/test.c
@@ -1,8 +1,8 @@
 #include <stdio.h>
 int main()

-       printf("hello world
-                       ");
+       printf("hello world");
+       printf("你好世界");

        return 0;
4.提交修改(add+commit)
$ git add test.c
$ git commit -m "添加了一行打印你好世界"
3) 再修改再提交(第3个版本)
再增加一句代码
$ cat test.c
#include <stdio.h>
int main()

        printf("hello world");
        printf("你好世界");
        printf("test linux");
        return 0;


$ git add test.c
$ git commit -m "添加了一行打印 test linux"
小结:
- 工作目录中写好的代码文件需要先
git add 文件名添加到暂存区,再git commit 文件名提交。以后每次修改都要重复前两步。 git status查看工作目录中的状态git diff 文件名查看文件修改了什么
4) 查看历史提交
1.使用git log查看提交的历史版本信息
$ git log
commit f75b56060b982e0ef308680e3fcf63fae5705584 (HEAD -> master)
Author: HeHanYu  <913861123@qq.com>
Date:   Wed Sep 21 16:18:51 2022 +0800

    添加了一行打印 test linux

commit 73e3978849cfeb888f0e6c46b9a77cc7f3df4479
Author: HeHanYu <913861123@qq.com>
Date:   Wed Sep 21 16:16:20 2022 +0800

    添加了一行打印你好世界

commit 837d07c54ee019c56148ed2e688bdb8632cfbe37
Author: HeHanYu  <913861123@qq.com>
Date:   Wed Sep 21 16:09:41 2022 +0800

    提交测试文件
2.使用git log --pretty=oneline查看提交的历史版本信息, 查看的显示信息更简洁
前面字符串你可以看作就是一个版本号(commit id)
$ git log --pretty=oneline
f75b56060b982e0ef308680e3fcf63fae5705584 (HEAD -> master) 添加了一行打印 test linux
73e3978849cfeb888f0e6c46b9a77cc7f3df4479 添加了一行打印你好世界
837d07c54ee019c56148ed2e688bdb8632cfbe37 提交测试文件
5) 版本回退与还原
1.使用git reset --hard HEAD^回退到上一个版本(也就是第2个版本)
$ git reset --hard HEAD^
HEAD is now at 73e3978 添加了一行打印你好世界

$ cat test.c
#include <stdio.h>
int main()

        printf("hello world");
        printf("你好世界");

        return 0;
2.使用git reset --hard 第3个版本号 还原到第3个版本。
但如果我忘了第3个版本号是什么了,使用git reflog查看所有的操作历史
$ git reflog
73e3978 (HEAD -> master) HEAD@0: reset: moving to HEAD^
f75b560 HEAD@1: commit: 添加了一行打印 test linux
73e3978 (HEAD -> master) HEAD@2: commit: 添加了一行打印你好世界
837d07c HEAD@3: commit (initial): 提交测试文件
3.还原到第3个版本
$ git reset --hard f75b560
HEAD is now at f75b560 添加了一行打印 test linux

$ cat test.c
#include <stdio.h>
int main()

        printf("hello world");
        printf("你好世界");
        printf("test linux");
        return 0;
4.回退到上上一个版本, 也就是回退两个版本,使用git reset --hard HEAD^^
回退三个版本,使用git reset --hard HEAD^^^, 以此类推
如果回退100个版本,那用100个^符号不方便,可以换成git reset --hard HEAD~100
$ git reset --hard HEAD^^
HEAD is now at 837d07c 提交测试文件

$ cat test.c
#include <stdio.h>
int main()

        printf("hello world
                        ");

        return 0;
小结:
- 提交后的代码文件,使用
git log查看当前版本及以前的历史版本。 - 使用
git reset --hard HEAD^或者git reset --hard HEAD~100实现版本回退。 - 使用
git reflog查看提交的所有操作及版本号 - 使用
git reset --hard 版本号你可以自由的在不同版本之间来回切换。
注意:
- 工作目录里任何修改或增加的文件,都要git add到暂存区,让暂存区和工作目录的状态一致,这样才能提交一个版本。
- git commit提交的是在暂存区里的所有文件状态。也就是说是整个工作目录里的状态保存为一个版本,而不是某一个文件。
- git版本控制不仅仅是用于项目开发,你也可以用于一个软件包仓库的版本控制
6) 撤销修改
如果你今天状态不好,写了很多bug,git也提供了撤销的办法
先准备写乱的代码
$ cat test.c
#include <stdio.h>
int main()

        printf("hello world");
        for (int i = 0; i < 10; i++);

                printf("test");


        return 0;
$ git add test.c
$ git reset HEAD test.c  # 撤销文件的修改
Unstaged changes after reset:
M       test.c

HeHanYu@DESKTOP-GF336QI MINGW64 ~/Desktop/code/test_git (master)
$ git checkout -- test.c

$ cat test.c
#include <stdio.h>
int main()

        printf("hello world
                        ");

        return 0;
想要撤销修改有以下方法:
- 直接把写错的代码删除就好, 但如果改变的代码很多,开发者自己都忘了具体改了哪些代码,这种做法就不方便了
- 使用
git checkout -- 文件名就可以直接撤销修改了 - 如果写乱了代码,添加暂存区但还没有commit提交。使用
git reset HEAD 文件名取消暂存区添加,再git checkout -- 文件名来撤销修改 - 如果写乱了代码,添加暂存区并提交了。则使用版本回退
7) 文件删除
1.没有git add到暂存区的文件直接rm删除就ok
2.git add添加到暂存区,但没有git commit`提交的文件。需要rm删除本地,还要git rm 文件名删除
$ touch Test.java
$ git add Test.java

$ rm test.java -f

$ git rm Test.java
rm 'Test.java'
3.git add添加到暂存区,并且已经git commit`提交的文件。需要rm删除本地,再git rm 文件名删除,最后再提交删除
$ touch test.py
$ git add test.py
$ git commit -m "提交了test.py"
[master 34569a9] 提交了test.py
 1 file changed, 0 insertions(+), 0 deletions(-)
 create mode 100644 test.py


$ rm test.py -rf
$ git rm test.py
rm 'test.py'

$ git commit -m "删除test.py"
[master b92b761] 删除test.py
 1 file changed, 0 insertions(+), 0 deletions(-)
 delete mode 100644 test.py
二、git分支管理
每个项目都有一个主分支,而其它分支就是主分支的一个副本,在分支上写代码不会影响到主分支,比如说有两个小组开发两个功能模块,它们有各自的分支就互不影响,开发测试完毕后就可以合并到主分支上
1. 查看分支
默认只有一个master分支, 前面有*号的代表为当前分支
$ git branch
* master
2. 创建分支
使用git branch 分支名来创建分支
$ git branch test

$ git branch
* master
  test
3. 切换分支
使用git checkout 分支名来切换分支
$ git checkout test
Switched to branch 'test'

$ git branch
  master
* test
4. 合并分支
1.在test分支上新创建了一个代码文件,添加并提交
$ git branch
  master
* test

$ echo  "print('hello')" >> prt.py
$ cat prt.py
print('hello')

$ git add prt.py

$ git commit -m "测试分支合并"
[test 74b35fe] 测试分支合并
 1 file changed, 1 insertion(+)
 create mode 100644 prt.py
2.切换到master上分支后,却发现根本没有prt.py这个文件
$ git checkout master
Switched to branch 'master'

$ ls
test.c
3.合并分支,再查看能在master分支上查看到了
$ git merge test
Updating b92b761..74b35fe
Fast-forward
 prt.py | 1 +
 1 file changed, 1 insertion(+)
 create mode 100644 prt.py


$ ls
prt.py  test.c
$ cat prt.py
print('hello')
5. 分支冲突
有些复杂的情况会造成冲突,这个时候git就不能帮我们自动的合并分支。我们就要手动处理冲突。
1.在test分支修改文件
$ git checkout test
Switched to branch 'test'
$ git branch
  master
* test

$ echo "#冲突测试" >> prt.py

$ cat prt.py
print('hello')
#冲突测试
2.提交test分支上的修改
$ git add prt.py

$ git commit -m "冲突测试"
[test 023f7be] 冲突测试
 1 file changed, 1 insertion(+)
3.切回master分支,也修改相同的文件
$ git checkout master

$ git branch
* master
  test

$ echo "#冲突测试" >> prt.py
$ echo "#冲突测试" >> prt.py
4.提交master分支上的修改
$ git add prt.py


$ git commit -m "冲突测试"
[master b1967de] 冲突测试
 1 file changed, 2 insertions(+)
5.合并test分支到master,就会出现冲突了
$ git merge test
Auto-merging prt.py
CONFLICT (content): Merge conflict in prt.py
Automatic merge failed; fix conflicts and then commit the result.
6.手工解决冲突
git使用<<<<<<<<<,=========,>>>>>>>>符号分割冲突的内容,手动删除这些符号,并修改成你想要的内容
手动解决冲突前:

$ cat prt.py
print('hello')
#冲突测试
<<<<<<< HEAD
#这是测试
=======
>>>>>>> test


手动解决冲突后:我直接删除了符号
$ cat prt.py
print('hello')
#冲突测试
#这是测试
7.解决冲突后添加并提交,最后再合并
$ git commit -m "解决了冲突,修改了代码"
[master 2bbe764] 解决了冲突,修改了代码

$ git merge test
Already up to date.
6. 删除分支使用
git branch -d 分支名来删除分支。注意: 不能删除当前使用的分支.
$ git branch
* master
  test

$ git branch -d test
Deleted branch test (was 023f7be).

$ git branch
* master
三、使用远程仓库(gitee)
1.使用远程仓库
1.在git上获取克隆地址

2.使用 git clone 命令克隆项目到本地目录
$ git clone https://gitee.com/he-hanyu/test.git
Cloning into 'test'...
git: 'credential-manager' is not a git command. See 'git --help'.

The most similar command is
        credential-manager-core
remote: Enumerating objects: 4, done.
remote: Counting objects: 100% (4/4), done.
remote: Compressing objects: 100% (4/4), done.
remote: Total 4 (delta 0), reused 0 (delta 0), pack-reused 0
Receiving objects: 100% (4/4), done.


$ cat test/README.md
# test

#### 介绍
测试仓库

#### 软件架构
软件架构说明
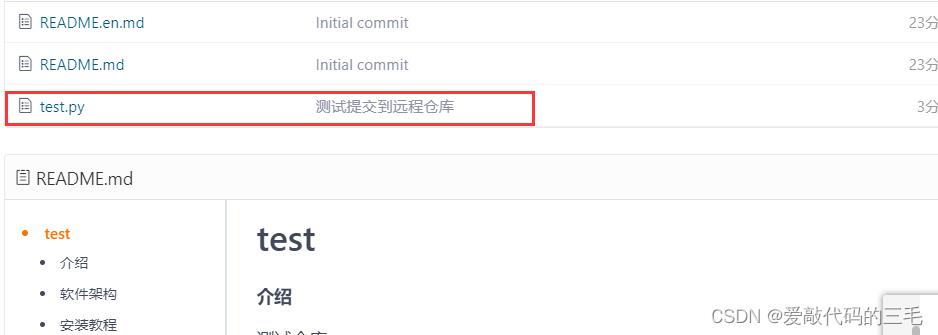
3.提交代码到
在仓库里准备一个代码文件
$ cat test.py
print('hello!')

$ git add test.py


$  git commit -m "提交远程仓库测试"
[main 1c17fd7] 提交远程仓库测试
 1 file changed, 1 insertion(+)
 create mode 100644 test.py
4.使用git push命令将代码推送到远程仓库
$ git push
Username for 'https://gitee.com': HeHanYu  # 填写用户名
Password for 'https://17775137420@gitee.com': #填写密码
Counting objects: 4, done.
Delta compression using up to 8 threads.
Compressing objects: 100% (2/2), done.
Writing objects: 100% (3/3), 344 bytes | 0 bytes/s, done.
Total 3 (delta 0), reused 0 (delta 0)
error: RPC failed; result=6, HTTP code = 0
fatal: The remote end hung up unexpectedly
fatal: The remote end hung up unexpectedly
Everything up-to-dat
2. 免密push
免密push其实就是利用了ssh免密登录的原理:
- 在本地产生空密码密钥对
- 本地保留私钥,把公钥给对方
- 实现本地到远程的免密
第1步: 开发者电脑产生ssh空密码密钥对
一路回车
$ ssh-keygen
Generating public/private rsa key pair.
Enter file in which to save the key (/c/Users/HeHanYu/.ssh/id_rsa):
Enter passphrase (empty for no passphrase):
Enter same passphrase again:
Your identification has been saved in /c/Users/HeHanYu/.ssh/id_rsa #私钥
Your public key has been saved in /c/Users/HeHanYu/.ssh/id_rsa.pub # 公钥
The key fingerprint is:
SHA256:Ja9C1yX7pktARe1Q20G+DBY3z8seH4UeeG7agxS9PM0 HeHanYu@DESKTOP-GF336QI
The key's randomart image is:
+---[RSA 3072]----+
|         .ooo.=  |
|         .. .O * |
|        o ooB B +|
|       . = =.O.*o|
|      . S + . X=E|
|     . . o o =..+|
|      . . . = o..|
|       . . o   . |
|          o.     |
+----[SHA256]-----+
第2步: 把公钥文件的内容复制到剪贴板
ssh-rsa AAAAB3NzaC1yc2EAAAADAQABAAABgQDEXOyeiTc4dAL8muG62PSbOc3SgE8iLZ1eyDftGne345aPuZFYht5bIV63X2gE96/sARnsYnwN3JW11v0B2i6jD1ml1HHOW/VtS0fx4y4+s26IGLhFtzhRvkcigHSKcOZgzKQ/YCKG7SdBRasfuTZNGwALlpknMFlOBbiVfJ8Mvrxa8MgDHplS8OqEvrS2If2dkYGOGUtmsfdEiKeTWcvYmLmuZV4He6uIxeaA+1oxnvWoEQMiiUuoabU/ilzdBYHTt3j5sKMj8Tf2OpEcMGAGNYEDiyjVA1zIICtPALKT8A9BLNAjGCKbwI6O4o04/1njz+XdKoRngDleA3D/s5Hvs+5f53A99thDj6GGZEH8jGxPmoDEvx1x0m5zsWXMEfrZbZFSAe/2XoalH5g8U8NTaJnVCrnd29SFmSkswF56PylJyB0cqQYDL3bysl2Ang7sf9jLlqsLBic49Nfb1HerK0myiF5OeAoAK6s3nz/9ilpgPctogTr5KecQEKNShf8= HeHanYu@DESKTOP-GF336QI
第3步: gitee上添加开发者的公钥
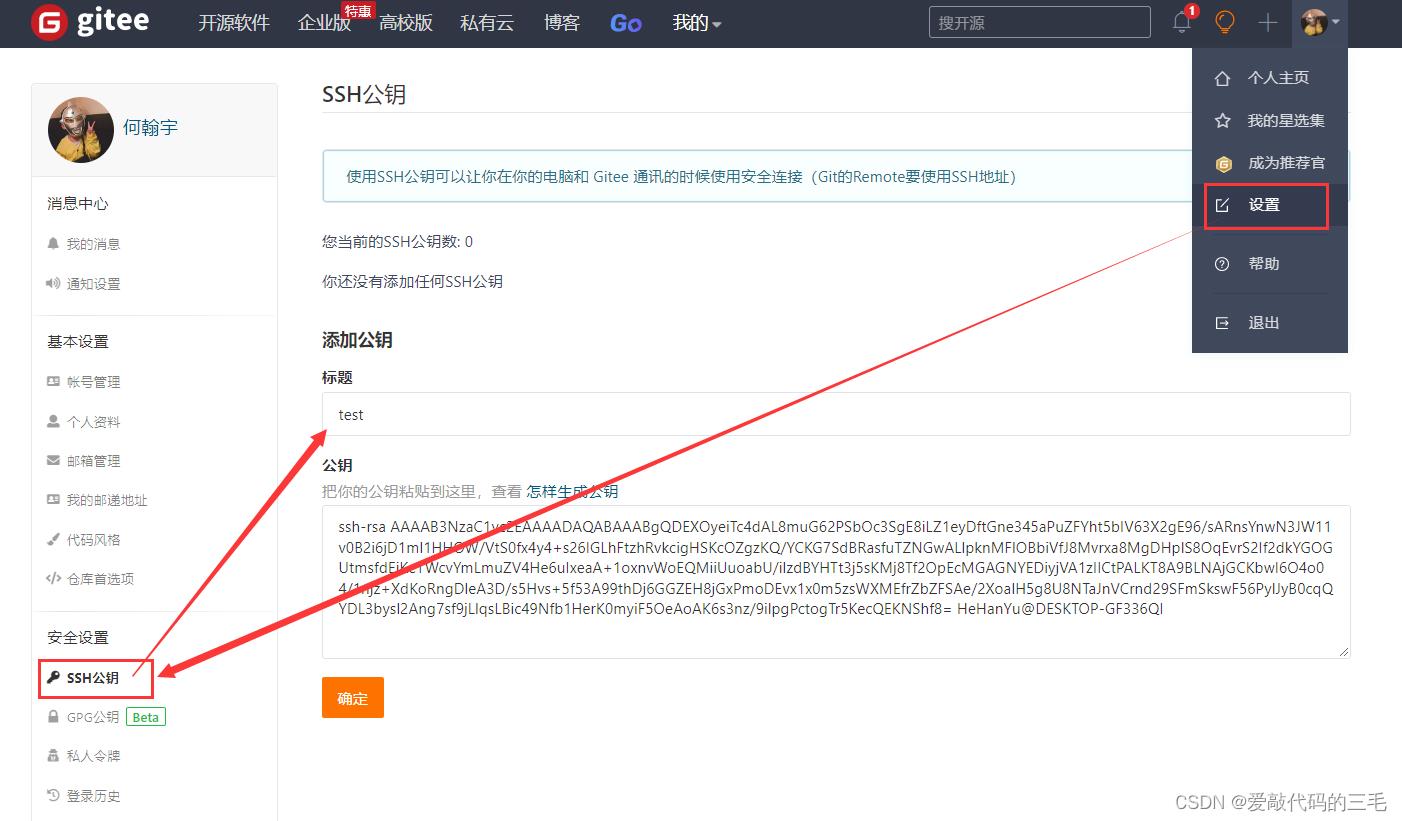

第4步: 获取ssh克隆方式地址
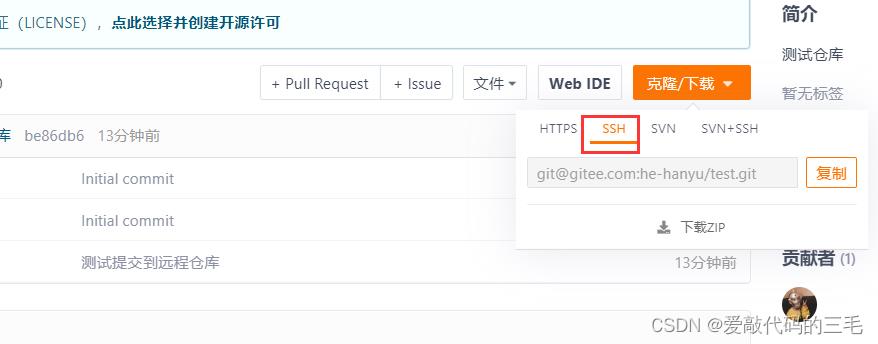
第5步: 再git clone项目到本地
$ git clone git@gitee.com:he-hanyu/test.git
Cloning into 'test'...
The authenticity of host 'gitee.com (212.64.63.215)' can't be established.
ED25519 key fingerprint is SHA256:+ULzij2u99B9eWYFTw1Q4ErYG/aepHLbu96PAUCoV88.
This key is not known by any other names
Are you sure you want to continue connecting (yes/no/[fingerprint])? yes
Warning: Permanently added 'gitee.com' (ED25519) to the list of known hosts.
remote: Enumerating objects: 10, done.
remote: Counting objects: 100% (10/10), done.
remote: Compressing objects: 100% (8/8), done.
remote: Total 10 (delta 2), reused 0 (delta 0), pack-reused 0
Receiving objects: 100% (10/10), done.
Resolving deltas: 100% (2/2), done.
7.这次再使用git push就会发现不需要输入账号密码了
$ git push
3.push到指定分支
使用git push origin 分支名 push到指定分支
git push origin master
4. 小结
小结: github有两种连接方式:
-
Clone with HTTPS
-
Clone with SSH(通过ssh免密密钥对实现免密push)
四、总结
1. 简单使用三板斧
git clone 你的https/ssh地址克隆远程仓库到本地git add 文件名添加文件到暂存区`git commit -m "提交描述"# 将文件提价到版本库git push将文件push到远程仓库
2. 命令简单汇总
| 命令 | 作用 |
|---|---|
| git add 文件名 | 添加指定文件到暂存区 |
| git add * | 添加当前目录所欲文件到暂存区 |
| git status | 查看工作目录有哪些文件需要提交 |
| git commit -m “描述” | 提交文件到版本库 |
| git log | 查看提交历史版本信息 |
| git diff | 查看工作目录的文件修改了啥 |
| git log --pretty=oneline | 更简洁的查看提交的历史版本信息 |
| git reset --hard HEAD^ | 回退到上一个版本 |
| git reset --hard 版本号 | 回退到指定版本 |
| git reset --hard HEAD~100 | 回退100个版本 |
| git checkout – 文件名 | 撤销代码修改,误删恢复 |
| git branch | 查看分支 |
| git branch 分支名 | 创建分支 |
| git checkout 分支名 | 切换分支 |
| git merge 分支名 | 合并分支 |
| git branch -d 分支名 | 删除分支 |
以上是关于总结git的基本使用(上传+分支+回滚+免密)的主要内容,如果未能解决你的问题,请参考以下文章