react源码学习
Posted coderlin_
tags:
篇首语:本文由小常识网(cha138.com)小编为大家整理,主要介绍了react源码学习相关的知识,希望对你有一定的参考价值。
jsx
jsx会被转为createElement方法,看下源码这个方法
export function createElement(type, config, children)
接受三个参数:
- type元素类型,对于普通元素,就是div p ,对于函数组件,就是 函数本身, 对于类组件,就是类本身
- config 配置属性,比如ref, key, style…
- children 子元素
这个方法的主要作用就是: - 1 分离props属性和特殊属性
  let propName;
  const props = ; // 存储普通元素属性
  // 待提取属性,react内部为了实现某些功能而存在的属性
  let key = null;
  let ref = null;
  let self = null;
  let source = null;


  // 分离props属性和特殊属性
  if (config != null)
    // 判断是否是合法的ref
    if (hasValidRef(config))
      ref = config.ref;

    // 判断是否是合法的key
    if (hasValidKey(config))
      key = '' + config.key;

    // Remaining properties are added to a new props object
    // 将其他属性存入props中
    for (propName in config)
      if (
        hasOwnProperty.call(config, propName) &&
        // 不是key self ref source的其中一个
        !RESERVED_PROPS.hasOwnProperty(propName)
      )
        props[propName] = config[propName];
- 2 将子元素挂载到porps.children中
// 将子元素挂载到porps.children中
  // 如果子元素有多个,就是一个数组
  // 如果只有一个,就是一个对象

  const childrenLength = arguments.length - 2;
  if (childrenLength === 1)
    props.children = children;
   else if (childrenLength > 1)
    const childArray = Array(childrenLength);
    for (let i = 0; i < childrenLength; i++)
      childArray[i] = arguments[i + 2];

    props.children = childArray;
- 3 为Props属性赋默认值
// 3 为Props属性赋默认值
  if (type && type.defaultProps)
    const defaultProps = type.defaultProps;
    for (propName in defaultProps)
      if (props[propName] === undefined)
        props[propName] = defaultProps[propName];


  if (__DEV__)
    if (key || ref)
      const displayName =
        typeof type === 'function'
          ? type.displayName || type.name || 'Unknown'
          : type;

    // 如果通过props去获取key或者ref,就会给你报错。
      if (key)
        defineKeyPropWarningGetter(props, displayName);

      if (ref)
        defineRefPropWarningGetter(props, displayName);
如果通过props获取Key和ref,在开发环境的时候还会报错。
- 4 创建并返回ReactElement
// 4 创建并返回ReactElement
  return ReactElement(
    type,
    key,
    ref,
    self,
    source,
    ReactCurrentOwner.current,
    props,
  );
看下ReactElement
 */
const ReactElement = function(type, key, ref, self, source, owner, props)
  const element =
    // This tag allows us to uniquely identify this as a React Element
    // 组建的类型,十六进制数值或者是SYmbol值
    // React在最终渲染DOM的时候,需要确保元素的类型是REACT_ELEMENT_TYPE,需要此属性作为判断的依据
    $$typeof: REACT_ELEMENT_TYPE,

    // Built-in properties that belong on the element
    // 元素的具体类型,span, div, class A , function App()...
    type: type,
    // key值, 元素的唯一标识,用做内部vdom比对提升dom操作性能。
    key: key,
    // ref值 存储元素DOM对象或者组件实例对象
    ref: ref,
    // 存储向组件内部传递的数据
    props: props,

    // Record the component responsible for creating this element.
    // 记录当前元素所属组件(记录当前元素是哪个组件创建的)
    _owner: owner,
  ;
返回一个vdom对象。
isValidElement
react内部提供了判断是否是标准ReactELemtn的方法
/**
 * 验证object参数是否是ReactElement,返回布尔值
 * 验证成功的条件:
 * 是对象
 * 部位null
 * 并且$$typeof === React_ELEMNT_TYPE
 */
export function isValidElement(object)
  return (
    typeof object === 'object' &&
    object !== null &&
    object.$$typeof === REACT_ELEMENT_TYPE
  );
验证成功的条件:
- 是对象
- 部位null
- 并且$$typeof === React_ELEMNT_TYPE(如果支持SYmbol就是一个SYmbol,如果不支持就是一个十六进制数)
React架构
React16版本的架构可以分为三层,调度层,协调层,渲染层。
Scheduler调度层
- react15的版本中,采用了循环加递归的方式进行了vdom的比对,由于递归使用js自身的执行栈,一旦开始就无法停止。直到任务执行完成。如果dom树的层级较深,就容易出现长期占用js主线程,导致gui渲染线程无法得到工作,造成页面卡顿。
- 在16的版本中,放弃了js递归方式进行vdom比对,而是采用了循环模拟递归,而且比对的过程是利用浏览器的空闲时间完成的,不会占用主线程,这就解决了vdom对比造成页面卡顿原因。
- 在window中提供了requestIdCallback的api,它可以利用浏览器空闲的时间执行任务,但是他自设能触发频率不稳定,并且不是所有浏览器都支持他。
- react自己实现了任务调度库,叫做Scheduler,如果浏览器支持postMessage,那么他就会采用postMessage来进行调度,不支持再使用setTimoute,setTimeout的缺点是连续调用setTimeout(()=>,0),最后会发现他的触发频率变成了4ms一次。并且Scheduler还采用了小顶堆算法,实现了任务优先级的概念。
Reconciler协调层
- react15的版本中,协调器和渲染器交替执行,找到了差异就更新差异,这也是15无法中断的原因,因为会造成页面渲染不完全。
- react16中,则是Scheduler和Reconciler交替工作,Scheduler负责调度,Reconciler负责找出差异,打上标记。等所有差异找完之后,才会交给Renderer统一进行DOM更新。这也是为什么react16可以实现可中断的异步更新的原因。
Renderer渲染层
- 渲染层工作的时候,是同步的,也就是无法中断的。可中断的异步更新的概念是描述Scheduler和Reconciler,他们是在内存中完成的。而Renderer是无法被中断的。
- 既然无法被中段,那么就不会出现dom渲染不完全的情况,因为渲染器的工作是一气呵成的,从0到1。
Fiber数据结构
fiber本质就是一个js对象。
export type Fiber =


  /**-----------------实例相关---------------- */
  // 标记不同的组件类型 ,比如函数组件是0,类组件是1....
  tag: WorkTag,
  key: null | string,
  elementType: any,
  // div p span class A function A() .....
  type: any,
  //实例 实例对象,比如类组件的实例,原生元素就是dom, funciton没有实例 rootFiber的stateNode是FiberRoot
  stateNode: any,

  /**-------- fiber相关--------- */
  return: Fiber | null, //指向自己的父级fiber
  child: Fiber | null, //指向大儿子fiber
  sibling: Fiber | null, //指向兄弟节点fiber
  index: number,
  // fiber工作一般在workInprogress fiber,为了实现复用, alternate指向当前current Fiber得对应的fiber
  // 等到工作完毕,workInprogress fiber就变成current Fiber,以此循环
  alternate: Fiber | null,

  ref:
    | null
    | (((handle: mixed) => void) &  _stringRef: ?string, ... )
    | RefObject,

  /**----------- 状态数据相关-------------- */
  pendingProps: any, //  即将更新的Props
  memoizedProps: any, // 旧的props
  memoizedState: any, // 旧的state

  // Dependencies (contexts, events) for this fiber, if it has any
  dependencies: Dependencies | null,


  mode: TypeOfMode,  //当前组件及子组件处于何种渲染模式, createRoot/render

  /**-------- Effect副作用相关-------------- */
  updateQueue: mixed, //该Fiber对应的组件产生的状态会存放到这个队列,比如update对象
  flags: Flags,  // effectTag标记,用来记录当前fiber要执行得DOM操作
  subtreeFlags: Flags,
  deletions: Array<Fiber> | null,
  nextEffect: Fiber | null, // 单链表用来快速查找下一个sied effect
  firstEffect: Fiber | null,// 子树中第一个side effect
  lastEffect: Fiber | null, // 子树中最后一个last Effect
  lanes: Lanes, // 优先级
  childLanes: Lanes,
这里主要列了几种比较常用的,比如instance实例相关的属性,作为fiber相关的属性,状态数据相关得属性以及副作用相关的属性。
flags对应的标记是
export type Flags = number;

// Don't change these two values. They're used by React Dev Tools.
export const NoFlags = /*                      */ 0b00000000000000000000000000;
export const PerformedWork = /*                */ 0b00000000000000000000000001;

// You can change the rest (and add more).
export const Placement = /*                    */ 0b00000000000000000000000010;
export const Update = /*                       */ 0b00000000000000000000000100;
export const PlacementAndUpdate = /*           */ Placement | Update;
export const Deletion = /*                     */ 0b00000000000000000000001000;
export const ChildDeletion = /*                */ 0b00000000000000000000010000;
export const ContentReset = /*                 */ 0b00000000000000000000100000;
export const Callback = /*                     */ 0b00000000000000000001000000;
export const DidCapture = /*                   */ 0b00000000000000000010000000;
export const ForceClientRender = /*            */ 0b00000000000000000100000000;
export const Ref = /*                          */ 0b00000000000000001000000000;
export const Snapshot = /*                     */ 0b00000000000000010000000000;
export const Passive = /*                      */ 0b00000000000000100000000000;
export const Hydrating = /*                    */ 0b00000000000001000000000000;
export const HydratingAndUpdate = /*           */ Hydrating | Update;
export const Visibility = /*                   */ 0b00000000000010000000000000;
export const StoreConsistency = /*             */ 0b00000000000100000000000000;
双缓存技术介绍
- 在react中,DOM得更新采用了双缓存技术,双缓存技术致力于更快速得DOM更新。
- 举个例子,canvas绘制动画的时候,绘制每一帧动画之前就需要清除上一帧得动画,如果当前帧动画计算较长,就会导致出现替换白屏出现。为了解决这个问题,可以现在内存中构建当前帧动画,绘制完毕后直接替换上一帧,这样就不会出现白屏问题,这种在内存中构建并直接替换的技术叫做双缓存。
- React使用双缓存技术完成Fiber树的构建和替换,实现DOM的快速更新。
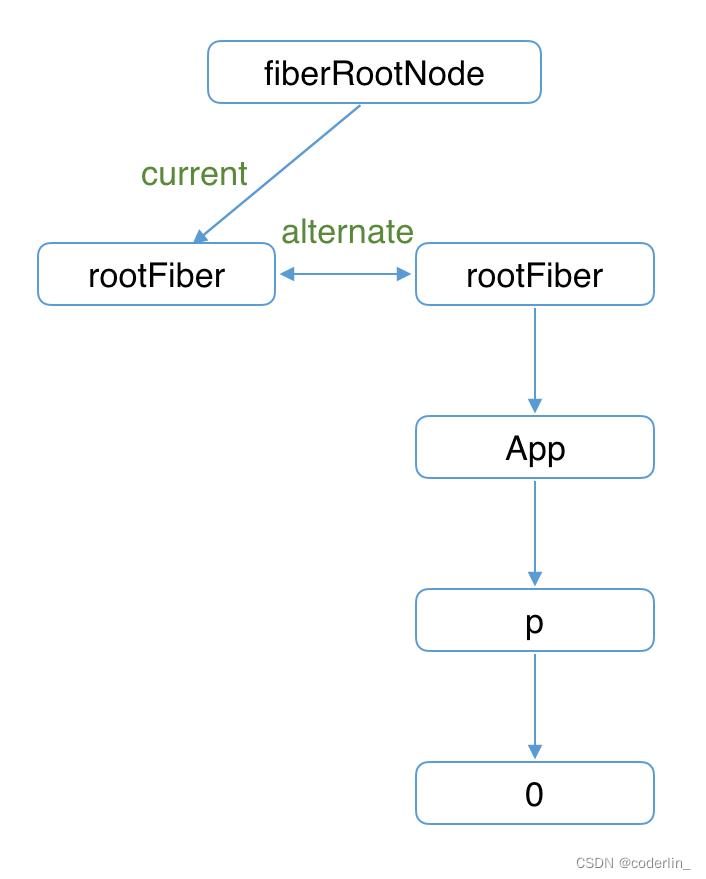
- 在react中最多同时存在两颗fiber树,当前屏幕显示的是current Fiber,发生更新的时候,react在内存中构建workInporgress fiber。并且在两颗中之间对应的fiber节点有一个alternate指针,通过这个指针,workInporgress的构建就可以最大化的复用current fiber。进而更快速的构建玩workInporgress fiber。
第一个mount的时候,会先创建FiberRottNode,他的current指针指向rootFiber,然后拷贝一份rootFiber,他就是workInprogress fiber的rootFiber了,然后将alternate指针指向这个复制的节点。通过这个复制的节点继续创建fiber。如

然后将右边构建完毕的workInprogress fiber树更新为current fiber。

update的时候,

workInporgress fiber可以通过alternate属性并且通过diff决定要不要进行复用。
最终构建完新的workInporegss fiber 树,然后再替换成current Fiber树。

区分FiberRoot和rootFiber
- FIberRoot表示Fiber数据结构对象,是Fiber数据结构的最外层对象
- rootFiber表示组件挂载点对应的fiber对象,比如React应用中默认组件挂载点就是id为root的div
- FiberRoot.current => rootFiber
- rootFiber.stateNode = FiberRoot
- 在react应用中,FiberRoot只有一个,而rootFiber可以有多个。因为render方法可以调用多次。
- fiberRoot会记录应用的更新信息,比如Reconciler完成工作之后,会将工作结果存储在FiberRoot中。
render方法
/**
 *
 * @param * element ReactElement, createElement的返回值
 * @param * container  容器
 * @param * callback  渲染后执行的回调函数
 * @returns
 */
export function render(
  element: React$Element<any>,
  container: Container,
  callback: ?Function,
)
  if (__DEV__)
    console.error(
      'ReactDOM.render is no longer supported in React 18. Use createRoot ' +
        'instead. Until you switch to the new API, your app will behave as ' +
        "if it's running React 17. Learn " +
        'more: https://reactjs.org/link/switch-to-createroot',
    );


  //判断是否是合法的容器
  if (!isValidContainerLegacy(container))
    throw new Error('Target container is not a DOM element.');


  // 初始化FiberRoot和rootFiber
  return legacyRenderSubtreeIntoContainer(
    null,
    element,
    container,
    false,
    callback,
  );
render方法主要接受三个参数
- element : ReactElement, createElement的返回值
- container 容器
- callback 渲染后执行的回调函数
然后判断是否是合法的container,最后调用legacyRenderSubtreeIntoContainer,他会创建FiberRoot和rootFiber并且开启调度。
react18之后使用render会报错。
以上是关于react源码学习的主要内容,如果未能解决你的问题,请参考以下文章