在SpringBoot中集成单元测试
Posted DreamMakers
tags:
篇首语:本文由小常识网(cha138.com)小编为大家整理,主要介绍了在SpringBoot中集成单元测试相关的知识,希望对你有一定的参考价值。
在SpringBoot中集成单元测试
在Springboot中集成单元测试入门很简单,这里做个简单的记录,后续会针对不同的单元测试场景不断进行完善和记录,希望给需要的人一点帮助。
引入相应的依赖
在SprintBoot中引入单元测试依赖包很简单,一般在创建SpringBoot项目的时候就会自行引入单元测试的依赖包。
<dependency>
	<groupId>org.springframework.boot</groupId>
	<artifactId>spring-boot-starter-test</artifactId>
	<scope>test</scope>
</dependency>
该依赖在引入时如果带上了exclusions的说明,需要根据情况自行删除。
入门示例
我们创建一个入门的Springboot项目(啥业务逻辑都没有!),我们以Service层为例,创建一个Service的服务TestService,然后定义两个业务方法,具体如下:
package com.majing.learning.springboot.junit.service;

import org.springframework.stereotype.Service;

@Service
public class TestService

    public void method1()
        System.out.println("TestService -> method1");


    public void method2()
        System.out.println("TestService -> method2");
接下来看怎么对上面的TestService进行测试。
如果你用的是IDEA,那么创建单元测试很方便,如下图所示:

这样在src/test/java下就会生成一个单元测试类,相应的目录结构和src/main/java中的包名相同。

相应的测试类TestServiceTest的实现如下。
package com.majing.learning.springboot.junit.service;

import org.junit.AfterClass;
import org.junit.BeforeClass;
import org.junit.jupiter.api.*;
import org.junit.runner.RunWith;
import org.springframework.beans.factory.annotation.Autowired;
import org.springframework.boot.test.context.SpringBootTest;
import org.springframework.test.context.junit4.SpringRunner;

@RunWith(SpringRunner.class)
@SpringBootTest
class TestServiceTest

    @Autowired
    private TestService testService;

    @BeforeAll
    public static void beforeAll()
        System.out.println("TestServiceTest -> @BeforeAll");


    @AfterAll
    public static void afterAll()
        System.out.println("TestServiceTest -> @AfterAll");


    @AfterEach
    void tearDown()
        System.out.println("TestServiceTest -> @AfterEach");


    @BeforeEach
    void setUp()
        System.out.println("TestServiceTest -> @BeforeEach");


    @Test
    void method1()
        testService.method1();


    @Test
    void method2()
        testService.method2();
运行结果如下:
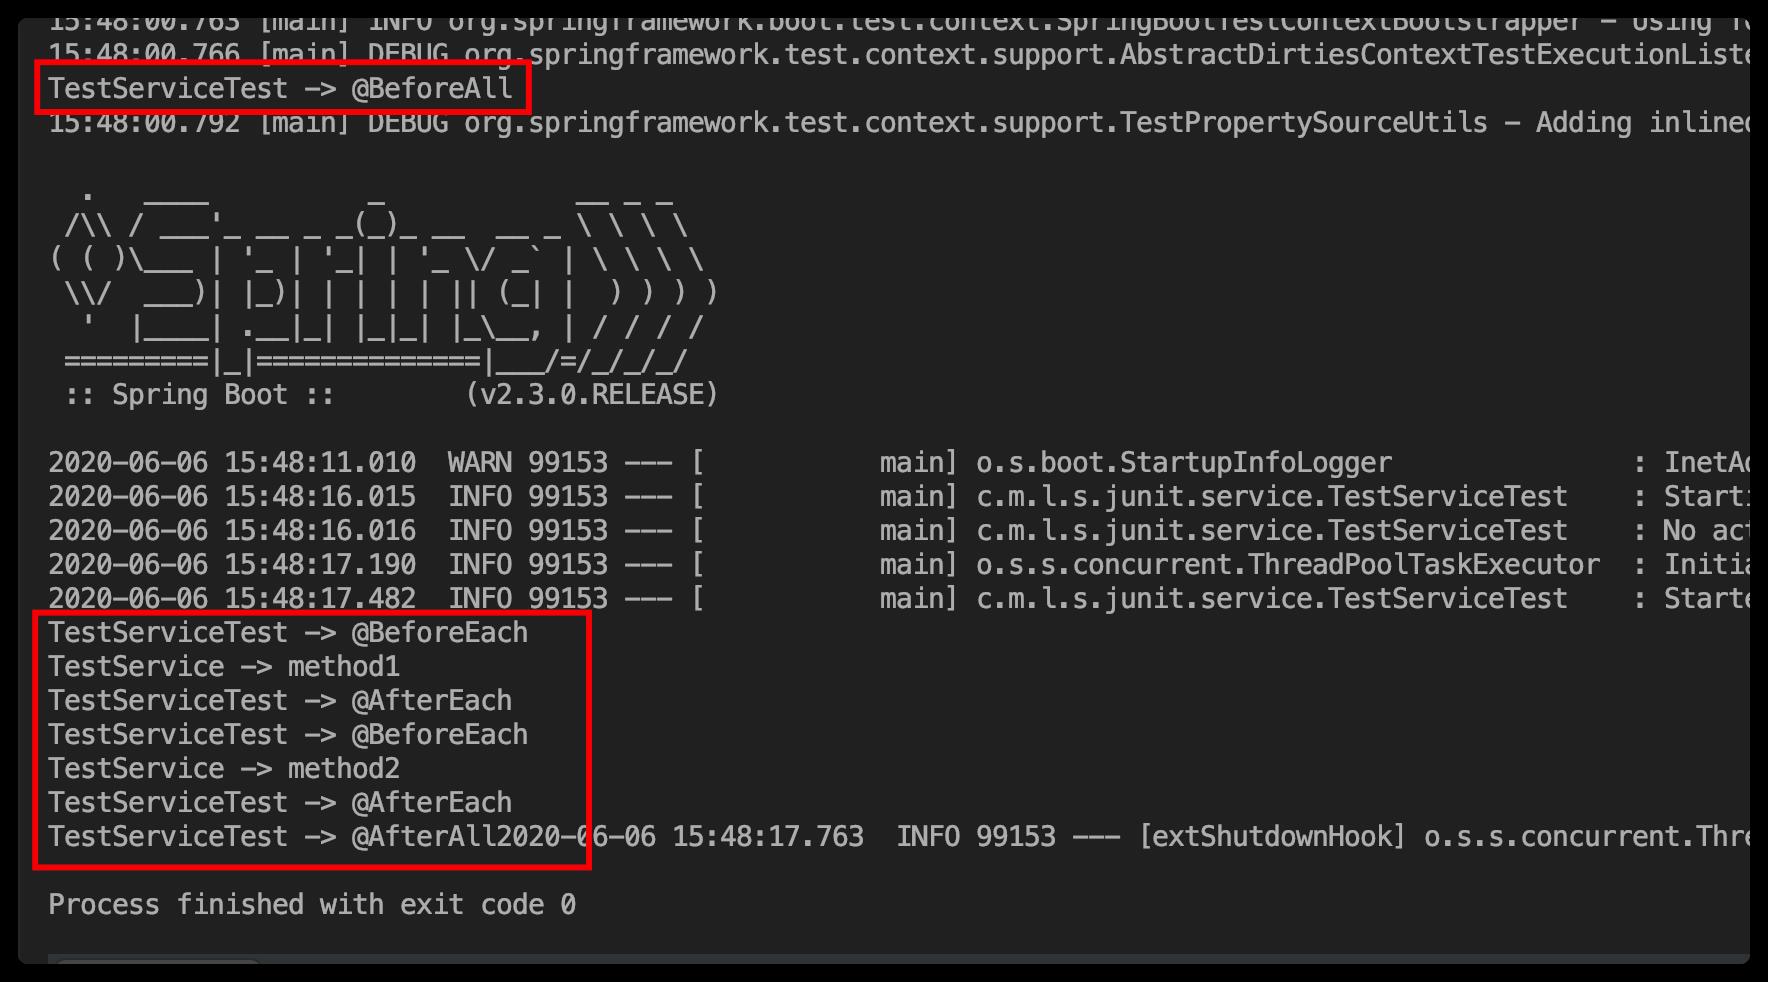
在上面的测试用例中,用了几个注解,@BeforeAll,@AfterAll,@BeforeEach,@AfterEach,@Test。
需要说明的是,最开始我用@Before,@After,@BeforeClass,@AfterClass,想实现在这个测试类的所有测试方法前/后执行,但是发现都没有实现。后来发现要实现这样的功能,需要使用@BeforeAll,@AfterAll这两个注解。如上图结果所示,@BeforeAll,@AfterAll,这两个注解只被执行了一次,符合期望。
单元测试事务回滚
在业务代码中,难免会操作数据库。为了不影响数据库的数据,需要在单元测试完成之后,将数据库操作进行回滚。
这在springboot中也是很容易解决的事情,只需要将单元测试类继承AbstractTransactionalJUnit4SpringContextTests即可。
首先看下没有继承时的效果,我们先定义一个简单的数据库操作类,数据库只有一个简单的方法add,该方法用于向数据库表city中插入一条数据。这里只是简单的演示。
首先在springboot中添加mysql配置项
#mysql配置
spring.datasource.url=jdbc:mysql://127.0.0.1:3306/test
spring.datasource.username=root
spring.datasource.password=root
spring.datasource.driver-class-name=com.mysql.cj.jdbc.Driver
spring.datasource.max-idle=10
spring.datasource.max-wait=10000
spring.datasource.min-idle=5
spring.datasource.initial-size=5
然后编写dao层的逻辑,简单的执行一条插入命令:
package com.majing.learning.springboot.junit.dao;

import org.springframework.beans.factory.annotation.Autowired;
import org.springframework.jdbc.core.JdbcTemplate;
import org.springframework.stereotype.Repository;

@Repository
public class CityDao

    @Autowired
    private JdbcTemplate jdbcTemplate;

    public void add()
        jdbcTemplate.execute("insert into `city`(`name`,`state`,`country`) values('test','test','test')");
然后针对这个CityDao进行单元测试。
package com.majing.learning.springboot.junit.dao;

import org.junit.jupiter.api.AfterEach;
import org.junit.jupiter.api.BeforeEach;
import org.junit.jupiter.api.Test;
import org.junit.runner.RunWith;
import org.springframework.beans.factory.annotation.Autowired;
import org.springframework.boot.test.context.SpringBootTest;
import org.springframework.test.context.junit4.SpringRunner;

@RunWith(SpringRunner.class)
@SpringBootTest
class CityDaoTest

    @Autowired
    private CityDao cityDao;

    @BeforeEach
    void setUp()


    @AfterEach
    void tearDown()


    @Test
    void add()
        cityDao.add();
执行这个单元测试类前后,数据表的数据分别如下:
执行前:

执行后:
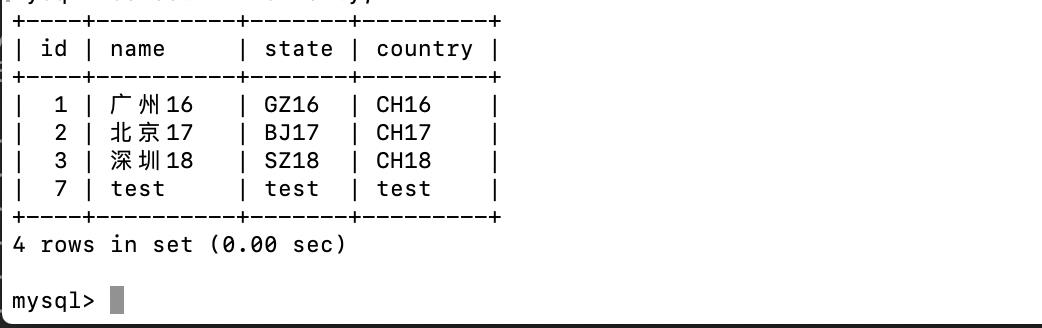
可见单元测试执行后对原数据库表状态产生了影响。
接下来,我们把这个单元测试类继承AbstractTransactionalJUnit4SpringContextTests。
package com.majing.learning.springboot.junit.dao;

import org.junit.jupiter.api.AfterEach;
import org.junit.jupiter.api.BeforeEach;
import org.junit.jupiter.api.Test;
import org.junit.runner.RunWith;
import org.springframework.beans.factory.annotation.Autowired;
import org.springframework.boot.test.context.SpringBootTest;
import org.springframework.test.context.junit4.AbstractTransactionalJUnit4SpringContextTests;
import org.springframework.test.context.junit4.SpringRunner;

@RunWith(SpringRunner.class)
@SpringBootTest
class CityDaoTest extends AbstractTransactionalJUnit4SpringContextTests

    @Autowired
    private CityDao cityDao;

    @BeforeEach
    void setUp()


    @AfterEach
    void tearDown()


    @Test
    void add()
        cityDao.add();
删除之前插入的脏数据,然后重新执行该单元测试,我们可以发现没有插入脏数据了。说明起到了事务的效果。
未完待续
上面只是一个简单说明,后面会整理针对不同业务场景下该如何进行单元测试,会不断的补充和完善这篇文章,有兴趣的可以添加关注,谢谢。
待续。。。
以上是关于在SpringBoot中集成单元测试的主要内容,如果未能解决你的问题,请参考以下文章