微信支付的大致流程
Posted SmallCuteMonkey80%
tags:
篇首语:本文由小常识网(cha138.com)小编为大家整理,主要介绍了微信支付的大致流程相关的知识,希望对你有一定的参考价值。
文章目录
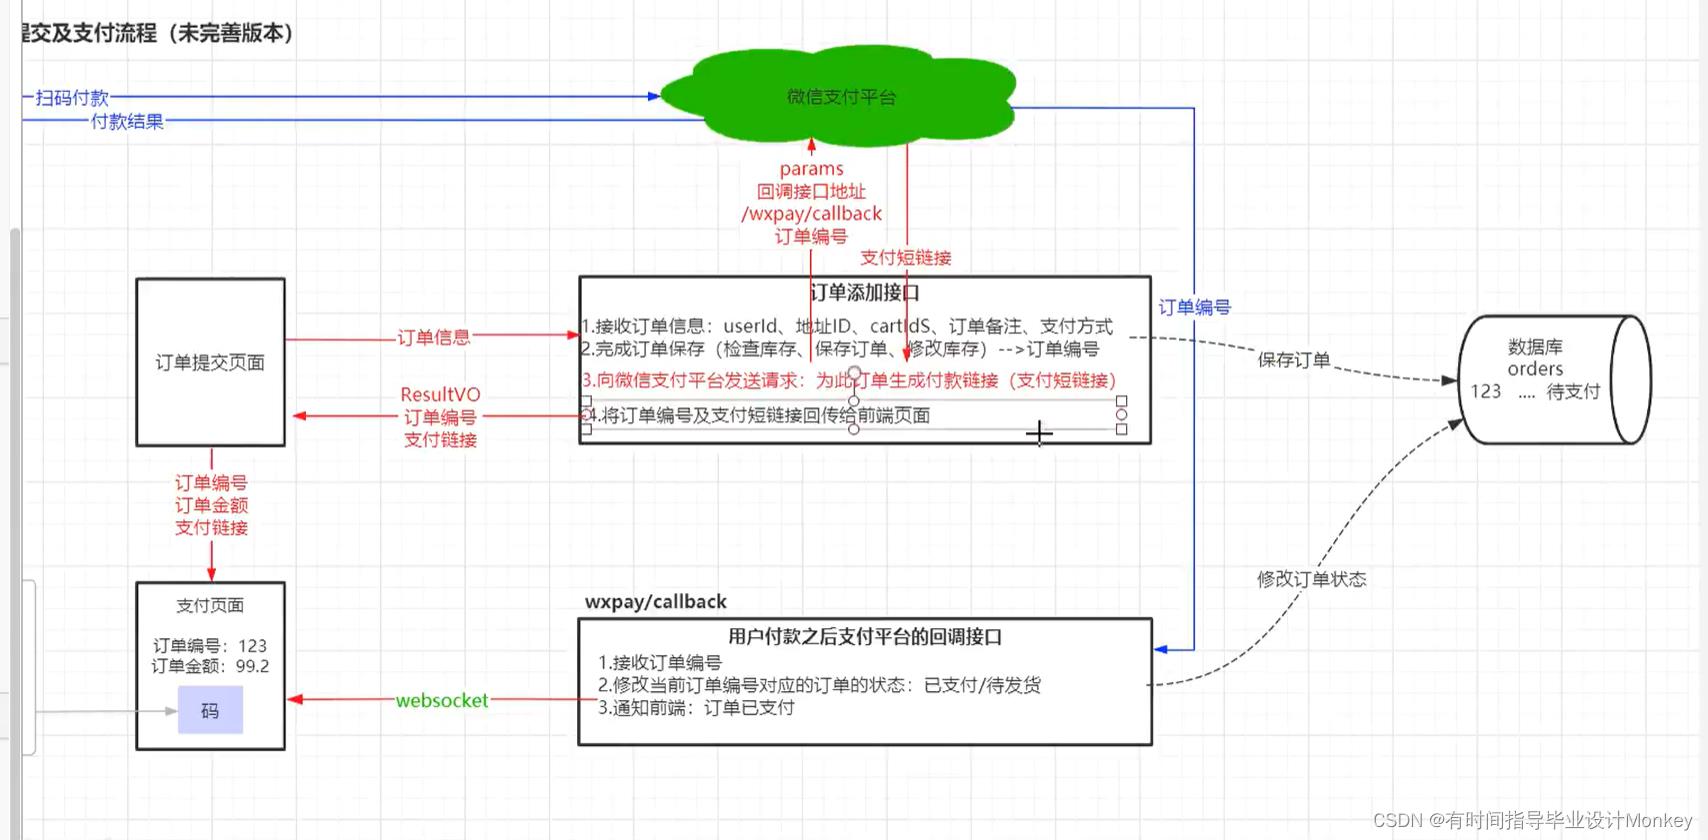
流程图:

微信支付
为商家提供代理收款服务
1.微信支付业务-商户需要注册微信支付业务
- 商户编号:3454563
- 商户账号:23435
- 商户编号appID: werselfjldsjhtoieiurt0
- 商户密钥:sdfsdlkfjdslkjfFGFGDSRTG89
2. 微信支付业务-商户注册微信支付业务
支付订单,并不是用户提交的商品订单,而是商户向微信支付平台申请的支付链接
2.1导入微信支付Maven依赖
-
wxpay的maven依赖生成
<!-- https://mvnrepository.com/artifact/com.github.wxpay/wxpay-sdk -->
<dependency>
    <groupId>com.github.wxpay</groupId>
    <artifactId>wxpay-sdk</artifactId>
    <version>0.0.3</version>
</dependency>
2.2 创建微信支付配置类:
-
创建一类,实现WxPayConfig接口
-
重写三分方法,分别设置AppID\\商户ID\\商户密钥
package com.qfedu.fmmall.config;

import com.github.wxpay.sdk.WXPayConfig;

import java.io.InputStream;

public class MyPayConfig implements WXPayConfig

    //商户账号
    @Override
    public String getAppID()
        return "wx632c8f211f8122c6";

    //商户appID
    @Override
    public String getMchID()
        return "1497984412";


    @Override
    public String getKey()
        return "sbNCm1JnevqI36LrEaxFwcaT0hkGxFnC";

	//商户的密钥
    @Override
    public InputStream getCertStream()
        return null;


    @Override
    public int getHttpConnectTimeoutMs()
        return 0;


    @Override
    public int getHttpReadTimeoutMs()
        return 0;
2.2和微信的接口进行相关的参数设置和获取微信支付链接
2.21 支付回调接口,支付成功前端面试进行提示,支付成功
创建自己的url,PayController类:
package com.qfedu.fmmall.controller;

import org.springframework.web.bind.annotation.PostMapping;
import org.springframework.web.bind.annotation.RequestMapping;
import org.springframework.web.bind.annotation.RestController;

@RestController
@RequestMapping("/pay")
public class PayController
    @PostMapping("/success")
    public void success()
2.22添加订单快照成功生成支付链接
必须设置的配置参数:
//            必填选项   用于设置支付完成时的回调方法接口
            data.put("notify_url","/pay/success");
package com.qfedu.fmmall.controller;

import com.github.wxpay.sdk.WXPay;
import com.qfedu.fmmall.config.MyPayConfig;
import com.qfedu.fmmall.entity.Orders;
import com.qfedu.fmmall.service.OrderService;
import com.qfedu.fmmall.vo.ResultStatus;
import com.qfedu.fmmall.vo.ResultVO;
import io.swagger.annotations.Api;
import org.springframework.beans.factory.annotation.Autowired;
import org.springframework.web.bind.annotation.*;

import java.sql.SQLException;
import java.util.HashMap;
import java.util.List;
import java.util.Map;

@RestController
@CrossOrigin
@RequestMapping("/order")
@Api(value = "提供订单相关的接口",tags = "订单管理")
public class OrderController
    @Autowired
    private OrderService orderService;

    @PostMapping("/add/cids")
    public ResultVO add(@PathVariable("cids") List<Integer> cids,
                        @RequestBody Orders orders)

        ResultVO resultVO=null;

//        测试用的OrderId
        try
            Map<String, String> orderInfo = orderService.addOrder(cids, orders);
            String orderId=orderInfo.get("orderId");


//           订单快照创建成功,申请支付链接

            HashMap<String,String> data=new HashMap<>();
//            设置当前订单信息
            data.put("body",orderInfo.get("productNames")); //商品描述
            data.put("out_trade_no",orderId);//使用当前用户订单编号作为当前支付交易的交易编号
            data.put("fee_type","CNY"); //支付币种
            data.put("total_fee", orders.getActualAmount()+""); //支付金额
            data.put("trade_type","NATIVE");//交易类型

//            必填选项   用于设置支付完成时的回调方法接口
            data.put("notify_url","/pay/success");
            WXPay wxPay=new WXPay(new MyPayConfig());
            Map<String, String> resp = wxPay.unifiedOrder(data);

//            把微信支付平台生成的链接获取到
            orderInfo.put("payUrl",resp.get("code_url"));
            resultVO=new ResultVO(ResultStatus.OK,"提交订单成功!",orderInfo);
            System.out.println(resp);

//            code_url -> weixin://wxpay/bizpayurl?pr=Iv5Fsq6zz
         catch (SQLException e)

            resultVO= new ResultVO(ResultStatus.NO,"下单失败",null);

         catch (Exception e)
            e.printStackTrace();


        return resultVO;
前端获取到生成的payUrl,根据payUrl生成相关的支付二维码
// 提交订单
			    		 doSubmit:function()
						//1.准备订单数据
						var cids=this.cartIds;
						var orders=
						"actualAmount":this.totalPrice,

						"orderId": "",
						// 通过双向绑定可以获取订单备注
						"orderRemark": this.orderRemark,
						"payTime": "",
						"payType": "1",
						"receiverAddress": this.addrs[0].province+""+this.addrs[0].city+""+
						this.addrs[0].area+""+this.addrs[0].addr,
						"receiverMobile": this.addrs[0].receiverMobile,
						"receiverName":  this.addrs[0].receiverName,

						"totalAmount": this.totalPrice,

						"updateTime": "",
						"userId": getCookieValue("userId")
						;

						console.log(this.cartIds);
						var url3=baseUrl+"order/add/"+this.cartIds;
						axios(
							url:url3,
							method:"post",
							headers:
								token:getCookieValue("token"),
							,
							data:orders
						).then((res)=>
							var orderinfo=res.data.data;
							console.log("orderinfo------------------------")
							console.log(res.data.data,"data---------");

							console.log(orderinfo,"orderinfo------------");

							orderinfo.totalPrice = this.totalPrice;

							localStorage.setItem("orderinfo",JSON.stringify(orderinfo));
							window.location.href="order-pay.html";


							console.log(res.data.data);
						);
// vue的生命周期 创建对象---》beforeCreate--->created---->加载模板
			created()
				this.username=getCookieValue("username");
				var jsonstr=localStorage.getItem("orderinfo");
				console.log(jsonstr);
				// if(jsonstr!=null)
				// 	localStorage.removeItem("orderinfo");
				//

			   this.orderInfo=eval("("+jsonstr+")");
				console.log(this.orderInfo);
			,

			// 渲染二维码放在mounted中,不可以放在created中
			mounted()
				var url=this.orderInfo.payUrl;
			          console.log("url="+url);
					  new QRCode(document.getElementById("qrcode"), url);
			,
以上是关于微信支付的大致流程的主要内容,如果未能解决你的问题,请参考以下文章