12 rtsp视频服务 转换为 rtmp服务 转换为前端可用的服务
Posted 蓝风9
tags:
篇首语:本文由小常识网(cha138.com)小编为大家整理,主要介绍了12 rtsp视频服务 转换为 rtmp服务 转换为前端可用的服务相关的知识,希望对你有一定的参考价值。
准备工作
需要安装如下软件
- docker, 用于支持 docker 容器服务, 方便快速构建 nginx-flv 的服务, 可以在 Home - Docker 下载
- docker-compose, 更好的维护 docker 服务,可以在 Release v2.10.2 · docker/compose · GitHub 下载
- ffmpeg, 用于支持 rtsp/mp4视频 传输到 rtmp 服务, 可以在 FFmpeg 下载
- vlc, 用于测试 rtmp 服务是否正常, Download VLC Media Player – VLC
请先确保 以上软件正常安装, 当然 vlc 不是必要软件
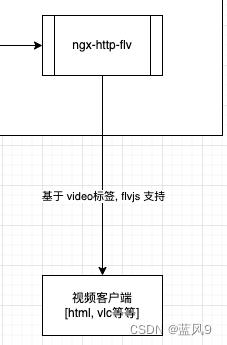
整个流程大致如下, 因为我们这里 没有可用的 rtsp 服务, 这里 使用一个 mp4 视频来测试
注意这张图哦, 要随时回顾这张图
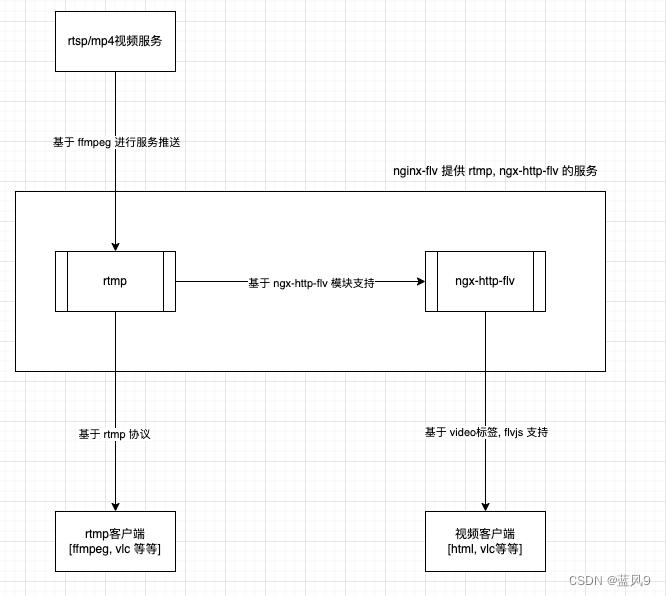
1. 基于 nginx-flv 构建 rtmp, nginx-http-flv 的服务
原生的 nginx 是不支持 rtmp, nginx-http-flv 的服务, 因此 需要额外使用 nginx-http-flv-module 添加到 nginx 中, nginx-http-flv-module 中又包含了 nginx-rtmp-module 的所有功能
因此 原生nginx + nginx-http-flv-module 一起编译, 即可以包含 nginx, rtmp, nginx-http-flv 我们这里所需要的几种服务
不过好在 有 docker, 可以让我们的上面编译的这一个环节省掉, 让我们可以忽略掉不必要关注的很多 编译环境的细节
我们这里直接基于 darkfriday/nginx-flv 的 docker 镜像
假设我们的 docker 的工作空间为 /Users/jerry/Documents/HelloDocker/workspace/
新建 nginx-flv 的目录作为我们的 nginx-flv 的管理目录, 并进入 nginx-flv 目录, 然后 新建 docker-compose.yml 文件, 文件内容录入如下
version: "2"

services:
  nginx-flv:
    image: darkfriday/nginx-flv
    container_name: nginx-flv
    restart: always
    ports:
        - "80:80"
        - "1935:1935"
    volumes:
        - ./conf/rtmp/:/etc/nginx/conf.d/rtmp/
        - ./conf/http/:/etc/nginx/conf.d/http/
    logging:
          driver: "json-file"
          options:
              max-size: "1m"
              max-file: "3"
注意上面在宿主机挂载[volumes 关键字下面两行]了两个配置文件, 这两个配置文件是配置 rtmp 服务 和 nginx-http-flv 的服务
在当前目录下面 conf, conf/rtmp, conf/http 文件夹
新建 conf/http/http-flv.conf, 文件内容录入如下
server
    listen                          80;
    root                            /var/www;
    charset                         utf-8;
    access_log                      off;
    error_log                       off;

    location /
        index                       index.html;


    location /live
        flv_live                    on;
        chunked_transfer_encoding   on;
        add_header                  'Access-Control-Allow-Origin' '*';
        add_header                  'Access-Control-Allow-Credentials' 'true';


    location /hls
        types
            application/vnd.apple.mpegurl m3u8;
            video/mp2t              ts;


        root                        /tmp/hls;
        add_header                  'Cache-Control' 'no-cache';


    location /dash
        root                        /tmp/dash;
        add_header                  'Cache-Control' 'no-cache';


    location /status
        vhost_traffic_status_display;
        vhost_traffic_status_display_format html;


    location /stat
        rtmp_stat                   all;
        rtmp_stat_stylesheet        stat.xsl;


    location /stat.xsl
        root                        /var/www;


    location = /favicon.ico
        access_log                  off;
        log_not_found               off;
        expires                     30d;


    location = /robots.txt
        access_log                  off;
        log_not_found               off;
        expires                     30d;


    location ~* \\.(css|js)(\\?.*)?$
        access_log                  off;
        expires                     24h;


    location ~* \\.(ico|gif|jpg|jpeg|png)(\\?.*)?$
        access_log                  off;
        expires                     30d;


    location ~* \\.(eot|ttf|otf|woff|woff2|svg)$
        access_log                  off;
        expires                     max;
新建 conf/rtmp/rtmp.conf, 文件内容录入如下
server
    listen              1935;

    application live
        live            on;
        gop_cache       on;


    application hls
        live            on;
        hls             on;
        hls_path        /tmp/hls;


    application dash
        live            on;
        dash            on;
        dash_path       /tmp/dash;
最终配置完成之后 目录结构如下
master:nginx-flv jerry$ pwd
/Users/jerry/Documents/HelloDocker/workspace/nginx-flv
master:nginx-flv jerry$ tree
.
├── conf
│   ├── http
│   │   └── http-flv.conf
│   └── rtmp
│       └── rtmp.conf
└── docker-compose.yml

3 directories, 3 files
然后 进入到 /Users/jerry/Documents/HelloDocker/workspace/nginx-flv
然后执行 docker-compose up -d 启动 nginx-flv 的服务, 这里如果你第一次启动, docker 会自动拉取 darkfriday/nginx-flv 的镜像
master:nginx-flv jerry$ docker-compose up -d
Creating network "nginx-flv_default" with the default driver
Creating nginx-flv ... done
这一部分支持的是上面流程图中, nginx-flv 提供的服务, 还未产生数据交互
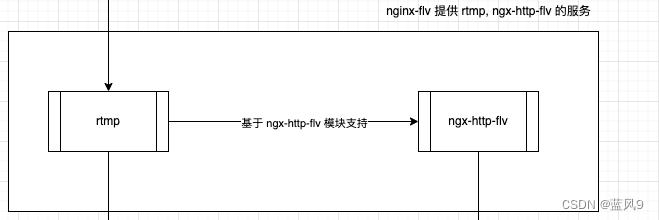
2. 测试 nginx, nginx-http-flv 的服务
测试 nginx 的 http 服务, 访问 http://localhost/ 看到经典的 index.html 说明服务正常

测试 nginx-http-flv 的服务, 访问 http://localhost/stat 看到如下页面说明正常

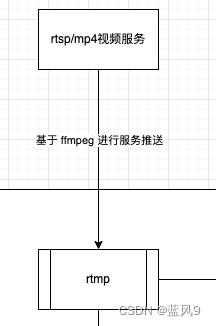
3. 基于 ffmpeg 推送 rtsp/mp4 视频服务到 rmtp 服务
ffmpeg 推送命令如下
其中 /Users/jerry/Jobs/10_rtsp/test_rtps.mp4 是测试的 mp4 视频文件
其中 rtmp://localhost:1935 是我们上面 nginx-flv 开放的 rtmp 服务, hls 指代的是上面的 "application hls", test_rtps 是自定义的服务路由路径
ffmpeg -re -stream_loop -1 -i /Users/jerry/Jobs/10_rtsp/test_rtps.mp4 -c copy -f flv rtmp://localhost:1935/hls/test_rtpsffmpeg 推送正常的情况下 日志如下
master:~ jerry$ ffmpeg -re -stream_loop -1 -i /Users/jerry/Jobs/10_rtsp/test_rtps.mp4 -c copy -f flv rtmp://localhost:1935/hls/test_rtps
ffmpeg version 5.1.1-tessus Copyright (c) 2000-2022 the FFmpeg developers
  built with Apple clang version 11.0.0 (clang-1100.0.33.17)
  configuration: --cc=/usr/bin/clang --prefix=/opt/ffmpeg --extra-version=tessus --enable-avisynth --enable-fontconfig --enable-gpl --enable-libaom --enable-libass --enable-libbluray --enable-libdav1d --enable-libfreetype --enable-libgsm --enable-libmodplug --enable-libmp3lame --enable-libmysofa --enable-libopencore-amrnb --enable-libopencore-amrwb --enable-libopenh264 --enable-libopenjpeg --enable-libopus --enable-librubberband --enable-libshine --enable-libsnappy --enable-libsoxr --enable-libspeex --enable-libtheora --enable-libtwolame --enable-libvidstab --enable-libvmaf --enable-libvo-amrwbenc --enable-libvorbis --enable-libvpx --enable-libwebp --enable-libx264 --enable-libx265 --enable-libxavs --enable-libxvid --enable-libzimg --enable-libzmq --enable-libzvbi --enable-version3 --pkg-config-flags=--static --disable-ffplay
  libavutil      57. 28.100 / 57. 28.100
  libavcodec     59. 37.100 / 59. 37.100
  libavformat    59. 27.100 / 59. 27.100
  libavdevice    59.  7.100 / 59.  7.100
  libavfilter     8. 44.100 /  8. 44.100
  libswscale      6.  7.100 /  6.  7.100
  libswresample   4.  7.100 /  4.  7.100
  libpostproc    56.  6.100 / 56.  6.100
[mov,mp4,m4a,3gp,3g2,mj2 @ 0x7fa0c340fb00] overread end of atom 'colr' by 1 bytes
Input #0, mov,mp4,m4a,3gp,3g2,mj2, from '/Users/jerry/Jobs/10_rtsp/test_rtps.mp4':
  Metadata:
    major_brand     : isom
    minor_version   : 512
    compatible_brands: isomiso2avc1mp41
    encoder         : Lavf58.20.100
    copyright       :
    copyright-eng   :
  Duration: 00:00:16.70, start: 0.000000, bitrate: 2447 kb/s
  Stream #0:0[0x1](und): Video: h264 (High) (avc1 / 0x31637661), yuv420p(tv, unknown/bt470bg/unknown, progressive), 720x1280, 2391 kb/s, 30 fps, 30 tbr, 90k tbn (default)
    Metadata:
      handler_name    : VideoHandler
      vendor_id       : [0][0][0][0]
  Stream #0:1[0x2](und): Audio: aac (LC) (mp4a / 0x6134706D), 48000 Hz, mono, fltp, 48 kb/s (default)
    Metadata:
      handler_name    : SoundHandler
      vendor_id       : [0][0][0][0]
Output #0, flv, to 'rtmp://localhost:1935/hls/test_rtps':
  Metadata:
    major_brand     : isom
    minor_version   : 512
    compatible_brands: isomiso2avc1mp41
    copyright-eng   :
    copyright       :
    encoder         : Lavf59.27.100
  Stream #0:0(und): Video: h264 (High) ([7][0][0][0] / 0x0007), yuv420p(tv, unknown/bt470bg/unknown, progressive), 720x1280, q=2-31, 2391 kb/s, 30 fps, 30 tbr, 1k tbn (default)
    Metadata:
      handler_name    : VideoHandler
      vendor_id       : [0][0][0][0]
  Stream #0:1(und): Audio: aac (LC) ([10][0][0][0] / 0x000A), 48000 Hz, mono, fltp, 48 kb/s (default)
    Metadata:
      handler_name    : SoundHandler
      vendor_id       : [0][0][0][0]
Stream mapping:
  Stream #0:0 -> #0:0 (copy)
  Stream #0:1 -> #0:1 (copy)
Press [q] to stop, [?] for help
frame=    1 fps=0.0 q=-1.0 size=       0kB time=00:00:00.00 bitrate=N/A speed=N/
frame=   16 fps=0.0 q=-1.0 size=     151kB time=00:00:00.53 bitrate=2318.9kbits/
frame=   31 fps= 31 q=-1.0 size=     316kB time=00:00:01.04 bitrate=2475.4kbits/
frame=   47 fps= 31 q=-1.0 size=     449kB time=00:00:01.53 bitrate=2396.4kbits/
这一部分对应于流程图中, ffmpeg 推送视频流数据到 rtmp 服务
4. 测试 rtmp 服务
可以通过 ffmpeg 测试, 或者 vlc 进行测试
基于 ffmpeg 获取 rtmp 服务的数据, dump 成为一个视频文件, 需要按 ctrl + c, 结束 消费 rtmp 服务
master:~ jerry$ ffmpeg -i  rtmp://localhost:1935/hls/test_rtps -c copy dump.flv
ffmpeg version 5.1.1-tessus Copyright (c) 2000-2022 the FFmpeg developers
  built with Apple clang version 11.0.0 (clang-1100.0.33.17)
  configuration: --cc=/usr/bin/clang --prefix=/opt/ffmpeg --extra-version=tessus --enable-avisynth --enable-fontconfig --enable-gpl --enable-libaom --enable-libass --enable-libbluray --enable-libdav1d --enable-libfreetype --enable-libgsm --enable-libmodplug --enable-libmp3lame --enable-libmysofa --enable-libopencore-amrnb --enable-libopencore-amrwb --enable-libopenh264 --enable-libopenjpeg --enable-libopus --enable-librubberband --enable-libshine --enable-libsnappy --enable-libsoxr --enable-libspeex --enable-libtheora --enable-libtwolame --enable-libvidstab --enable-libvmaf --enable-libvo-amrwbenc --enable-libvorbis --enable-libvpx --enable-libwebp --enable-libx264 --enable-libx265 --enable-libxavs --enable-libxvid --enable-libzimg --enable-libzmq --enable-libzvbi --enable-version3 --pkg-config-flags=--static --disable-ffplay
  libavutil      57. 28.100 / 57. 28.100
  libavcodec     59. 37.100 / 59. 37.100
  libavformat    59. 27.100 / 59. 27.100
  libavdevice    59.  7.100 / 59.  7.100
  libavfilter     8. 44.100 /  8. 44.100
  libswscale      6.  7.100 /  6.  7.100
  libswresample   4.  7.100 /  4.  7.100
  libpostproc    56.  6.100 / 56.  6.100
Input #0, flv, from 'rtmp://localhost:1935/hls/test_rtps':
  Metadata:
    |RtmpSampleAccess: true
    Server          : NGINX HTTP-FLV (https://github.com/winshining/nginx-http-flv-module)
    displayWidth    : 720
    displayHeight   : 1280
    fps             : 30
    profile         :
    level           :
  Duration: 00:00:00.00, start: 0.021000, bitrate: N/A
  Stream #0:0: Audio: aac (LC), 48000 Hz, mono, fltp, 48 kb/s
  Stream #0:1: Video: h264 (High), yuv420p(tv, unknown/bt470bg/unknown, progressive), 720x1280, 2391 kb/s, 30 fps, 30 tbr, 1k tbn
Output #0, flv, to 'dump.flv':
  Metadata:
    |RtmpSampleAccess: true
    Server          : NGINX HTTP-FLV (https://github.com/winshining/nginx-http-flv-module)
    displayWidth    : 720
    displayHeight   : 1280
    fps             : 30
    profile         :
    level           :
    encoder         : Lavf59.27.100
  Stream #0:0: Video: h264 (High) ([7][0][0][0] / 0x0007), yuv420p(tv, unknown/bt470bg/unknown, progressive), 720x1280, q=2-31, 2391 kb/s, 30 fps, 30 tbr, 1k tbn
  Stream #0:1: Audio: aac (LC) ([10][0][0][0] / 0x000A), 48000 Hz, mono, fltp, 48 kb/s
Stream mapping:
  Stream #0:1 -> #0:0 (copy)
  Stream #0:0 -> #0:1 (copy)
Press [q] to stop, [?] for help

frame=    0 fps=0.0 q=-1.0 size=       1kB time=00:00:00.02 bitrate= 218.3kbits/
frame=   56 fps=0.0 q=-1.0 size=     512kB time=00:00:01.92 bitrate=2184.5kbits/
frame=   72 fps= 71 q=-1.0 size=     512kB time=00:00:02.43 bitrate=1724.6kbits/
frame=   88 fps= 56 q=-1.0 size=     768kB time=00:00:02.96 bitrate=2121.2kbits/
frame=  104 fps= 50 q=-1.0 size=    1024kB time=00:00:03.49 bitrate=2397.4kbits/
frame=  119 fps= 46 q=-1.0 size=    1024kB time=00:00:04.03 bitrate=2080.5kbits/
frame=  134 fps= 43 q=-1.0 size=    1280kB time=00:00:04.52 bitrate=2318.3kbits/
frame=  150 fps= 41 q=-1.0 size=    1280kB time=00:00:05.03 bitrate=2082.2kbits/
frame=  166 fps= 40 q=-1.0 size=    1536kB time=00:00:05.56 bitrate=2259.9kbits/
frame=  173 fps= 39 q=-1.0 Lsize=    1760kB time=00:00:05.82 bitrate=2477.6kbits/s speed=1.31x
video:1718kB audio:34kB subtitle:0kB other streams:0kB global headers:0kB muxing overhead: 0.480861%
ffmpeg 消费 rtmp 服务之后生成的 dump.flv 文件如下

使用一个普通的视频播放器 能够正常播放, 说明 rtmp 服务正常

基于 vlc 获取 rtmp 服务的数据, vlc 可以直接获取 rtmp 的数据, 并播放
File -> OpenNetwork - 输入 rtmp 服务地址 rtmp://localhost:1935/hls/test_rtps
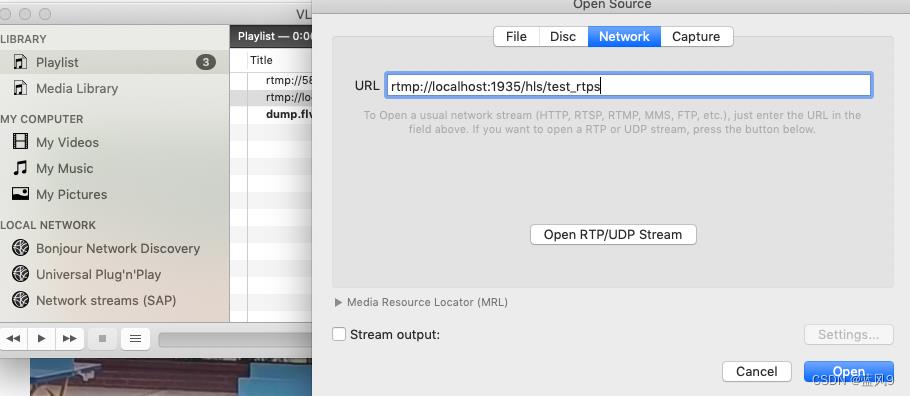
vlc 能够正常播放视频, 说明 rtmp 服务正常
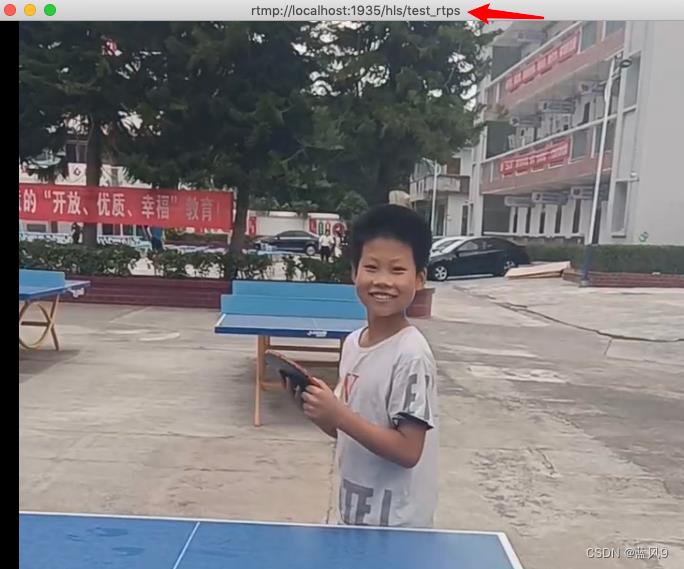
这一部分对应于流程图中 rtmp 服务的测试
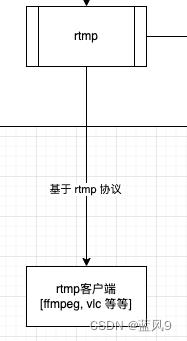
5. 测试如上 rtmp 视频服务转换为 nginx-http-flv 的服务是否可用
可以基于 浏览器直接测试, 或者基于 vlc 或者其他播放器, 或者 html 进行测试
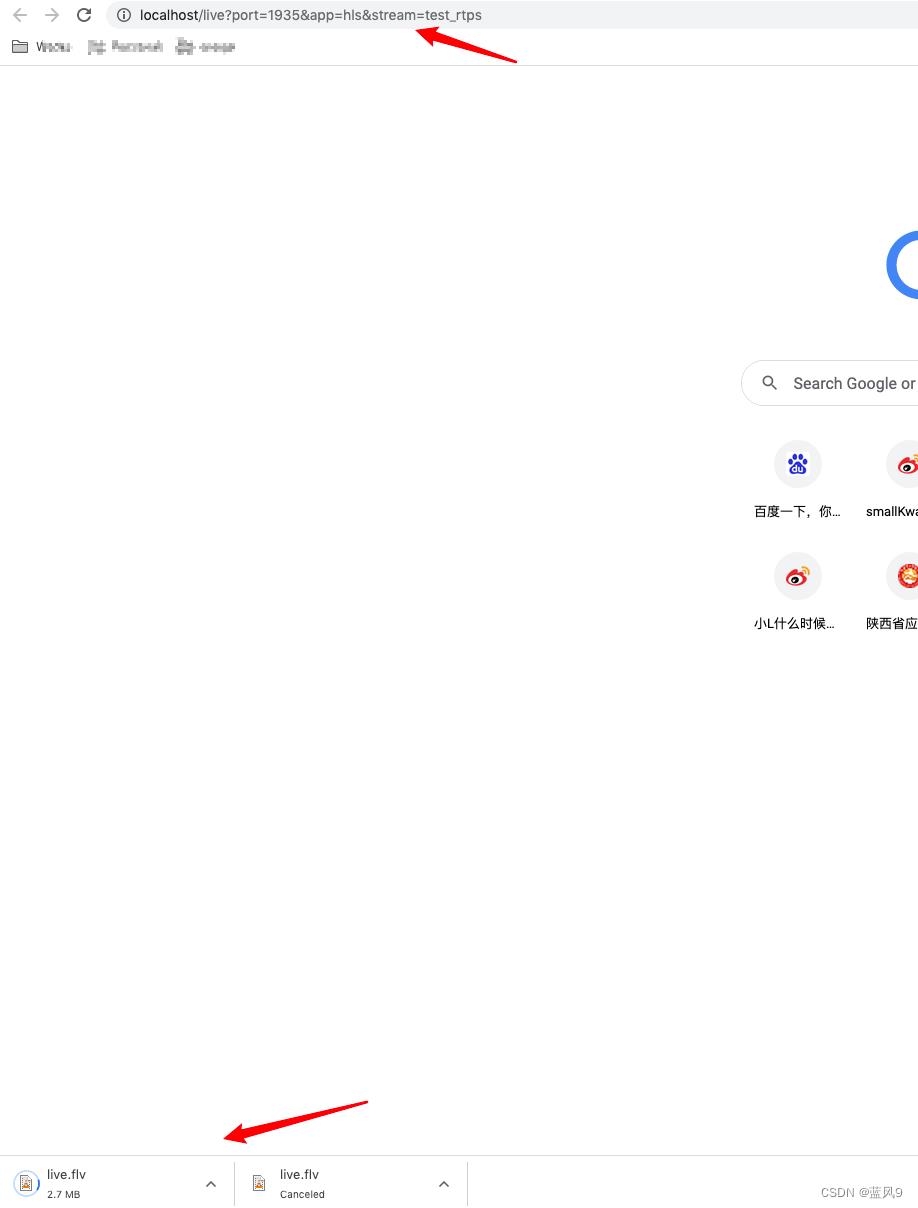
基于浏览器测试, 输入地址 http://localhost:80/live?port=1935&app=hls&stream=test_rtps
然后 浏览器自动进行下载, 表示服务能够拿到数据
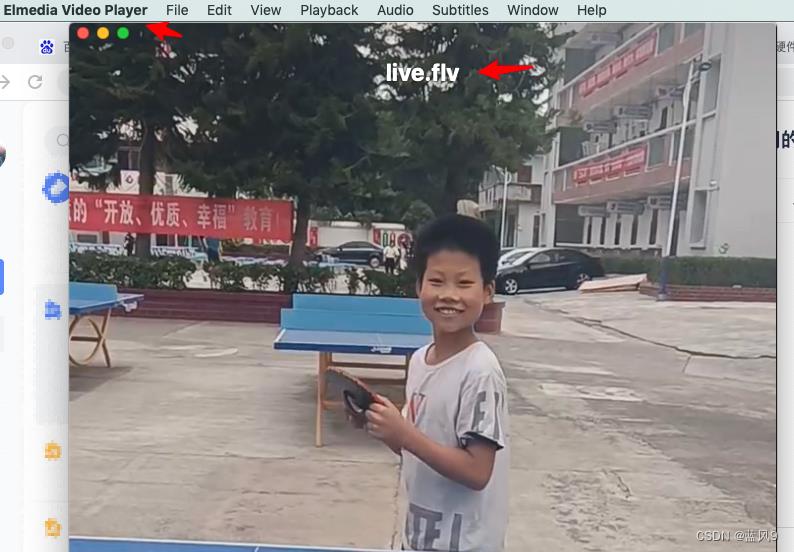
基于 vlc, ElMediaVideoPlayer 测试, 输入地址 http://localhost:80/live?port=1935&app=hls&stream=test_rtps

基于 html 代码进行测试, 假设 /Users/jerry/WebstormProjects/HelloWorld 作为工作区间
新建 videoUsage 文件夹存放本次测试用例, 新建文件 FlvUsage.html 作为测试用例, 录入内容为
<!DOCTYPE html>
<html>
<head>
  <meta http-equiv="Content-Type" content="text/html; charset=utf-8"/>
  <script src="https://cdn.bootcdn.net/ajax/libs/flv.js/1.6.2/flv.min.js"></script>
  <!--  <script src="./js/flv.min.js"></script>-->
  <style>
    body, center
      padding: 0;
      margin: 0;


    .v-container
      width: 640px;
      height: 360px;
      border: solid 1px red;


    video
      width: 100%;
      height: 100%;

  </style>

</head>
<body>
<div class="v-container">

  <video id="player1" muted autoplay="autoplay" preload="auto" controls="controls">
  </video>

</div>

<script>
  if (flvjs.isSupported())
    var videoElement = document.getElementById('player1');
    var flvPlayer = flvjs.createPlayer(
      type: 'flv',
      url: 'http://localhost:80/live?port=1935&app=hls&stream=test_rtps'
    );
    flvPlayer.attachMediaElement(videoElement);
    flvPlayer.load();
  </script>

</body>
</html>
保存之后, 把 html 文件 在 chrome 中打开, 能够正常看到 视频数据, 说明 转换后的服务正常可用

这一部分对应于流程图中 ngx-http-flv 服务是否能够正常拿到视频数据
6. 监控 rtmp, nginx-http-flv 服务的状态
访问 http://localhost/stat 可以看到 rtmp, nginx-http-flv 服务的相关状态

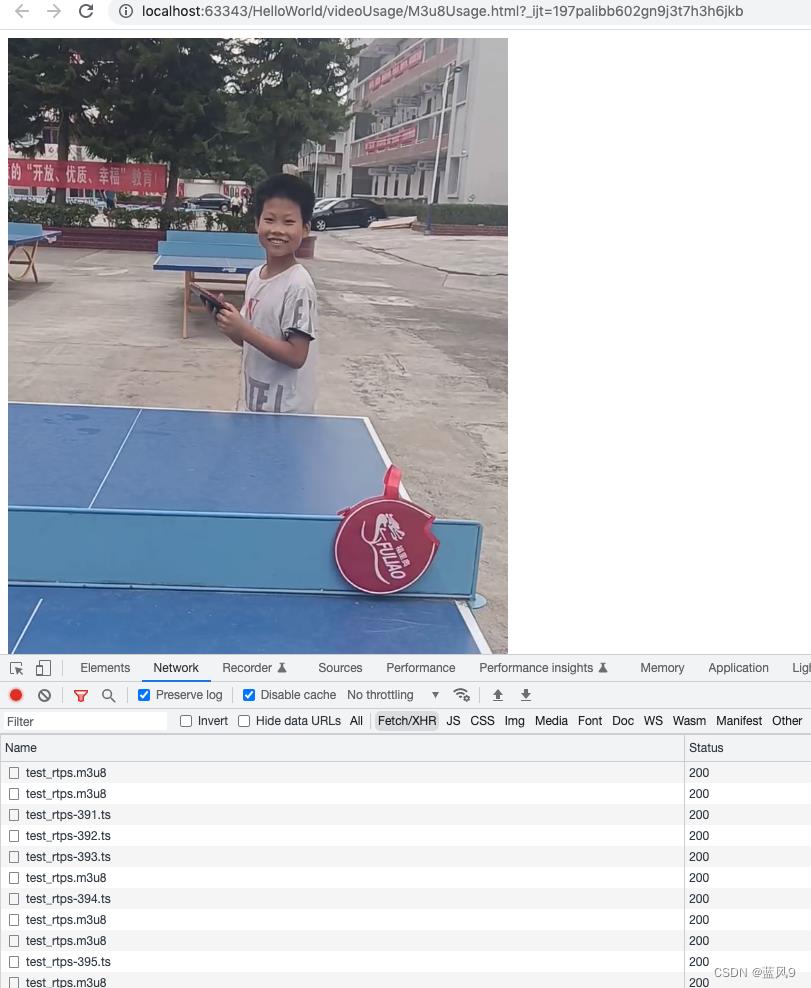
7. 测试如上 rtmp 视频服务生成的 hls 服务是否可用
上面 rtmp 的 hls 服务中有一个 hls 的配置, 当数据传输到 rtmp 服务之后, 会生成相应的 *.m3u8 索引文件 和 *.ts 视频数据
    application hls
        live            on;
        hls             on;
        hls_path        /var/www/hls_tmp;
比如我这里生成的文件如下
/var/www/hls_tmp # pwd
/var/www/hls_tmp
/var/www/hls_tmp # ls -l
total 29672
-rw-r--r--    1 nginx    nginx      1791640 Sep 10 08:39 test_rtps-313.ts
-rw-r--r--    1 nginx    nginx      1587660 Sep 10 08:39 test_rtps-314.ts
-rw-r--r--    1 nginx    nginx      1583148 Sep 10 08:39 test_rtps-315.ts
-rw-r--r--    1 nginx    nginx      1798408 Sep 10 08:39 test_rtps-316.ts
-rw-r--r--    1 nginx    nginx      1579764 Sep 10 08:39 test_rtps-317.ts
-rw-r--r--    1 nginx    nginx      1587848 Sep 10 08:39 test_rtps-318.ts
-rw-r--r--    1 nginx    nginx      1588976 Sep 10 08:39 test_rtps-319.ts
-rw-r--r--    1 nginx    nginx      1782804 Sep 10 08:39 test_rtps-320.ts
-rw-r--r--    1 nginx    nginx      1588600 Sep 10 08:39 test_rtps-321.ts
-rw-r--r--    1 nginx    nginx      1587096 Sep 10 08:39 test_rtps-322.ts
-rw-r--r--    1 nginx    nginx      1788632 Sep 10 08:40 test_rtps-323.ts
-rw-r--r--    1 nginx    nginx      1583900 Sep 10 08:40 test_rtps-324.ts
-rw-r--r--    1 nginx    nginx      1586720 Sep 10 08:40 test_rtps-325.ts
-rw-r--r--    1 nginx    nginx      1792392 Sep 10 08:40 test_rtps-326.ts
-rw-r--r--    1 nginx    nginx      1588412 Sep 10 08:40 test_rtps-327.ts
-rw-r--r--    1 nginx    nginx      1582772 Sep 10 08:40 test_rtps-328.ts
-rw-r--r--    1 nginx    nginx      1791640 Sep 10 08:40 test_rtps-329.ts
-rw-r--r--    1 nginx    nginx      1587660 Sep 10 08:40 test_rtps-330.ts
-rw-r--r--    1 nginx    nginx       566256 Sep 10 08:40 test_rtps-331.ts
-rw-r--r--    1 nginx    nginx          267 Sep 10 08:40 test_rtps.m3u8
然后通过 nginx 代理暴露出 hls 服务
    location /hls_tmp
        types
            application/vnd.apple.mpegurl m3u8;
            video/mp2t              ts;


        root                        /var/www;
        add_header                  'Cache-Control' 'no-cache';
        add_header                  'Access-Control-Allow-Origin' '*';
        add_header                  'Access-Control-Allow-Credentials' 'true';
访问 服务通过 http://localhost/hls_tmp/test_rtps.m3u8 来访问, 测试给定的 hls 服务
<!DOCTYPE html>
<html>

<head>
  <title>M3u8Usage</title>
  <meta charset="UTF-8">
  <meta name="renderer" content="webkit">
  <meta http-equiv="X-UA-Compatible" content="IE=edge,chrome=1">
  <script src="https://cdn.staticfile.org/hls.js/1.1.2/hls.min.js"></script>
  <script src="https://cdn.staticfile.org/dplayer/1.26.0/DPlayer.min.js"></script>
  <style>
    #dplayer
      width: 500px

  </style>
  <script>
    function init()
      const dp = new DPlayer(
        element: document.getElementById('dplayer'),
        video:
          //  pic: videoInfo.img, // 封面
          url: "http://localhost/hls_tmp/test_rtps.m3u8",
          type: 'customHls',
          customType:
            customHls: function (video, player)
              const hls = new Hls()
              hls.loadSource(video.src)
              hls.attachMedia(video)


      )

  </script>
</head>

<body onload="init()">
<div>
  <div id="dplayer"></div>
</div>
</body>
</html>
保存之后, 把 html 文件 在 chrome 中打开, 能够正常看到 视频数据, 说明 转换后的服务正常可用
vlc 中播放效果如下

8. 构建 rtsp 服务
上面提到 没有现成的 rtsp 服务, 这里 就来构建一个 rtsp 服务, rtsp 服务器下载地址如下
解压 release 安装包, 然后修改 rtsp-simple-server.yml 配置文件, 更新 rtmp 服务的端口
执行 "./rtsp-simple-server" 启动 rtsp 服务器, 启动之后效果如下
master:rtsp-simple-server jerry$ ./rtsp-simple-server
2022/09/03 11:22:03 INF rtsp-simple-server v0.20.0
2022/09/03 11:22:03 INF [RTSP] listener opened on :8554 (TCP), :8000 (UDP/RTP), :8001 (UDP/RTCP)
2022/09/03 11:22:03 INF [RTMP] listener opened on :2935
2022/09/03 11:22:03 INF [HLS] listener opened on :8888
基于 ffmpeg 推送视频数据到 rtsp 服务
ffmpeg -re -stream_loop -1 -i /Users/jerry/Jobs/10_rtsp/test_rtps.mp4 -c copy -f rtsp rtsp://localhost:8554/rtsp/test_rtsp基于 ffmpeg 推送 rtsp 服务的数据到 rtmp 服务
ffmpeg -re -stream_loop -1 -i "rtsp://localhost:8554/rtsp/test_rtsp" -c copy -f flv rtmp://localhost:1935/hls/test_rtps后续, 其他的就和上面 基本上一致了, 不多赘述
9. 验证 rtsp 服务, rtmp 服务
基于 vlc 验证 rtsp 服务
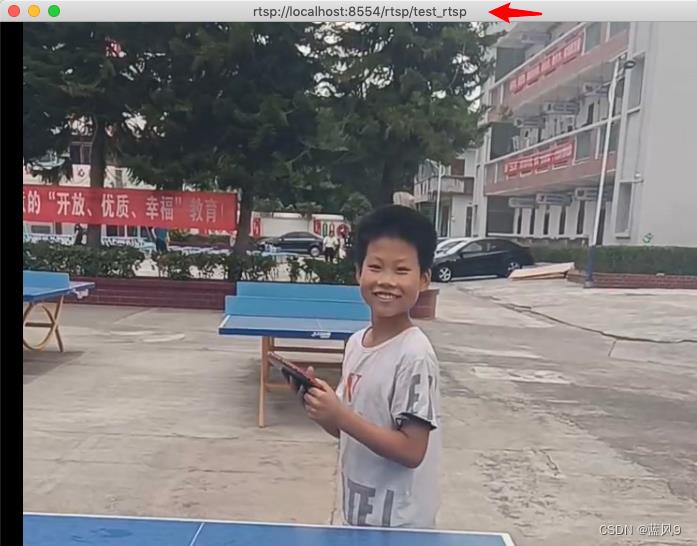
基于 vlc 验证 rtmp 服务

10. 编译 nginx-flv
和编译 nginx 类似, 不过需要多加入两个模块 nginx-http-flv-module 和 openssl
./configure --with-stream --without-http_rewrite_module --with-http_ssl_module --add-module=/Users/jerry/ClionProjects/nginx-http-flv-module-1.2.10 --with-openssl=/Users/jerry/ClionProjects/openssl-openssl-3.0.5
make
nginx-http-flv-module 来自于 GitHub - winshining/nginx-http-flv-module: Media streaming server based on nginx-rtmp-module. In addtion to the features nginx-rtmp-module provides, HTTP-FLV, GOP cache and VHost (one IP for multi domain names) are supported now.
openssl 来自于 GitHub - openssl/openssl: TLS/SSL and crypto library
完
以上是关于12 rtsp视频服务 转换为 rtmp服务 转换为前端可用的服务的主要内容,如果未能解决你的问题,请参考以下文章