本地Web与MQTT结合远程控制LED(SIOT+掌控版+web)
Posted Mpara
tags:
篇首语:本文由小常识网(cha138.com)小编为大家整理,主要介绍了本地Web与MQTT结合远程控制LED(SIOT+掌控版+web)相关的知识,希望对你有一定的参考价值。
文章目录
前言
最近在学习MQTT,在想能不能通过网页发送消息至MQTT的topic来远程控制想要的东西,正好找到了一个插件,可以使用网页发送消息至SIOT的topic,然后topic接收消息后控制掌控版做相应的动作,接下来是步骤。
提示:以下是本篇文章正文内容,下面案例可供参考
一、编辑控制网页
Bootstrap是最受欢迎的html、CSS和JS框架,用来开发响应式布局、移动设备优先的WEB项目。使用Bootstrap编写的网页是响应式网页,可以在不同的客户端自适应,显得较为美观。
Bootstrap文档地址:https://v3.bootcss.com/
本文使用$.get()函数来请求SIOT接口远程控制LED,关于SIOT的API接口,可以参考下图:

网页核心代码:
<head>
	<meta http-equiv="X-UA-Compatible" content="IE=edge,chrome=1" />
	<meta charset="utf-8" />
	<meta name="viewport" content="width=device-width, initial-scale=1.0, maximum-scale=1.0" />
	<!-- 最新版本的 Bootstrap 核心 CSS 文件 -->
	<link rel="stylesheet" href="css/bootstrap.min.css">
	<script src="js/jquery-2.1.4.min.js"></script>
	<script src="js/jquery.cookie.min.js"></script>
<link rel="stylesheet" href="css/style.css" crossorigin="anonymous">
	<!-- 最新的 Bootstrap 核心 javascript 文件 -->
	<script src="js/bootstrap.min.js"></script>
	<script src="js/vue.js"></script>
	<!-- <script src="js/app.js"></script> -->
	<title></title>
	<meta name="description" />
</head>

<body style="background-image:url(gamersky_04origin_07_20186301837DB3.jpg);
               background-repeat:no-repeat">

	<div class="container text-center">
		<button type="button" id="ledRedOn" class="btn btn-success btn-lg">红灯开</button>
		<button type="button" id="ledRedOff" class="btn btn-info btn-lg">红灯关</button>
	</div>
	<br>
	<div class="container text-center">
		<button type="button" id="ledGreenOn" class="btn btn-success btn-lg">绿灯开</button>
		<button type="button" id="ledGreenOff" class="btn btn-info btn-lg">绿灯关</button>
	</div>
	<br>
	<div class="container text-center">
		<button type="button" id="ledBlueOn" class="btn btn-success btn-lg">蓝灯开</button>
		<button type="button" id="ledBlueOff" class="btn btn-info btn-lg">蓝灯关</button>
	</div>
	<br>
	<script>
		$(function()
			$('#ledRedOn').click(function()
				$.get("http://locathost:8080/publish?topic=2018A14120/LEDR&msg=on&iname=siot&ipwd=dfrobot");
			);
			$('#ledRedOff').click(function()
				$.get("http://locathost:8080/publish?topic=2018A14120/LEDR&msg=off&iname=siot&ipwd=dfrobot");
			);
			$('#ledGreenOn').click(function()
				$.get("http://locathost:8080/publish?topic=2018A14120/LEDG&msg=on&iname=siot&ipwd=dfrobot");
			);
			$('#ledGreenOff').click(function()
				$.get("http://locathost:8080/publish?topic=2018A14120/LEDG&msg=off&iname=siot&ipwd=dfrobot");
			);
			$('#ledBlueOn').click(function()
				$.get("http://locathost:8080/publish?topic=2018A14120/LEDB&msg=on&iname=siot&ipwd=dfrobot");
			);
			$('#ledBlueOff').click(function()
				$.get("http://locathost:8080/publish?topic=2018A14120/LEDB&msg=off&iname=siot&ipwd=dfrobot");
			);

		);
	</script>
</body>
</html>
注意:localhost请换成SIOT的ip地址
网页的$.get()函数内,点击按钮将发送on/off命令,当掌控版接收到命令,将做出相应的动作。
网页下载地址:稍后补充
二、编辑SIOT插件
此插件参考了这位作者的文章:https://mc.dfrobot.com.cn/thread-309135-1-1.html
首先首先新建一个网页,将SIoT文件目录下的“devices.html”文件,复制并重命名为“web_control.html”,在“modules”文件夹中,也将“devices.js”文件复制一份,改名为“sfamily.js”,并且在“index.html”中添加超链接
<li><a href="web_control.html">远程控制(插件)</a></li>
然后需要修改“web_control.html”网页内的内容,主要修改section部分
<section>
			<table class="table table-striped">
				<thead>
					<tr>
						<th>项目ID</th>
						<th>LEDR</th>
						<th>LEDG</th>
						<th>LEDB</th>
						<th>操作</th>
					</tr>
				</thead>
				<tbody>

					<tr v-for="(project,k) in projectsList">
						<th scope="row">project.ID</th>
						<td :class="project.ID+'LEDR'">getlastMsg(project.ID,"LEDR")</td>
						<td :class="project.ID+'LEDG'">getlastMsg(project.ID,"LEDG")</td>
						<td :class="project.ID+'LEDB'">getlastMsg(project.ID,"LEDB")</td>
						<td>
							<button type="button" class="btn btn-default" @click="openurl(project.ID)">详情</button>
							<button type="button" class="btn btn-default" @click="sendMsg_af(project.ID + '/d2','1')">警报</button></td>
						<td>project.Description</td>
					</tr>

				</tbody>
			</table>
		</section>
完整网页下载:稍后补充
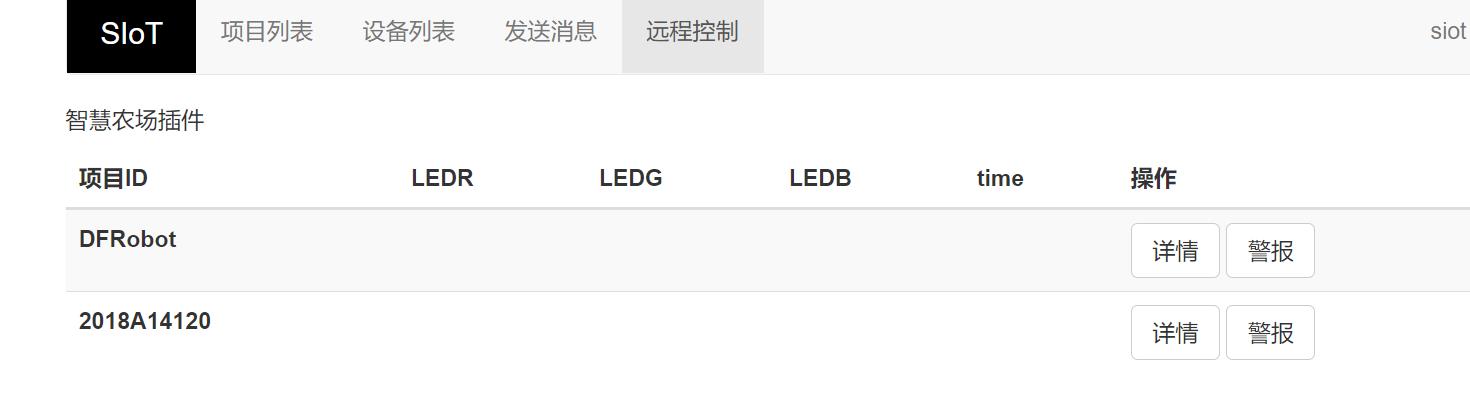
SIOT网页效果:
三、使用掌控板连接SIOT
掌控板首先需要连接wifi与SIOT

SIOT设置参数:
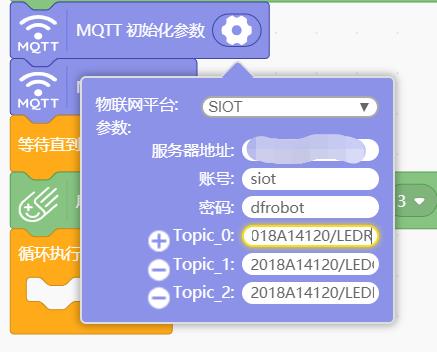
这里topic可以任意修改,但注意应该与网页中订阅的topic保持一致。
然后到功能模块,部分代码:

代码下载:稍后补充
四、效果
点击网页中的按钮,可以实现控制LED功能

以上是关于本地Web与MQTT结合远程控制LED(SIOT+掌控版+web)的主要内容,如果未能解决你的问题,请参考以下文章