编写自定义控件构造函数的正确姿势 - defStyleAttr/defStyleRes
Posted dsliang12
tags:
篇首语:本文由小常识网(cha138.com)小编为大家整理,主要介绍了编写自定义控件构造函数的正确姿势 - defStyleAttr/defStyleRes相关的知识,希望对你有一定的参考价值。
编写自定义控件构造函数的正确姿势 - defStyleAttr/defStyleRes
在学习自定义控件的时候,接触到第一样东西就是自定义控件的构造函数.这个东西可以说是很简单,但是如果你细细品味或许发现里面还有很多奥妙的地方.
这一篇博客就是深究到底如何正确编写自定义控件的构造函数.
默认的构造函数
习惯上,使用开发环境帮我们生成的是以下这四个构造函数
public class CustomView extends View

    public CustomView(Context context)
        super(context);


    public CustomView(Context context, AttributeSet attrs)
        super(context, attrs);


    public CustomView(Context context, AttributeSet attrs, int defStyleAttr)
        super(context, attrs, defStyleAttr);


    public CustomView(Context context, AttributeSet attrs, int defStyleAttr, int defStyleRes)
        super(context, attrs, defStyleAttr, defStyleRes);
但是一般我们会将它改写成一下这种形式
public class CustomView extends View
    public CustomView(Context context)
        this(context, null);


    public CustomView(Context context, AttributeSet attrs)
        this(context, attrs, 0);


    public CustomView(Context context, AttributeSet attrs, int defStyleAttr)
        this(context, attrs, defStyleAttr, 0);


    public CustomView(Context context, AttributeSet attrs, int defStyleAttr, int defStyleRes)
        super(context, attrs, defStyleAttr, defStyleRes);
但是你注意到在第二个构造函数里面我们给defStyleAttr传递0这样的做法是否正确呢?一种怎么样的姿势才是正确的呢?
当然我们这一篇博客就是为了解决这个问题而诞生的.
如何理解attr,declare-styleable
首先我们从最简单的开始,讲讲定义属性.
还是接着CustomView这个例子讲下去,我们首先给CustomView定义一些属性.
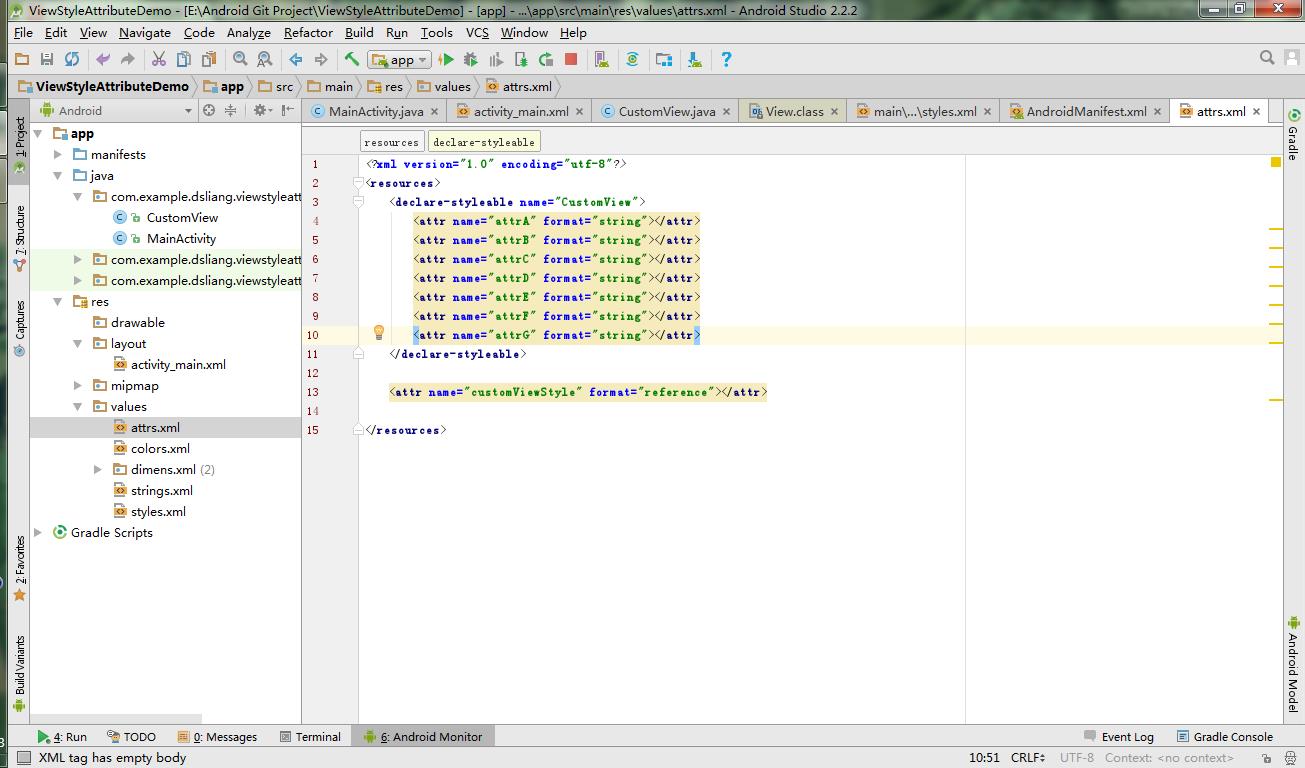
在attrs文件下新建declare-styleable节点,并且在该节点下添加attr节点.attr就是我们CustomView的属性了.
不使用declare-styleable节点,定义属性像customViewStyle属性那样可不可以?一开始我是拒绝这样的,但是我可以告诉你是可以的.这样做太麻烦了.declare-styleable节点会在背后帮你做很多工作.
看看declare-styleable节点的作用.其实我们通过观察customViewStyle属性和其他属性的区别就知道declare-styleable节点的作用了.
观察R文件,发现只要我们使用attr定义一个属性那么就会自动在R文件的attr类里生成一个用来标识该属性的int型属性(以该属性命名).

customViewStyle属性也一样是这样
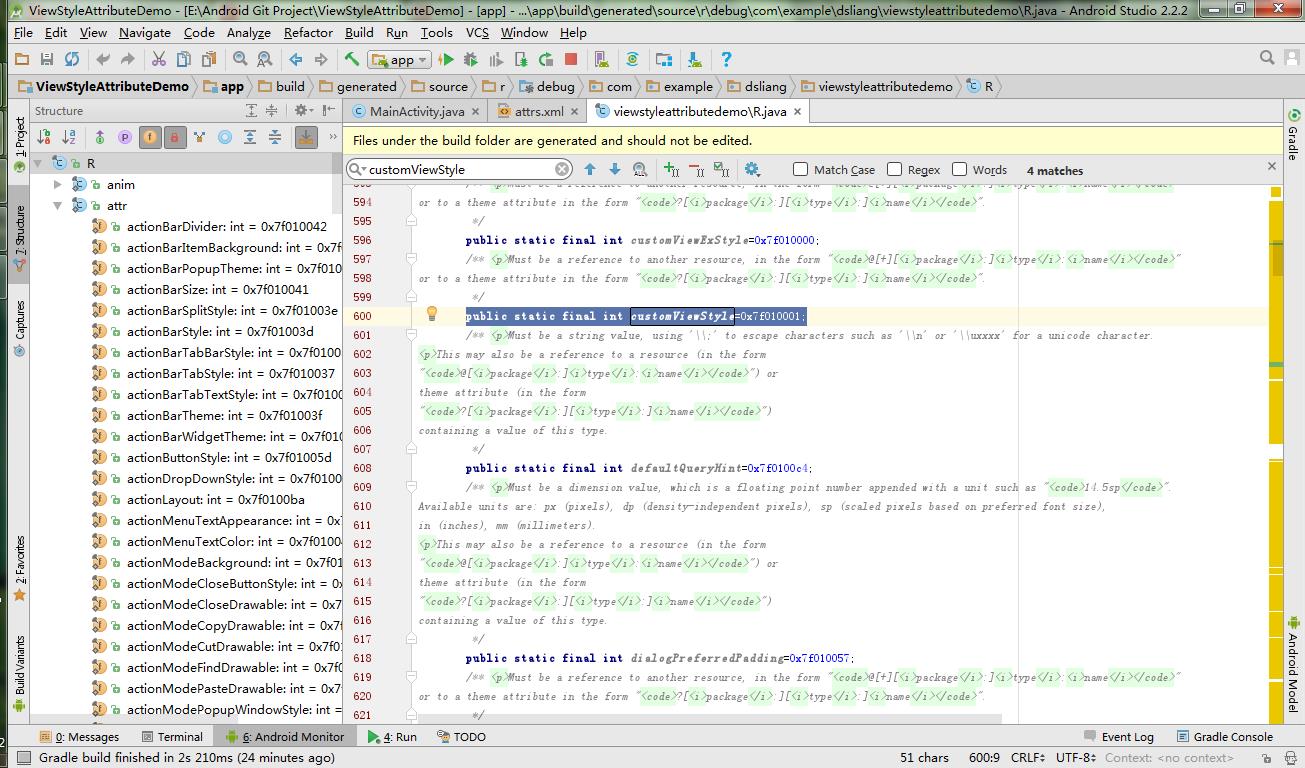
    当然我们需要找出他们的区别.看吧!如果使用declare-styleable节点包含attr属性.开发环境会帮我们自动生成一个数组并且把内容是所包含属性的标识,而且还生成了索引!
    declare-styleable的作用就借此而已!当然你不喜欢可以不使用declare-styleable节点.
给一个属性赋值
给View的一个属性赋值一共有5中方式:
- 通过布局文件直接对属性赋值
- 通过给控件设置style属性,从而对某一些特点的属性赋值
- 通过自定义theme的方式,给某一属性赋值
- 通过自定义theme的方式,给某一个属性赋予一个style引用
编写View的时候通过defStyleAttr引用给属性设置默认值
以上这五种方式看起来头晕晕的,接下来通过代码的方式详细说明每一种方式.
首先给出自定义的属性
<?xml version="1.0" encoding="utf-8"?>
<resources>
    <declare-styleable name="CustomView">
        <attr name="attrA" format="string"></attr>
        <attr name="attrB" format="string"></attr>
        <attr name="attrC" format="string"></attr>
        <attr name="attrD" format="string"></attr>
        <attr name="attrE" format="string"></attr>
        <attr name="attrF" format="string"></attr>
        <attr name="attrG" format="string"></attr>
    </declare-styleable>

    <attr name="customViewStyle" format="reference"></attr>

</resources>
通过布局文件直接对属性赋值
这种是最常用的
<com.example.dsliang.viewstyleattributedemo.CustomView
        android:layout_width="match_parent"
        android:layout_height="match_parent"
        app:attrA="set from xml file"
        app:attrB="set from xml file"
        />
通过给控件设置style属性,从而对某一些特点的属性赋值
除了上面第一种的使用方式,我们还会把某一些特定抽取出来并且汇聚在一个style里统一管理.从而使某些控件有统一的风格.例如,比较常见我们会把应用程序里面的文字的大小,颜色放在同一个style里面进行管理.使用同样样式的TextView我们给它一个的style属性赋予同样的style引用即可.
    <com.example.dsliang.viewstyleattributedemo.CustomView
        style="@style/SpecialCustomViewStyle"
        android:layout_width="match_parent"
        android:layout_height="match_parent"
        app:attrA="set from xml file"
        app:attrB="set from xml file"
        />
<style name="SpecialCustomViewStyle">
<item name="attrB">set from view style</item>
<item name="attrC">set from view style</item>
<item name="attrD">set from view style</item>
</style>通过给CustomView的style属性赋予SpecialCustomViewStyle引用,我们可以知道这个时候attrC和attrD的值应该都是”set from view style”.(暂时忽略attrB的值到底是什么)
通过自定义theme的方式,给某一属性赋值
这种方式很少人会使用,估计也比较少人知道.我们首先自定义一个theme,然后在我们自定义的theme里面给某一些属性赋值.这样的做法有什么好处?
上面第二种方法是通过对控件的style属性赋予某一个我们已经定义的style引用实现对属性赋值的.这样说如果我们想所有的TextView(或者其他需要同一种风格的控件)都拥有同一样的字体大小,字体颜色.那么每一我们希望的控件都要写一条赋值给style属性引用的语句.
第三种方法就是为了解放你我.
<style name="AppTheme" parent="Theme.AppCompat.Light.DarkActionBar">
<!-- Customize your theme here. -->
<item name="colorPrimary">@color/colorPrimary</item>
<item name="colorPrimaryDark">@color/colorPrimaryDark</item>
<item name="colorAccent">@color/colorAccent</item>
<item name="android:textSize">24px</item>
</style><?xml version="1.0" encoding="utf-8"?>
<manifest xmlns:android="http://schemas.android.com/apk/res/android"
package="com.example.dsliang.viewstyleattributedemo">
<application
android:allowBackup="true"
android:icon="@mipmap/ic_launcher"
android:label="@string/app_name"
android:supportsRtl="true"
android:theme="@style/AppTheme">
<activity android:name=".MainActivity">
<intent-filter>
<action android:name="android.intent.action.MAIN" />
<category android:name="android.intent.category.LAUNCHER" />
</intent-filter>
</activity>
</application>
</manifest>这样一来,默认情况下所有textSize属性默认值都是24px.这种方式是站在统一theme(主题)的角度设置一个属性.(这种设置属性的方式优先级是最低的)
通过自定义theme的方式,给某一个属性赋予一个style引用
第四种方式就显得更加另类而且更加偏门.或许你根本没见过这的用法.但是我可以很肯定告诉你这样用法虽然你没见过,但是你绝对用过.而且很隐藏的使用,但只是你自己不知道而已!
这种方式和第三种区别在于,我是给一个属性赋予一个style的引用.(这个属性是一个很特殊的属性)
<style name="AppTheme" parent="Theme.AppCompat.Light.DarkActionBar">
<!-- Customize your theme here. -->
<item name="colorPrimary">@color/colorPrimary</item>
<item name="colorPrimaryDark">@color/colorPrimaryDark</item>
<item name="colorAccent">@color/colorAccent</item>
<item name="customViewStyle">@style/CustomViewStyle</item>
</style> <style name="CustomViewStyle">
<item name="attrD">set from theme style</item>
<item name="attrE">set from theme style</item>
<item name="attrF">set from theme style</item>
</style><?xml version="1.0" encoding="utf-8"?>
<manifest xmlns:android="http://schemas.android.com/apk/res/android"
package="com.example.dsliang.viewstyleattributedemo">
<application
android:allowBackup="true"
android:icon="@mipmap/ic_launcher"
android:label="@string/app_name"
android:supportsRtl="true"
android:theme="@style/AppTheme">
<activity android:name=".MainActivity">
<intent-filter>
<action android:name="android.intent.action.MAIN" />
<category android:name="android.intent.category.LAUNCHER" />
</intent-filter>
</activity>
</application>
</manifest> customViewStyle属性是我们自定义的一个属性.因为这种用法绕了很大个圈,下面说说这个过程是怎么样的.
1. 首先我们为CustomView定义一个customViewStyle属性
2. 接着为CustomView定义一个style
3. 自定义一个theme,并且给customViewStyle属性赋予我们自定义的style引用
4. 把我们自定义的theme应用在application或者对于的activity
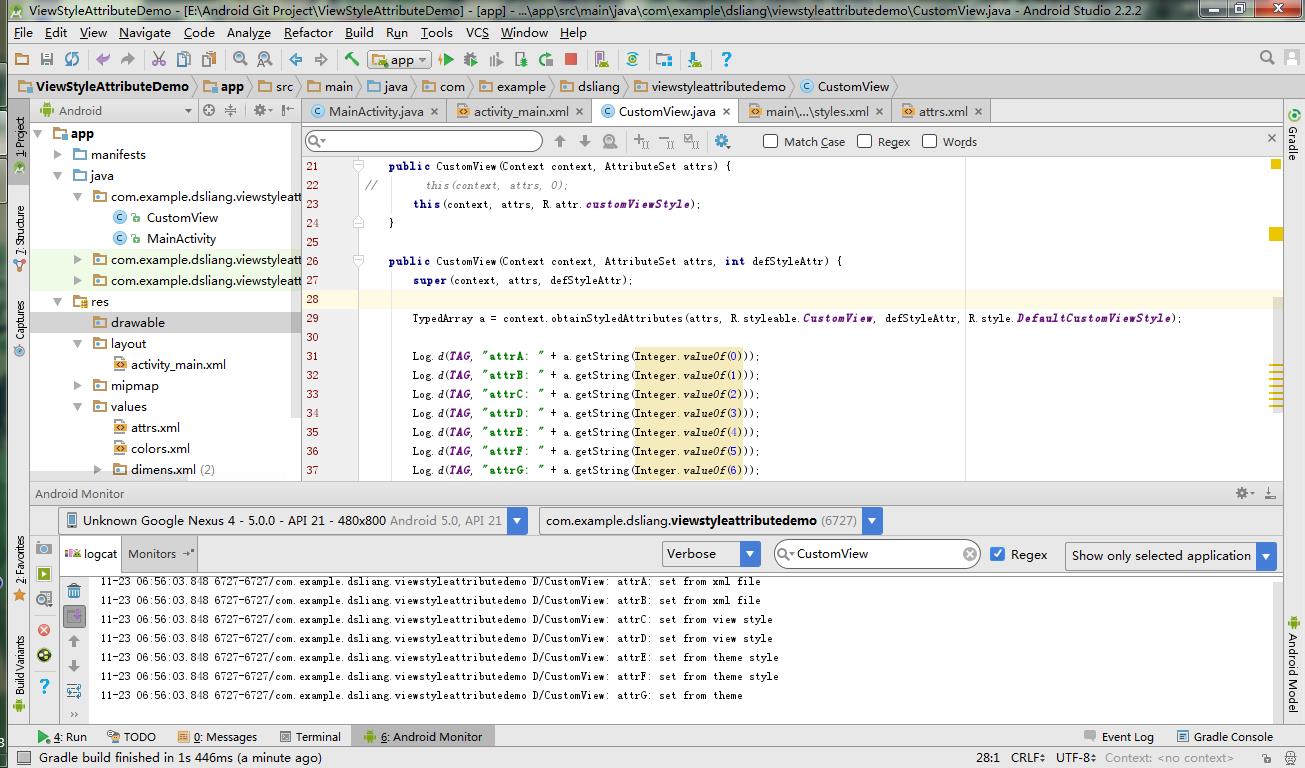
5. 在CustomView的构造函数里面通过obtainStyledAttributes函数并且以R.attr.customViewStyle为其中一个参数
通过上述5个步骤我们可以在CustomView的构造函数里面获取到为CustomView定义的style里面的属性.步骤1,2,3,4在前面一个给出代码了.现在把5的代码也补充上.
public CustomView(Context context, AttributeSet attrs, int defStyleAttr)
super(context, attrs, defStyleAttr);
TypedArray a = context.obtainStyledAttributes(attrs, R.styleable.CustomView, R.attr.customViewStyle, 0);
......
a.recycle();
编写View的时候通过defStyleAttr引用给属性设置默认值
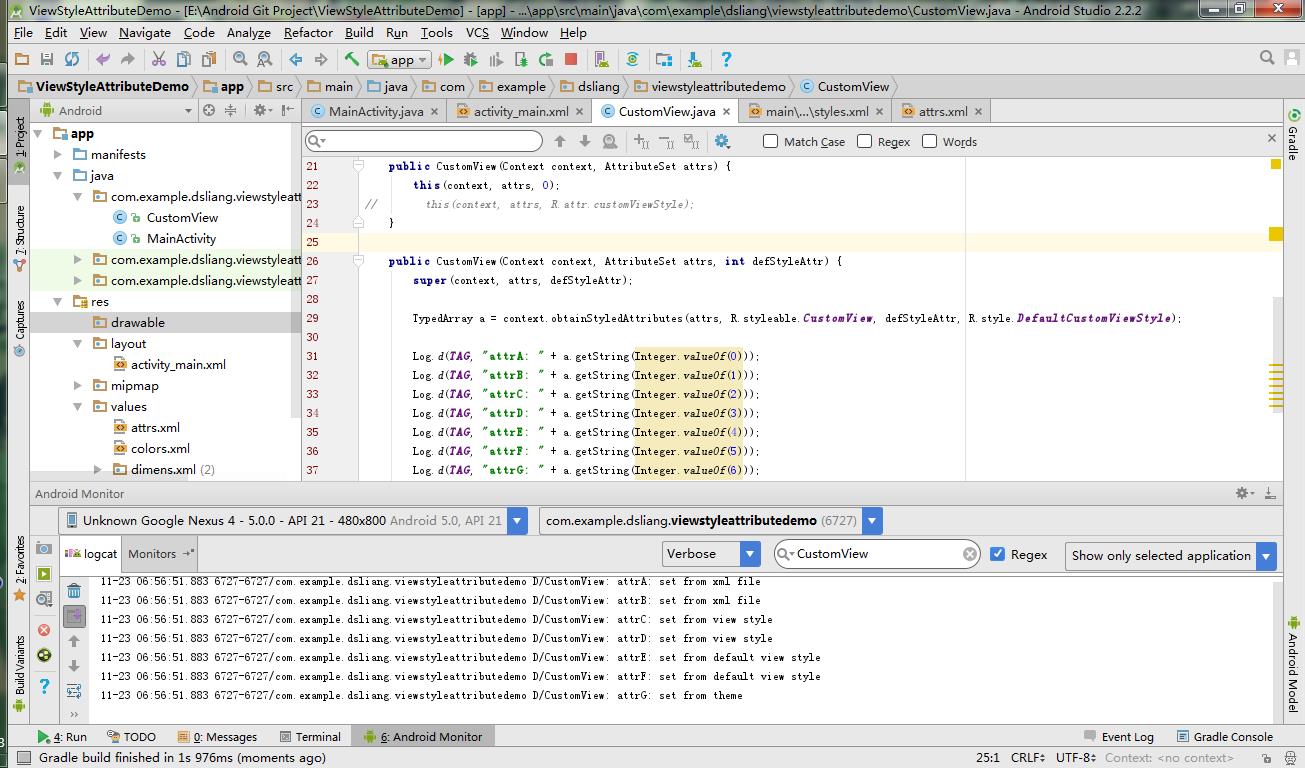
终于到最后一种方式了.设想一下,在第四种基础之上,我们没给theme的customViewStyle赋予某一style的引用或者在调用obtainStyledAttributes函数的时候没传递R.attr.customViewStyle进去(或者传递0)会怎么样?
说的直白一点,调用obtainStyledAttributes函数的时候没办法在theme里面找到第三个参数所指定的style引用或者第三个参数本来就是0.这个时候我们是不是应该提供一个默认值.没错这就是我们现在这种情况了.
<style name="DefaultCustomViewStyle">
<item name="attrD">set from default view style</item>
<item name="attrE">set from default view style</item>
<item name="attrF">set from default view style</item>
</style> public CustomView(Context context, AttributeSet attrs, int defStyleAttr)
super(context, attrs, defStyleAttr);
TypedArray a = context.obtainStyledAttributes(attrs, R.styleable.CustomView, defStyleAttr, R.style.DefaultCustomViewStyle);
......
a.recycle();
attrs为0,或者当attrs为某一属性但是在theme里面没找到该属性的值的时候我们会用第四个参数(R.style.DefaultCustomViewStyle)作为默认值赋予给属性.这就是defStyleAttr名字的最后解析了!
探讨完对一个属性的五种赋值方式以后.面临的一大难题肯定就是谁的优先级最高!
赋值优先级
我们对CustomView采用五种的赋值方式并且各种有交集.最终得到结论.
<?xml version="1.0" encoding="utf-8"?>
<RelativeLayout xmlns:android="http://schemas.android.com/apk/res/android"
xmlns:app="http://schemas.android.com/apk/res-auto"
xmlns:tools="http://schemas.android.com/tools"
android:id="@+id/activity_main"
android:layout_width="match_parent"
android:layout_height="match_parent"
android:paddingBottom="@dimen/activity_vertical_margin"
android:paddingLeft="@dimen/activity_horizontal_margin"
android:paddingRight="@dimen/activity_horizontal_margin"
android:paddingTop="@dimen/activity_vertical_margin"
tools:context="com.example.dsliang.viewstyleattributedemo.MainActivity">
<com.example.dsliang.viewstyleattributedemo.CustomView
style="@style/SpecialCustomViewStyle"
android:layout_width="match_parent"
android:layout_height="match_parent"
app:attrA="set from xml file"
app:attrB="set from xml file"
/>
</RelativeLayout>
<resources>
<!-- Base application theme. -->
<style name="AppTheme" parent="Theme.AppCompat.Light.DarkActionBar">
<!-- Customize your theme here. -->
<item name="colorPrimary">@color/colorPrimary</item>
<item name="colorPrimaryDark">@color/colorPrimaryDark</item>
<item name="colorAccent">@color/colorAccent</item>
<item name="attrF">set from theme</item>
<item name="attrG">set from theme</item>
<item name="customViewStyle">@style/CustomViewStyle</item>
</style>
    <style name="SpecialCustomViewStyle">
        <item name="attrB">set from view style</item>
        <item name="attrC">set from view style</item>
        <item name="attrD">set from view style</item>
    </style>
<style name="CustomViewStyle">
<item name="attrD">set from theme style</item>
<item name="attrE">set from theme style</item>
<item name="attrF">set from theme style</item>
</style>
<style name="DefaultCustomViewStyle">
<item name="attrD">set from default view style</item>
<item name="attrE">set from default view style</item>
<item name="attrF">set from default view style</item>
</style>
</resources>
<?xml version="1.0" encoding="utf-8"?>
<manifest xmlns:android="http://schemas.android.com/apk/res/android"
    package="com.example.dsliang.viewstyleattributedemo">

    <application
        android:allowBackup="true"
        android:icon="@mipmap/ic_launcher"
        android:label="@string/app_name"
        android:supportsRtl="true"
        android:theme="@style/AppTheme">
        <activity android:name=".MainActivity">
            <intent-filter>
                <action android:name="android.intent.action.MAIN" />

                <category android:name="android.intent.category.LAUNCHER" />
            </intent-filter>
        </activity>
    </application>

</manifest>package com.example.dsliang.viewstyleattributedemo;
import android.content.Context;
import android.content.res.TypedArray;
import android.util.AttributeSet;
import android.util.Log;
import android.view.View;
/**
* Created by dsliang on 2016/11/22.
*/
public class CustomView extends View
static final public String TAG = CustomView.class.getSimpleName();
public CustomView(Context context)
this(context, null);
public CustomView(Context context, AttributeSet attrs)
// this(context, attrs, 0);
this(context, attrs, R.attr.customViewStyle);
public CustomView(Context context, AttributeSet attrs, int defStyleAttr)
super(context, attrs, defStyleAttr);
TypedArray a = context.obtainStyledAttributes(attrs, R.styleable.CustomView, defStyleAttr, R.style.DefaultCustomViewStyle);
Log.d(TAG, "attrA: " + a.getString(Integer.valueOf(0)));
Log.d(TAG, "attrB: " + a.getString(Integer.valueOf(1)));
Log.d(TAG, "attrC: " + a.getString(Integer.valueOf(2)));
Log.d(TAG, "attrD: " + a.getString(Integer.valueOf(3)));
Log.d(TAG, "attrE: " + a.getString(Integer.valueOf(4)));
Log.d(TAG, "attrF: " + a.getString(Integer.valueOf(5)));
Log.d(TAG, "attrG: " + a.getString(Integer.valueOf(6)));
a.recycle();
结论:
属性直接赋值>对控件通过使用style方式赋值>自定义theme并且对属性赋予style的引用的赋值方式/defStyleRes>自定义theme并且对属性的赋值方式
Api21 以后引入四个参数的构造函数
当我还没弄明白defStyleAttr和defStyleRes是什么区别的时候,就迎来了四个参数的构造函数.但是现在我发现其实新引入的第四个构造函数没有本质的区别,只是把第三个参数的构造函数开展一下而已.使得defStyleRes参数可以从外部传递进来而已.
看看google开发人员是怎么写代码的
前面说到第四种我们其实是经常用但是自己没发现.我们看看到底是怎么一回事.
我们跟踪AppTheme看看
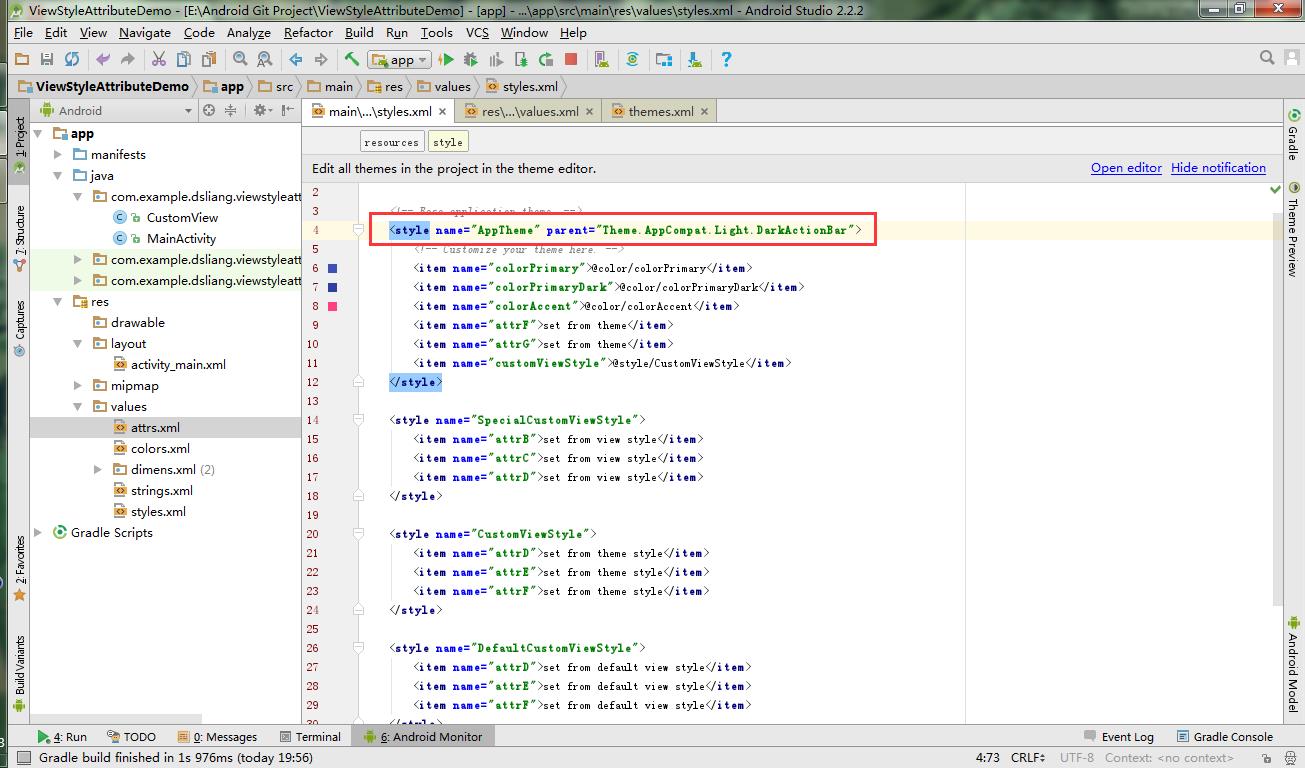
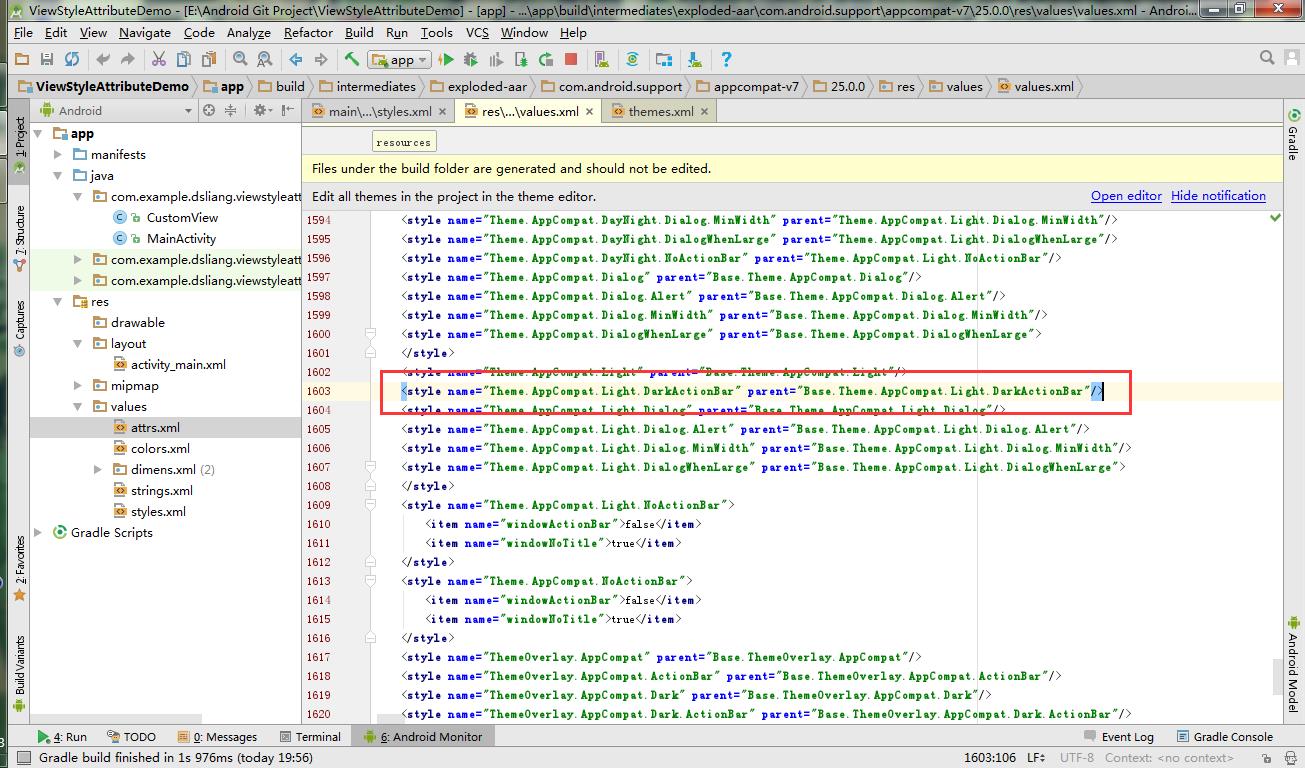


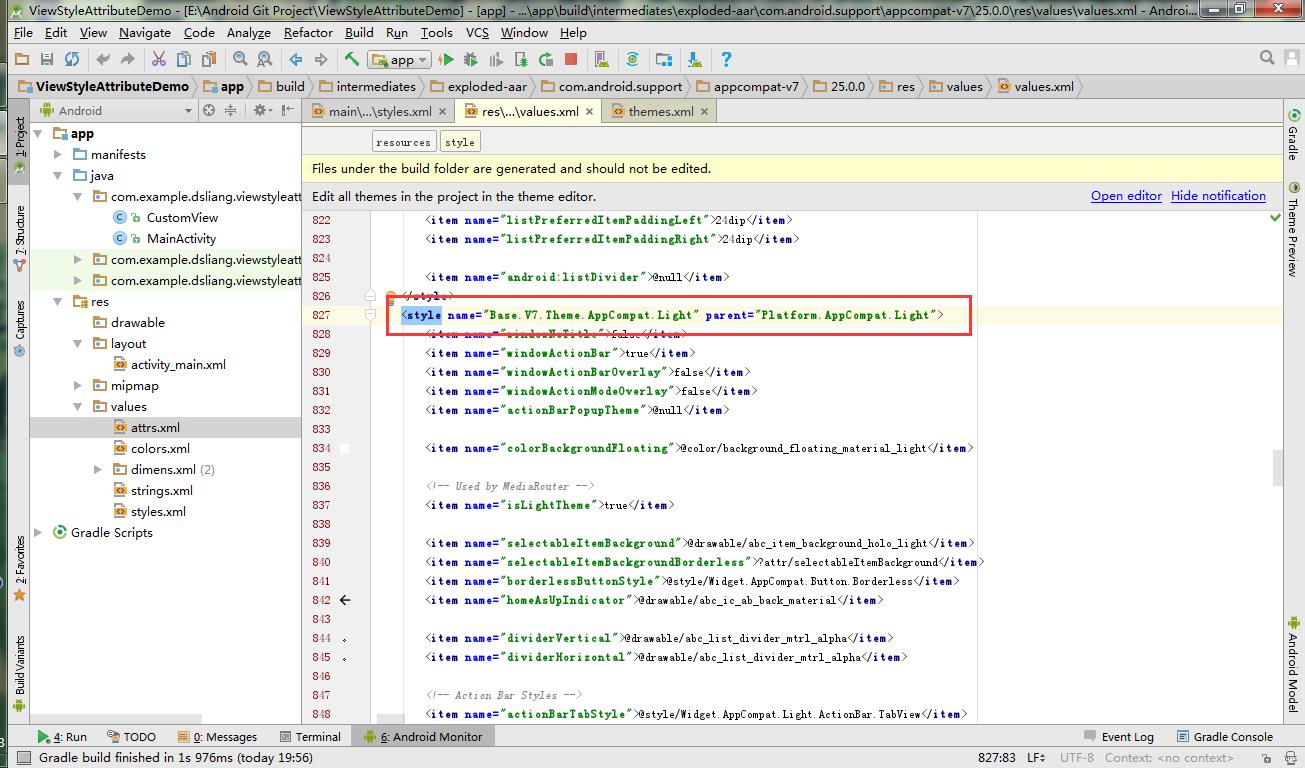
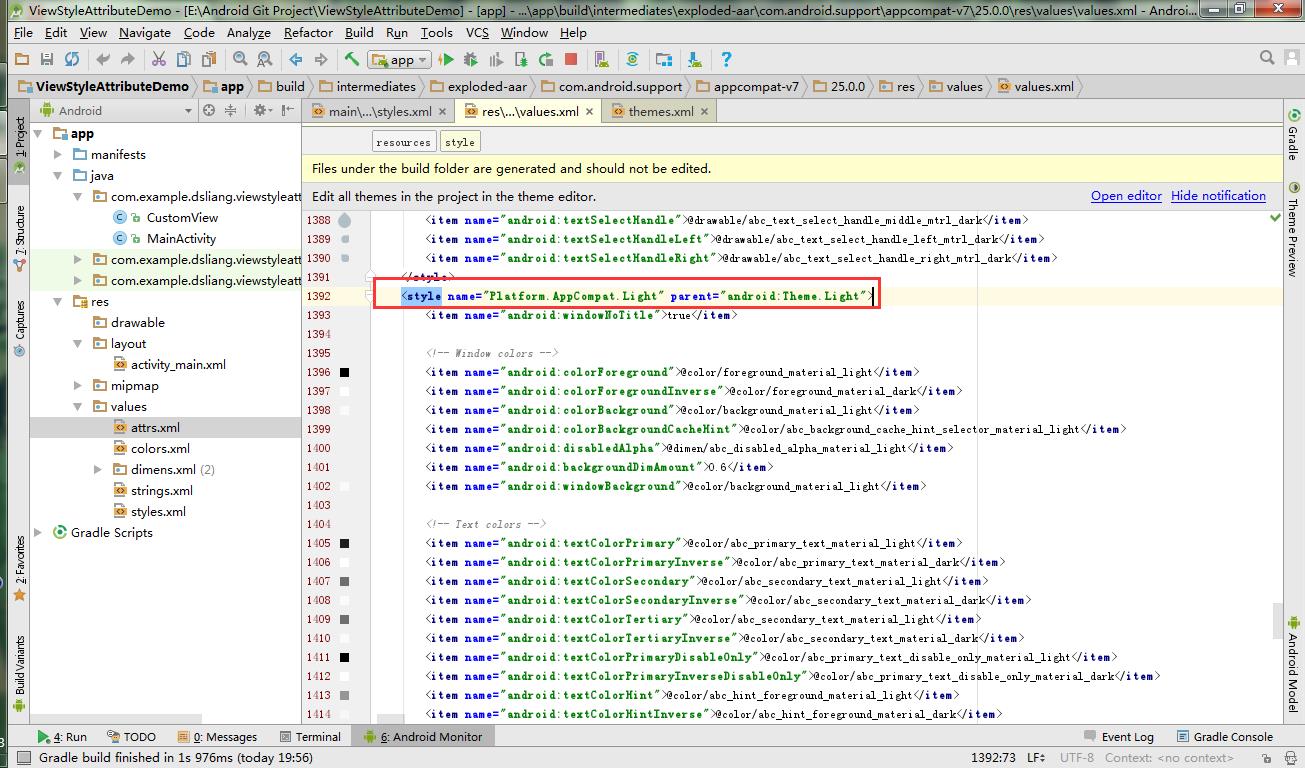

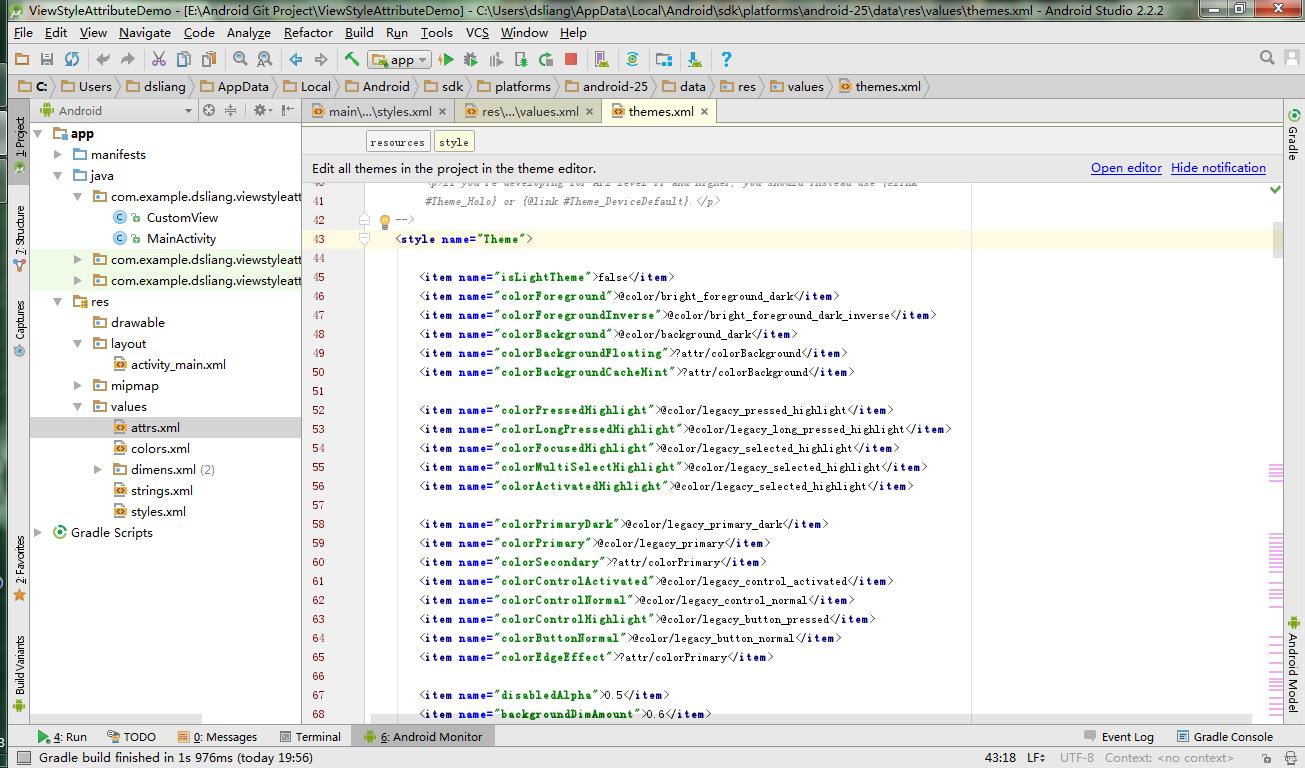
几经辛苦终于追踪到顶层的父类(Theme),当然也不是需要追踪到顶层父类的.
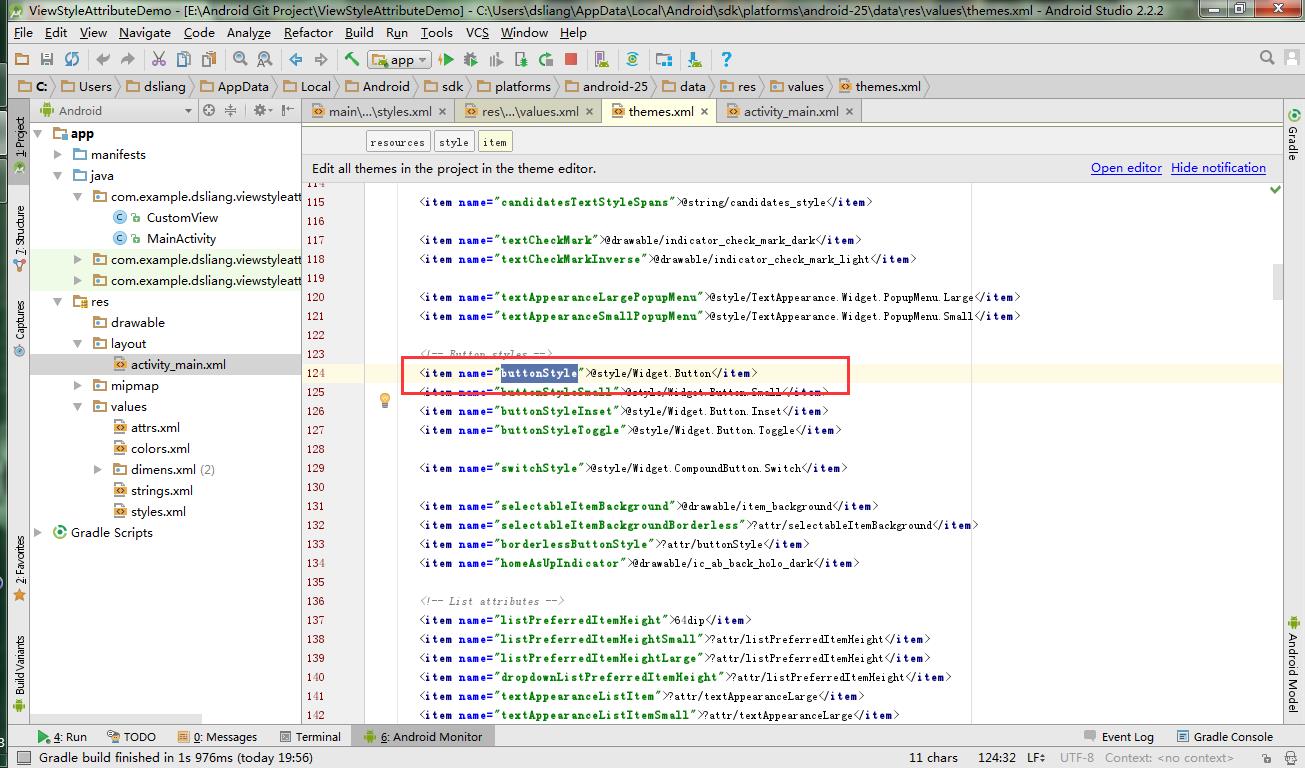

看到在父类对buttonStyle属性赋予@style/Widget.Button引用了.在结合button的构造函数看看.
知道其实我们给application或者activity设定theme的时候就静悄悄的在使用了.应该感觉看的还不够过瘾吧?来来来,见识一下最新的开发环境新功能.

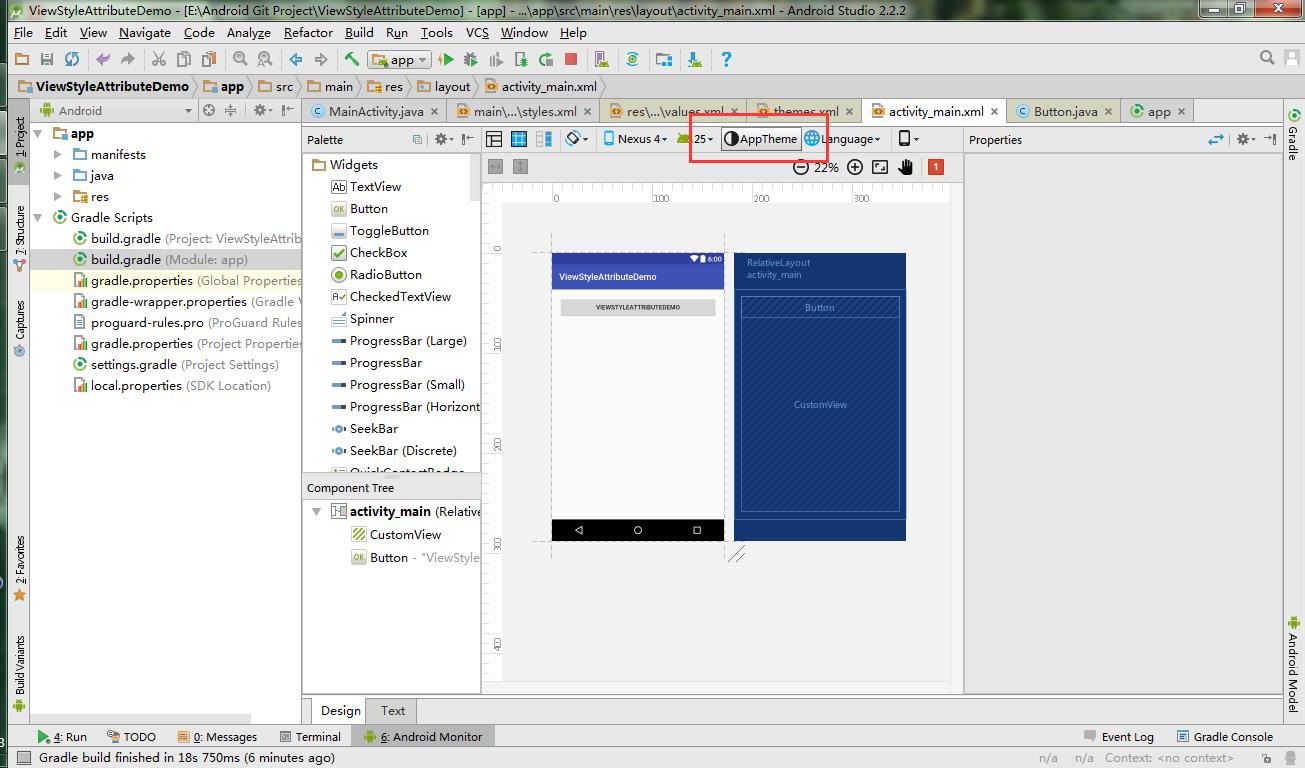
这是使用Theme主题的,可以看到有多么丑陋了吧?
其实这个时候button表现出来的是@style/Widget.Button的属性
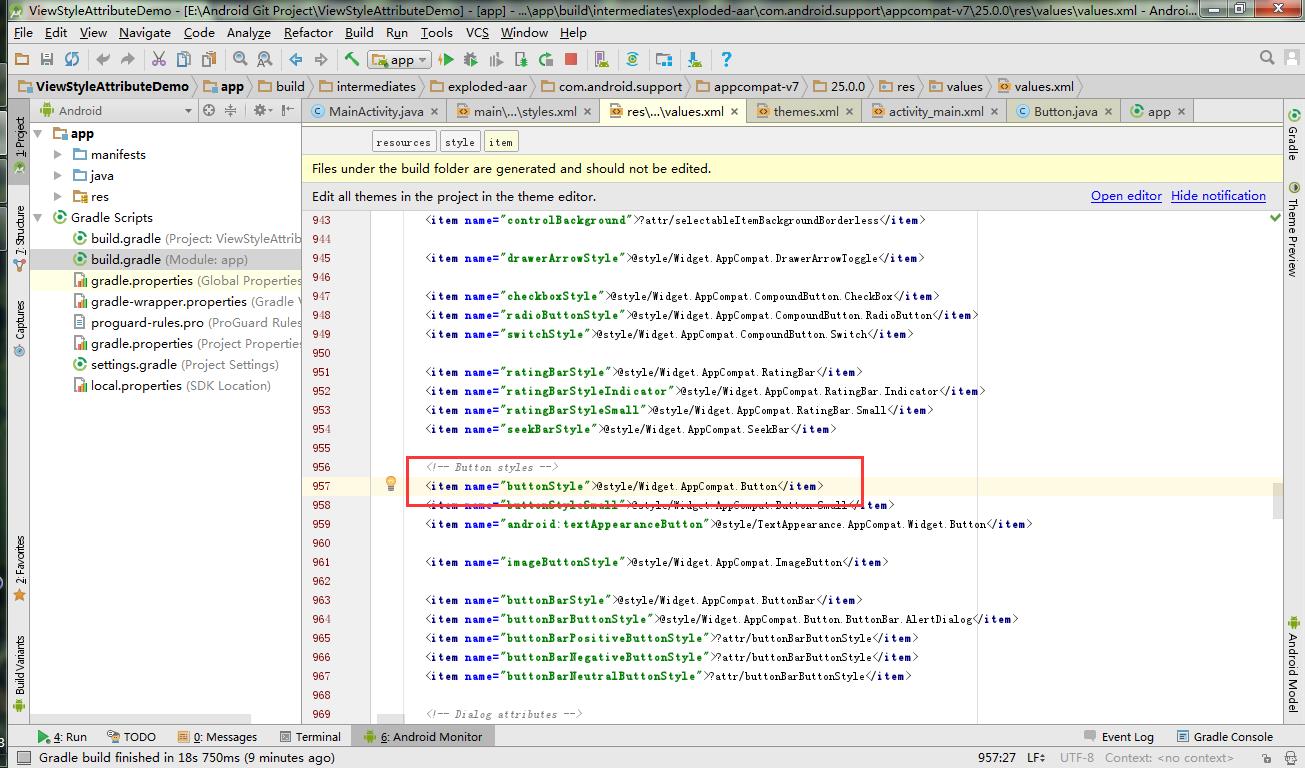
切换到AppTheme主题,这个时候特别顺眼把!来找找是哪一个style的功劳?这个时候换成了@style/Widget.AppCompat.Button的属性.
很明显把?没想到其实我们一直在默默的使用把?
结论
其实归根到底就是如何对一个属性赋值的问题,并且五种赋值方式直接优先级的次序问题而已.
附上例子github地址:
https://github.com/dsliang/ViewStyleAttributeDemo.git
以上是关于编写自定义控件构造函数的正确姿势 - defStyleAttr/defStyleRes的主要内容,如果未能解决你的问题,请参考以下文章