学会一个手写一个简单的vue-含视频
Posted _阿锋丶
tags:
篇首语:本文由小常识网(cha138.com)小编为大家整理,主要介绍了学会一个手写一个简单的vue-含视频相关的知识,希望对你有一定的参考价值。
文章目录
前言
想直接看视频的可以点击下面
视频观看我的手写简单vue全过程
代码地址:https://github.com/Zourunfa/imitate_vue/tree/main
本片文章的讲解步骤不完全按照视频里写代码的思路,但是有详细注释
准备工作
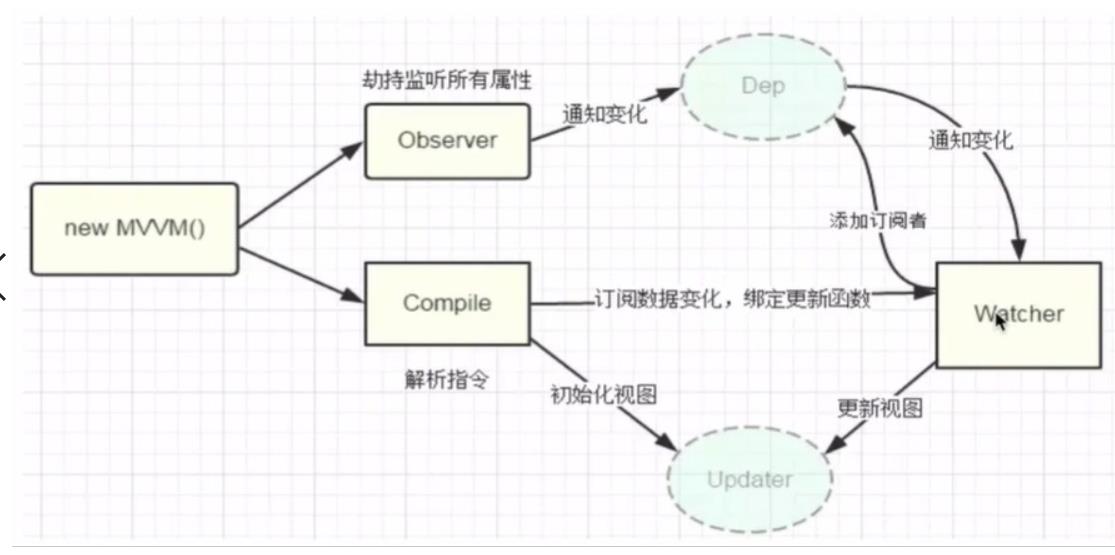
先看下面这张图,我是按照这张图的思路一步一步写的

由于时间原因 ,视频录制中已经把vue的响应式核心的部分串联,但是编译解析部分还只写了mustuche,v-html,v-text的编译解析代码,后面会进一步完善v-model,v-bind等一系列指令
先建立一个文件夹,里面放置index.html如下,然后建立下面引入的几个文件 observer.js和compiler.js,vue.js
<!DOCTYPE html>
<html lang="en">
  <head>
    <meta charset="UTF-8" />
    <meta http-equiv="X-UA-Compatible" content="IE=edge" />
    <meta name="viewport" content="width=device-width, initial-scale=1.0" />
    <title>Document</title>
  </head>
  <body>
    <div id="app">
      <p>emp.name</p>
      <p v-text="emp.hobby"></p>

      <div v-html="username"></div>
    </div>
    <script src="vue.js"></script>
    <script src="observer.js"></script>
    <script src="compiler.js"></script>
    <!-- <script src="https://cdn.jsdelivr.net/npm/vue@2.5.16/dist/vue.js"></script> -->
    <script>
      let vm = new Vue(
        el: '#app',

        data:
          username: '阿锋',

          msg: 'asdasdsadd',
          emp:
            name: 'af',
            age: '21',
            slary: 8000,
            hobby: 'guitar',
          ,
        ,
        methods:
          handleClick()
            console.log(this.emp.name);
            this.emp.name = '你好啊';
          ,
        ,
      );
    </script>
  </body>
</html>
vue.js
这就相当于new Vue的入口文件,
class Vue
  constructor(options)
    this.$data = options.data;
    this.$el = options.el;

    // console.log(options);
    this._init();


  _init()
   // 1.实现一个数据观察者
    new Observer(this.$data);
     // 2.实现一个指令的解析器
    new Compiler(this.$el, this);
Observer.js

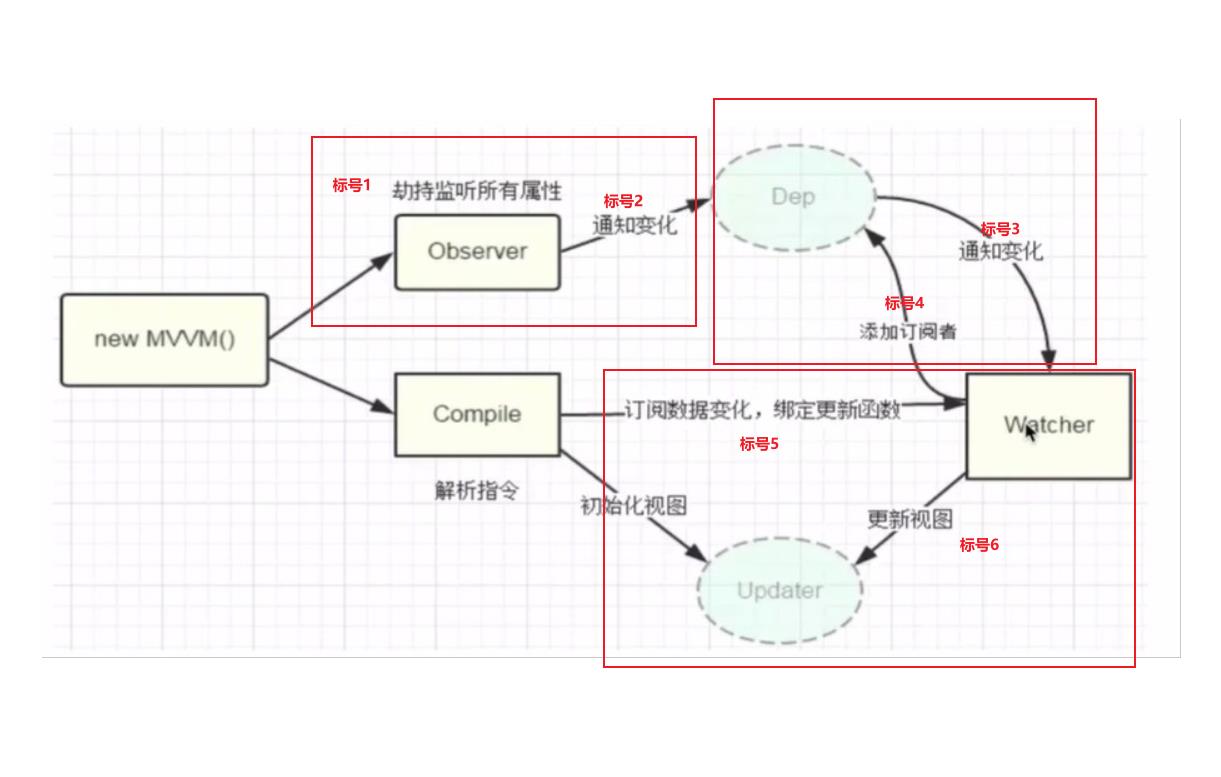
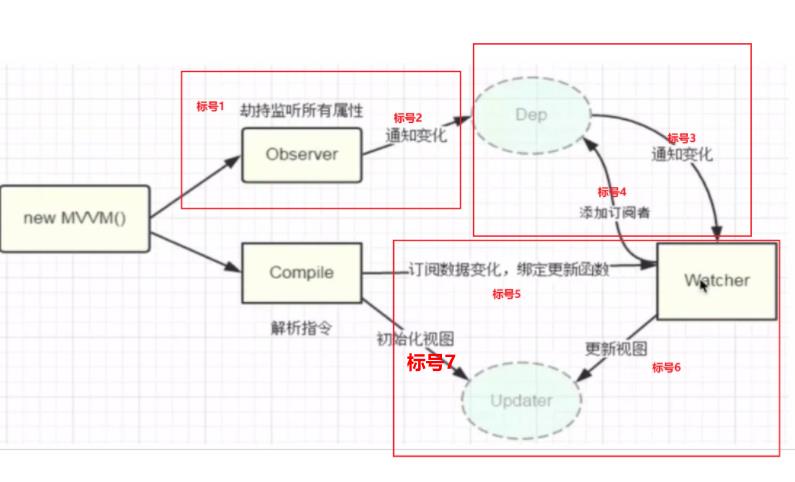
这部分有三个类,分别是Observer类,watcher类,dep类。分别对应上面响应式图的三个,
注意上面视图的标号有对应的代码,在注释里面 标注 提出来看 更方便理解
Observer

class Observer
  constructor(data)
    // console.log(data);
    this.observe(data);


  observe(data)
    if (data && typeof data === 'object')
      // console.log(Object.keys(data));
      Object.keys(data).forEach((key) =>
        // console.log(`劫持监听所有属性`);
        // 对应标号1
        this.defineReactive(data, key, data[key]);
      );


  defineReactive(obj, key, value)
    // 递归遍历
    this.observe(value);
    const dep = new Dep();

    Object.defineProperty(obj, key,
      enumerable: true,
      configurable: false,
      get()
        // 编译之前  初始化的时候
        // 订阅数据变化时,玩dep中添加观察者
        // 对应标号4 和 标号 2
        console.log(
          `getter劫持$key时 订阅数据变化时,往dep中添加观察者watcher`,
        );
        Dep.target && dep.addSub(Dep.target);
        return value;
      ,
      set: (newVal) =>
        this.observe(newVal);
        if (newVal !== value)
          value = newVal;

        // 告诉dep 通知变化
        // 对应标号3
        console.log(`setter设置新值时  调用dep.notify通知变化`);
        dep.notify();
      ,
    );
dep
// 收集watcher 通知更新
class Dep
  constructor()
    this.subs = [];


  // 收集观察者
  addSub(watcher)
    this.subs.push(watcher);

  // 通知观察者更新
  notify()
    // 通知标号3
    console.log('通知wacher更新', this.subs);
    this.subs.forEach((w) =>
      w.update();
    );
watcher
class Watcher
  constructor(expr, vm, cb)
    this.vm = vm;
    this.expr = expr;
    this.cb = cb;
    // 把旧值保存
    this.oldVal = this.getSub(expr, vm);


  getSub(expr, vm)
       //当获取旧值时把watcher挂载到当前dep的target上
       console.log(
        `当在watcher中获取旧值$this.expr时把watcher挂载到当前dep的target上`,
      );
      // 对应标号5  编译时会使用new Watcher来使用这个函数
    Dep.target = this;

    const value = compMidWare.getValue(expr, vm);
       //用完之后一定要销毁掉,不然会有重复的watcher
       Dep.target = null;
    return value;


  update()
    const newVal = compMidWare.getValue(this.expr, this.vm);

    this.cb(newVal);
compiler.js

这个文件主要是编译解析vue指令 ,然后需要注意的是 我下面代码的compMidWare就相当于图上的updater
注意上面视图的标号有对应的代码,在注释里面 标注 提出来看 更方便理解
class Compiler
  constructor(el, vm)
    this.el = document.querySelector(el);
    this.vm = vm;

    // 1,获取文档碎片对象 放入内存中会减少页面的回流和重绘
    const fragment = this.createFragment(this.el);
    // console.log(this.el);
    // 2,编译模板
    this.compile(fragment);

    // 3,追加子元素到根元素上
    this.el.appendChild(fragment);


  createFragment(el)
    // 创建文档碎片对象
    const fragment = document.createDocumentFragment();

    let firstChild;
       // 注意下面是=是赋值 拿到就填进去 并且判断是不是有child
    // 把所有节点都追加到fragment对象中
    while ((firstChild = el.firstChild))
      fragment.appendChild(firstChild);


    return fragment;


  compile(fragment)
    const childNodes = fragment.childNodes;
    // console.log(childNodes);
    [...childNodes].forEach((node) =>
      if (node.nodeType === 1)
          // 如果是元素节点,就编译它
        this.compileNode(node);
       else
         // 文本节点
        // 编译文本节点
        this.compileText(node);

      // 递归
      node.childNodes && this.compile(node);
    );


  compileNode(node)
    // console.log(node);
    const attributes = node.attributes;
    // console.log(attributes);
    [...attributes].forEach((attr) =>
      // console.log(attr);
      const  name, value  = attr;
      // console.log(name, value);
      // 's'.startsWith
      const expr = value;
      if (name.startsWith('v-'))
        const orderName = name.split('-')[1];
        // console.log(orderName);
        compMidWare[orderName](expr, node, this.vm);


      //
    );


  compileText(node)
    const text = node.textContent;
    // console.log(text);
    if (/\\\\(.+?)\\\\/.test(text))
      // console.log(node);
      const expr = text.replace(/\\\\(.+?)\\\\/, (...args) =>
        // console.log(args);
        return args[1];
      );

      // console.log(expr);
      console.log(expr);
      compMidWare['text'](expr, node, this.vm);


const compMidWare =
  // 这里用到reduce很巧妙 . 之前的pres刚好就是 . 之后的上一级对象
  getValue(expr, vm)
    return expr.split('.').reduce((pres, cur) =>
      return pres[cur];
    , vm.$data);
  ,

  html(expr, node, vm)
    // console.log(expr, node, vm);

    const value = this.getValue(expr, vm);
    // console.log(value);
    // 绑定观察者,将来数据发生变化 触发这里的回调 进行更新
    // 对应标号5
    new Watcher(expr, vm, (newValue) =>
      // console.log(newValue);
      this.toView.htmlToView(node, newValue);
    );
    // 对应标号7
    console.log(`更新当前$expr-$value到视图上`);
    this.toView.htmlToView(node, value);
  ,
  text(expr, node, vm)
    // console.log(expr, node, vm);
    // console.log(expr);
    const value = this.getValue(expr, vm);
    // console.log(value);
    // 绑定一个watcher对值进行监听  标号5
    new Watcher(expr, vm, (newValue) =>
      // console.log(newValue);
      console.log(`订阅数据变化,绑定更新函数:更新$expr 为  $newValue`);
      this.toView.textToView(node, newValue);
    );
    //   // 对应标号7
    console.log(`更新当前$expr-$value到视图上`);
    this.toView.textToView(node, value);
  ,
  on() ,
  model() ,
  toView:
    htmlToView(node, value)
      node.innerHTML = value;
    ,
    textToView(node, value)
      node.textContent = value;
    ,
  ,
;
以上是关于学会一个手写一个简单的vue-含视频的主要内容,如果未能解决你的问题,请参考以下文章