GAN Step By Step -- Step5 ACGAN
Posted 风信子的猫Redamancy
tags:
篇首语:本文由小常识网(cha138.com)小编为大家整理,主要介绍了GAN Step By Step -- Step5 ACGAN相关的知识,希望对你有一定的参考价值。
GAN Step By Step

心血来潮
GSBS,顾名思义,我希望我自己能够一步一步的学习GAN。GAN 又名 生成对抗网络,是最近几年很热门的一种无监督算法,他能生成出非常逼真的照片,图像甚至视频。GAN是一个图像的全新的领域,从2014的GAN的发展现在,在计算机视觉中扮演这越来越重要的角色,并且到每年都能产出各色各样的东西,GAN的理论和发展都蛮多的。我感觉最近有很多人都在学习GAN,但是国内可能缺少比较多的GAN的理论及其实现,所以我也想着和大家一起学习,并且提供主流框架下 pytorch,tensorflow,keras 的一些实现教学。
在一个2016年的研讨会,杨立昆描述生成式对抗网络是“机器学习这二十年来最酷的想法”。
Step5 ACGAN (Auxiliary Classifier GAN)
Auxiliary Classifier GAN
Auxiliary Classifier Generative Adversarial Network
Authors
Augustus Odena, Christopher Olah, Jonathon Shlens
Abstract
Synthesizing high resolution photorealistic images has been a long-standing challenge in machine learning. In this paper we introduce new methods for the improved training of generative adversarial networks (GANs) for image synthesis. We construct a variant of GANs employing label conditioning that results in 128x128 resolution image samples exhibiting global coherence. We expand on previous work for image quality assessment to provide two new analyses for assessing the discriminability and diversity of samples from class-conditional image synthesis models. These analyses demonstrate that high resolution samples provide class information not present in low resolution samples. Across 1000 ImageNet classes, 128x128 samples are more than twice as discriminable as artificially resized 32x32 samples. In addition, 84.7% of the classes have samples exhibiting diversity comparable to real ImageNet data.
ACGAN的全称叫Auxiliary Classifier Generative Adversarial Network,翻译过来很简单,就是带有辅助分类器的GAN
其实他的思想和CGAN很想,也是利用label的信息作为噪声的输入的条件概率,但是相比较于CGAN,ACGAN在设计上更为巧妙,他很好地利用了判别器使得不但可以判别真假,也可以判别类别,通过对生成图像类别的判断,判别器可以更好地传递loss函数使得生成器能够更加准确地找到label对应的噪声分布。
我们也可以简单看一下GAN -> CGAN -> ACGAN的一个结构变化过程
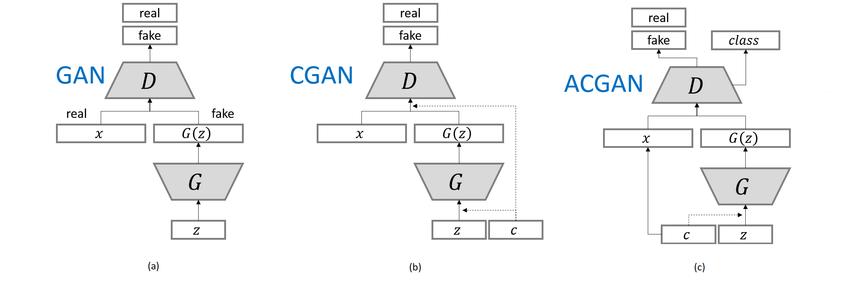
CGAN与ACGAN的区别
通过下图,我们可以很清楚的看到,与CGAN不同的是, C不直接输入 D。D 不仅需要判断每个样本的真假,还需要完成一个分类任务即预测 C ,这是通过通过增加一个辅助分类器实现。并且,我们的ACGAN的判别器不再混入label,而是在鉴别网络的输出时,把label作为target进行反馈来提交给鉴别网络的学习能力。
除此之外,可能还有一个不同的点,在DCGAN出现之后,后面的GAN几乎都使用了深度卷积网络,因为卷积能够更好的提取图片的特征值,所有ACGAN生成的图片边缘更具有连续性,感觉更真实。
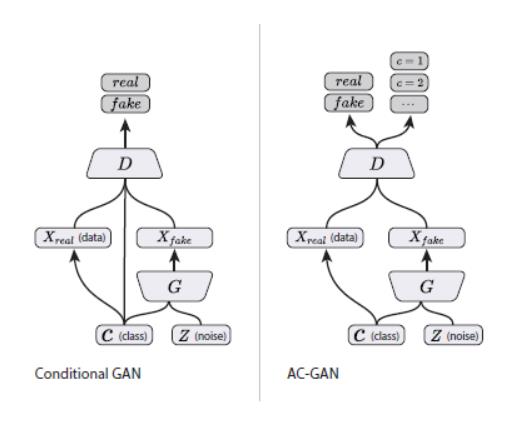
再给大家两幅图比较,这样就更加清楚了
上面第一张是 [CGAN][] 的训练模式,第二张是 ACGAN 的模式,他们的不同点具体体现在 Discriminator 上,
- CGAN 的 Discriminator 需要同时接收标签和图片信息,输出是否真实的结论
- ACGAN 的 Discriminator 只需要接收图片的输入,这点和[经典GAN][] 一样,但是需要输出图片的类别和是否真实两个任务
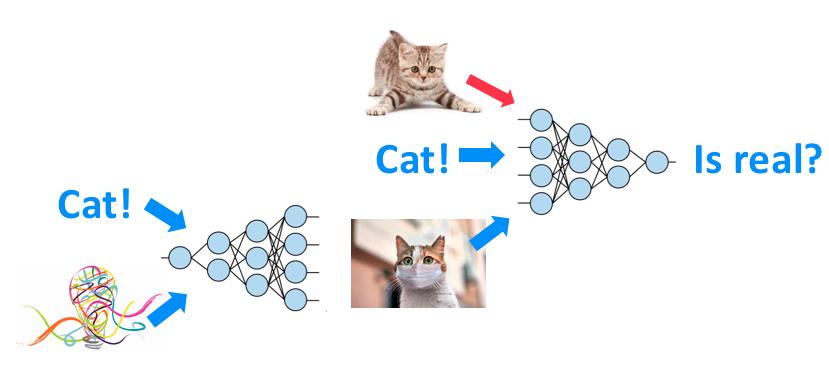
为什么这样做呢?因为作者纯粹是为了达成偷懒的目的,这样做可以加速训练。你问我是这能加速哪?这可就 tricky 了, 如果你让 Discriminator 输出标签,那这不就是一个正常 CNN 该做的事吗?这岂不是可以直接拿一个正常 CNN 来做这件事?而且既然拿来了, 我们是不是可以拿一个已经训练好的 CNN,有判别能力的 CNN?当然可以,这么做能大大减轻我们训练的难度,因为 Discriminator 能有更有能力告诉 Generator 你这个类型生成得对不对了。 当然,Discriminator 的本质工作 - 判断是否真实,也是还要继续做的。
一句话来介绍 ACGAN: 一种按条件生成图片的GAN,并且你还可以拿着预训练CNN模型来加速它的训练过程。
ACGAN的损失函数
除此之外我们先回顾一下我们CGAN的loss函数:

那么在对比一下我们ACGAN他的loss函数:

L S L_S LS表示的是真实样本对应ground truth,假的样本对应fake.
L c L_c Lc表示的是真实样本对应他真实的类别信息,假的样本对应的也是真实样本的类别信息
其实可以简单将其理解为
L s Ls Ls:可以理解为判别器将“真的”判别为“真的”,“假的”判别为“假的”的能力
L c Lc Lc:判别器将真、假数据正确分类的能力
在训练判别器的时候,我们希望 L S + L C L_S+L_C LS+LC最大化
在训练生成器的时候,我们希望 L C − L S L_C-L_S LC−LS最大化
生成器被训练为要使 L c − L s Lc-Ls Lc−Ls 最大化,即G要使Lc最大化,Ls最小化,Ls与Lc中关于真实图像的部分与G无关。Ls部分,G要使得其生成的数据被判别为假的概率最小,即要使得G生成的数据更逼真;Lc部分,G要使得其生成数据被正确分类的概率最大。
判别器被训练为要使得 L c + L s Lc+Ls Lc+Ls 最大化。即要使得判别器针对真假数据,分类、判别的能力都最大化.
MNIST数据集实验
其实和之前的CGAN,只是做了很微小的改变,生成器和CGAN相比,就是加入了卷积层,相当于把原来CGAN里面的多层感知机换成了DCGAN里面一样的深度卷积神经网络,那么判别器同理,这也是在DCGAN出现之后做的。
判别网络
首先,我们的判别网络是用卷积网络的,除此之外,判别器的输出有两个,一个是判断真假的validity,一个图片对应的label信息,相当于在卷积层的末尾相当于做了一个分叉,一边是判断真假,一边是还得判断类别.
# 判别器
class Discriminator(nn.Module):
    def __init__(self):
        super(Discriminator, self).__init__()

        def discriminator_block(in_filters, out_filters, bn=True):
            """Returns layers of each discriminator block"""
            block = [nn.Conv2d(in_filters, out_filters, 3, 2, 1), nn.LeakyReLU(0.2, inplace=True), nn.Dropout2d(0.25)]
            if bn:
                block.append(nn.BatchNorm2d(out_filters, 0.8))
            return block
        # 判别网络也利用卷积网路
        self.conv_blocks = nn.Sequential(
            *discriminator_block(opt.channels, 16, bn=False),
            *discriminator_block(16, 32),
            *discriminator_block(32, 64),
            *discriminator_block(64, 128),
        )

        # The height and width of downsampled image
        ds_size = opt.img_size // 2 ** 4

        # Output layers
        self.adv_layer = nn.Sequential(nn.Linear(128 * ds_size ** 2, 1), nn.Sigmoid())
        # 辅助分类层
        self.aux_layer = nn.Sequential(nn.Linear(128 * ds_size ** 2, opt.n_classes), nn.Softmax())

    def forward(self, img):
        out = self.conv_blocks(img)
        out = out.view(out.shape[0], -1)
        validity = self.adv_layer(out)
        label = self.aux_layer(out)
        # 判别器的输出有两个,一个是判断真假的validity,一个图片对应的label信息
        return validity, label
生成网络
# ACGAN 生成器
class Generator(nn.Module):
    def __init__(self):
        super(Generator, self).__init__()

        # 将label映射成于z一样的维度
        self.label_emb = nn.Embedding(opt.n_classes, opt.latent_dim)

        self.init_size = opt.img_size // 4  # Initial size before upsampling
        self.l1 = nn.Sequential(nn.Linear(opt.latent_dim, 128 * self.init_size ** 2))

        # 利用卷积网络
        self.conv_blocks = nn.Sequential(
            nn.BatchNorm2d(128),
            nn.Upsample(scale_factor=2),
            nn.Conv2d(128, 128, 3, stride=1, padding=1),
            nn.BatchNorm2d(128, 0.8),
            nn.LeakyReLU(0.2, inplace=True),
            nn.Upsample(scale_factor=2),
            nn.Conv2d(128, 64, 3, stride=1, padding=1),
            nn.BatchNorm2d(64, 0.8),
            nn.LeakyReLU(0.2, inplace=True),
            nn.Conv2d(64, opt.channels, 3, stride=1, padding=1),
            nn.Tanh(),
        )

    def forward(self, noise, labels):
        # 相乘起来这样便使得noise的输入是建立在label作为条件的基础上
        gen_input = torch.mul(self.label_emb(labels), noise)
        out = self.l1(gen_input)
        out = out.view(out.shape[0], 128, self.init_size, self.init_size)
        img = self.conv_blocks(out)
        return img
训练过程
判别器目标函数:
L
(
D
)
=
−
E
x
∼
pdata
log
D
(
x
)
−
E
z
log
[
1
−
D
(
G
(
z
∣
y
)
)
]
−
E
x
∼
pdata
p
(
c
∣
x
)
−
E
z
log
p
(
c
∣
g
(
z
∣
y
)
)
\\mathcalL^(\\mathrmD)=-\\mathbbE_\\mathrmx \\sim \\text pdata \\log \\mathrmD(\\mathrmx)-\\mathbbE_\\mathrmz \\log [1-\\mathrmD(\\mathrmG(\\mathrmz \\mid \\mathrmy))]-\\mathbbE_\\mathrmx \\sim \\text pdata \\mathrmp(\\mathrmc \\mid \\mathrmx)-\\mathbbE_\\mathrmz \\log \\mathrmp(\\mathrmc \\mid \\mathrmg(\\mathrmz \\mid \\mathrmy))
L(D)=−Ex∼ pdata logD(x)−Ezlog[1−D(G(z∣y))]−Ex∼ pdata p(c∣x)−Ezlogp(c∣g(z∣y))
生成器目标函数:
L
(
G
)
=
−
E
z
log
D
(
g
(
z
∣
y
)
)
−
E
z
log
p
(
c
∣
g
(
z
∣
y
)
)
\\mathcalL^(G)=-\\mathbbE_\\mathrmz \\log \\mathrmD(\\mathrmg(\\mathrmz \\mid \\mathrmy))-\\mathbbE_\\mathrmz \\log \\mathrmp(\\mathrmc \\mid \\mathrmg(\\mathrmz \\mid \\mathrmy))
L(G)=−EzlogD(g(z∣y))−Ezlogp(c∣g(z∣y))
# ----------
# Training
# ----------
for epoch in range(opt.n_epochs):
epoch_step = len(dataloader)
with tqdm(total = epoch_step,desc = f'Epoch epoch+1:3d/opt.n_epochs:3d',postfix=dict,mininterval=0.3) as pbar:
for i, (imgs, labels) in enumerate(dataloader):
batch_size = imgs.shape[0]
# Adversarial ground truths
# 得到对抗的ground truths,valid全为1, fake全为0
valid = Variable(FloatTensor(batch_size, 1).fill_(1.0), requires_grad=False)
fake = Variable(FloatTensor(batch_size, 1).fill_(0.0), requires_grad=False)
# Configure input 转化数据格式
real_imgs = Variable(imgs.type(FloatTensor))
labels = Variable(labels.type(LongTensor))
# Sample noise and labels as generator input
# z为设置的噪声,用正态分布来随机生成,均值为0,方差为1
z = Variable(FloatTensor(np.random.normal(0, 1, (batch_size, opt.latent_dim))))
gen_labels = Variable(LongTensor(np.random.randint(0, opt.n_classes, batch_size)))
# Generate a batch of images
# 生成一个batch的图片,并且ACGAN加入生成的labels
gen_imgs = generator(z, gen_labels)
# ---------------------
# Train Discriminator 训练判别器
# ---------------------
optimizer_D.zero_grad()
# Loss for real images
real_pred, real_aux = discriminator(real_imgs)
d_real_loss = (adversarial_loss(real_pred, valid) + auxiliary_loss(real_aux, labels)) / 2
# Loss for fake images
fake_pred, fake_aux = discriminator(gen_imgs.detach())
d_fake_loss = (adversarial_loss(fake_pred, fake) + auxiliary_loss(fake_aux, gen_labels)) / 2
# Total discriminator loss
# 不仅需要判别类别正确,并且也需要正确判定真假
d_loss = (d_real_loss + d_fake_loss) / 2 # -(LS + LC)
# Calculate discriminator accuracy
pred = np.concatenate([real_aux.data.cpu().numpy(), fake_aux.data.cpu().numpy()], axis=0)
gt = np.concatenate([labels.data.cpu().numpy(), gen_labels.data.cpu().numpy()], axis=0)
d_acc = np.mean(np.argmax(pred, axis=1) == gt)
d_loss.backward() # 进行反向传播
optimizer_D.step() # 更新参数
# -----------------
# Train Generator 训练生成器
# -----------------
optimizer_G.zero_grad()
# Loss measures generator's ability to fool the discriminator
validity, pred_label = discriminator(gen_imgs)
# 使得生成图片的loss最小,并且生成图片的label与指定的loss也是最小的
g_loss = 0.5 * (adversarial_loss(validity, valid) + auxiliary_loss(pred_label, gen_labels))
g_loss.backward() # 进行反向传播
optimizer_G.step() # 更新参数
# 每sample_interval个batchs后保存一次images,图片放在images文件夹下
batches_done = epoch * len(dataloader) + i
if batches_done % opt.sample_interval == 0:
sample_image(n_row=10, batches_done=batches_done)
# 利用tqdm实时的得到我们的损失的结果
pbar.set_postfix(**'D Loss' : d_loss.item(),
'G Loss' : g_loss.item(),
'ACGAM Acc': GAN Step By Step -- Step5 ACGAN
GAN Step By Step -- Step1 GAN介绍
GAN Step By Step -- Step1 GAN介绍