Flutter项目开发之仿微信的Excel报表
Posted Xiao冰同学
tags:
篇首语:本文由小常识网(cha138.com)小编为大家整理,主要介绍了Flutter项目开发之仿微信的Excel报表相关的知识,希望对你有一定的参考价值。
Flutter 仿微信excel功能
前言
在项目开发中,报表是一个很常见的功能,有利于使用者一眼能看出数据的趋势与规律,非常适合数量大,且种类繁多的数据查看与对比。虽然Flutter提供了 Table,DataTable等相关的组件,但是在实际项目开发中,功能、扩展性、实用性、灵活性等十分有限,可以说几乎不可能不经调整修改能直接用于生产项目,笔者这次将详细讲解如何运用Flutter技术开发报表。
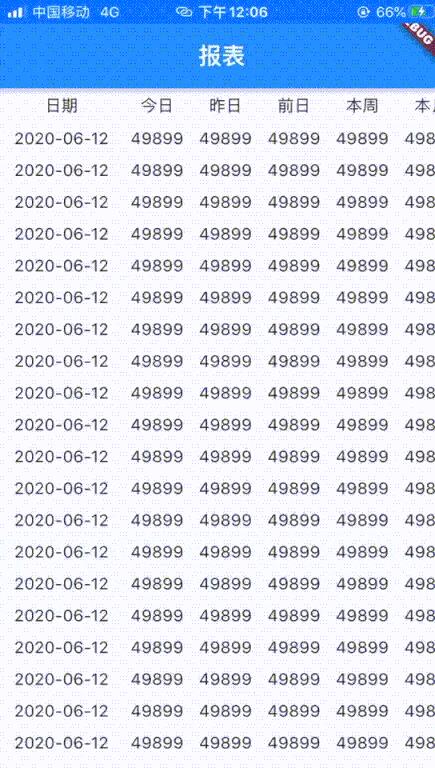
效果预览

需求实现
| 实现需求 | 是否实现 |
|---|---|
| android、ios跨平台 | ✅ |
| 首列固定 | ✅ |
| 标题行固定 | ✅ |
| 首列跟随内容列上下滑动联动 | ✅ |
| 标题行跟随内容行左右滑动联动 | ✅ |
开发环境
| 所需环境 | 功能描述 |
|---|---|
| Flutter 1.22.6.stable | 跨平台的UI框架 |
| flutter_screenutil: 4.0.4+1 | Flutter屏幕适配插件 |
在 pubspec.yaml 文件中添加依赖
flutter_screenutil: 4.0.4+1
技术分析
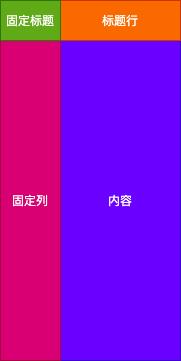
将整个报表分为4个部分,左上的固定列标题,左下的固定列、右上的标题行、右下的内容。由此看出,Table、Datatable 是不适用于这种功能的开发,所以笔者决定用 ListView来实现这个需求。固定列、标题行、内容3个部分采用ListView,左边的固定列是垂直滑动的ListView,右上面的标题行是 水平滑动的ListVie,右下面的是 既可以垂直滑动,又可以水平滑动的ListView,而左上的固定列标题使用普通的组件。这样就可以实现仿Excel的报表。功能分解可以参考如下图所示

技术实现
初步定义组件
组件所需要的无非是 数据源、标题行,另外增加了一些样式参数,代码如下
class DataGrid extends StatefulWidget
  final List<Map> datas; // 数据源

  final List<String> titleRow; // 标题行

  final Alignment cellAlignment; // 单元格对齐方式

  final EdgeInsets cellPadding; // 单元格 内边距

  final Color borderColor; // 边框颜色

  final String fixedKey;	// 固定列的key

  final String fixedTitle;	 // 固定列的标题

  const DataGrid(
    Key key,
    this.datas,
    this.titleRow,
    this.fixedTitle,
    this.fixedKey,
    this.cellAlignment,
    this.cellPadding,
    this.borderColor,
    ) : super(key: key);

  @override
  _DataGridState createState() => _DataGridState();

......
单元格
单元格的渲染分为两种,被合并的单元格与普通的单元格。普通单元格需要有四面边框,而被合并的单元格则需要去除相对应的边框。
定义渲染边框的方法,控制单元格的边框渲染,代码如下所示
Border _buildBorderSide(bool hideLeft = false, bool hideRight = false, bool hideTop = false, bool hideBottom = false)
  final double borderWidth = 0.33;
  return Border(
      bottom: hideBottom ?
      BorderSide.none
          :
      BorderSide(width: borderWidth, color: widget.borderColor ?? widget.LIGHT_GREY),
      top: hideTop ?
      BorderSide.none
          :
      BorderSide(width: borderWidth, color: widget.borderColor ?? widget.LIGHT_GREY),
      right: hideRight ?
      BorderSide.none
          :
      BorderSide(width: borderWidth, color: widget.borderColor ?? widget.LIGHT_GREY),
      left: hideLeft ?
      BorderSide.none
          :
      BorderSide(width: borderWidth, color: widget.borderColor ?? widget.LIGHT_GREY)
  );
构件单元格的方法如下所示
Widget _buildCell(String title,
  bool hideLeft = false, bool hideRight = false, bool hideTop = false,
  bool hideBottom = false, bool hideTitle = false, Color bgColor)
  return IntrinsicHeight(
      child: Container(
          alignment: widget.cellAlignment ?? Alignment.center,
          padding: widget.cellPadding ?? EdgeInsets.fromLTRB(0, 15.0.h, 0, 15.h),
          decoration: BoxDecoration(
              border: _buildBorderSide(
                  hideLeft: hideLeft,
                  hideRight: hideRight,
                  hideTop: hideTop,
                  hideBottom: hideBottom
              ),
              color: bgColor
          ),
          child: Opacity(
              opacity: hideTitle ? 0 : 1,
              child: Text(
                title,
                maxLines: 1,
                overflow: TextOverflow.ellipsis,
                style: TextStyle(fontSize: 14, color: widget.borderColor ?? ColorHelper.TEXT_BLACK),
              ))
      )
  );
温馨提示:上面代码的 IntrinsicHeight 组件可能用的很少,这是一个智能根据子组件的高度自动调整的组件,类似于 Android 的 wrap_content
构件空单元格
  Widget _buildEmptyCell()
    return IntrinsicHeight(
        child: Container(
            alignment: widget.cellAlignment ?? Alignment.center,
            padding: widget.cellPadding ?? EdgeInsets.fromLTRB(0, 20.0.h, 0, 20.h),
            decoration: BoxDecoration(
                border: Border(
                  bottom: BorderSide(width: 0.33, color: widget.borderColor ?? ColorHelper.LIGHT_GREY),
                  top: BorderSide(width: 0.33, color: widget.borderColor ?? ColorHelper.LIGHT_GREY),
                  right: BorderSide(width: 0.33, color: widget.borderColor ?? ColorHelper.LIGHT_GREY),
                  left: BorderSide(width: 0.33, color: widget.borderColor ?? ColorHelper.LIGHT_GREY),
                )
            ),
            child: Text(
              '',
              maxLines: 1,
              overflow: TextOverflow.ellipsis,
              style: TextStyle(fontSize: 14, color: widget.borderColor ?? ColorHelper.TEXT_BLACK),
            )
        )
    );
技术难点
- 如何让垂直滑动内容的时候联动标题列移动
- 如何让水平滑动内容的时候联动标题行移动
- 如何让内容既可以水平滑动又可以垂直滑动
解决方案
针对问题 1, 2 ,每个可滚动的组件都可以用一个 ScrollController 来控制、监听、记录滚动的位置,所以我们可以利用ScrollController来实现联动 。定义4个 ScrollController 对象,一个负责固定列,一个负责标题行、一个负责内容的横向滚动,一个负责内容的纵向滚动,代码如下
//定义可控制滚动组件
ScrollController firstColumnController = ScrollController();
ScrollController secondColumnController = ScrollController();

ScrollController firstRowController = ScrollController();
ScrollController secondedRowController = ScrollController();

 // 固定列的宽度
 final double columnWidth = 780.0.w;
在 initState方法里面,绑定各个ScrollController对象的联动关系
  @override
  void initState()
    super.initState();
    //监听固定列滚动
    firstColumnController.addListener(()
      if (firstColumnController.offset != secondColumnController.offset)
        secondColumnController.jumpTo(firstColumnController.offset);

    );

    //监听第内容行的纵向滚动
    secondColumnController.addListener(()
      if (firstColumnController.offset != secondColumnController.offset)
        firstColumnController.jumpTo(secondColumnController.offset);

    );

    //监听标题行的滚动
    firstRowController.addListener(()
      if (firstRowController.offset != secondedRowController.offset)
        secondedRowController.jumpTo(firstRowController.offset);

    );

    //监听第内容行的横向滚动
    secondedRowController.addListener(()
      if (firstRowController.offset != secondedRowController.offset)
        firstRowController.jumpTo(secondedRowController.offset);

    );
固定列与固定单元格 代码如下
                Container(
                  width: 300.w,
                  height: 1900.h,
                  child: Column(
                    children: [
                      Table(
                        children: [
                          TableRow(
                            children: [
                              _buildCell(
                                '$widget.fixedTitle ?? ''',
                                hideBottom: true,
                                hideTop: true,
                                hideLeft: true,
                                bgColor: ColorHelper.LIGHT_GREY
                              ),
                            ]
                          ),
                        ],
                      ),
                      Expanded(
                        child: ListView(
                          controller: firstColumnController,
                          children: [
                            Table(children: _buildTableColumnOne()),
                          ],
                        ),
                      ),
                    ],
                  ),
                ),
实现既可以纵向滚动又可以横向滚动的内容
针对问题3,可以采用 ListView内部嵌套 SingleChildScrollView组件来实现内容的既可以横向滚动又可以纵向滚动,SingleChildScrollView负责横向滚动,ListView负责纵向滚动,并且SingleChildScrollView必须有一个确定的宽度。具体代码可参考如下所示
ListView(
	controller: thirdColumnController,
	children: [
	  SingleChildScrollView(
	    controller: secondedRowController,
	    scrollDirection: Axis.horizontal,
	    child: IntrinsicWidth(
	        child: Container(
	          padding: EdgeInsets.only(bottom: 10.h),
	          // 避免行数未填满时,下边框消失
	          child: ...
	          width: 1000.w
	        )
	      )
	    )
	],
)
完整代码如下
import 'package:flutter/cupertino.dart';
import 'package:flutter/material.dart';
import 'package:flutter_study/common/util/color_helper.dart';
import 'package:flutter_screenutil/flutter_screenutil.dart';

/// 数据表格
class DataGrid extends StatefulWidget

  final List<Map> datas; // 数据源

  final List<String> titleRow; // 标题行

  final Alignment cellAlignment; // 单元格对齐方式

  final EdgeInsets cellPadding; // 单元格 内边距

  final Color borderColor; // 边框颜色

  final String fixedKey;	// 固定列的key

  final String fixedTitle;	 // 固定列的标题

  const DataGrid(
    Key key,
    this.datas,
    this.titleRow,
    this.fixedTitle,
    this.fixedKey,
    this.cellAlignment,
    this.cellPadding,
    this.borderColor,
    ) : super(key: key);

  @override
  _DataGridState createState() => _DataGridState();


class _DataGridState extends State<DataGrid>

  final List<String> fixedColumn = [];

  final List<Map> datas = [];

  //定义可控制滚动组件
  final ScrollController firstColumnController = ScrollController();

  final ScrollController thirdColumnController = ScrollController();

  final ScrollController firstRowController = ScrollController();

  final ScrollController secondedRowController = ScrollController();

  // 非浮动的列宽
  final double columnWidth = 390;

  final Color LIGHT_GREY = Color.fromRGBO(244, 247, 252, 1);

  @override
  void initState()
    super.initState();
    //监听第一列变动
    firstColumnController.addListener(()
      if (firstColumnController.offset != thirdColumnController.offset)
        thirdColumnController.jumpTo(firstColumnController.offset);

    );

    //监听第三列变动
    thirdColumnController.addListener(()
      if (firstColumnController.offset != thirdColumnController.offset)
        firstColumnController.jumpTo(thirdColumnController.offset);

    );

    //监听第一行变动
    firstRowController.addListener(()
      if (firstRowController.offset != secondedRowController.offset)
        secondedRowController.jumpTo(firstRowController.offset);

    );

    //监听第二行变动
    secondedRowController.addListener(()
      if (firstRowController.offset != secondedRowController.offset)
        firstRowController.jumpTo(secondedRowController.offset);

    );
    widget.datas.forEach((e)
      fixedColumn.add(e[widget.fixedKey].toString());
      e.remove(widget.fixedKey);
      datas.add(e);
    );


  @override
  Widget build(BuildContext context)
    return Container(
      color: Colors.white,
      child: NotificationListener(
        child: Scaffold(
          body: Container(
            height: 1900.h,
            width: 1080.w,
            color: ColorHelper.DAY_TEXT,
            child: Row(
              children: [
                Container(
                  width: 300.w,
                  height: 1900.h,
                  child: Column(
                    children: [
                      Table(
                        children: [
                          TableRow(
                            children: [
                              _buildCell(
                                '$widget.fixedTitle ?? ''',
                                hideBottom: true,
                                hideTop: true,
                                hideLeft: true,
                                bgColor: ColorHelper.LIGHT_GREY
                              ),
                            ]
                          ),
                        ],
                      ),
                      Expanded(
                        child: ListView(
                          controller: firstColumnController,
                          children: [
                            Table(children: _buildTableColumnOne()),
                          ],
                        ),
                      ),
                    ],
                  ),
                ),
                //其余列
              Expanded(
                child: Container(
                  child: Column(
                    children: [
                      SingleChildScrollView(
                        scrollDirection: Axis.horizontal, //horizontal
                        controller: firstRowController,
                        child: IntrinsicWidth(
                          child: Container(
                            child: Table(children: _buildTableFirstRow()),
                            width: 1000.w,
                          )
                        )
                      ),
                      Expanded(
                        child: ListView(
                          controller: thirdColumnController,
                          children: [
                            SingleChildScrollView(
                              controller: secondedRowController,
                              scrollDirection: Axis.horizontal,
                              child: IntrinsicWidth(
                                  child: Container(
                                    padding: EdgeInsets.only(bottom: 10.h),
                                    // 避免行数未填满时,下边框消失
                                    child: Table(children: _buildTableRow()),
                                    width: 1000.w
                                  )
                                )
                              )
                            ],
                          ),
                        ),
                      ]
                    ),
                  ),
                ),
              ],
            ),
          )
        ),
      ),
    );


  /*
   * 创建固定列
   * 比如时间列固定,只会响应垂直滑动
   * 当为非日报时,会多一行的单元行占位
   */
  List<TableRow> _buildTableColumnOne()
    List<TableRow> returnList = [];
    int i = 0;
    fixedColumn?.forEach((e)
      returnList.add(_buildSingleColumnOne(
          e, bgColor: i % 2 == 0 ? LIGHT_GREY : ColorHelper.LIGHT_GREY));
      i++;
    );
    return returnList;


  /*
   * 创建数据行
   * 渲染数据行
   */
  List<TableRow> _buildTableRow()
    List<TableRow> returnList = [];
    int i = 0;
    this.datas.forEach((e)
      Color bgColor = i % 2 == 0 ? LIGHT_GREY : ColorHelper.LIGHT_GREY;
      List<String> vals = [];
      e.values.forEach((v)
        vals.add(v.toString());
      );
      returnList.add(
          _buildRow(vals, isTitle: false, bgColor: bgColor));
      i++;
    );
    return returnList;


  /*
   * 创建第一行表头
   * 该数据行只会左右滑动,上下滑动时在最上面浮动
   * 当为非日报时,多生成一个标题行
   */
  List<TableRow> _buildTableFirstRow()
    List<TableRow> returnList = [];
    returnList.add(_buildRow(widget.titleRow, isTitle: true));
    return returnList;


  /*
   * 创建一列
   * 左固定的列的第一行,这个单元格不会有任何的滑动
   */
  TableRow _buildSingleColumnOne(String text,
      bool isTitle = false, Color bgColor)
    return TableRow(
        children: [
          _buildCell(
            isTitle ? '$widget.fixedTitle ?? ''' : '$text ?? ''',
            bgColor: bgColor,
            hideLeft: true,
            hideTop: true,
            hideBottom: true,
          ),
        ]
    );


  /*
   * 构建每行数据的单元格
   * 当为月报与年报的时候,一个通道拥有3个单元格
   */
  TableRow _buildRow(List<String> textList,
      bool isTitle = false, Color bgColor = ColorHelper.LIGHT_GREY)
    List<Widget> wd = [];
    textList.forEach((e)
      wd.add(_buildCell(e, hideRight: true,
          hideTop: true,
          hideBottom: true,
          hideLeft: true,
          bgColor: bgColor));
    );
    return TableRow(
        children: wd
    );


  /*
   * 构建月报与年报时的 第二行标题
   */
  TableRow _buildSecondTitleRow()
    List<Widget> wd = [];
    widget.titleRow.forEach((e)
      wd.add(_buildCell('平均值', bgColor: ColorHelper.LIGHT_GREY,
          hideRight: true,
          hideTop: true,
          hideBottom: true));
      wd.add(_buildCell('最大值', bgColor: ColorHelper.LIGHT_GREY,
          hideRight: true,
          hideTop: true,
          hideBottom: true,
          hideLeft: true));
      wd.add(_buildCell('最小值', bgColor: ColorHelper.LIGHT_GREY,
          hideLeft: true,
          hideTop: true,
          hideBottom: true));
    );
    return TableRow(
        children: wd
    );


  /*
   * 构建空的单元格
   */
  Widget _buildEmptyCell()
    return IntrinsicHeight(
      child: Container(
          alignment: widget.cellAlignment ?? Alignment.center,
          padding: widget.cellPadding ??
              EdgeInsets.fromLTRB(0, 20.0.h, 0, 20.h),
          decoration: BoxDecoration(
              border: Border(
                bottom: BorderSide(width: 0.33,
                    color: widget.borderColor ?? ColorHelper.LIGHT_GREY),
                top: BorderSide(width: 0.33,
                    color: widget.borderColor ?? ColorHelper.LIGHT_GREY),
                right: BorderSide(width: 0.33,
                    color: widget.borderColor ?? ColorHelper.LIGHT_GREY),
                left: BorderSide(width: 0.33,
                    color: widget.borderColor ?? ColorHelper.LIGHT_GREY),
              )
          ),
          child: Text(
            '',
            maxLines: 1,
            overflow: TextOverflow.ellipsis,
            style: TextStyle(fontSize: 14,
                color: widget.borderColor ?? ColorHelper.TEXT_BLACK),
          )
      )
    );


  // 构建被合并的单元格
  Widget _buildCell(String title,
    bool hideLeft = false, bool hideRight = false, bool hideTop = false,
    bool hideBottom = false, bool hideTitle = false, Color bgColor)
    return IntrinsicHeight(
        child: Container(
            alignment: widget.cellAlignment ?? Alignment.center,
            padding: widget.cellPadding ??
                EdgeInsets.fromLTRB(0, 15.0.h, 0, 15.h),
            decoration: BoxDecoration(
                border: _buildBorderSide(
                    hideLeft: hideLeft,
                    hideRight: hideRight,
                    hideTop: hideTop,
                    hideBottom: hideBottom
                ),
                color: bgColor
            ),
            child: Opacity(
                opacity: hideTitle ? 0 : 1,
                child: Text(
                  title,
                  maxLines: 1,
                  overflow: TextOverflow.ellipsis,
                  style: TextStyle(fontSize: 14,
                      color: widget.borderColor ?? ColorHelper.TEXT_BLACK),
                ))
        )
    );


  Border _buildBorderSide(
      bool hideLeft = false, bool hideRight = false, bool hideTop = false, bool hideBottom = false)
    final double borderWidth = 0.33;
    return Border(
        bottom: hideBottom ?
        BorderSide.none
            :
        BorderSide(
            width: borderWidth, color: widget.borderColor ?? LIGHT_GREY),
        top: hideTop ?
        BorderSide.none
            :
        BorderSide(
            width: borderWidth, color: widget.borderColor ?? LIGHT_GREY),
        right: hideRight ?
        BorderSide.none
            :
        BorderSide(
            width: borderWidth, color: widget.borderColor ?? LIGHT_GREY),
        left: hideLeft ?
        BorderSide.none
            :
        BorderSide(
            width: borderWidth, color: widget.borderColor ?? LIGHT_GREY)
    );
使用该组件
代码如下
import 'package:flutter/material.dart';
import 'package:flutter_study/common/ui/datagrid.dart';

class TestScrollView extends StatefulWidget
  const TestScrollView(Key key) : super(key: key);

  @override
  _TestScrollViewState createState() => _TestScrollViewState();


class _TestScrollViewState extends State<TestScrollView>

  List<Map> datas = [];

  @override
  void initState()
    super.initState();


  @override
  Widget build(BuildContext context)
    datas = _getData();
    return Scaffold(
      appBar: AppBar(
        title: Text('报表'),
      ),
      body: _buildBody(),
    );


  Widget _buildBody()
    return Container(
      child: DataGrid(
        datas: datas,
        fixedKey: 'day',
        fixedTitle: '日期',
        titleRow: ['今日', '昨日', '前日', '本周', '本月', '本年'],
      ),
    );


// 生成数据源
  List<Map> _getData()
    List<Map> datas = [];
    for (int i = 0; i < 100; i++)
      Map data = ;
      data['day'] = '2020-06-12';
      data['today'] = 49899;
      data['yesterday'] = 49899;
      data['beforeday'] = 49899;
      data['week'] = 49899;
      data['month'] = 49899;
      data['year'] = 49899;
      datas.add(data);

    return datas;
这样就能实现预览中的效果,读者可以根据实际业务场景调整代码。
注意事项
如果是既可以横向滑动又可以纵向滑动的组件必须确定 一个宽度或者高度。Flutter 允许直接设置组件高度或者宽度,也可以通过设置子组件的宽度或者高度来确定组件的宽度或者高度
以上是关于Flutter项目开发之仿微信的Excel报表的主要内容,如果未能解决你的问题,请参考以下文章