2Spring 源码学习 ~ Spring 容器的基本实现
Posted 戴泽supp
tags:
篇首语:本文由小常识网(cha138.com)小编为大家整理,主要介绍了2Spring 源码学习 ~ Spring 容器的基本实现相关的知识,希望对你有一定的参考价值。
Spring 容器的基本实现
博客使用源码地址:https://github.com/RononoaZoro/archer-spring.git
前言
大家好,我是小罗,一个普通的码农,在我们使用 Java 进行企业后台项目开发时, Spring 可以说是绕不开的框架,为此我们有必要来学习 Spring 的用法,以及在源码层面是怎么来实现这些功能的,学习源码的目的,对于小罗我来说,大致如下:
- a、更好的使用 Spring:熟悉 Spring 源码,可以让我们更好的应用它,包括在需要的时候可以拓展它的功能,来满足特殊的需求
- b、建立编码的基准线:了解大师们写代码的风格,建立起我自己编码的品位
- c、掌握学习源码的学习方法:为学习其他的框架代码(如 mybatis,dubbo等)打下基础
下面就请跟着小罗一起来学习 Spring 源码吧!
一、容器的基本用法
问题:怎么使用 Spring 呢?
一句话概括:往容器中注册 bean,再通过容器取到注册的bean来使用
0、引入依赖
ext
        //spring libs
        springVersion = '5.3.23'

        //logging libs
        slf4jVersion = '1.7.25'
        logbackVersion = '1.2.3'

        // lombok jdk 17 兼容版本 最低 1.18.20
        lombokVersion = '1.18.20'

        spring = [
                context: "org.springframework:spring-context:$springVersion",
        ]

        other = [
                slf4jJcl       : "org.slf4j:jcl-over-slf4j:$slf4jVersion",
                logback        : "ch.qos.logback:logback-classic:$logbackVersion",
                lombok         : "org.projectlombok:lombok:$lombokVersion"
        ]
1、Bean
package com.luo.spring.guides.helloworld.common;

import lombok.Data;

/**
 * @author : archer
 * @date : Created in 2022/9/28 17:21
 * @description :
 */
@Data
public class TestBean
    private String testStr;

    public TestBean()
        this.testStr = "helloworld";
2、beanfactory-test.xml 配置
<?xml version="1.0" encoding="UTF-8"?>
<beans xmlns="http://www.springframework.org/schema/beans"
       xmlns:xsi="http://www.w3.org/2001/XMLSchema-instance"
       xmlns:p="http://www.springframework.org/schema/p"
       xsi:schemaLocation="http://www.springframework.org/schema/beans
        http://www.springframework.org/schema/beans/spring-beans.xsd">

    <bean id="testBean" class="com.luo.spring.guides.helloworld.common.TestBean"/>

</beans>
3、测试
package helloworld;

import com.luo.spring.guides.helloworld.common.TestBean;
import org.junit.jupiter.api.Test;
import org.springframework.beans.factory.BeanFactory;
import org.springframework.beans.factory.xml.XmlBeanFactory;
import org.springframework.core.io.ClassPathResource;

import static org.junit.jupiter.api.Assertions.assertEquals;

/**
 * @author : archer
 * @date : Created in 2022/9/28 17:41
 * @description :
 */
@SuppressWarnings("deprecation")
public class BeanFactoryTest

    @Test
    public void testSimpleLoad()
        BeanFactory beanFactory = new XmlBeanFactory(new ClassPathResource("beanfactory-test.xml"));
        TestBean testBean = (TestBean) beanFactory.getBean("testBean");
        assertEquals("helloworld", testBean.getTestStr());
二、功能分析
我们来分析下上面代码,探索 Spring 帮我们做了什么工作?大体流程如下:
- 1、读取配置文件
beanfactory-test.xml - 2、根据配置文件找到对应类的配置,并实例化
- 3、调用实例化后的实例
为了完成上述功能,我们至少需要 3 个类,如下
- ConfigReader:用于读取及验证配置文件。即读取配置文件的内容,放到内存中。
- ReflectionUtil:用于根据配置文件中的配置,通过反射技术来进行实例化。
- App:用于完成整个逻辑的串联。

三、工程搭建
在 Spring 源码中,用于实现上面功能的是 org.springframework.beans.jar,完成上述功能的 Spring 依赖如图
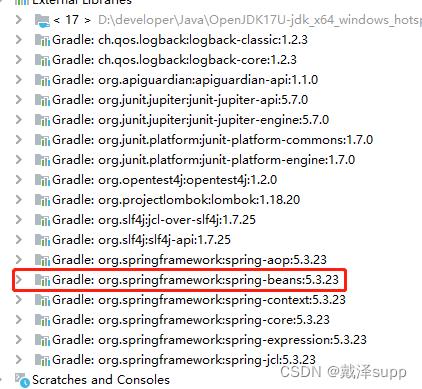
可以看到除了 Spring-beans 之外,还依赖了其他的一些 Spring 的 jar 包。接下来我们来学习下 Spring 的结构,它是怎么来组织代码的呢?
四、Spring 的结构组成
1、beans 包的层级结构
小罗认为阅读源码最好的方法,是通过示例跟着操作一遍,虽然有时候或者说大多数时候会被复杂的代码逻辑绕来绕去,最后不知道自己身在何处,但若再配以 UML ,还是可以把思路完整的理出来的。下面就按照我学习的思路,配以必要的 UML 来进行分析。
先来看看整个 beans 工程的源码结构,如图

2、核心类介绍
1)、DefaultListableBeanFactory
DefaultListableBeanFactory 是整个 bean 加载的核心部分,是 Spring 注册和加载 bean 的默认实现,XmlBeanFactory 继承自 DefaultListableBeanFactory,对它进行了拓展,主要用于从 XML 文档中读取 BeanDefinition ,增加了 XmlBeanDefinitionReader 类型的 reader 属性,在 XmlBeanFactory 中主要使用 reader 属性对资源文件进行读取和注册。下面是 DefaultListableBeanFactory 的类关系图
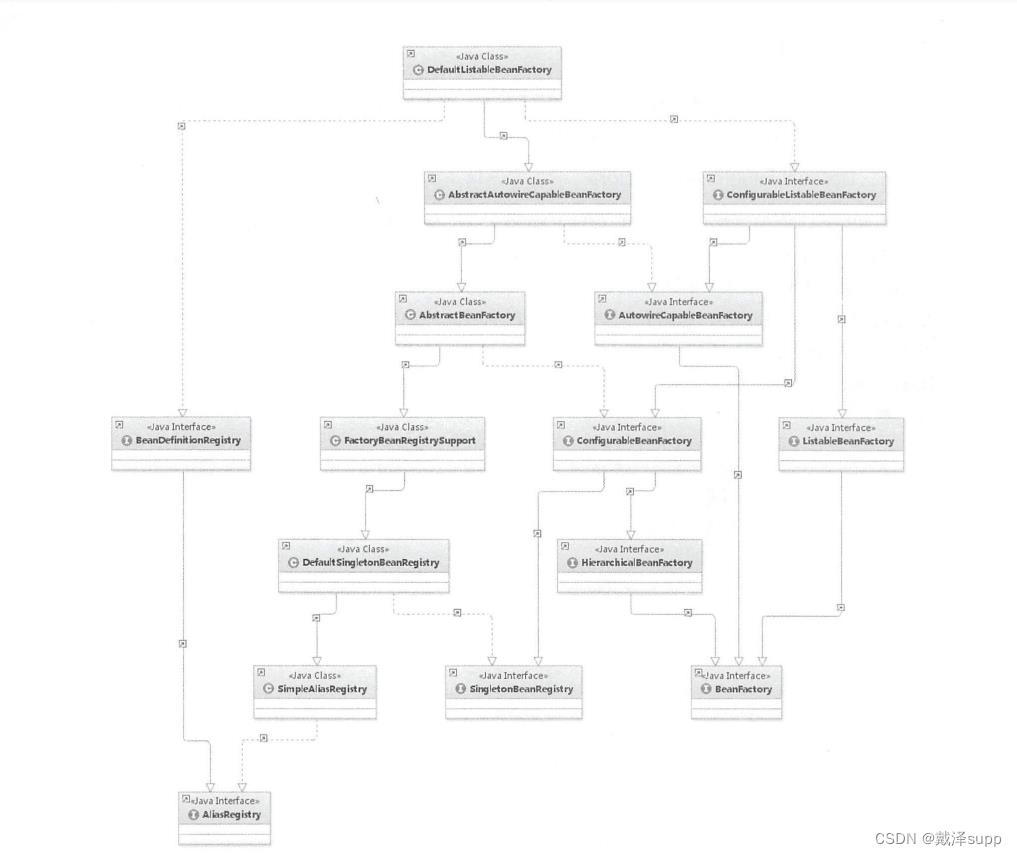
下面我们来简述上述图中各个类的作用
- AliasRegistry:接口,定义对 alias(别名) 的简单增删改等操作
- SimpleAliasRegistry:实现类,主要使用 map 作为 alias 的缓存,并对接口 AliasRegistry 进行实现
- BeanDefinitionRegistry:接口,定义对 BeanDefinition 的各种增删查改操作
- SingletonBeanRegistry:接口,定义对单例的注册及获取
- DefaultSingletonBeanRegistry:实现类,对接口 SingletonBeanRegistry 的实现
- FactoryBeanRegistrySupport:实现类,在 DefaultSingletonBeanRegistry 的基础上增加对 FactoryBean 的特殊处理功能
- BeanFactory:接口,定义获取 bean 及 bean 的各种属性
- HierarchicalBeanFactory:接口,继承 BeanFactory ,在 BeanFactory 的基础上增加了对 parentFactory 的支持
- ConfigurableBeanFactory:接口,提供配置 Factory 的各种方法
- ListableBeanFactory:接口,根据各种条件获取 bean 的配置清单
- AbstractBeanFactory:;类,综合 FactoryBeanRegistrySupport 和 ConfigurableBeanFactory 的功能
- AutowireCapableBeanFactory:接口,提供创建 bean、自动注入、初始化以及应用 bean 的处理器
- AbstractAutowireCapableBeanFactory:类,综合 AbstractBeanFactory 并对 接口 AutowireCapableBeanFactory 进行实现
- ConfigurableListableBeanFactory:接口,BeanFactory 配置清单,指定忽略类型及接口等
- DefaultListableBeanFactory:综合上面所有的功能,主要是对 bean 注册后的处理
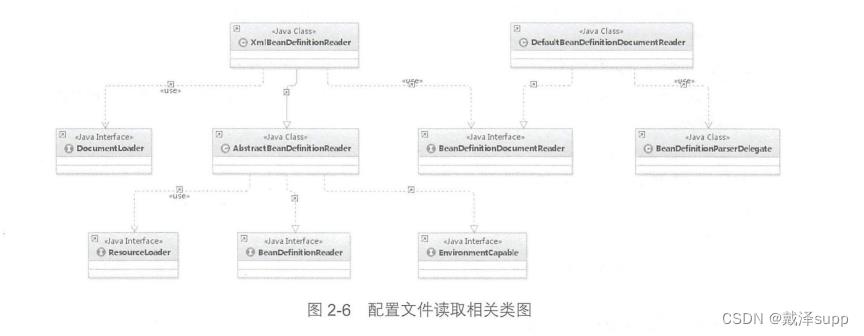
2)、XmlBeanDefinitionReader
XML 配置文件的读取是 Spring 中重要的功能,因为 Spring 的大部分功能都是以配置作为切入点的,从 XmlBeanDefinitionReader 中,我们可以梳理出资源文件读取、解析及注册的大致脉络,先来看看各个类的功能
- ResourceLoader:定义资源加载器,主要应用于根据给定的资源文件地址,来返回对应的 Resource
- BeanDefinitionReader:主要定义资源文件读取并转换为 BeanDefinition 的各个功能
- EnvironmentCapable:定义获取 Environment 的方法
- DocumentLoader:定义从资源文件加载到转换为 Document 的功能
- AbstractBeanDefinitionReader:对 EnvironmentCapable 、BeanDefinitionReader 类定义的功能进行实现
- BeanDefinitionDocumentReader:定义读取 Document 并注册 BeanDefinition 功能
- BeanDefinitionParserDelegate:定义解析 Element 的各种方法
下面是配置文件读取的相关类图
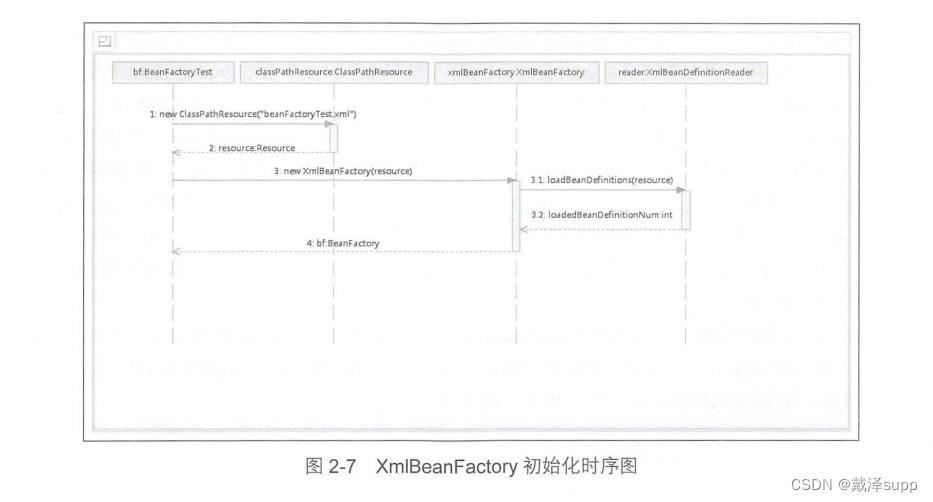
五、容器的基础 XmlBeanFactory
接下我们来深入分析下容器初始化代码的实现:
BeanFactory beanFactory = new XmlBeanFactory(new ClassPathResource("beanfactory-test.xml"));
下面是上述代码的时序图
1、配置文件封装
Spring 的配置文件读取,是通过 ClassPathResource 进行封装的,如 new ClassPathResource(“beanfactory-test.xml”),我们来看下具体是如何封装的,ClassPathResource 最顶级的父接口是 InputStreamSource。
InputStreamSource:InputStreamSource 封装任何能返回 InputStream 的类,比如 File、Classpath 下的资源和 ByteArray 等。它的唯一方法 getInputStream() 返回一个新的 InputStream 对象。
package org.springframework.core.io;

import java.io.IOException;
import java.io.InputStream;

public interface InputStreamSource
	InputStream getInputStream() throws IOException;
Resource:Resource 接口抽象了所有 Spring 内部使用到的底层资源:File、Classpath、URL 等,
package org.springframework.core.io;

import java.io.File;
import java.io.IOException;
import java.io.InputStream;
import java.net.URI;
import java.net.URL;
import java.nio.channels.Channels;
import java.nio.channels.ReadableByteChannel;

import org.springframework.lang.Nullable;

public interface Resource extends InputStreamSource

    //存在性:是否存在
	boolean exists();
    //可读性:是否可读
	default boolean isReadable()
		return exists();

    //打开状态:是否处于打开状态
	default boolean isOpen()
		return false;

	default boolean isFile()
		return false;

    //不同资源转换为 URL
	URL getURL() throws IOException;
    //不同资源转换为 URI
	URI getURI() throws IOException;
    //不同资源转换为 File
	File getFile() throws IOException;
	default ReadableByteChannel readableChannel() throws IOException
		return Channels.newChannel(getInputStream());

    //内容长度
	long contentLength() throws IOException;
    //最后修改的时间戳
	long lastModified() throws IOException;
    //基于当前资源创建一个相对资源
	Resource createRelative(String relativePath) throws IOException;
	@Nullable
	String getFilename();
    //错误处理中打印详细错误信息
	String getDescription();
对于不同来源的资源文件都有相应的 Resource 实现:文件(FileSystemResource)、Classpath 资源(ClasspathResource)、URL 资源(UrlResource )、InputStream 资源(InputStreamResource)、Byte 数组(ByteArrayResource)等

有了 Resource 接口便可以对所有资源文件进行统一处理,实现也非常简单,下面列举出 ClassPathResource 和 FileSystemResource 的获取 InputStream 的实现
ClassPathResource
@Override
public InputStream getInputStream() throws IOException
    InputStream is;
    if (this.clazz != null)
        is = this.clazz.getResourceAsStream(this.path);

    else if (this.classLoader != null)
        is = this.classLoader.getResourceAsStream(this.path);

    else
        is = ClassLoader.getSystemResourceAsStream(this.path);

    if (is == null)
        throw new FileNotFoundException(getDescription() + " cannot be opened because it does not exist");

    return is;
FileSystemResource
@Override
public InputStream getInputStream() throws IOException
    try
        return Files.newInputStream(this.filePath);

    catch (NoSuchFileException ex)
        throw new FileNotFoundException(ex.getMessage());
当 Resource 相关类完成对配置文件封装工作(转换为 流,以及获取各种属性)后,配置文件的读取工作就交给 XmlBeanDefinitionReader 来处理了。
XmlBeanFactory 初始化有若干方法,这里我们分析的是使用 Resource 实例作为构造函数参数的方法,代码如下:
package org.springframework.beans.factory.xml;

import org.springframework.beans.BeansException;
import org.springframework.beans.factory.BeanFactory;
import org.springframework.beans.factory.support.DefaultListableBeanFactory;
import org.springframework.core.io.Resource;

public class XmlBeanFactory extends DefaultListableBeanFactory

    //在实例化 BeanDefinitionReader 的时候会将 BeanDefinitionRegistry 传入,默认使用继承自 DefaultListableBeanFactory 的子类
	private final XmlBeanDefinitionReader reader = new XmlBeanDefinitionReader(this);

	public XmlBeanFactory(Resource resource) throws BeansException
		this(resource, null);


	public XmlBeanFactory(Resource resource, BeanFactory parentBeanFactory) throws BeansException
		super(parentBeanFactory);
		this.reader.loadBeanDefinitions(resource);
this.reader.loadBeanDefinitions(resource); 是资源加载的真正实现,在 XmlBeanDefinitionReader 加载数据前,还有一个调用父类构造函数完成初始化的过程:
super(parentBeanFactory); 跟踪代码后定位到 AbstractAutowireCapableBeanFactory 的构造函数中
public AbstractAutowireCapableBeanFactory()
    super();
    ignoreDependencyInterface(BeanNameAware.class);
    ignoreDependencyInterface(BeanFactoryAware.class);
    ignoreDependencyInterface(BeanClassLoaderAware.class);
    if (NativeDetector.inNativeImage())
        this.instantiationStrategy = new SimpleInstantiationStrategy();

    else
        this.instantiationStrategy = new CglibSubclassingInstantiationStrategy();
上面 ignoreDependencyInterface 的主要功能是忽略给定接口的自动装配功能,举例说明:
当 A 中有属性 B,Spring 在获取 A 的 Bean 的时候,如果属性 B 还未初始化,Spring 会自动初始化 B,但是如果 B 实现了 BeanNameAware、BeanFactoryAware、BeanClassLoaderAware 其中之一的话,此时 B 不会初始化。
2、加载 Bean
以 this.reader.loadBeanDefinitions(resource); 为切入点,先来看看它的时序图
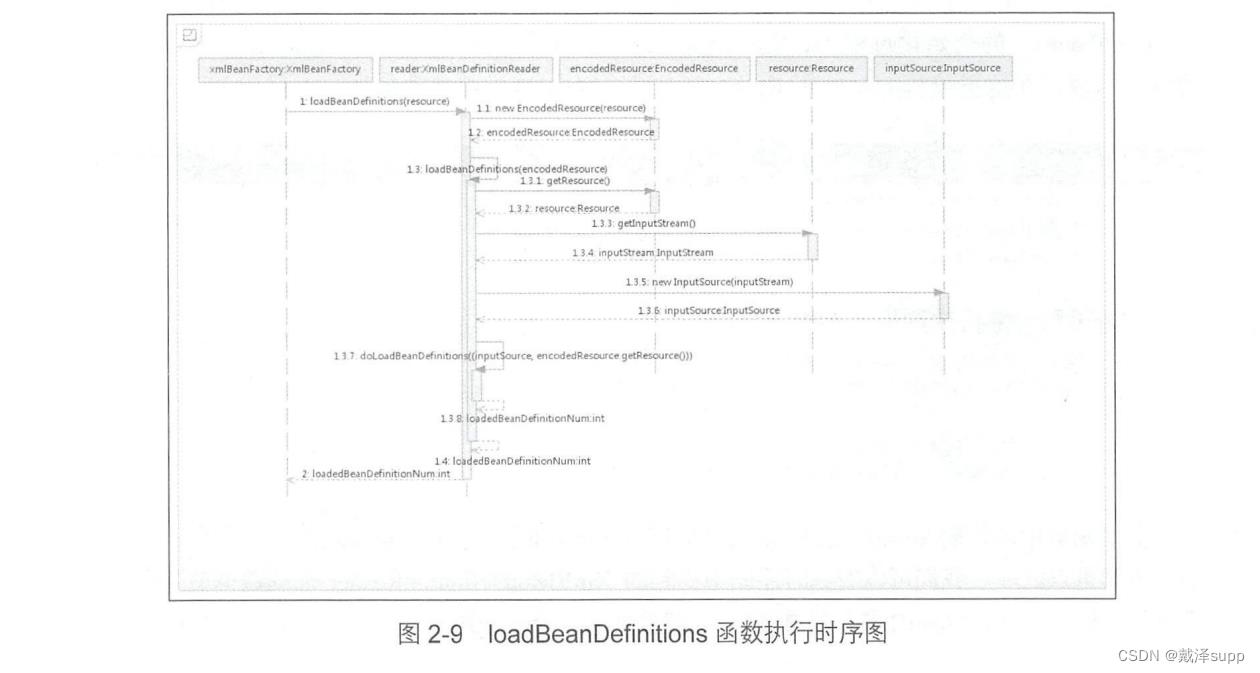
上图中处理过程如下:
- 1、封装资源文件。当进入 XmlBeanDefinitionReader 后首先对参数 Resource 使用 EncodedResource 类进行封装。
- 2、获取输入流。从 Resource 中获取对应的 InputStream 并构造 InputResource。
- 3、通过构造的 InputResource 实例和 Resource 实例继续调用函数 doLoadBeanDefinitions。
接下来我们根据代码来分析下 loadBeanDefinitions 函数的具体实现过程。
	@Override
	public int loadBeanDefinitions(Resource resource) throws BeanDefinitionStoreException
		return loadBeanDefinitions(new EncodedResource(resource));
EncodedResource 的作用是对资源文件的编码进行处理,当设置了响应的编码属性时,Spring 会使用想用的编码作为输入流的编码,下面代码构造了一个有编码(encoding)的 InputStreamReader
public Reader getReader() throws IOException
    if (this.charset != null)
        return new InputStreamReader(this.resource.getInputStream(), this.charset);

    else if (this.encoding != null)
        return new InputStreamReader(this.resource.getInputStream(), this.encoding);

    else
        return new InputStreamReader(this.resource.getInputStream());
构造好 EncodedResource 对象后,就转入了 XmlBeanDefinitionReader#loadBeanDefinitions(EncodedResource) 方法
public int loadBeanDefinitions(EncodedResource encodedResource) throws BeanDefinitionStoreException
		Assert.notNull(encodedResource, "EncodedResource must not be null");
		if (logger.isTraceEnabled())
			logger.trace("Loading XML bean definitions from " + encodedResource);


    	// 通过属性来记录已经
		Set<EncodedResource> currentResources = this.resourcesCurrentlyBeingLoaded.get();

		if (!currentResources.add(encodedResource))
			throw new BeanDefinitionStoreException(
					"Detected cyclic loading of " + encodedResource + " - check your import definitions!");


    	// 从 encodedResource 中获取已经封装的 Resource 对象,并再次从中获取到 inputStream
		try (InputStream inputStream = encodedResource.getResource().getInputStream())

            //InputSource 不属于 Spring ,来自于 org.xml.sax.InputSource
			InputSource inputSource = new InputSource(inputStream);
			if (encodedResource.getEncoding() != null)
				inputSource.setEncoding(encodedResource.getEncoding());


            //真正的逻辑核心部分
			return doLoadBeanDefinitions(inputSource, encodedResource.getResource());

		catch (IOException ex)
			throw new BeanDefinitionStoreException(
					"IOException parsing XML document from " + encodedResource.getResource(), ex);

		finally
			currentResources.remove(encodedResource);
			if (currentResources.isEmpty())
				this.resourcesCurrentlyBeingLoaded.remove();
总结一下数据准备阶段的逻辑:
- 1、对传入的 resource 参数做编码封装,以为内其可能存在编码要求的情况
- 2、通过 SAX 读取 XML 文件的方式来准备 InputSource 对象
- 3、将准备的数据通过参数,传入真正的核心处理部分
doLoadBeanDefinitions(inputSource, encodedResource.getResource());
protected int doLoadBeanDefinitions(InputSource inputSource, Resource resource)
    throws BeanDefinitionStoreException

    try
        Document doc = doLoadDocument(inputSource, resource);
        int count = registerBeanDefinitions(doc, resource);
        if (logger.isDebugEnabled())
            logger.debug("Loaded " + count + " bean definitions from " + resource);

        return count;

    catch (BeanDefinitionStoreException ex)
        throw ex;

    catch (SAXParseException ex)
        throw new XmlBeanDefinitionStoreException(resource.getDescription(),
                                                  "Line " + ex.getLineNumber() + " in XML document from " + resource + " is invalid", ex);

    catch (SAXException ex)
        throw new XmlBeanDefinitionStoreException(resource.getDescription(),
                                                  "XML document from " + resource + " is invalid", ex);

    catch (ParserConfigurationException ex)
        throw new BeanDefinitionStoreException(resource.getDescription(),
                                               "Parser configuration exception parsing XML from " + resource, ex);

    catch (IOException ex)
        throw new BeanDefinitionStoreException(resource.getDescription(),
                                               "IOException parsing XML document from " + resou以上是关于2Spring 源码学习 ~ Spring 容器的基本实现的主要内容,如果未能解决你的问题,请参考以下文章