12W字;2022最新Android11位大厂面试专题阿里篇
Posted 初一十五啊
tags:
篇首语:本文由小常识网(cha138.com)小编为大家整理,主要介绍了12W字;2022最新Android11位大厂面试专题阿里篇相关的知识,希望对你有一定的参考价值。
由于近期很多小伙伴开始面试了,所以在大量的刷题,也有很多问到我有没有一些大厂面试题或者常见的面试题,字节参考一下,于是乎花了一周时间整理出这份 《2022android十一位大厂面试真题》 结合之前的 《腾讯Android开发笔记》 也算是双管齐下了!😃
字数限制,分几篇更。可以关注公众号:初一十五a 提前解锁
二丶阿里篇
1. Android 插件化】Hook 插件化框架 ( Hook Activity 启动流程 | Hook 点分析
①Hook点分析
在当前应用主进程中 , 在 Activity 中执行 startActivity 方法 , 然后调用 Instrumentation 中的 execStartActivity 方法 ;
然后在 ActivityManagerService 进程中 , 执行后续操作 ; ( 具体细节看上面的两篇博客 )
这里只需要研究 Activity 中执行 startActivity 方法的情况 , 因为插件化只涉及在 " 宿主 " 应用中 , 启动 " 插件 " 包中的 Activity 类 , 只需要考虑这一种情况即可 ;
Activity 的所有的生命周期函数 , 都与 Instrumentation 相关 , Instrumentation 会处理 Activity 实例化等操作 ;
②查看Instrumetation源码
查看 Instrumentation 相关代码 , 双 Shift 搜索界面中 , 选中 " Include non-project items " 选项 , 当前的编译版本是 28 , 因此这里选择 API 28 中的 Instrumentation.java 源码 ;
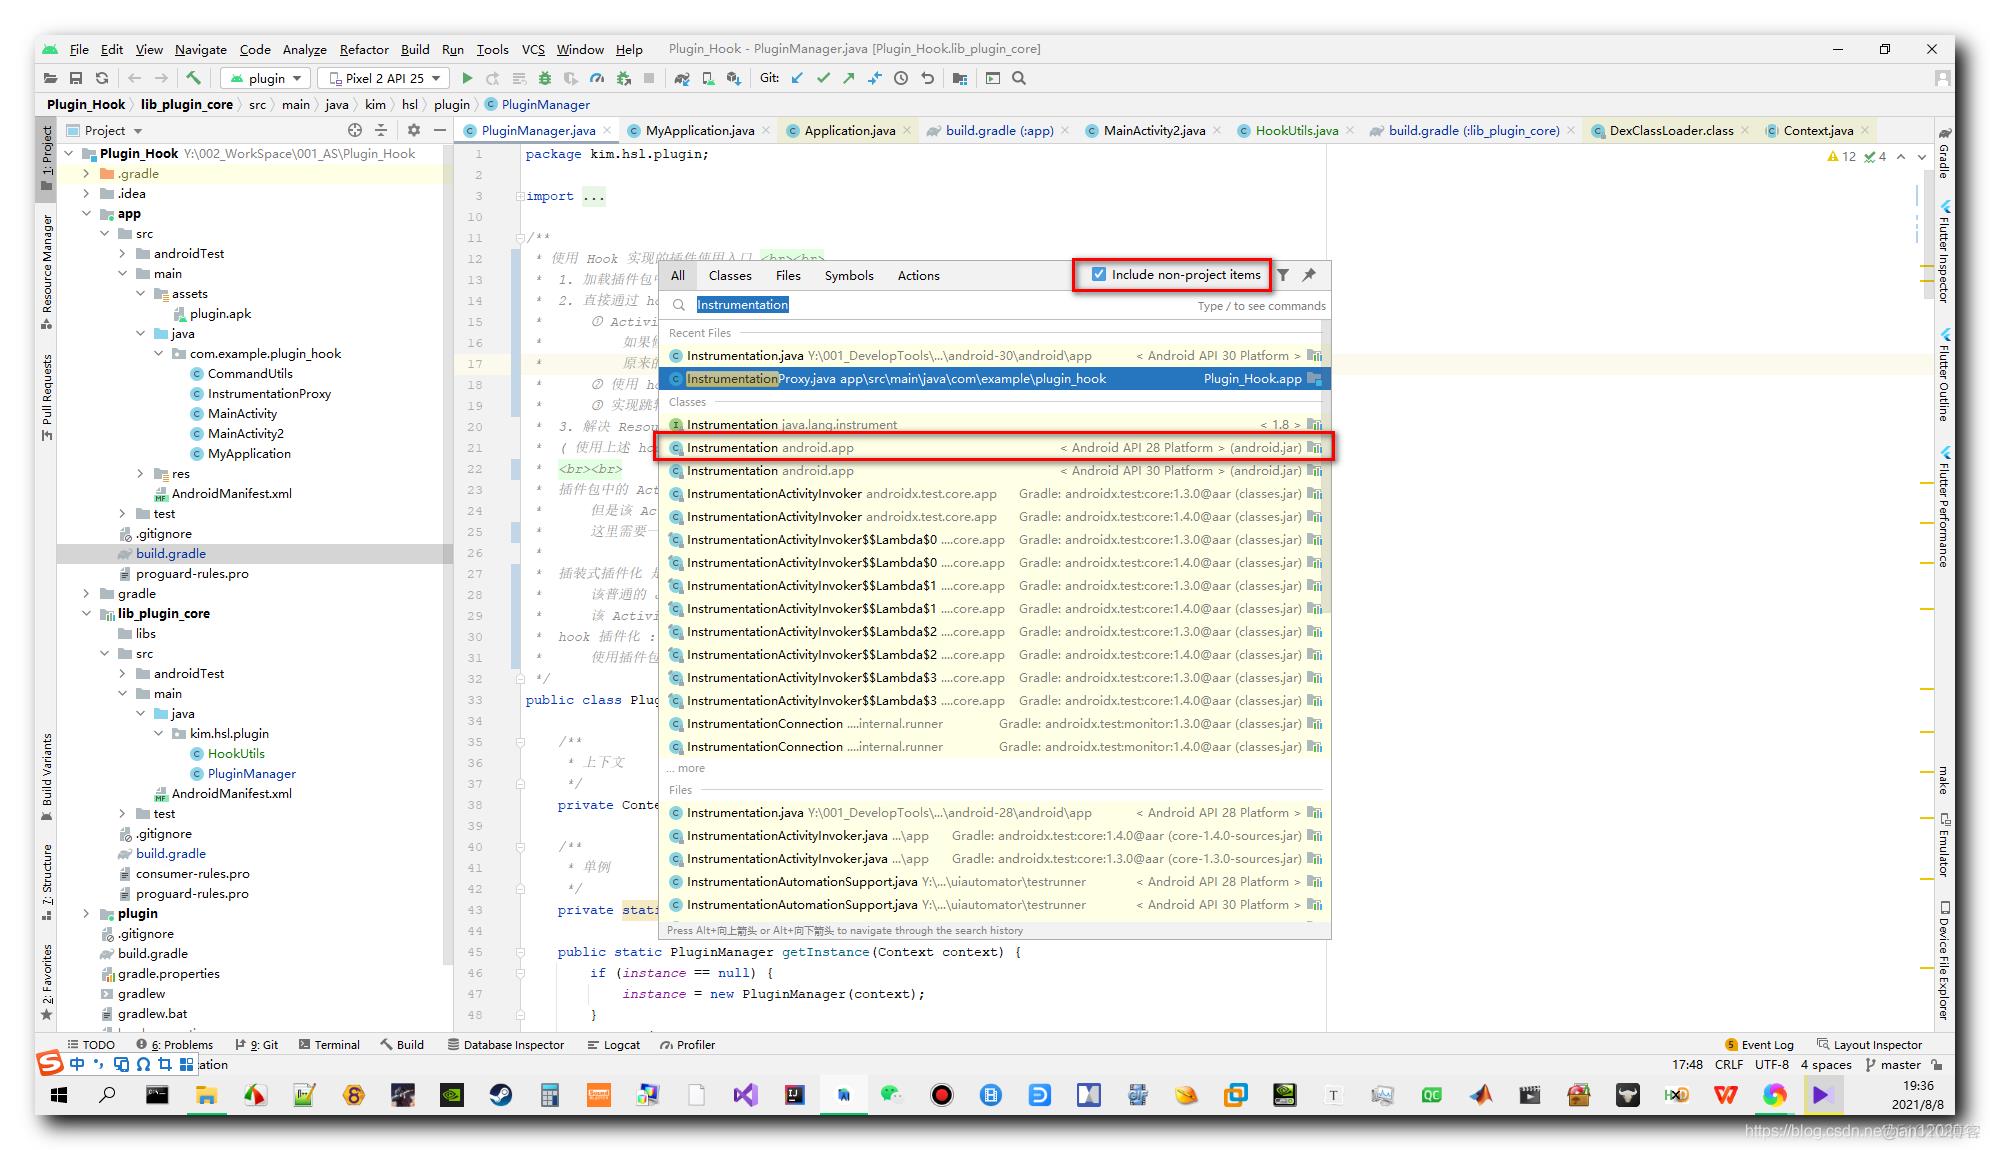
③分析 Instrumentation.execStartActivity 方法
启动 Activity 时 , 调用的是下面的 Instrumentation.execStartActivity 方法 ;
public class Instrumentation
    /**
     * Execute a startActivity call made by the application.  The default
     * implementation takes care of updating any active @link ActivityMonitor
     * objects and dispatches this call to the system activity manager; you can
     * override this to watch for the application to start an activity, and
     * modify what happens when it does.
     *
     * <p>This method returns an @link ActivityResult object, which you can
     * use when intercepting application calls to avoid performing the start
     * activity action but still return the result the application is
     * expecting.  To do this, override this method to catch the call to start
     * activity so that it returns a new ActivityResult containing the results
     * you would like the application to see, and don't call up to the super
     * class.  Note that an application is only expecting a result if
     * <var>requestCode</var> is >= 0.
     *
     * <p>This method throws @link android.content.ActivityNotFoundException
     * if there was no Activity found to run the given Intent.
     *
     * @param who The Context from which the activity is being started.
     * @param contextThread The main thread of the Context from which the activity
     *                      is being started.
     * @param token Internal token identifying to the system who is starting
     *              the activity; may be null.
     * @param target Which activity is performing the start (and thus receiving
     *               any result); may be null if this call is not being made
     *               from an activity.
     * @param intent The actual Intent to start.
     * @param requestCode Identifier for this request's result; less than zero
     *                    if the caller is not expecting a result.
     * @param options Addition options.
     *
     * @return To force the return of a particular result, return an
     *         ActivityResult object containing the desired data; otherwise
     *         return null.  The default implementation always returns null.
     *
     * @throws android.content.ActivityNotFoundException
     *
     * @see Activity#startActivity(Intent)
     * @see Activity#startActivityForResult(Intent, int)
     * @see Activity#startActivityFromChild
     *
     * @hide
     */
    public ActivityResult execStartActivity(
            Context who, IBinder contextThread, IBinder token, Activity target,
            Intent intent, int requestCode, Bundle options)
        IApplicationThread whoThread = (IApplicationThread) contextThread;
        Uri referrer = target != null ? target.onProvideReferrer() : null;
        if (referrer != null)
            intent.putExtra(Intent.EXTRA_REFERRER, referrer);

        if (mActivityMonitors != null)
            synchronized (mSync)
                final int N = mActivityMonitors.size();
                for (int i=0; i<N; i++)
                    final ActivityMonitor am = mActivityMonitors.get(i);
                    ActivityResult result = null;
                    if (am.ignoreMatchingSpecificIntents())
                        result = am.onStartActivity(intent);

                    if (result != null)
                        am.mHits++;
                        return result;
                     else if (am.match(who, null, intent))
                        am.mHits++;
                        if (am.isBlocking())
                            return requestCode >= 0 ? am.getResult() : null;

                        break;


        try
            intent.migrateExtraStreamToClipData();
            intent.prepareToLeaveProcess(who);
            int result = ActivityManager.getService()
                .startActivity(whoThread, who.getBasePackageName(), intent,
                        intent.resolveTypeIfNeeded(who.getContentResolver()),
                        token, target != null ? target.mEmbeddedID : null,
                        requestCode, 0, null, options);
            checkStartActivityResult(result, intent);
         catch (RemoteException e)
            throw new RuntimeException("Failure from system", e);

        return null;
在上述方法最后 , 调用了 AMS 的 startActivity 方法 , ActivityManager.getService().startActivity() 方法最终是 ActivityManagerService 执行的 ;
由于当前主线程与 ActivityManagerService 不再同一个进程中 , 因此需要使用 Binder 进行调用 ;
int result = ActivityManager.getService()
                .startActivity(whoThread, who.getBasePackageName(), intent,
                        intent.resolveTypeIfNeeded(who.getContentResolver()),
                        token, target != null ? target.mEmbeddedID : null,
                        requestCode, 0, null, options);
④分析 ActivityManager 中的源码
在 ActivityManager 中的 getService 方法 , 获取的
/**
     * @hide
     */
    public static IActivityManager getService()
        return IActivityManagerSingleton.get();


    private static final Singleton<IActivityManager> IActivityManagerSingleton =
            new Singleton<IActivityManager>()
                @Override
                protected IActivityManager create()
                    final IBinder b = ServiceManager.getService(Context.ACTIVITY_SERVICE);
                    final IActivityManager am = IActivityManager.Stub.asInterface(b);
                    return am;

            ;
IActivityManager 是 Binder 的 Proxy , Binder 下存在 Stub 和 Proxy 两个内部类 , Binder 生成的 Java 类时内部生成上述 Stub 和 Proxy 两个内部类 ;
反射的时候 , 反射
final IActivityManager am = IActivityManager.Stub.asInterface(b);
对象 , 最终调用 startActivity 的是 IActivityManager , 使用占坑的 Activity 隐瞒 IActivityManager , 实际上启动我们从插件包中加载的 Activity ;
Hook 点就是 android.app.ActivityManager 的 private static final Singleton IActivityManagerSingleton成员 ;
2.Android中Handler处理Runnable任务的常见方法
- post:立即启动Runnable任务
- postDelayed:延迟若干时间后启动Runnable任务。
- postAtTime:在指定时间启动Runnbale任务。
- removeCallbacks:移除指定的Runnable任务。
3.为什么要有handler?
①为什么要有handler?
主要目的是要解决线程切换问题,handler里的Message机制解决了线程间通信;
②为什么有队列MessageQueue?
MessageQueue是一个单向链表,next()调用nativePollOnce->lunx的epoll_wait()等待实现阻塞时队列;
- 在单线程中一次只能执行一句代码
- 假如发送了一个大消息A
- 处理这个大的消息A
- 但是处理的太慢了
- 从而导致其他后续要发送的消息发不出去
- 因为单线程阻塞到了第3步处理那个消息A的地方
队列的出现解决了"处理消息"阻塞到"发送消息"的问题;
队列是生产者消费者模式;
而要使用队列需要至少两个线程、和一个死循环;
- 一个线程负责生产消息;
- 一个线程消费消息;
- 死循环需要取出放入队列里的消息;
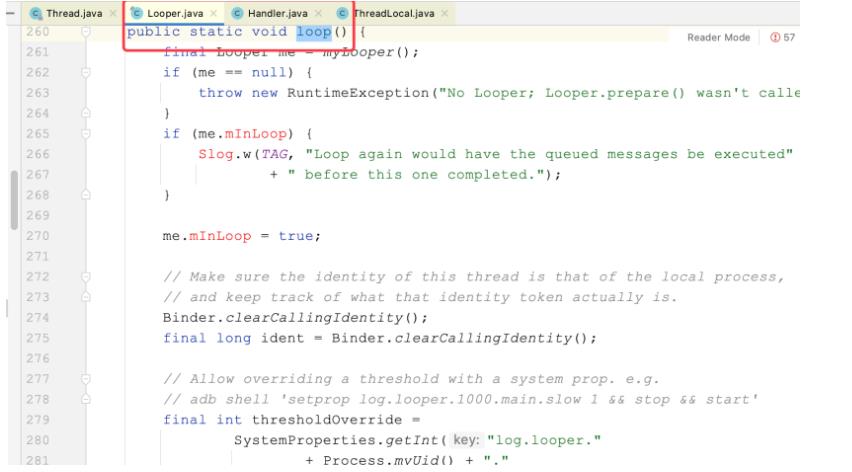
③为什么有Looper?
为了循环取出队列里的消息;
一个线程有几个Looper,为什么不会有多个?
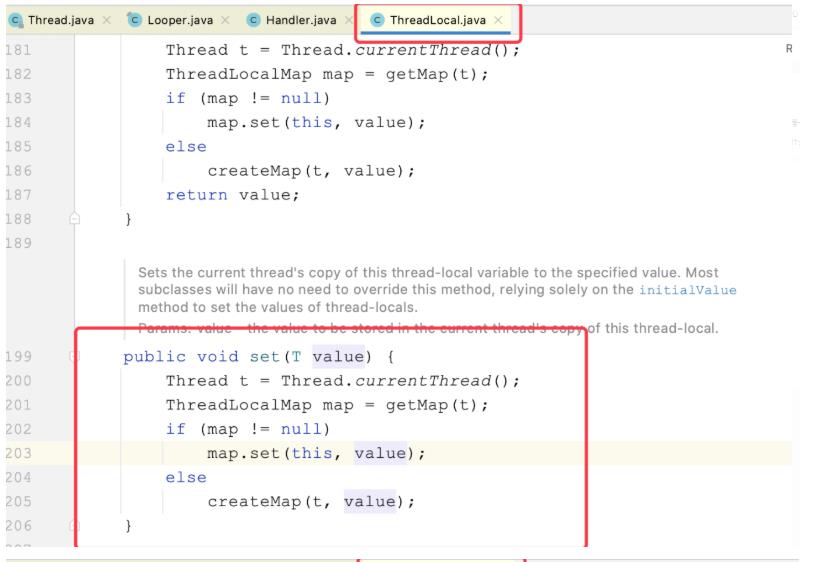
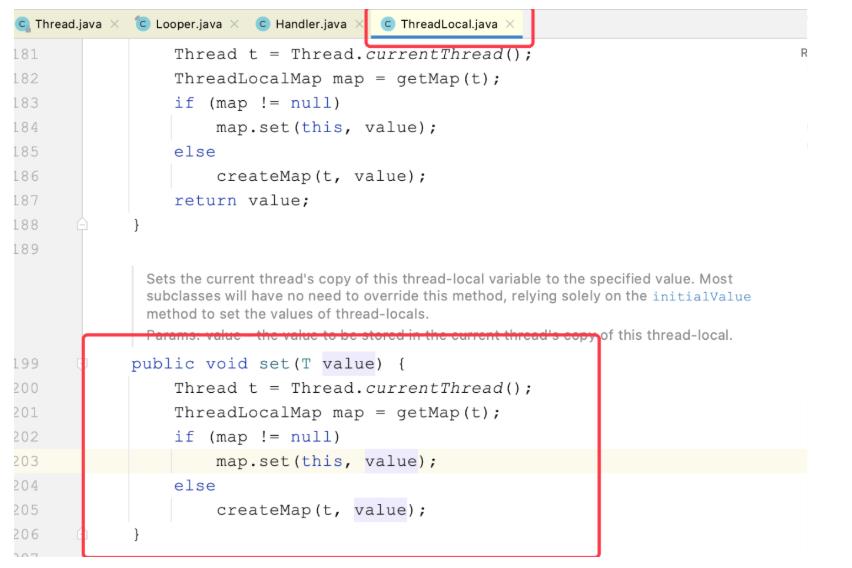
一个线程一个Looper,放在ThreadLocalMap中;
假如Looper对象由Handler创建,每创建一个Handler就有一个Looper,那么调用Looper.loop()时开启死循环;在外边调用Looper的地方就会阻塞;
④主线程中Looper的死循环为什么没有导致系统卡死?
- 我们的UI线程主线程其实是ActivityThread线程,而一个线程只会有一个Looper;
- ActivityThread.java的main函数是一个APP进程的入口,如果不卡死,main函数执行完则整个应用进程就会退出;
- android是以事件为驱动的操作系统,当有事件来时,就去做对应的处理,没有时就显示静态界面;
获取当前线程:Thread.currentThread();
ThreadLocalMap:类似于HashMap;
每个Thread对象都有一个对应的ThreadLocalMap;

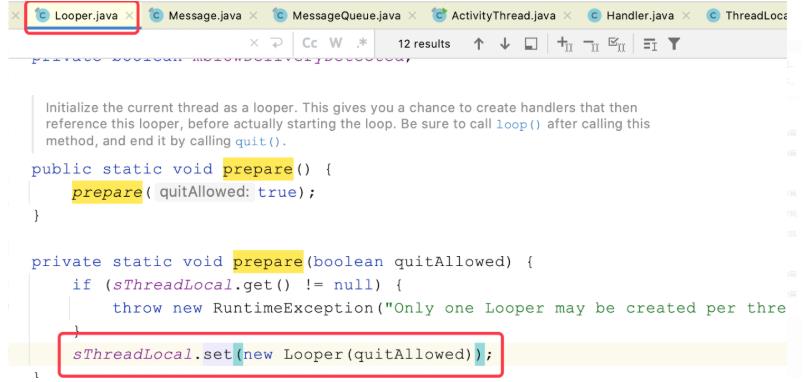
在Looper.prepare()时,存入Looper,存Looper时ThreadLocalMap的key为ThreadLocal,value为Looper;
内存抖动根本的解决方式是复用;
handler.obtainMessage();
-
从Looper的回收池中取Message;
-
Message是一个单向链表,Message不是一个单纯的对象,而是一个链表集合
-
最大长度固定50个
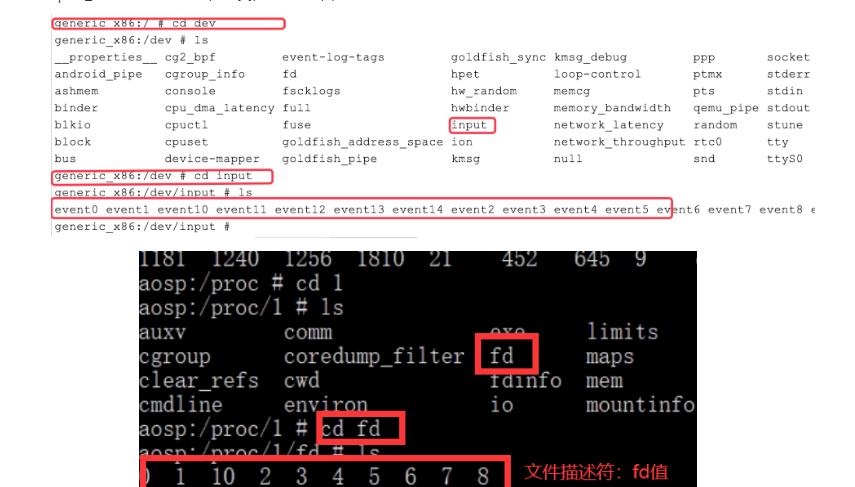
Linux函数:
epoll_create:App注册进红黑树中,拿到一个事件fd的值;
epoll_ctl:注册事件类型,监听fd是否改变(Linux中事件都会被写入文件中,如触摸屏幕事件会写入到:dev/input/event0文件中),fd有改变时唤醒epoll_wait;
epoll_wait:有事件时就分发,没事件就阻塞
⑤总结:
handler如何做的线程切换的?
首先Handler的使用步骤:
-
调用
Looper.prepare(); -
创建Handler对象;
-
调用
Looper.Loop()方法。 -
线程中发送消息。
在第一步时,创建一个Looper,并放到当前线程的变量threadLocals中;threadLocals是一个map,key为ThreadLocal对象本身,value为Looper;在Looper.loop()时取出;
第二步,用户在当前线程(可能是子线程)创建Handler对象;
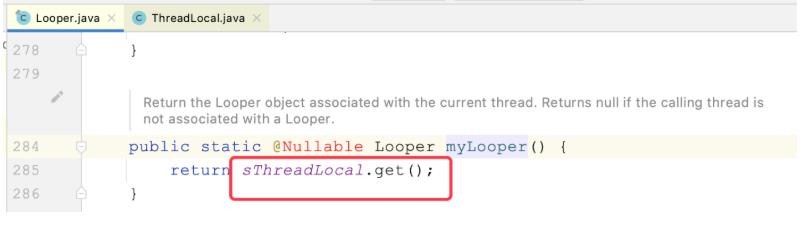
第三步,Looper.loop()一直在死循环,Looper.loop()这句代码下面的代码是不会被调用的,调用Looper.loop()函数时,先从当前线程的map变量中取出Looper,再从Looper中拿到队列MessageQueue,for循环中不断从队列中取出消息
第四步,在其他线程调用handelr发送消息时,Message里有个target,就是发送消息的handler;
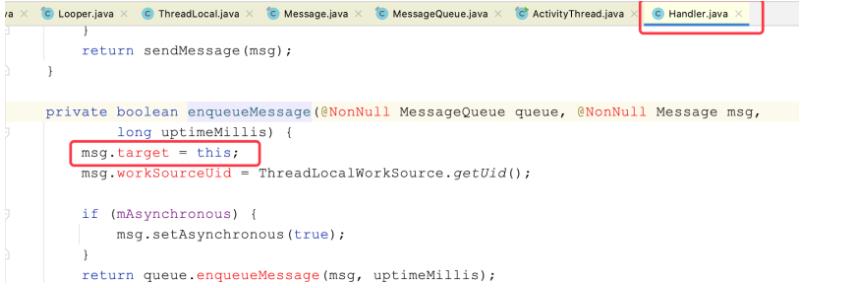
在Looper.loop()时,队列中取到消息时,调用msg.target.dispatchMessage(msg);其实就是handler对象.dispatchMessage(msg);
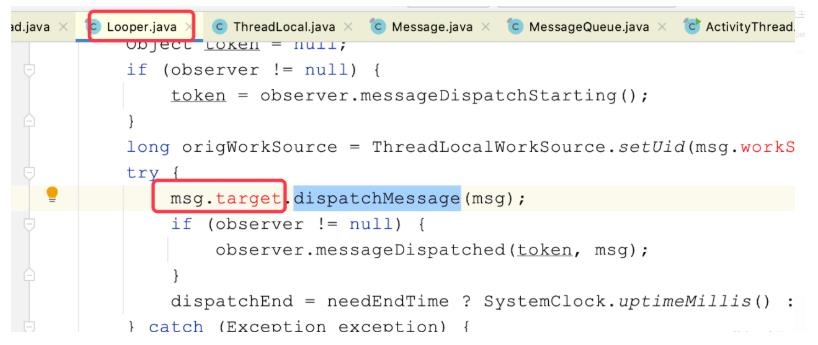
所以不论在哪个线程调用发送消息,都会调用到handler自己分发消息;而handler所处的线程是创建时的“当前线程”,所以处理时也就回到了“当前线程”;实现了线程切换,和线程通信;
⑥Looper的死循环为什么不会让主线程卡死(或ANR)?
简单版:
- 我们的UI线程主线程其实是ActivityThread所在的线程,而一个线程只会有一个Looper;
- ActivityThread.java的main函数是一个APP进程的入口,如果不一直循环,则在main函数执行完最后一行代码后整个应用进程就会退出;
- android是以事件为驱动的操作系统,当有事件来时,就去做对应的处理,没有时就显示静态界面;
- ANR发生条件是:
Activity:5 秒。应用在 5 秒内未响应用户的输入事件(如按键或者触摸)
BroadCastReceiver :10 秒。BroadcastReceiver 未在 10 秒内完成相关的处理
Service:20 秒(均为前台)。Service 在20 秒内无法处理完成 - 如果Handler收到以上三个相应事件在规定时间内完成了,则移除消息,不会ANR;若没完成则会超时处理,弹出ANR对话框;
详细:
- App进程的入口为
ActivityThread.java的main()函数,注意ActivityThread不是一个线程; - 应用的ui主线程实际是调用
ActivityThread.java的main()函数执行时所在的线程,而这个线程对我们不可见,但是这就是主线程;参考: - 在
ActivityThread.java的main()函数中,会调用Looper.prepareMainLooper(); Looper.prepareMainLooper()会创建一个Looper并放到当前线程(主线程)的变量threadLocals中进行绑定,threadLocals是一个ThreadLocal.ThreadLocalMap;- 在
ActivityThread.java的main()函数结尾,开启Looper.loop()进行死循环,不让main函数结束,从而让App进程不会结束; - Android系统是以事件作为驱动的操作系统,当有事件来时,就去做对应处理,没有事件时,就显示当前界面,不做其他多余操作(浪费资源);
- 在
Looper.loop()的死循环中,不仅要取用户发的事件,还要取系统内核发的事件(如屏幕亮度改变等等); - 在调用
Looper.loop()时,从MessageQueue.next()中获取事件,若没有则阻塞,有则分发; MessageQueue其实不是一个队列,用epoll机制实现了阻塞;- 在
Looper.prepareMainLooper()时,调用c++函数epoll_create()会将App注册进epoll机制的红黑树中得到fd的值,epoll_ctl()给每个App注册事件类型并监听fd值是否改变,fd有改变时唤醒epoll_wait; epoll_wait()有事件时就分发,没事件就阻塞
⑦子线程的Looper和子线程Looper有什么不同?
子线程Looper是可以退出的,主线程不行;
4.求二叉树中两个节点之间的最大距离。
例如这样一棵二叉树:
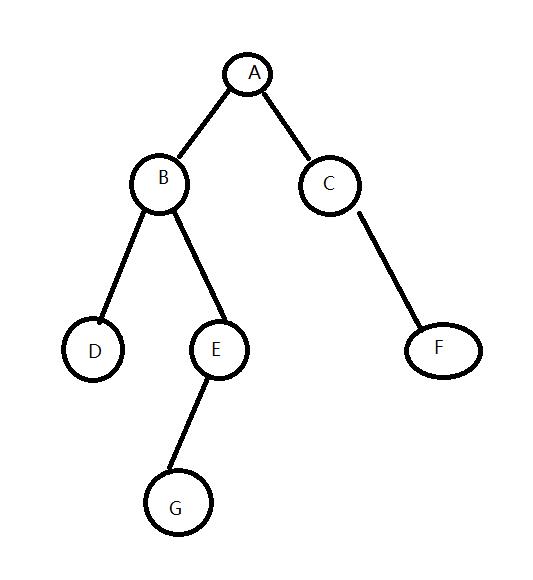
什么叫做二叉树结点间的最大距离呢?例如从结点a出发,可以向上走或向下走,但沿途的结点只能经过一次,到达结点b时路径上经过的结点个数叫做a到b的距离,因此,二叉树任意两个结点间都有距离,那么也就存在一个最大距离。
上图二叉树中B到C的距离就是3.最大距离容易得出是6,为G到F的距离。
所谓最大距离,可以分为三种情况,最大距离就在根结点的左子树上,或者右子树上,这两种情况下,根结点都是不参与进去的。所谓不参与进去就是计算最大距离路径上结点时不把根结点也算进去。那么第三种情况就包含了根结点,也就是说求解最大距离时的路径需要经过根结点,也就是上图二叉树中的这种情况。因此,为了实现程序,我们可以用递归的方法:
  public class MaxDistance
      private static class Node
          public char value;
          public Node left;
          public Node right;

          public Node(char value, Node left, Node right)
              this.left = left;
              this.right = right;
             this.value = value;


     public static class Info
         public int maxDistance;
         public int height;

         public Info(int dis, int h)
             maxDistance = dis;
             height = h;


     private static Info process(Node node)
         if (node == null)
             return new Info(0, 0);

         Info leftInfo = process(node.left);
         Info rightInfo = process(node.right);
         int d1 = leftInfo.maxDistance;
         int d2 = rightInfo.maxDistance;
         int d3 = leftInfo.height + 1 + rightInfo.height;
         int maxDistance = Math.max(d1, Math.max(d2, d3));
         int height = Math.max(leftInfo.height, rightInfo.height) + 1;
         return new Info(maxDistance, height);


     public static int getMaxDistance(Node head)
         return process(head).maxDistance;


     public static void main(String[] args)
         Node nodeG = new Node('B', null, null);
         Node nodeD = new Node('B', null, null);
         Node nodeE = new Node('B', nodeG, null);
         Node nodeF = new Node('B', null, null);
         Node nodeB = new Node('B', nodeD, nodeE);
         Node nodeC = new Node('B', null, nodeF);
         Node nodeA = new Node('A', nodeB, nodeC);
        int distance = getMaxDistance(nodeA);
         System.out.println(distance);
这其中的核心方法是这个:
private static Info process(Node node)
        if (node == null)
            return new Info(0, 0);

        Info leftInfo = process(node.left);
        Info rightInfo = process(node.right);
        int d1 = leftInfo.maxDistance;
        int d2 = rightInfo.maxDistance;
        int d3 = leftInfo.height + 1 + rightInfo.height;
        int maxDistance = Math.max(d1, Math.max(d2, d3));
        int height = Math.max(leftInfo.height, rightInfo.height) + 1;
        return new Info(maxDistance, height);
我需要取得某一个结点的左子树和右子树的情况,当然对应于第三种情况,两边树高再加上结点本身就是距离,这三个数比较一下大小,很容易就能算出最大距离,同时,还要记录算上当前结点的树高,全部计算完毕后,把这个对象返回出去即可。
运行也无问题:

5.谈谈你对Binder的认识?
①为什么要用Binder?
- Android系统内核是Linux内核
- Linux内核进程通信有:管道、内存共享、Socket、File;
- 对比:
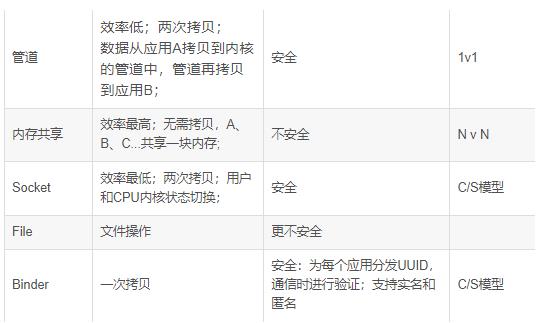
Binder的一次拷贝发生在用户空间拷贝到内核空间;
用户空间:
App进程运行的内存空间;
内核空间:
系统驱动、和硬件相关的代码运行的内存空间,也就是进程ID为0的进程运行的空间;
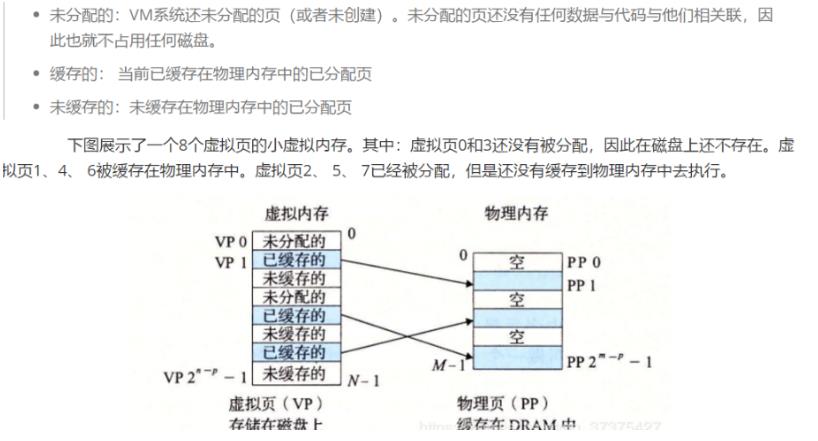
程序局部性原则:
只加载少量代码;应用没有运行的代码放在磁盘中,运行时高速缓冲区进行加载要运行的代码;默认一次加载一个页(4K),若不够4K就用0补齐;
MMU:内存管理单元;
给CPU提供虚拟地址;
当对变量操作赋值时:
- CPU拿着虚拟地址和值给到MMU
- MMU用虚拟地址匹配到物理地址,MMU去物理内存中进行赋值;
物理地址:
物理内存的实际地址,并不是磁盘;
虚拟地址:
MMU根据物理内存的实际地址翻译出的虚拟地址;提供给CPU使用;
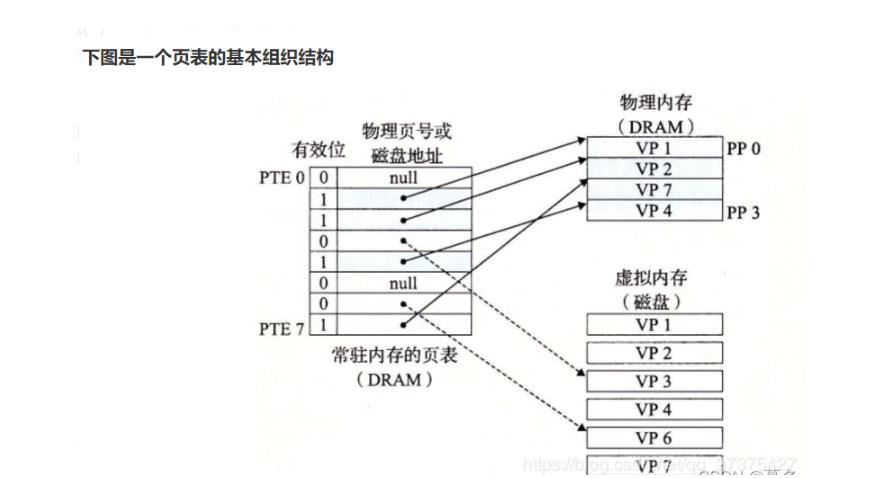
页命中:CPU读取变量时,MMU在物理内存的页表中找到了这个地址;
页未命中:CPU读取变量时,MMU在物理内存的页表中没有找到了这个地址,此时会触发MMU去磁盘读取变量并存到物理内存中;
普通的二次拷贝:
应用A拷贝到服务端:coay_from_user
从服务端拷贝到应用B:coay_to_user
mmap():
- 在物理内存中开辟一段固定大小的内存空间
- 将磁盘文件与物理内存进行映射(理解为绑定)
- MMU将物理内存地址转换为虚拟地址给到CPU(虚拟地址映射物理内存)
共享内存进程通信:
- 进程A调用mmap()函数会在内核空间中虚拟地址和一块同样大小的物理内存,将两者进行映射
- 得到一个虚拟地址
- 进程B调用mmap()函数,传参和步骤1一样的话,就会得到一个和步骤2相同的虚拟地址
- 进程A和进程B都可以用同一虚拟地址对同一块映射内存进行操作
- 进程A和进程B就实现了通信
- 没有发生拷贝,共享一块内存,不安全
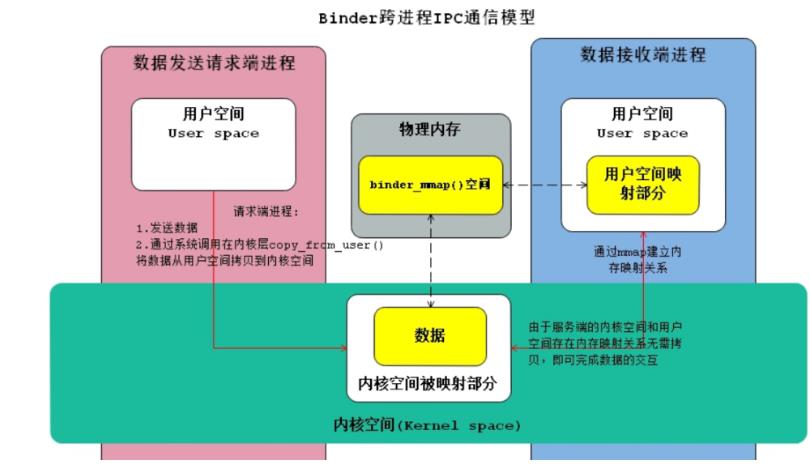
②Binder通信原理:
角色:Server端A、Client端B、Binder驱动、内核空间、物理内存
- Binder驱动在物理内存中开辟一块固定大小(1M-8K)的物理内存w,与内核空间的虚拟地址x进行映射得到
- A的用户空间的虚拟地址ax和物理内存w进行映射
- 此时内核空间虚拟地址x和物理内存w已经进行了映射,物理内存w和Server端A的用户空间虚拟地址ax进行了映射:也就是 内核空间的虚拟地址x = 物理内存w = Server端A的用户空间虚拟地址ax
- B发送请求:将数据按照binder协议进行打包给到Binder驱动,Binder驱动调用coay_from_user()将数据拷贝到内核空间的虚拟地址x
- 因步骤3中的三块区域进行了映射
- Server端A就得到了Client端B发送的数据
- 通过内存映射关系,只发生了一次拷贝
Activity跳转时,最多携带1M-8k(1兆减去8K)的数据量;
真实数据大小为:1M内存-两页的请求头数据=1M-8K;
应用A直接将数据拷贝到应用B的物理内存空间中,数据量不能超过1M-8K;拷贝次数少了一次,少了从服务端拷贝到用户;
IPC通信机制:
- 服务注册
- 服务发现
- 服务调用
以下为简单的主进程和子进程通信:
1、服务注册:
缓存中心中有三张表(暂时理解为三个HashMap,Binder用的是native的红黑树):
- 第一种:放key :String - value:类的Class;
- 第二种:放key :Class的类名 - value:类的方法集合;
- 第三种:放key :Class的类名 - value:类的对象;
类的方法集合:key-value;
key:方法签名:“方法名” 有参数时用 “方法名-参数类型-参数类型-参数类型…”;
value: 方法本身;
注册后,服务若没被调用则一直处于沉默状态,不会占用内存,这种情况只是指用户进程里自己创建的服务,不适用于AMS这种;
2、服务发现:
当被查询到时,要被初始化;
- 客户端B通过发送信息到服务端A
- 服务端解析消息,反序列化
- 通过反射得到消息里的类名,方法,从注册时的第一种、第二种表里找到Class,若对象没初始化则初始化对象,并将对象添加到第三种的表里;
3、服务调用:
- 使用了动态代理
- 客户端在服务发现时,拿到对象(其实是代理)
- 客户端调用对象方法
- 代理发送序列化数据到服务端A
- 服务端A解析消息,反序列化,得到方法进行处理,得到序列化数据结果
- 将序列化结果写入到客户端进程的容器中;
- 回调给客户端
AIDL:
BpBinder:数据发送角色
BbBinder:数据接收角色
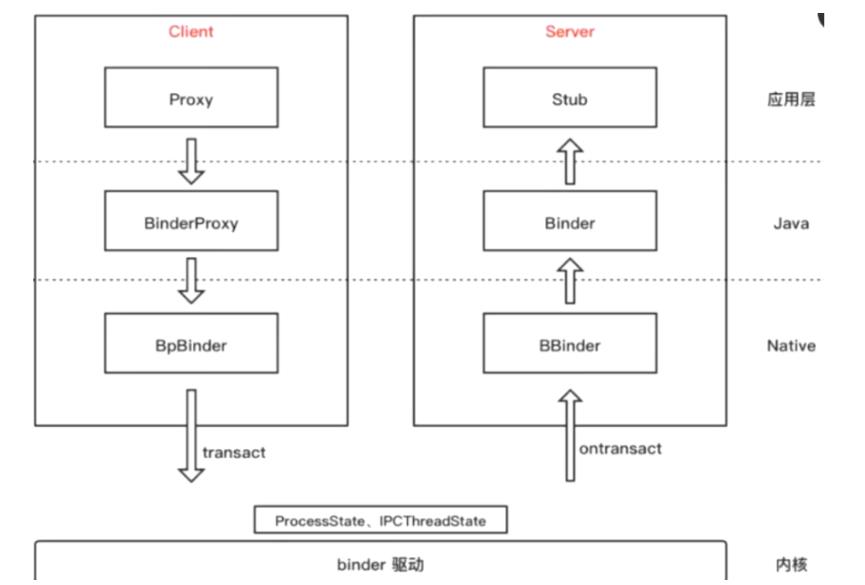
编译器生成的AIDL的java接口.Stub.proxy.transact()为数据发送处;
发送的数据包含:数据+方法code+方法参数等等;
- 发送时调用了Linux的驱动
- 调用copy_from_user()拷贝用户发送的数据到内核空间
- 拷贝成功后又进行了一次请求头的拷贝:copy_from_user()
- 也就是把一次的数据分为两次拷贝
请求头:包含了目的进程、大小等等参数,这些参数占了8K
编译器生成的AIDL的java接口.Stub.onTransact()为数据接收处;
③Binder中的IPC机制:
- 每个App进程启动时会在内核空间中映射一块1M-8K的内存
- 服务端A的服务注册到ServiceManager中:服务注册
- 客户端B想要调用服务端A的服务,就去请求ServiceManager
- ServiceManager去让服务端A实例化服务:服务发现
- 返回一个用来发送数据的对象BpBinder给到客户端B
- 客户端B通过BpBinder发送数据到服务端A的内核的映射区域(传参时客户端会传一个reply序列化对象,在底层会将这个地址一层一层往下传,直至传到回调客户端):这里发生了一次通信copy_from_user:服务调用
- 服务端A通过BBBinder得到数据并处理数据
- 服务端唤醒客户端等待的线程;将返回结果写入到客户端发送请求时传的一个reply容器地址中,调用onTransact返回;
- 客户端在onTransac中得到数据;通信结束;
ServiceManager维持了Binder这套通信框架;
6.动态代理实现
设计模式之动态代理
什么是动态代理网上已经讲了很多了,这里我就没必要讲了,只贴一个简单概念出来
代理模式的定义:由于某些原因需要给某对象提供一个代理以控制对该对象的访问。这时,访问对象不适合或者不能直接引用目标对象,代理对象作为访问对象和目标对象之间的中介。
代理模式的主要优点有:
- 代理模式在客户端与目标对象之间起到一个中介作用和保护目标对象的作用;
- 代理对象可以扩展目标对象的功能;
- 代理模式能将客户端与目标对象分离,在一定程度上降低了系统的耦合度,增加了程序的可扩展性
其主要缺点是:
- 代理模式会造成系统设计中类的数量增加
- 在客户端和目标对象之间增加一个代理对象,会造成请求处理速度变慢;
- 增加了系统的复杂度;
Jdk动态代理实现的源码分析
实现:
jdk动态代理的实现为:实现java.lang.reflect.InvocationHandler接口
例子:
class ProxyObject implements InvocationHandler
    private final Object target;

    public ProxyObject(Object target)
        this.target = target;


    @Override
    public Object invoke(Object proxy, Method method, Object[] args) throws Throwable
        Objects.requireNonNull(target);
        System.out.println("代理开始前");
        Object ret = method.invoke(target, args);
        System.out.println("代理结束");
        return ret;
然后使用java.lang.reflect.Proxy的newProxyInstance方法
//调用jdk的api生成代理类
    public static <T> T getProxy(Class<T> ret, Class<?>[] interfaces, InvocationHandler handler)
        Object o = Proxy.newProxyInstance(handler.getClass().getClassLoader(), interfaces, handler);
        return (T) o;
所以要明白jdk动态代理实现,我们的切入点就是newProxyInstance方法
这里贴出该方法中重要的代码段:
//newProxyInstance方法
...
//Look up or generate the designated proxy class.
Class<?> cl = getProxyClass0(loader, intfs);
....
//获取生成代理类的构造方法
final Constructor<?> cons = cl.getConstructor(constructorParams);
...
//反射调用代理类的构造方法实例化
return cons.newInstance(new Object[]h);
从上面的代码可以看出来,我们关心的是getProxyClass0这个方法,怎么生成的代理类,我们继续往下看:
private static Class<?> getProxyClass0(ClassLoader loader,
                                           Class<?>... interfaces)
      	...
        //可以看到,代理类是有缓存的,通过缓存的key值是对应的类加载器
        return proxyClassCache.get(loader, interfaces);

//缓存的get方法
public V get(K key, P parameter)
       	...
        Object cacheKey = CacheKey.valueOf(key, refQueue);

        // lazily install the 2nd level valuesMap for the particular cacheKey
        ConcurrentMap<Object, Supplier<V>> valuesMap = map.get(cacheKey);
        if (valuesMap == null)
            ConcurrentMap<Object, Supplier<V>> oldValuesMap
                = map.putIfAbsent(cacheKey,
                                  valuesMap = new ConcurrentHashMap<>());
            if (oldValuesMap != null)
                valuesMap = oldValuesMap;


        // create subKey and retrieve the possible Supplier<V> stored by that
        // subKey from valuesMap
    	//这里的apply方法生成subKey
        Object subKey = Objects.requireNonNull(subKeyFactory.apply(key, parameter));
        Supplier<V> supplier = valuesMap.get(subKey);
        Factory factory = null;

        while (true)
            if (supplier != null)
                // supplier might be a Factory or a CacheValue<V> instance
                //get方法获取对应的代理对象
                V value = supplier.get();
                if (value != null)
                    return value;

                if (factory == null)
                	factory = new Factory(key, parameter, subKey, valuesMap);

				...
                //将构建的factor赋值给supplier
                supplier = factory;

		...

    ...

//Factory类的声明
  private final class Factory implements Supplier<V>
		...
        @Override
        public synchronized V get()  // serialize access
            // re-check
            //主要部分
            value = Objects.requireNonNull(valueFactory.apply(key, parameter));
            ...

      ...

//proxyClassCache的声明
 /**
     * a cache of proxy classes
     */
 private static final WeakCache<ClassLoader, Class<?>[], Class<?>>
        proxyClassCache = new WeakCache<>(new KeyFactory(), new ProxyClassFactory());
从上面的代码中可以看出,代理类的生成是在ProxyClassFactory的apply方法中
 //ProxyClassFactory的apply方法
        @Override
        public Class<?> apply(ClassLoader loader, Class<?>[] interfaces)

          	...
            /*
             * Generate the specified proxy class.
             */
            //生成代理类
            byte[] proxyClassFile = ProxyGenerator.generateProxyClass(
                proxyName, interfaces, accessFlags);
            try
                return defineClass0(loader, proxyName,
                                    proxyClassFile, 0, proxyClassFile.length);
             catch (ClassFormatError e)
                /*
                 * A ClassFormatError here means that (barring bugs in the
                 * proxy class generation code) there was some other
                 * invalid aspect of the arguments supplied to the proxy
                 * class creation (such as virtual machine limitations
                 * exceeded).
                 */
                throw new IllegalArgumentException(e.toString());
但是ProxyGenerator,generateProxyClass方法的源码在sun.misc包下面,没有找到源码。
jdk动态代理大概流程
但是jdk整个动态代理的大概流程,通过上面的分析,应该已经知晓了整理一下就是
1.根据传入的接口生成一个代理类(这个代理类有一个参数为InvocationHandler的构造方法)
2.将InvocationHandler的实现类传入到代理类的构造方法中,并实例化
代理类数据结构
根据这个我们可以大概推敲一下代理类的数据结构,这里贴出我所认为的结构(基于Human接口):
//接口Human
interface Human
    void say(String args);

class Chinese implements Human
    @Override
    public void say(String word)
        System.out.println("哈哈,中国:" + word);


//我所认为的jdk为human接口生成的代理类
class SimulateProxy implements Human
    private final InvocationHandler handler;

    public SimulateProxy(InvocationHandler handler)
        this.handler = handler;


    @Override
    public void say(String word)
        Objects.requireNonNull(handler);
        try
            Method say = Human.class.getDeclaredMethod("say", String.class);
            Object invoke = handler.invoke(this, say, new Object[]word);
         catch (Throwable e)
            e.printStackTrace();


//测试猜测
class ProxyObject implements InvocationHandler
    private final Object target;

    public ProxyObject(Object target)
        this.target = target;


    @Override
    public Object invoke(Object proxy, Method method, Object[] args) throws Throwable
        Objects.requireNonNull(target);
        System.out.println("代理开始前");
        Object ret = method.invoke(target, args);
        System.out.println("代理结束");
        return ret;


public static void main(String[] args)
    Chinese chinese = new Chinese();
    Class<?>[] classes = new Class<?>[]Human.class;
   	InvocationHandler handler = new ProxyObject(chinese);
    SimulateProxy proxy0 = new SimulateProxy(handler);
    proxy0.say("推测的结构")

/
// 运行结果:
// 代理开始前
// 哈哈,中国:推测的结构
// 代理结束
好了,通过上面的描述,我们清楚了动态代理生成代理类的结构,所以现在要自己实现类似jdk的动态代理就剩下一个问题,怎么根据接口来生成对应的代理类。这里会用到一个java字节码生成框架javassist
自己实现动态代理类似于Jdk的动态代理
思路:
根据接口生成动态代理的类的思路如下:
1.先利用反射获取接口信息,主要是方法签名(方法名称,方法返回类型,方法入参类型)
2.利用javassist根据接口信息生成对应的字节码
3.返回该字节码
上面的代理实现了单个接口的动态代理,并且兼容Jdk的InvocationHandler接口,如果需要实现多接口的代理,也简单,只需要将多个接口的方法信息传入上面的生成函数即可。
7.ASM 的原理
AMS(ActivityManagerService)
在SystemServer的进程中,是SystemServer中的一个对象;
①作用:
-
管理activity的生命周期
-
启动activity
-
与PMS进行交互
Activity->AMS:
-
调用
activity.startActivity() -
通过
ActivityManage.getService("activity")得到AMS的BpBinder; -
通过BpBinder发送请求,调用AMS的
startActivity()AMS->PMS:
-
AMS和PMS都在
SystemServer进程中,都是SystemServer中一个对象 -
通过包名和PMS里的缓存
mPackage查询到App对应的Package -
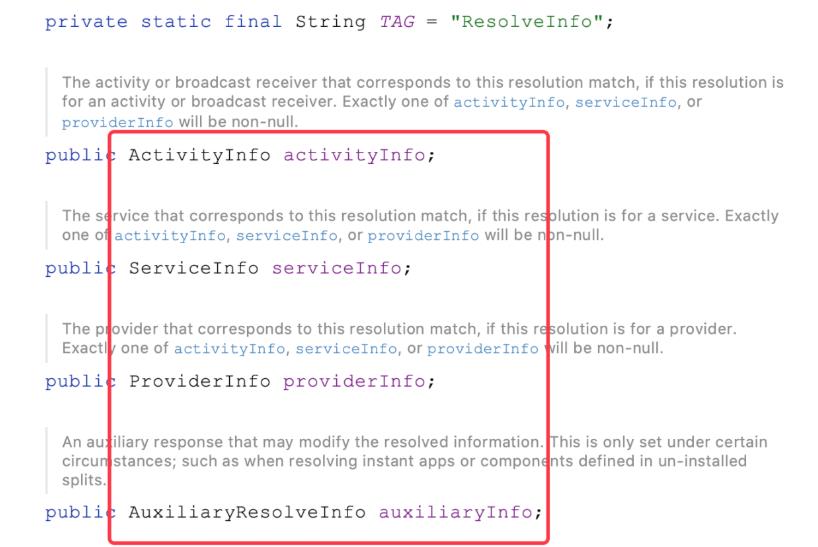
使用activity的类名通过PMS里的内部类
PackageManagerInternalImpl查询到activity对应的包装类ResolveInfo; ps:ResolveInfo这个javabean里有activityInfo、ServiceInfo等变量,查询啥就给哪个变量赋值,再返回ResolveInfo; -
得到
ResolveInfo里的activityInfo; -
将
activityInfo返回给App进程的ActivityThread;` -
ActivityThread中发送事件 -
ActivityThread中的Handler对象mH收到159事件,处理 -
通过反射创建Activity对象
-
将Activity对象放到activtes启动记录中
②ActivityThread
-
每个应用有一个ActivityThread;是应用的入口;
-
在APP进程中
-
是AMS的缓存中心
-
ActivityThread中的List activtes放了activity的启动记录
③ActivityThread中重要的对象:
- ApplicationThread:AMS回调给ActivityThread数据的桥梁
- mInstrumentation:管理Application和Activity的生命周期(及创建)
- mH:Handler,处理ApplicationThread里各种回调函数发送的各种消息
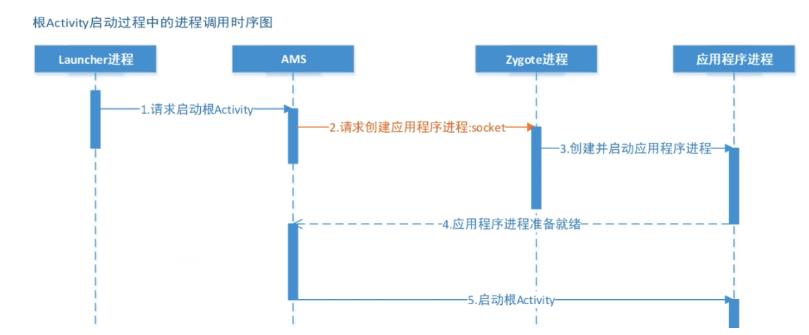
④点击桌面App图标发生了什么?
- 点击的APP图标是在单独的Luancher进程,是一个系统App进程
- Luancher进程请求SystemServer进程中的AMS去创建应用的根Activity(AndroidMnifest.xml中initen-fifter为Luanche的activity)
- AMS通过包名让PMS查询到相关应用信息,得到应用的Package;
- AMS创建activity栈,根据Package拿到根activity的配置节点信息,放到栈中,此时栈中只有一个根activity的配置节点信息,也就是在栈顶;(此处的栈不是应用层的栈,这个栈只是用来放activity节点信息的)
- AMS请求zygote进程创建App进程;zygote进程比较特殊, 使用Socket通信,而不是binder;zygote是所有应用的孵化器,zygote进程挂掉时,手机会自动重启;
- zygote进程去fork出App进程;
- APP进程中的主线程调用
ActivityThread.main()静态函数,main中创建ActivityThread对象 - 接着在
ActivityThread.attch()中创建了一个ApplicationThread对象,作为和AMS通信时,返回结果的桥梁; - App进程通过AMS的binder调用
attachApplication(thread)请求AMS获取应用对应的Applaction和栈顶中activity节点信息(步骤4),此时给AMS传过去了一个thread,这个thread就是ApplicationThread - AMS将从PMS查到的application节点数据序列化后,调用
thread.bindApplaction(data数据…)传给ActivityThread;(此时代码还会继续往下执行,去获取栈顶activity的节点信息) - ActivityThread调用sendMessage发送消息
BIND_APPLICATION(110)给Handler,Handler调用handleBindApplication(data) - 通过反射实例化Instrumentation对象:负责application和activity的生命周期的管理
- 通过Instrumentation对象反射实例化
new Applaction对象app - 调用
Instrumentation.callApplactionOnCreate(app) - 执行
Applaction.onCreate() - 步骤10中AMS继续向下执行查找activity,AMS将查到的栈顶根Activity(LaunchActivity )信息封装到一个事务ClientTransaction中,提交事务并执行,在执行中,调用
thread.scheduleTransaction(事务数据);(thread为ActivityThread中的ApplicationThread) - 在
ApplicationThread回调scheduleTransaction函数中,发送`EXECUTE_TRANSACTION(159)消息 - Handler处理
EXECUTE_TRANSACTION消息,从事务数据中取出LaunchActivity信息,并调用hanldeLaunchActivity(activity数据) - 通过Instrumentation对象反射实例化
newActivity()出对象activity - 执行
activity.attach(),在attach中创建WMS的桥接代理类;(绘制流程会用到) - 通过
Instrumentation调用callActivityOnCreate(activity) - 执行
Activty.onCreate(); - 至此启动页根Activity启动完成;
下图中4-5中少了上面7-23的步骤:
7-15创建并启动了Application;
16-22创建并启动了Activity;
⑤应用内activity与activity的跳转是跨进程通信,还是同一个进程内通信?
是跨进程通信;
跳转流程参考上面的:省去了application的创建过程;
步骤3 +步骤16-23;
8.内存泄漏常见场景以及解决方案
①资源性对象未关闭
对于资源性对象不再使用时,应该立即调用它的close()函数,将其关闭,然后再置为null。例如Bitmap 等资源未关闭会造成内存泄漏,此时我们应该在Activity销毁时及时关闭。
②注册对象未注销
例如BraodcastReceiver、EventBus未注销造成的内存泄漏,我们应该在Activity销毁时及时注销。
③类的静态变量持有大数据对象
尽量避免使用静态变量存储数据,特别是大数据对象,建议使用数据库存储。
④单例造成的内存泄漏
优先使用Application的Context,如需使用Activity的Context,可以在传入Context时使用弱引用进行封 装,然后,在使用到的地方从弱引用中获取Context,如果获取不到,则直接return即可。
⑤非静态内部类的静态实例
该实例的生命周期和应用一样长,这就导致该静态实例一直持有该Activity的引用,Activity的内存资源 不能正常回收。此时,我们可以将该内部类设为静态内部类或将该内部类抽取出来封装成一个单例,如 果需要使用Context,尽量使用Application Context,如果需要使用Activity Context,就记得用完后置 空让GC可以回收,否则还是会内存泄漏。
⑥Handler临时性内存泄漏
Message发出之后存储在MessageQueue中,在Message中存在一个target,它是Handler的一个引用,Message在Queue中存在的时间过长,就会导致Handler无法被回收。如果Handler是非静态的, 则会导致Activity或者Service不会被回收。并且消息队列是在一个Looper线程中不断地轮询处理消息, 当这个Activity退出时,消息队列中还有未处理的消息或者正在处理的消息,并且消息队列中的Message 持有Handler实例的引用,Handler又持有Activity的引用,所以导致该Activity的内存资源无法及时回 收,引发内存泄漏。解决方案如下所示:
1、使用一个静态Handler内部类,然后对Handler持有的对象(一般是Activity)使用弱引用,这 样在回收时,也可以回收Handler持有的对象。
2、在Activity的Destroy或者Stop时,应该移除消息队列中的消息,避免Looper线程的消息队列中 有待处理的消息需要处理
(Handler那篇有讲)
⑦容器中的对象没清理造成的内存泄漏
在退出程序之前,将集合里的东西clear,然后置为null,再退出程序
⑧WebView
WebView都存在内存泄漏的问题,在应用中只要使用一次WebView,内存就不会被释放掉。我们可以为 WebView开启一个独立的进程,使用AIDL与应用的主进程进行通信,WebView所在的进程可以根据业 务的需要选择合适的时机进行销毁,达到正常释放内存的目的。
⑨使用ListView时造成的内存泄漏
在构造Adapter时,使用缓存的convertView。
⑩Bitmap
80%的内存泄露都是Bitmap造成的,Bitmap有Recycle()方法,不用时要及时回收。但是如果遇到要用Bitmap直接用Glide就完事了,自己写10有8.9得出错。
9.touch 事件源码问题。
1.ViewRootImpl接收Event
-
ViewRootImpl的WindowInputEventReceiver中会接收系统传递的按键,执行onInputEvent方
-
onInputEvent方法执行enqueueInputEvent,再执行doProcessInputEvents或者scheduleProcessInputEvents,最终执行到deliverInputEvent
-
deliverInputEvent中通过InputStage向对应的输入目标发送按键,安卓view对应的stage是ViewPostImeInputStage
-
ViewPostImeInputStage中执行processPointerEvent,最终发到mView.dispatchPointerEvent(event),此处的mView就是根view,对于Activity来说就是Activity的根view(DecorView)
		private int processPointerEvent(QueuedInputEvent q)
            final MotionEvent event = (MotionEvent)q.mEvent;
            mAttachInfo.mUnbufferedDispatchRequested = false;
            mAttachInfo.mHandlingPointerEvent = true;
            boolean handled = mView.dispatchPointerEvent(event);
            maybeUpdatePointerIcon(event);
            maybeUpdateTooltip(event);
            mAttachInfo.mHandlingPointerEvent = false;
            if (mAttachInfo.mUnbufferedDispatchRequested && !mUnbufferedInputDispatch)
                mUnbufferedInputDispatch = true;
                if (mConsumeBatchedInputScheduled)
                    scheduleConsumeBatchedInputImmediately();


            return handled ? FINISH_HANDLED : FORWARD;
2.Event事件从DecodeView传递到view的dispatchTouchEvent
DecodeView的dispatchPointerEvent事件
  //dispatchPointerEvent 区分是touch事件还是鼠标事件
  public final boolean dispatchPointerEvent(MotionEvent event)
    if (event.isTouchEvent())
        return dispatchTouchEvent(event);
     else
        return dispatchGenericMotionEvent(event);
DecodeView的dispatchTouchEvent
@Override
    public boolean dispatchTouchEvent(MotionEvent ev)
       	//判断是否是window对象,区分事件分析,DecodeView会走cb.dispatchTouchEvent(ev),最终执行到			   activity的dispatchTouchEvent
        final Window.Callback cb = mWindow.getCallback();
        return cb != null && !mWindow.isDestroyed() && mFeatureId < 0
                ? cb.dispatchTouchEvent(ev) : super.dispatchTouchEvent(ev);
Activity的dispatchTouchEvent,会执行getWindow().superDispatchTouchEvent(ev)。getWindow是PhoneWindow对象,PhoneWindow的superDispatchTouchEvent执行的是mDecor.superDispatchTouchEvent(event),而DecodeView的此方法执行调用super.dispatchTouchEvent(event),最终执行到View的dispatchTouchEvent方法
  //Activity的dispatchTouchEvent
  public boolean dispatchTouchEvent(MotionEvent ev)
        if (ev.getAction() == MotionEvent.ACTION_DOWN)
            onUserInteraction();

        if (getWindow().superDispatchTouchEvent(ev))
            return true;

        return onTouchEvent(ev);
3.view中Event的处理
viewGroup分发
@Override
    public boolean dispatchTouchEvent(MotionEvent ev)
        if (mInputEventConsistencyVerifier != null)
            mInputEventConsistencyVerifier.onTouchEvent(ev, 1);


        // If the event targets the accessibility focused view and this is it, start
        // normal event dispatch. Maybe a descendant is what will handle the click.
        if (ev.isTargetAccessibilityFocus() && isAccessibilityFocusedViewOrHost())
            ev.setTargetAccessibilityFocus(false);


        boolean handled = false;
        if (onFilterTouchEventForSecurity(ev))
            final int action = ev.getAction();
            final int actionMasked = action & MotionEvent.ACTION_MASK;

            // Handle an initial down.
            //如果是DOWN事件,会先清除掉touchtarget对象以及touch状态
            if (actionMasked == MotionEvent.ACTION_DOWN)
                // Throw away all previous state when starting a new touch gesture.
                // The framework may have dropped the up or cancel event for the previous gesture
                // due to an app switch, ANR, or some other state change.
                cancelAndClearTouchTargets(ev);
                resetTouchState();


            // Check for interception.
            final boolean intercepted;
            //如果当前是DOWN事件或者已经有view处理了事件,则判断是否当前view拦截事件
            if (actionMasked == MotionEvent.ACTION_DOWN
                    || mFirstTouchTarget != null)
                 //是否禁止拦截
                final boolean disallowIntercept = (mGroupFlags & FLAG_DISALLOW_INTERCEPT) != 0;
                if (!disallowIntercept)
                	//判断是否拦截按键
                    intercepted = onInterceptTouchEvent(ev);
                    ev.setAction(action); // restore action in case it was changed
                 else
                    intercepted = false;

             else
                // There are no touch targets and this action is not an initial down
                // so this view group continues to intercept touches.
                intercepted = true;


            // If intercepted, start normal event dispatch. Also if there is already
            // a view that is handling the gesture, do normal event dispatch.
            if (intercepted || mFirstTouchTarget != null)
                ev.setTargetAccessibilityFocus(false);


            // Check for cancelation.
            final boolean canceled = resetCancelNextUpFlag(this)
                    || actionMasked == MotionEvent.ACTION_CANCEL;

            // Update list of touch targets for pointer down, if needed.
            final boolean isMouseEvent = ev.getSource() == InputDevice.SOURCE_MOUSE;
            //是否允许多点触控
            final boolean split = (mGroupFlags & FLAG_SPLIT_MOTION_EVENTS) != 0
                    && !isMouseEvent;
            TouchTarget newTouchTarget = null;
            boolean alreadyDispatchedToNewTouchTarget = false;
            if (!canceled && !intercepted)
                // If the event is targeting accessibility focus we give it to the
                // view that has accessibility focus and if it does not handle it
                // we clear the flag and dispatch the event to all children as usual.
                // We are looking up the accessibility focused host to avoid keeping
                // state since these events are very rare.
                View childWithAccessibilityFocus = ev.isTargetAccessibilityFocus()
                        ? findChildWithAccessibilityFocus() : null;

                if (actionMasked == MotionEvent.ACTION_DOWN
                        || (split && actionMasked == MotionEvent.ACTION_POINTER_DOWN)
                        || actionMasked == MotionEvent.ACTION_HOVER_MOVE)
                    final int actionIndex = ev.getActionIndex(); // always 0 for down
                    final int idBitsToAssign = split ? 1 << ev.getPointerId(actionIndex)
                            : TouchTarget.ALL_POINTER_IDS;

                    // Clean up earlier touch targets for this pointer id in case they
                    // have become out of sync.
                    removePointersFromTouchTargets(idBitsToAssign);

                    final int childrenCount = mChildrenCount;
                    if (newTouchTarget == null && childrenCount != 0)
                        final float x =
                                isMouseEvent ? ev.getXCursorPosition() : ev.getX(actionIndex);
                        final float y =
                                isMouseEvent ? ev.getYCursorPosition() : ev.getY(actionIndex);
                        // Find a child that can receive the event.
                        // Scan children from front to back.
                        final ArrayList<View> preorderedList = buildTouchDispatchChildList();
                        final boolean customOrder = preorderedList == null
                                && isChildrenDrawingOrderEnabled();
                        final View[] children = mChildren;
                        //遍历子元素,一般是底层的优先
                        for (int i = childrenCount - 1; i >= 0; i--)
                            final int childIndex = getAndVerifyPreorderedIndex(
                                    childrenCount, i, customOrder);
                            final View child = getAndVerifyPreorderedView(
                                    preorderedList, children, childIndex);
                              //是否可以接收事件,可见或者有动画,是否在点击区域内
                            if (!child.canReceivePointerEvents()
                                    || !isTransformedTouchPointInView(x, y, child, null))
                                continue;

							//判断当前子view是否在触摸记录链表中,如果存在直接break,此处需要注意,按键有可能不会往下层的子view分发,因为已经查到了可处理按键的view链
                            newTouchTarget = getTouchTarget(child);
                            if (newTouchTarget != null)
                                // Child is already receiving touch within its bounds.
                                // Give it the new pointer in addition to the ones it is handling.
                                newTouchTarget.pointerIdBits |= idBitsToAssign;
                                break;


                            resetCancelNextUpFlag(child);
                            //将按键向子view分发,判断子view是否处理按键
                            if (dispatchTransformedTouchEvent(ev, false, child, idBitsToAssign))
                                // Child wants to receive touch within its bounds.
                                mLastTouchDownTime = ev.getDownTime();
                                if (preorderedList != null)
                                    // childIndex points into presorted list, find original index
                                    for (int j = 0; j < childrenCount; j++)
                                        if (children[childIndex] == mChildren[j])
                                            mLastTouchDownIndex = j;
                                            break;


                                 else
                                    mLastTouchDownIndex = childIndex;

                                mLastTouchDownX = ev.getX();
                                mLastTouchDownY = ev.getY();
                                //如果子view处理了按键,则将子view加入到touchtarget链表中,单点触控中,链表长度为1,多点触控中,链表长度可能大于1
                                newTouchTarget = addTouchTarget(child, idBitsToAssign);
                                //记录按键已经处理完成
                                alreadyDispatchedToNewTouchTarget = true;
                                break;


                            // The accessibility focus didn't handle the event, so clear
                            // the flag and do a normal dispatch to all children.
                            ev.setTargetAccessibilityFocus(false);

                        if (preorderedList != null) preorderedList.clear();

					//此处需注意,如果没有newTouchTarget 并且当前view的mFirstTouchTarget 不为空,则将按键交给mFirstTouchTarget处理,比如A包含B,C,B包含D,第一个手指在D按下,第二个手指在B中不包含D的位置按下,此时按键会发给D,而不会往C分发,就是因为再B中,newTouchTarget 未空,而mFirstTouchTarget 指向了D
                    if (newTouchTarget == null && mFirstTouchTarget != null)
                        // Did not find a child to receive the event.
                        // Assign the pointer to the least recently added target.
                        newTouchTarget = mFirstTouchTarget;
                        while (newTouchTarget.next != null)
                            newTouchTarget = newTouchTarget.next;

                        newTouchTarget.pointerIdBits |= idBitsToAssign;


            // Dispatch to touch targets.
            if (mFirstTouchTarget == null) //当前View处理按键
                // No touch targets so treat this as an ordinary view.
                handled = dispatchTransformedTouchEvent(ev, canceled, null,
                        TouchTarget.ALL_POINTER_IDS);
         以上是关于12W字;2022最新Android11位大厂面试专题阿里篇的主要内容,如果未能解决你的问题,请参考以下文章