Elasticsearch:从 Elastic Stack 中的时间戳谈开去
Posted Elastic 中国社区官方博客
tags:
篇首语:本文由小常识网(cha138.com)小编为大家整理,主要介绍了Elasticsearch:从 Elastic Stack 中的时间戳谈开去相关的知识,希望对你有一定的参考价值。
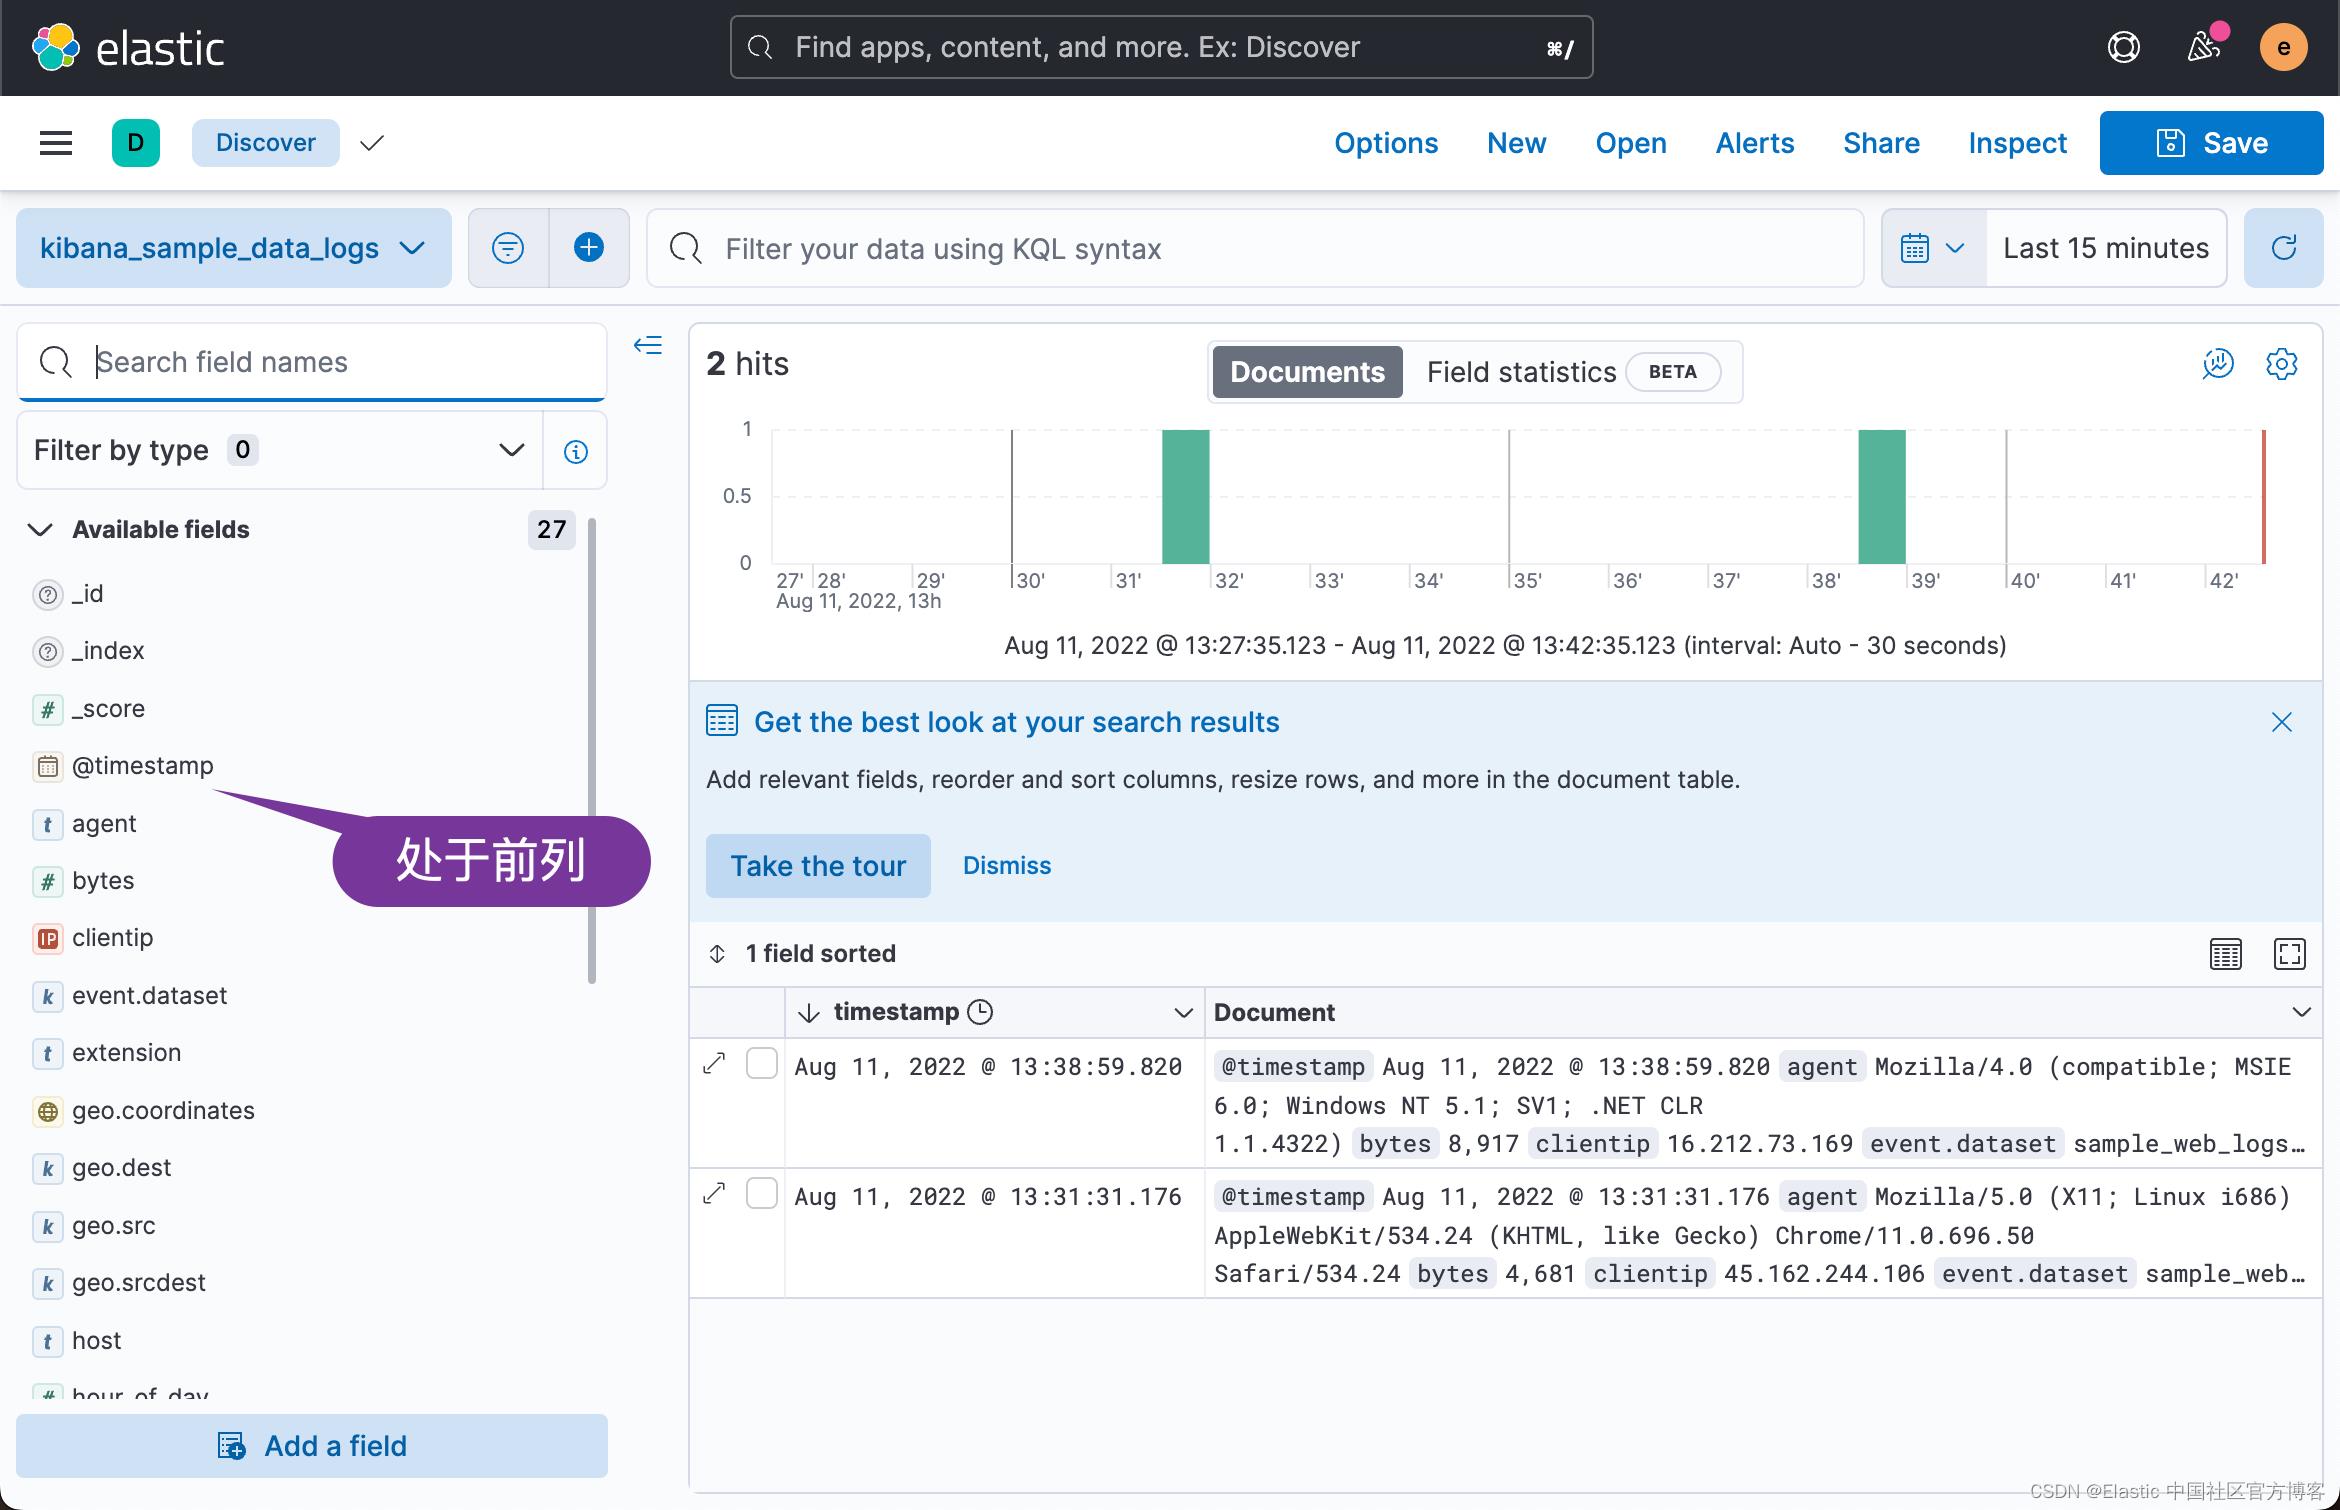
时间戳,也就是 timestamp, 它在许多的事件中,特别是时序数据中是一个不可少的字段。它记录事件或文档的时间。在我们对数据可视化时,也是非常重要的一个字段。针对时序时间,在我们对数据创建 index patterns 或者 date views 时,我们需要选择时间戳的字段。由于 @ 符号的排序比较靠前,所以通常 timestamp 的字段名称被定义为 @timestamp,这样在我们的 Kibana 可视化中,我们永远可以看到 @timestamp 处于列表的前段,无论你有多少个字段:

在今天的文章中,我特别地来讲述一下 @timestamp 这个字段。
把一个时间字段变成为 @timestamp 字段
在许多的事件中,结构化后的时间字段的名称并不是 @timestamp,而是 timestamp,或者 DOB (date of birth)等这样的字段名称。为了能够使得一下 dashboard 或可视化能够正常地显示我们的数据,我们一种解决方案就是把这些字段的只转化到 @timestamp 这个字段上。在我之前的文章 “Logstash:Logstash 入门教程 (二)” 就有一个使用案例。我们创建如下的 Logstash 配置文件:
weblog.conf
input
  tcp
    port => 9900


filter
  grok
    match =>  "message" => "%COMBINEDAPACHELOG"


  mutate
    convert =>
      "bytes" => "integer"


  geoip
    source => "[source][address]"
    target => "geoip"


  useragent
    source => "agent"
    target => "useragent"


output
  stdout
请注意这个是针对 Elastic Stack 8.x 的配置。针对 Elastic Stack 7.x 的配置如下:
input
  tcp
    port => 9900


filter
  grok
    match =>  "message" => "%COMBINEDAPACHELOG"


  geoip
    source => "clientip"


  useragent
    source => "agent"
    target => "useragent"


output
  stdout
我们按照如下的方法来启动 Logstash:
$ pwd
/Users/liuxg/elastic/logstash-8.3.3
$ ./bin/logstash -f weblog.conf
然后,我们在另外一个 terminal 中打入如下的命令:
head -n 1 weblog-sample.log | nc localhost 9900$ pwd
/Users/liuxg/demos/logstash
$ ls weblog-sample.log
weblog-sample.log
$ head -n 1 weblog-sample.log | nc localhost 9900我们可以看到如下的输出:

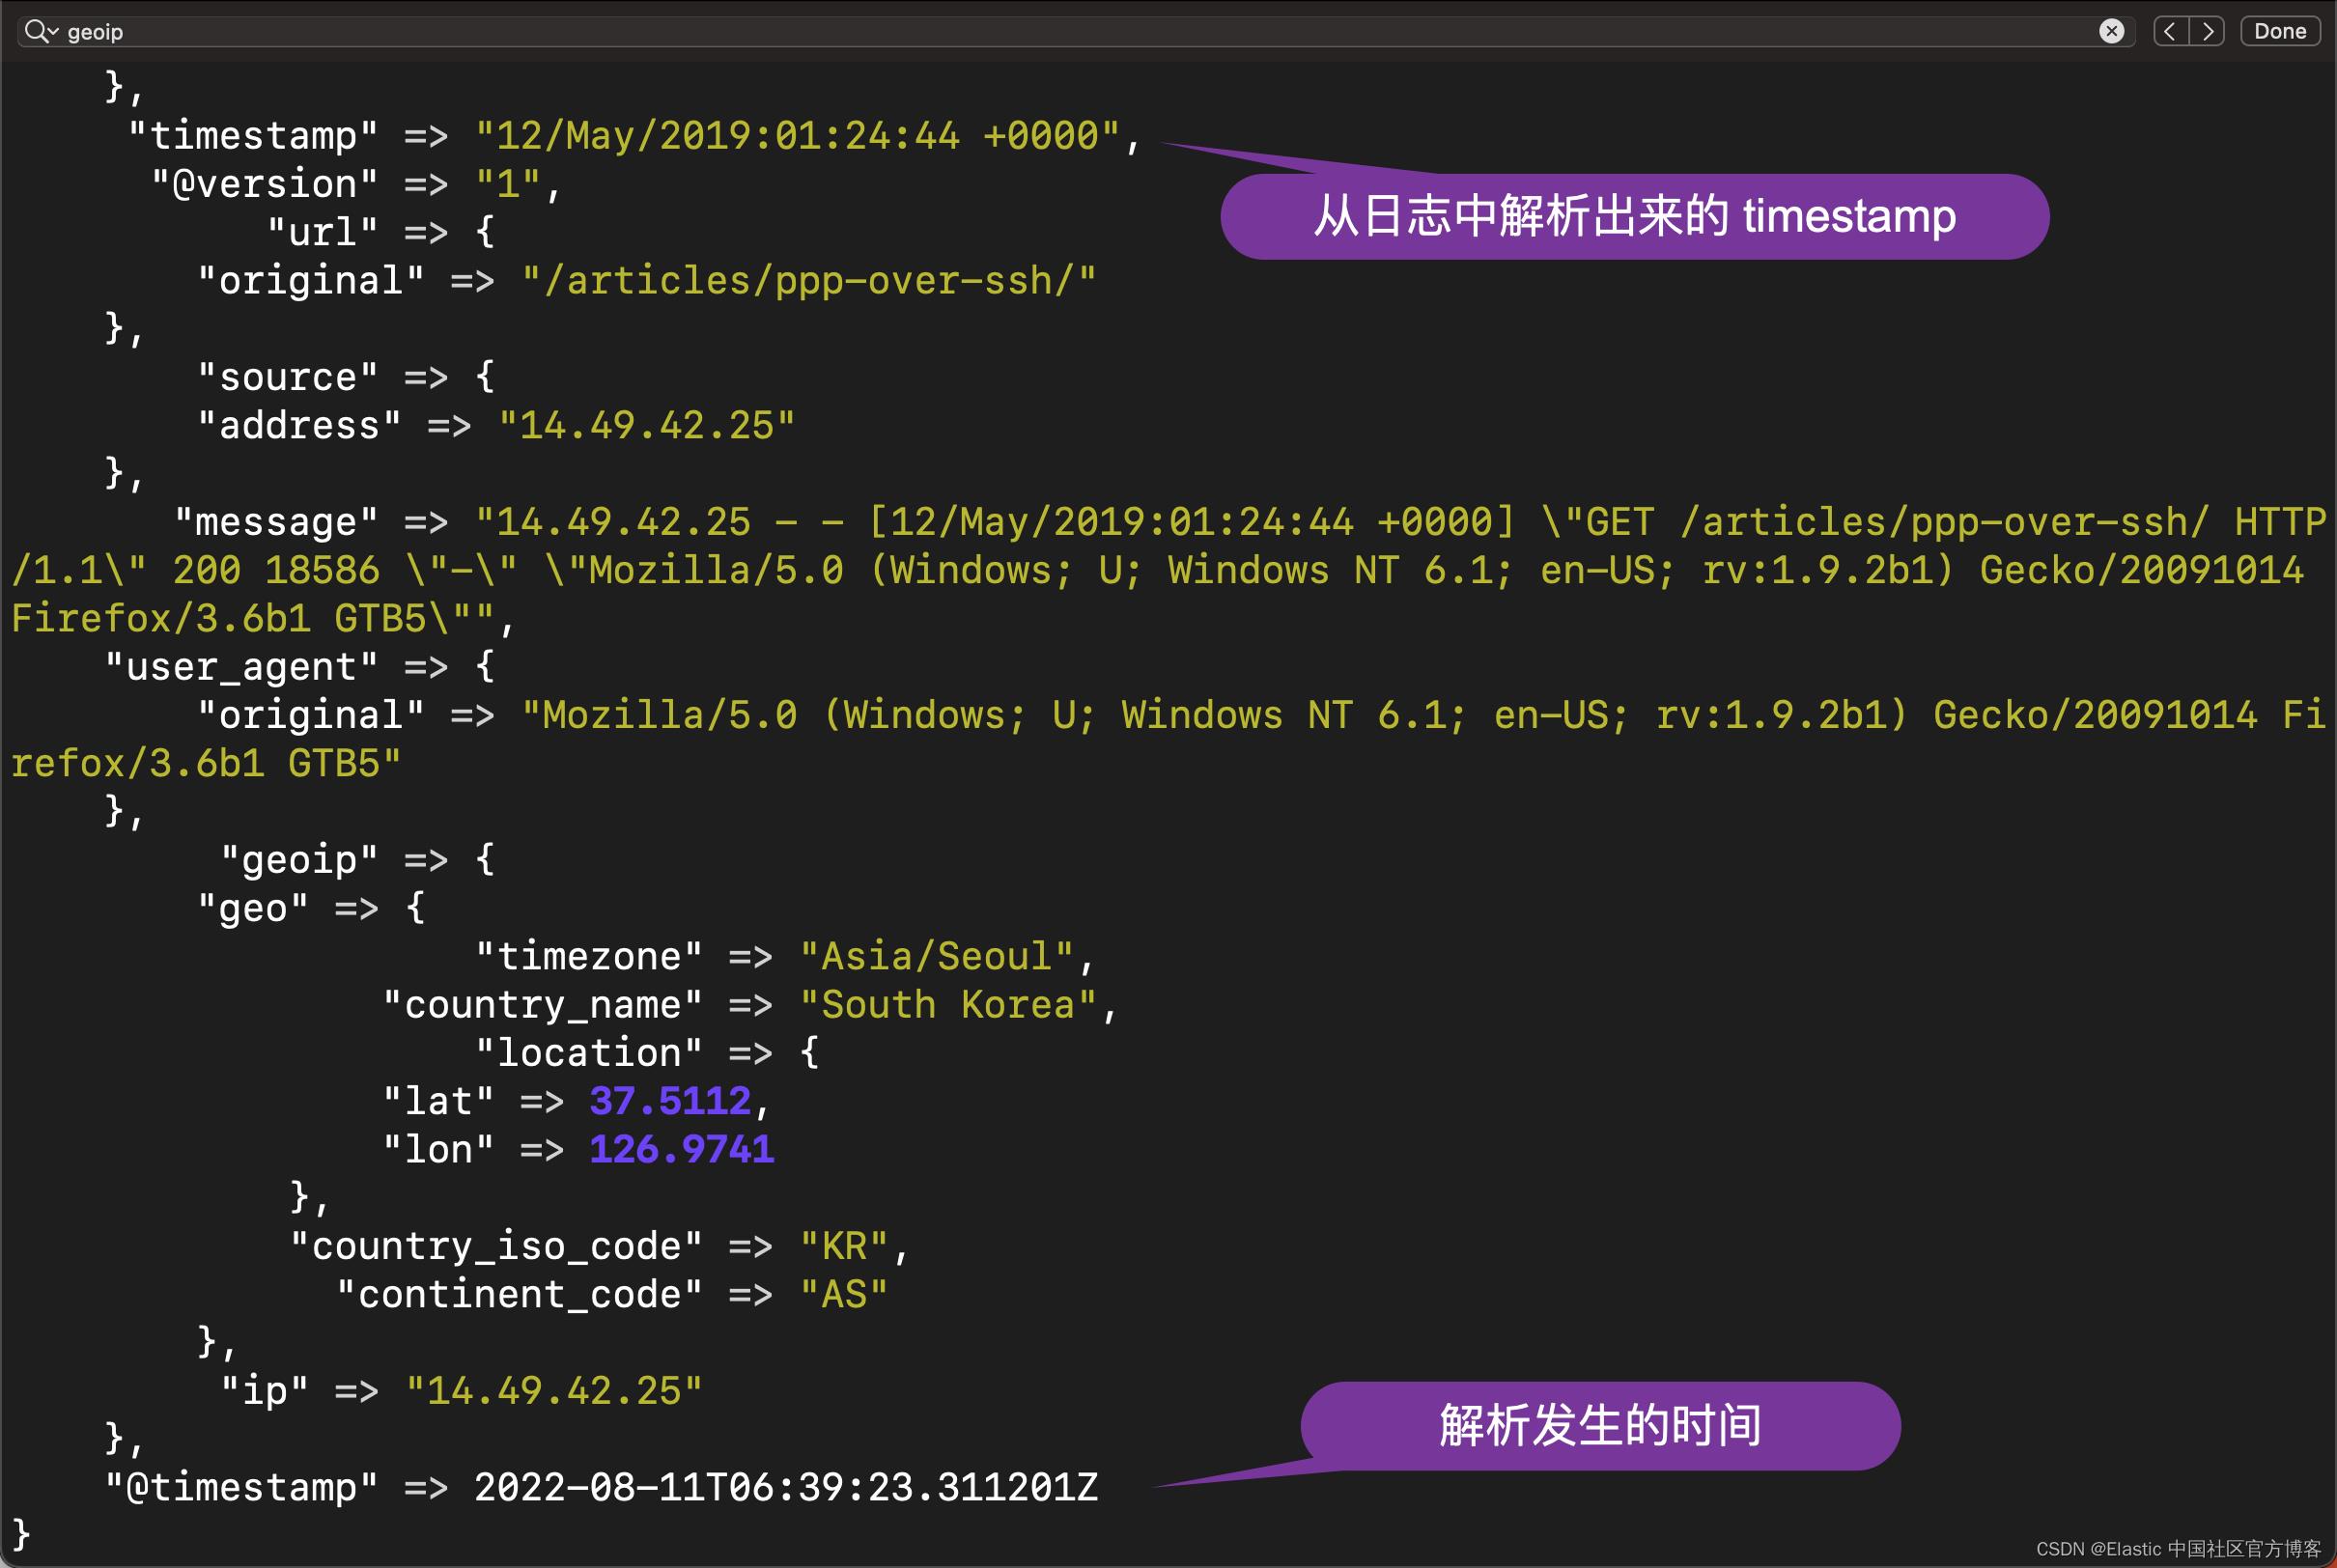
显然在上面有两个时间戳:timestamp 及 @timestamp。它们表达的意思是不一样的。我们希望的是 @timestamp 时间是事件发生的时间,也就是 timestamp 所表达的时间。在这个时候,我们可以使用 date 过滤器来完成:
weblog.conf
input
  tcp
    port => 9900


filter
  grok
    match =>  "message" => "%COMBINEDAPACHELOG"


  mutate
    convert =>
      "bytes" => "integer"


  geoip
    source => "[source][address]"
    target => "geoip"


  useragent
    source => "agent"
    target => "useragent"


  date
    match => ["timestamp", "dd/MMM/yyyy:HH:mm:ss Z"]


output
  stdout
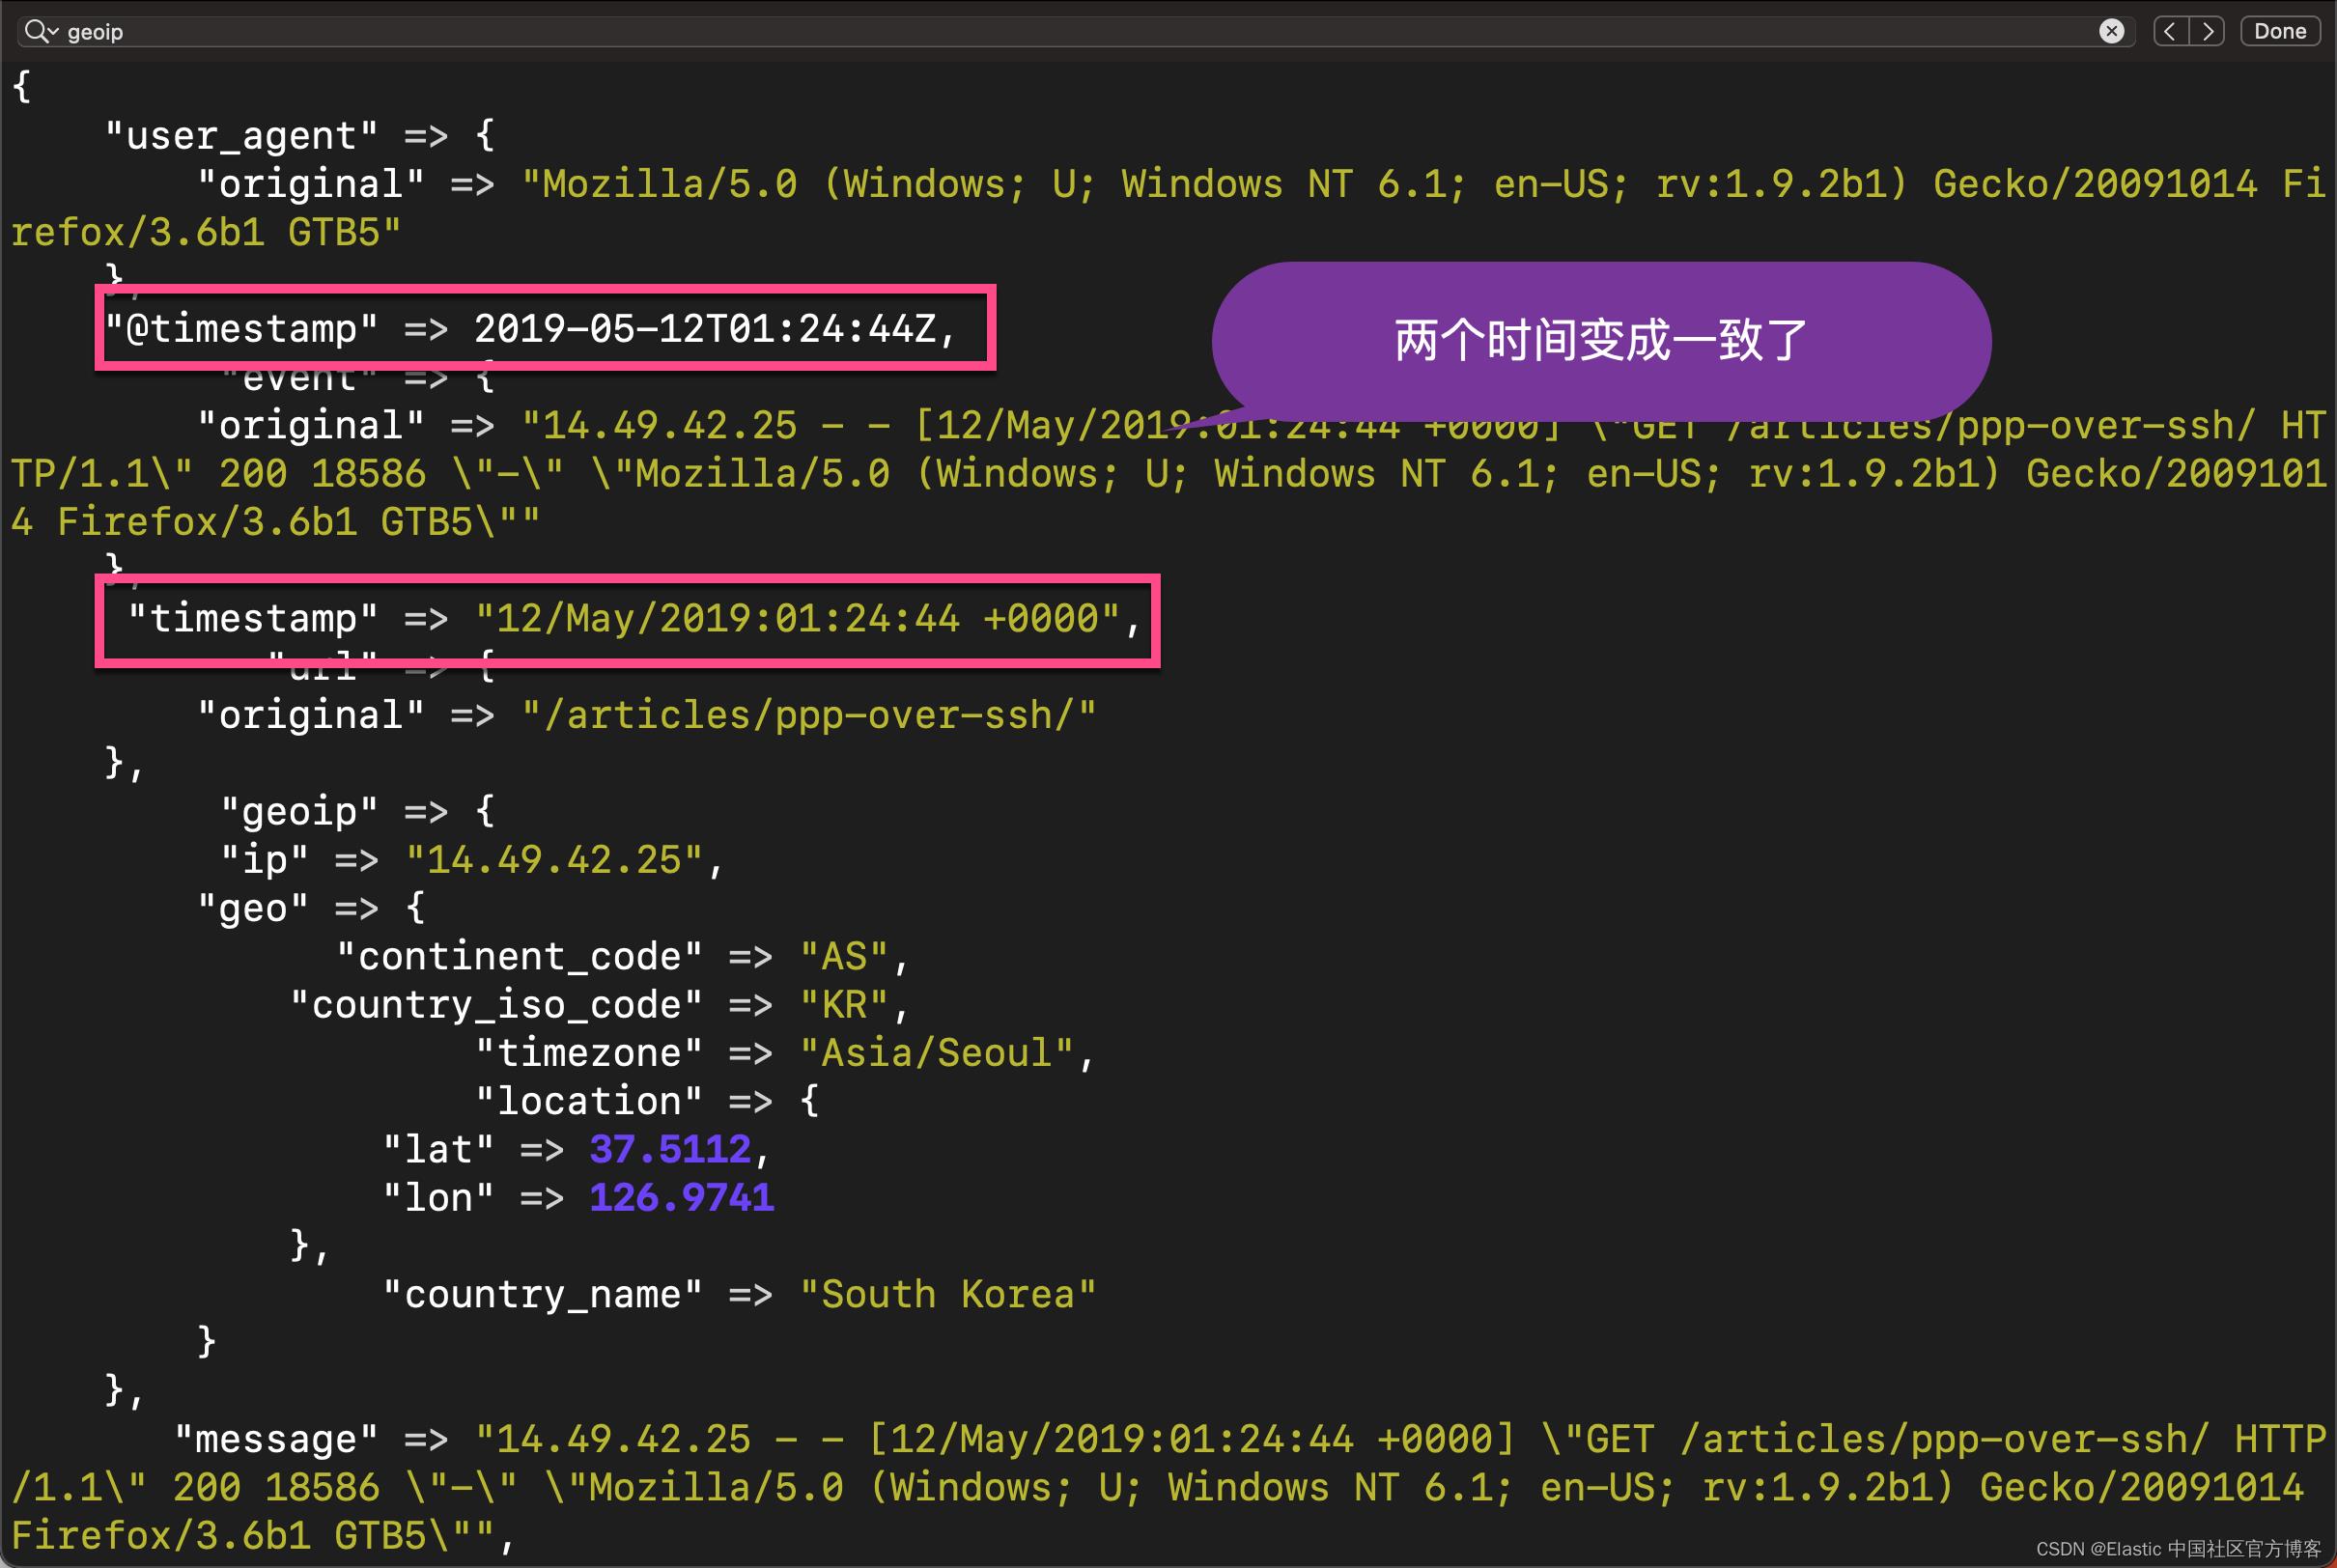
我们重新运行一下 Logstash。这次我们发现:

由于添加了 date 过滤器,所以 timestamp 及 @timestamp 现在是一致的了。
为时间添加时间戳
针对一些事件由于一些原因,可能在日志本身中不含有时间戳这些字段。我们可以使用 Beats 或者 client API 的方式采集数据。如果我们想针对这些事件添加时间戳,我们可以通过添加事件采集时的时间为时间的时间。我们可以通过 ingest pipeline 的元数据来进行添加。比如,我们先创建一个如下的 pipeline:
PUT _ingest/pipeline/add-timestamp

  "processors": [

      "set":
        "field": "@timestamp",
        "value": "_ingest.timestamp"


  ]
然后我们可以通过如下的方式来进行写入文档:
PUT my-index/_doc/1?pipeline=add-timestamp

  "event": "This is xiaoguo from Elastic"
我们通过如下的方式来进行查看:
GET my-index/_search
  "took": 0,
  "timed_out": false,
  "_shards":
    "total": 1,
    "successful": 1,
    "skipped": 0,
    "failed": 0
  ,
  "hits":
    "total":
      "value": 1,
      "relation": "eq"
    ,
    "max_score": 1,
    "hits": [

        "_index": "my-index",
        "_id": "1",
        "_score": 1,
        "_source":
          "@timestamp": "2022-08-11T07:01:53.400148840Z",
          "event": "This is xiaoguo from Elastic"


    ]
我们可以看到一条被添加的字段叫做 @timestamp,而它的时间就是 ingest pipeline 被调用的时间。
在上面,我们看到 Logstash 中的 date 过滤器,可以把我们的一个时间戳字段的内容复制到 @timestamp 这个字段。事实上,date processor 也可以做同样的事情。我们使用如下的例子:
PUT my-index/_doc/1?pipeline=add-timestamp

  "event": "This is xiaoguo from Elastic",
  "@timestamp": "2012-12-05"
在上面,我们添加一个叫做 @timestamp 的字段。执行完上面的命令后,我们可以看到如下的内容被写入到 Elasticsearch 文档中:
GET my-index/_search?filter_path=hits.hits._source
  "hits":
    "hits": [

        "_source":
          "@timestamp": "2022-08-11T07:08:46.191688712Z",
          "DOB": "2012-12-05",
          "event": "This is xiaoguo from Elastic"


    ]
很显然上面的 @timestamp 是 ingest pipeline 调用时的时间。这个在我们的时间使用中,可能不是我们需要的。我们更希望上面的 DOB(date of birth)的时间成为我们的时间戳的时间。我们可以借助于 date processor。我们对 pipeline 进行重新修改:
PUT _ingest/pipeline/add-timestamp

  "processors": [

      "set":
        "field": "@timestamp",
        "value": "_ingest.timestamp"

    ,

      "date":
        "field": "DOB",
        "formats": ["yyyy-MM-dd"]


  ]
我们再次执行上面的写入命令:
PUT my-index/_doc/1?pipeline=add-timestamp

  "event": "This is xiaoguo from Elastic",
  "DOB": "2012-12-05"
我们做如下的查询:
GET my-index/_search?filter_path=hits.hits._source
  "hits":
    "hits": [

        "_source":
          "@timestamp": "2012-12-05T00:00:00.000Z",
          "DOB": "2012-12-05",
          "event": "This is xiaoguo from Elastic"


    ]
很显然,这次的 @timestamp 和 DOB 两个字段的时间是一致的,尽管在之前的 set processor 中我们把它设置为 ingest pipeline 执行的时间。
时间格式转换
在我的一个私信中,有个开发者问我如何把不同时间格式的字段统一起来,这样显得好看一些。目前看来,Logstash 的 date 过滤器没有这个功能,但是 date processor 倒是有一个输出格式的定义。我们尝试如下的方法:
PUT _ingest/pipeline/add-timestamp

  "processors": [

      "date":
        "field": "DOB",
        "formats": [
          "strict_date_optional_time_nanos"
        ],
       "output_format": "yyyy-MM-dd"


  ]


PUT my-index/_doc/1?pipeline=add-timestamp

  "event": "This is xiaoguo from Elastic",
  "DOB": "2099-05-05T16:21:15.000000Z"
在上面,我们创建了一个 pipeline,并写入一个文档。我们希望的时间格式是:
GET my-index/_search?filter_path=hits.hits._source
  "hits":
    "hits": [

        "_source":
          "@timestamp": "2099-05-05",
          "DOB": "2099-05-05T16:21:15.000000Z",
          "event": "This is xiaoguo from Elastic"


    ]
我们也可以选择不同格式,比如:
PUT _ingest/pipeline/add-timestamp

  "processors": [

      "date":
        "field": "DOB",
        "formats": [
          "strict_date_optional_time_nanos"
        ],
       "output_format": "basic_date"


  ]
在上面,basic_date 及 strict_date_optional_time_nanos 可以在地址找到它们的定义。运行完上面的 pipeline后,我们再次写入文档:
PUT my-index/_doc/1?pipeline=add-timestamp

  "event": "This is xiaoguo from Elastic",
  "DOB": "2099-05-05T16:21:15.000000Z"
我们得到如下的结果:
  "hits":
    "hits": [

        "_source":
          "@timestamp": "20990505",
          "DOB": "2099-05-05T16:21:15.000000Z",
          "event": "This is xiaoguo from Elastic"


    ]
以上是关于Elasticsearch:从 Elastic Stack 中的时间戳谈开去的主要内容,如果未能解决你的问题,请参考以下文章