快速上手angular8常见使用
Posted 嘴巴嘟嘟
tags:
篇首语:本文由小常识网(cha138.com)小编为大家整理,主要介绍了快速上手angular8常见使用相关的知识,希望对你有一定的参考价值。
上一篇文章地址:快速上手angular8常见使用(一)
1、HttpClient
HttpClient服务:是Angular提供的用于发起异步XHR请求的对象
使用步骤:
1)主模块中导入
import  BrowserModule  from '@angular/platform-browser';
import  NgModule  from '@angular/core';
import  HttpClientModule  from "@angular/common/http";

// 装饰器中的元数据来实现
@NgModule(
  // 导入
  imports: [
    BrowserModule,
    AppRoutingModule,
    HttpClientModule
  ],
  // 依赖注入提供程序的列表。
  providers: [],
  // 自动引导的组件列表。
  bootstrap: [AppComponent]
)
export class AppModule
2)在组件中声明依赖于HttpClient服务对象,就会被自动注入进来
import  HttpClient  from '@angular/common/http';
import  Component, OnInit  from '@angular/core';

@Component(
  selector: 'app-ng-client',
  templateUrl: './ng-client.component.html',
  styleUrls: ['./ng-client.component.scss']
)
export class NgClientComponent implements OnInit

  constructor(private http:HttpClient)

  ngOnInit()
3)调用HttpClient实例实现异步请求
export class NgClientComponent implements OnInit
    private productList: object[] = []
    // 依赖注入服务对象
    constructor(private http: HttpClient)

    ngOnInit()

    public loadMore(): void
        const url: string = 'http://localhost:3000/news'
        const options: object =
            headers: new HttpHeaders(
                'Content-Type': 'application/json'
            )
        ;
        this.http.get(url, options).subscribe((res) =>  )
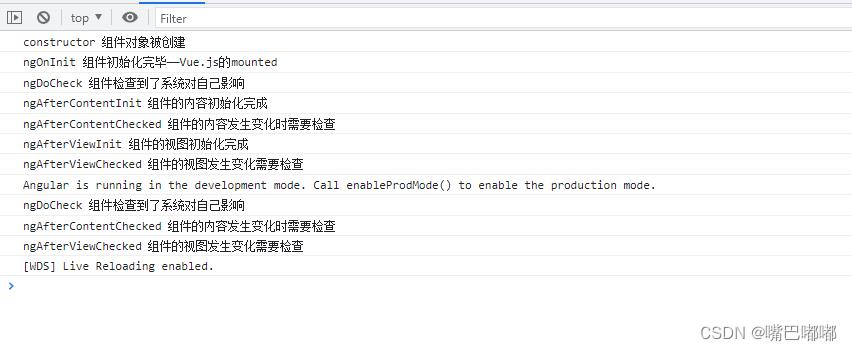
2、组件的生命周期钩子
当你的应用通过调用构造函数来实例化一个组件或指令时,Angular 就会调用那个在该实例生命周期的适当位置实现了的那些钩子方法。
Angular 会按以下顺序执行钩子方法。可以用它来执行以下类型的操作。
export class NgClientComponent implements OnInit, OnChanges
  private productList: object[] = []
  // 依赖注入服务对象
  constructor(private http: HttpClient)
    console.log('constructor 组件对象被创建')

  ngOnChanges()
    // 如果组件绑定过输入属性,那么在 ngOnInit() 之前以及所绑定的一个或多个输入属性的值发生变化时都会调用。
    console.log('ngOnChanges 属性的值发生变化时都会调用')

  ngOnInit()
    // 在 Angular 第一次显示数据绑定和设置指令/组件的输入属性之后,初始化指令/组件。
    // 常用
    console.log('ngOnInit 组件初始化完毕——Vue.js的mounted')

  ngDoCheck()
    // 检测,并在发生 Angular 无法或不愿意自己检测的变化时作出反应。
    console.log('ngDoCheck 组件检查到了系统对自己影响')

  ngAfterContentInit()
    // 当 Angular 把外部内容投影进组件视图或指令所在的视图之后调用。第一次 ngDoCheck() 之后调用,只调用一次。
    console.log('ngAfterContentInit 组件的内容初始化完成')

  ngAfterContentChecked()
    // ngAfterContentInit() 和每次 ngDoCheck() 之后调用。
    console.log('ngAfterContentChecked 组件的内容发生变化时需要检查')

  ngAfterViewInit()
    // 第一次 ngAfterContentChecked() 之后调用,只调用一次。
    console.log('ngAfterViewInit 组件的视图初始化完成')

  ngAfterViewChecked()
    // ngAfterViewInit() 和每次 ngAfterContentChecked() 之后调用。
    console.log('ngAfterViewChecked 组件的视图发生变化需要检查')

  ngOnDestroy()
    // 在 Angular 销毁指令或组件之前立即调用。
    // 常用
    console.log('ngOnDestroy 组件即将从DOM树上卸载,适合执行一些资源释放性语句')
3、父子组件传值
方向1:父=>子
父组件通过“子组件自定义属性”向下传递数据给子组件
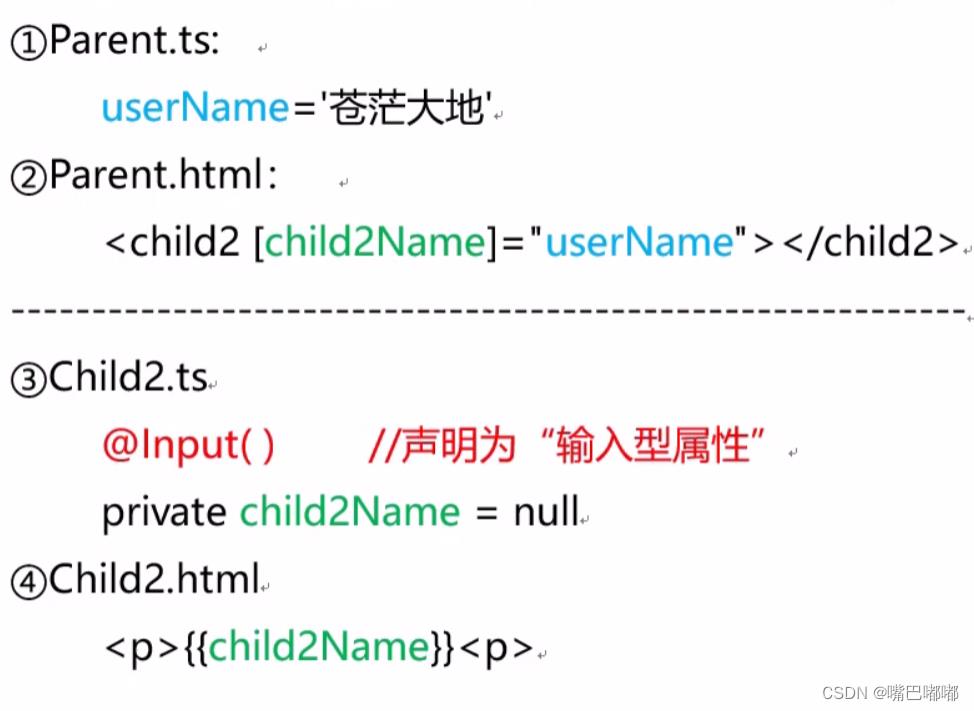
  // 一个装饰器对应一个属性
  @Input()
  private child2Name = null
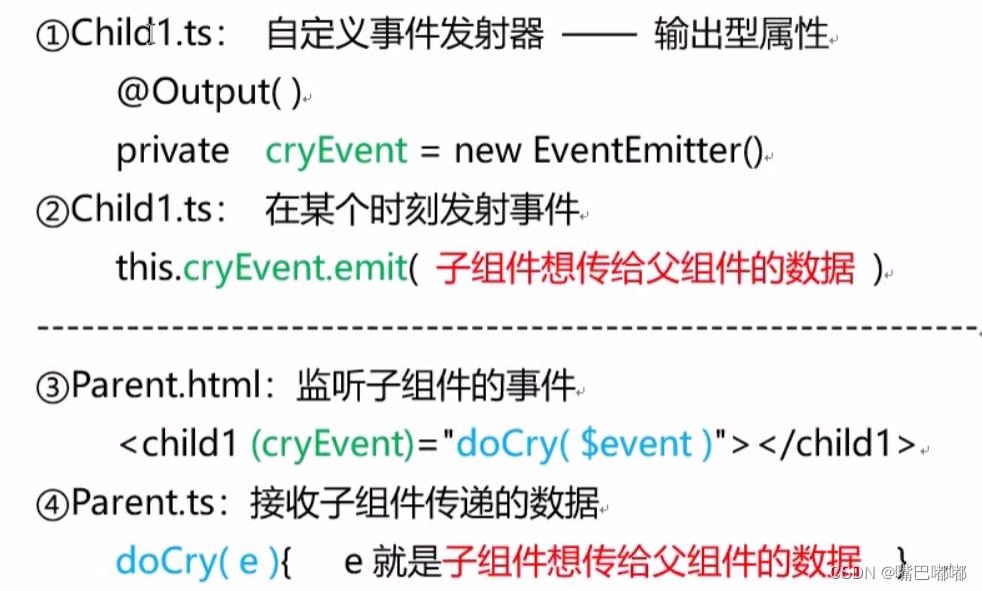
方向2:子=>父
子组件通过触发特额定的事件(其中携带着数据),把数据传递给父组件(父组件提供事件处理方法)
方向3:兄弟之间传递
子=>父=子
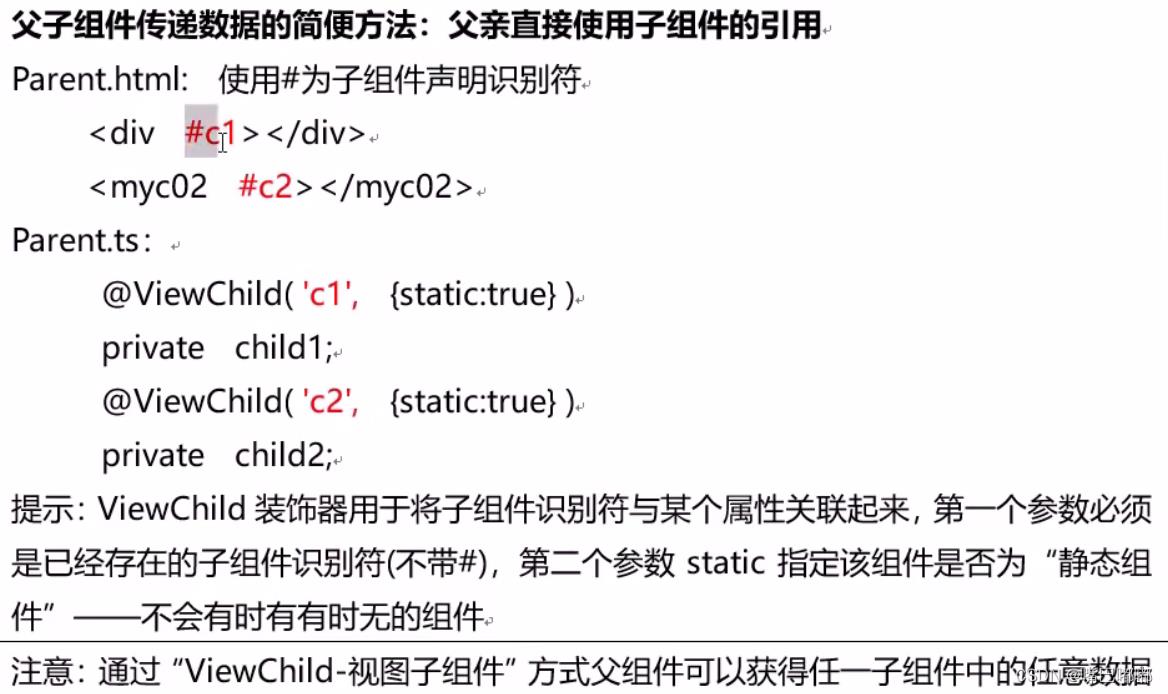
一定程度上违反了“最少知识法则”
总结:组件模板中可以出现的内容:
<div>
	<myc01 />
	<button (click)="doUpdateName()">修改</button>
	<p *ngIf="isMarried"></p>
	<ul>
	   <li *ngFor="let i of emList"></li>
	 </ul>
	 <div #myDiv></div>
</div>

4、路由和导航
多页面用应:一个项目中有个多个完整的HTML文件,使用超链接跳转,销毁一颗DOM树,同步请求另一颗,得到之后城建新的DOM树;不足:DOM树要反复重建,间隔中客户端一片空白
单页面用应:称为SPA(Single Page Application),整个项目中有且只有一个“完整的”HTML文件,其他的“页面”都只是HTML的片段;需要哪个“页面”就将其异步请求下来,“插入”到“完整的”HTML文件中
优势:整个项目中客户端只需要下载一个HTML页面,创建一个完整的DOM树,页面跳转都是一个DIV替换另一个DIV而已——能够实现过场动画
不足: 不利于SEO访问优化

1、Angular中使用“单页应用”的步骤:
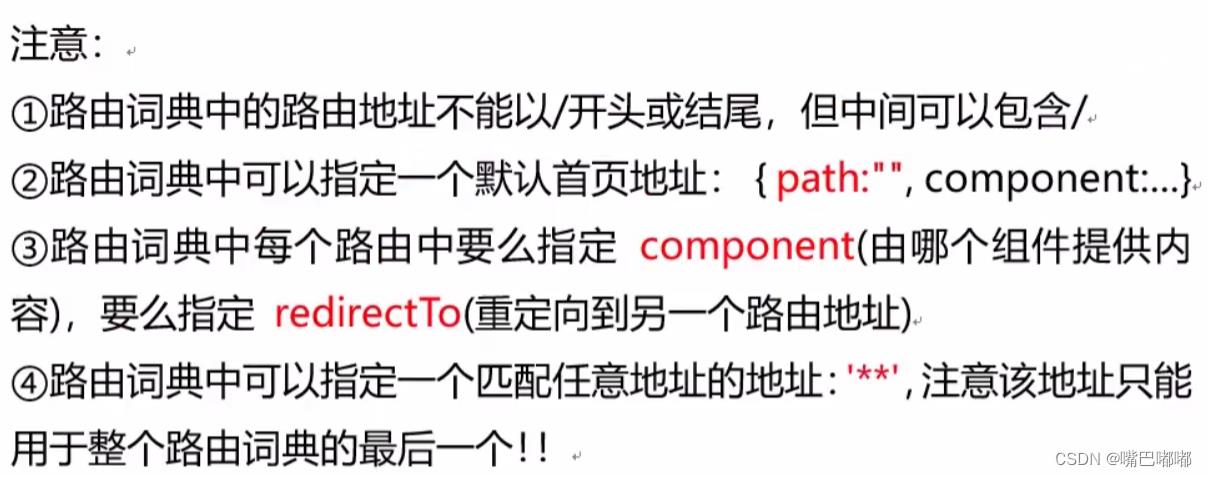
①定义“路由词典”——[URL-组件,URL-组件]
app-routing.module.ts
import  NgModule  from '@angular/core';
import  Routes, RouterModule  from '@angular/router';
import  ChildAComponentComponent  from './child-acomponent/child-acomponent.component';
import  IndexComponent  from './index/index.component';
import  LoginComponent  from './login/login.component';
import  Myc01ParentBlogComponent  from './myc01-parent-blog/myc01-parent-blog.component';
import  PageNotFoundComponent  from './page-not-found/page-not-found.component';
import  RegisterComponent  from './register/register.component';
import  UserInforComponent  from './user-infor/user-infor.component';


const routes: Routes = [

    path: '',
    component: IndexComponent,
    children: [

        path: 'child-a', // child route path
        component: ChildAComponentComponent, // child route component that the router renders
      ,

        path: 'center',
        component: Myc01ParentBlogComponent
      ,

        path: 'user/:id',
        component: UserInforComponent

    ]
  ,
    path: 'login',
    component: LoginComponent
  ,
    path: 'register',
    component: RegisterComponent
  ,
  // 重定向

    path: '',
    redirectTo: '',
    pathMatch: 'full'  // 路由匹配方式 完全匹配
  ,
  // ** 地址匹配任意格式的地址

    // 添加 404 页面
    path: '**',
    component: PageNotFoundComponent

];

@NgModule(
  imports: [RouterModule.forRoot(routes)],
  exports: [RouterModule]
)
export class AppRoutingModule
②注册“路由词典”
app.module.ts
import  BrowserModule  from '@angular/platform-browser';
import  NgModule  from '@angular/core';
import  FormsModule  from '@angular/forms';
import  HttpClientModule  from '@angular/common/http'

import  AppRoutingModule  from './app-routing.module';
import  AppComponent  from './app.component';
import  Myc01ParentBlogComponent  from './myc01-parent-blog/myc01-parent-blog.component';
import  Myc02Child1ModifyComponent  from './myc02-child1-modify/myc02-child1-modify.component';
import  Myc02Child2PhotoComponent  from './myc02-child2-photo/myc02-child2-photo.component';
import  UserCenterComponent  from './user-center/user-center.component';
import  LoginComponent  from './login/login.component';
import  RegisterComponent  from './register/register.component';
import  IndexComponent  from './index/index.component';

// 声明路由词典——路由地址和路由组件的对应集合

@NgModule(
  declarations: [
    AppComponent,
    Myc01ParentBlogComponent,
    Myc02Child1ModifyComponent,
    Myc02Child2PhotoComponent,
    UserCenterComponent,
    LoginComponent,
    RegisterComponent,
    IndexComponent,
  ],
  imports: [
    BrowserModule,
    AppRoutingModule,
    FormsModule,
    HttpClientModule
  ],
  providers: [],
  bootstrap: [AppComponent]
)
export class AppModule
③创建路由组件挂载点——称为“路由出口”
<router-outlet></router-outlet>
④访问测试
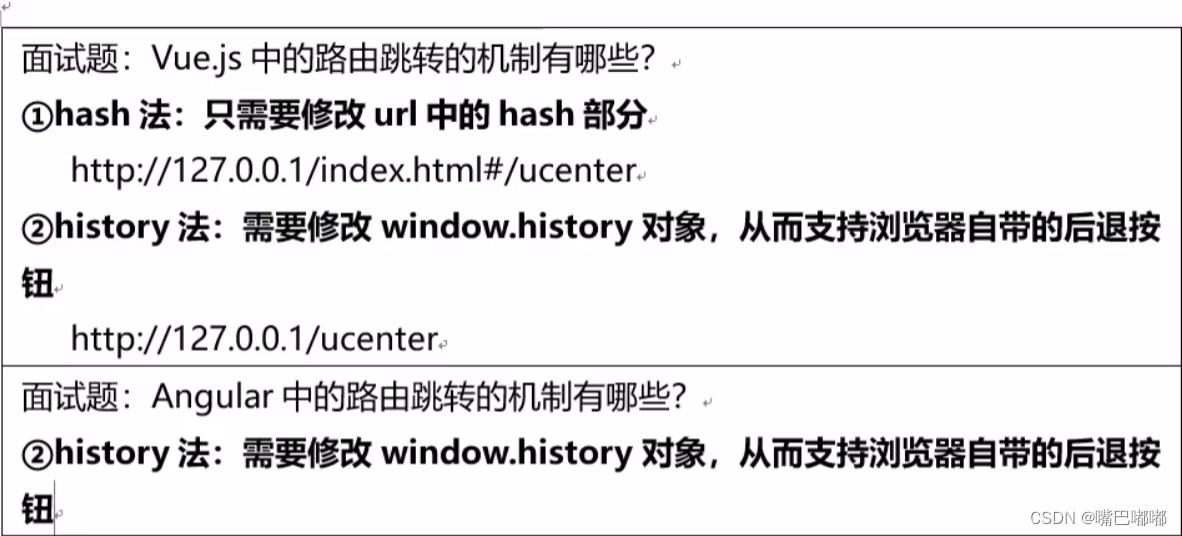
2、路由跳转/导航:从一个路由地址跳转到另一个
实现方案:
方式1:
<any routerLink="/index" ></any>
注意:①可用于任意标签②跳转地址应该以/开头,防止以相对当方式跳转
方式2:
<button (click)="goLogin()">用户信息</button>
index.modules.ts
import  Component, OnInit  from '@angular/core';
import  Router, ActivatedRoute, ParamMap  from '@angular/router';

@Component(
  selector: 'app-index',
  templateUrl: './index.component.html',
  styleUrls: ['./index.component.scss']
)
export class IndexComponent implements OnInit

  constructor(private route: ActivatedRoute, private router: Router)

  ngOnInit()

 goLogin()
    // 跳转到详情
    this.router.navigate(['/user', 2]);
    // this.router.navigateByUrl('/user/' + 2)
注意:Route类是RouterModule提供的一个服务类,声明以来即可使用
3、获取路由参数
 ngOnInit()
    // 组件初始化完成,读取路由参数进而根据路由参数进行处理

    this.route.params.subscribe((data) =>
      this.userId = data.id
    )
4、路由嵌套
const routes: Routes = [

    path: '',
    component: IndexComponent,
    children: [

        path: 'child-a', // child route path
        component: ChildAComponentComponent, // child route component that the router renders
      ,

        path: 'center',
        component: Myc01ParentBlogComponent
      ,

        path: 'user/:id',
        component: UserInforComponent

    ]
  ,
    path: 'login',
    component: LoginComponent
  ,
    path: 'register',
    component: RegisterComponent
  ,
  // 重定向

    path: '',
    redirectTo: '',
    pathMatch: 'full'  // 路由匹配方式 完全匹配
  ,
  // ** 地址匹配任意格式的地址

    // 添加 404 页面
    path: '**',
    component: PageNotFoundComponent

];
5、路由守卫
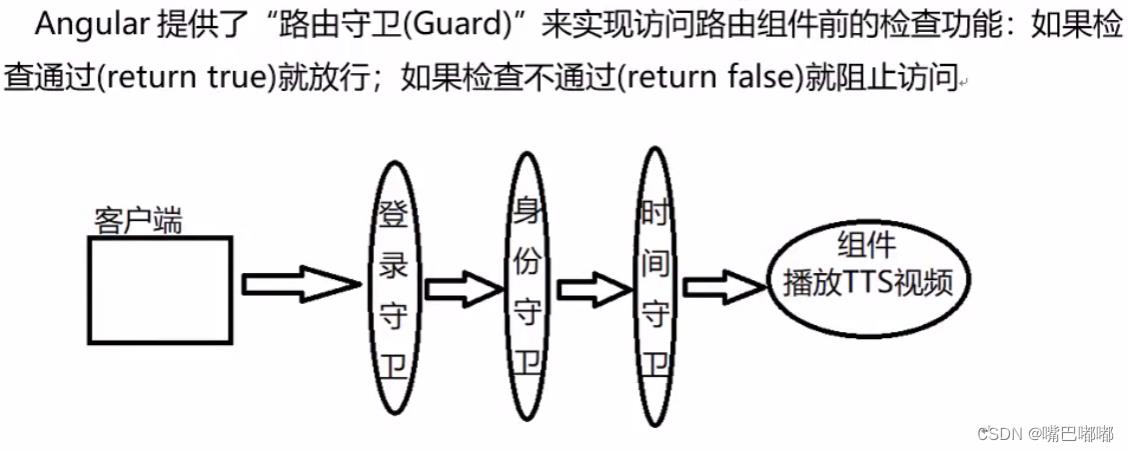
路由守卫的步骤:
①创建路由守卫 class
简化 ng g guard 守卫名字
// 路由守卫都是“可注入的”服务对象
@Injectable(
  providedIn: 'root'
)
export class LoginGuard implements CanActivate
  private isLogin = false
  canActivate()
    // return true 可以激活后续组件
    // return false 阻止激活后续组件
    if (this.isLogin)
      return true
     else
      return false
②在路由词典中使用路由守卫
    path: '',
    component: IndexComponent,
    canActivate: [LoginGuard],
  ,
模拟工作中登录案例
①·ng g s auth· 创建用户权限serve
import  Injectable  from '@angular/core';
import  Observable, of  from 'rxjs';

@Injectable(
  providedIn: 'root'
)
export class AuthService
  // 登陆状态
  isLoggedIn = false;
  // 保存登录后重定向的路径
  redirectUrl: string;
  constructor()
  // 模拟登录
  login(): Observable<boolean>
    this.isLoggedIn = true
    return of(true)


  logout(): void
    this.isLoggedIn = false;
② ng g guard login 登录路由守卫
import  Injectable  from "@angular/core";
import  CanActivate, Router, UrlTree,  from "@angular/router";
import  AuthService  from "./auth.service";


// 路由守卫都是“可注入的”服务对象
@Injectable(
  providedIn: 'root'
)
export class LoginGuard implements CanActivate
  private isLogin = false
  constructor(private router: Router, private authServe: AuthService)


  canActivate()
    return this.checkLogin()

  private checkLogin(): true | UrlTree
    // 已经登录,直接返回true
    if (this.authServe.isLoggedIn) return true;
    return this.router.parseUrl('/login')
③ng g component login 登录组件
import  Component, OnInit  from '@angular/core';
import  Router  from '@angular/router';
import  AuthService  from '../auth.service';

@Component(
  selector: 'app-login',
  templateUrl: './login.component.html',
  styleUrls: ['./login.component.scss']
)
export class LoginComponent implements OnInit
  public userName: string = ''
  public password: string = ''
  public message: string = ''
  constructor(public authService: AuthService, public router: Router)

  ngOnInit()

  doSubmit()
    if (this.userName === '123' && this.password === '123')
      this.authService.isLoggedIn = true
      this.authService.login().subscribe(() =>
          // 跳转回重定向路径
          this.router.navigateByUrl('/')
      )
<p [class.text-danger]="!authService.isLoggedIn">message</p>
<input type="text" [(ngModel)]="userName" />
<br>
<input type="password" [(ngModel)]="password" />
<br>
<button (click)="doSubmit()">登录</button>
④ 路由词典配置
const routes: Routes = [
path: '',
component: IndexComponent,
canActivate: [LoginGuard],
children: [
path