openvino+yolov5的检测优化及其在考勤机上的应用
Posted Cain50
tags:
篇首语:本文由小常识网(cha138.com)小编为大家整理,主要介绍了openvino+yolov5的检测优化及其在考勤机上的应用相关的知识,希望对你有一定的参考价值。
openvino+yolov5的检测优化及其在考勤机上的应用
1、简介
Pytorch+yolov5检测到onnx模型检测最后到IR文件部署到openvino上检测,通过openvino进行加速,实现不使用显卡可达到30帧以上的目标检测速率。
2、安装yolov5
安装方法参考链接:https://blog.csdn.net/qq_54496810/article/details/121760261
3、配置Pytorch环境
Anaconda怎么安装的网上已有许多博主发布了教程,在此便不再赘述;
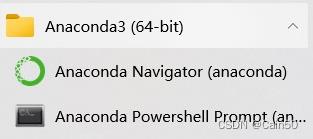
(1)、在开始界面中打开Anaconda Prompt
(2)、输入命令:
conda create -n Pytorch python=3.7
考虑到一些代码和库的版本冲突问题,此过程推荐的python版本为3.7,环境命名可以通过修改-n后面的内容名称,像是以上的命令把环境命名成了Pytorch。
之后在命令行会浮现proceed(Y/[n]),输如y之后等待环境安装完成。
3、安装PyTorch
首先要先激活刚刚建立的环境,在prompt下输入以下命令
conda activate Pytorch(自拟环境名称)
我们需要到官网获得安装命令,官网:https://pytorch.org/
进入之后往下滚动滚轮就会发现安装途径,这里我们选择比较旧的版本,防止出现各种各样的报错
该命令如下所示,下图的note可以不用管他,因为我们所用的版本都不用考虑那些情况,该命令需要在刚刚建立的Pytorch环境下运行:
conda install pytorch torchvision torchaudio cudatoolkit=11.1 -c pytorch-lts -c conda-forge
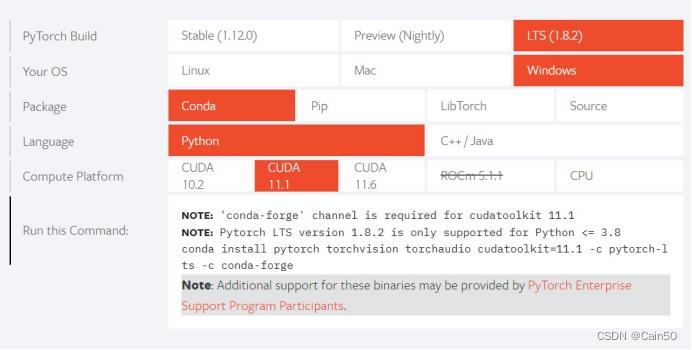
安装完成后可以检查一下是否安装成功,在命令行输入以下命令
python
import torch
print(torch.cuda.is_available())
若为True就安装成功
一般如果出现False的情况一般都是版本过新,新版本有时候就是这么坑爹,之前尝试过安装11.2的pytorch和11.6的CUDA,运行了很多次命令就是表示我没安装,即以上命令运行结果为False
4、配置到Pycharm
(1)、打开Pycharm
(2)、打开File–Settings
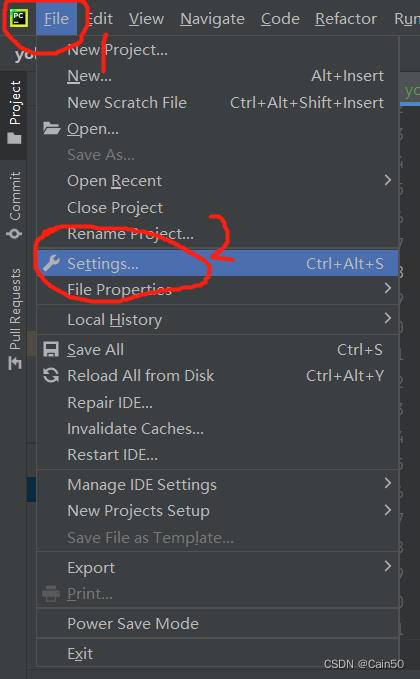
(3)、打开环境配置界面
打开project:xxx–Python Interpreter–设置(那个齿轮)–Add…
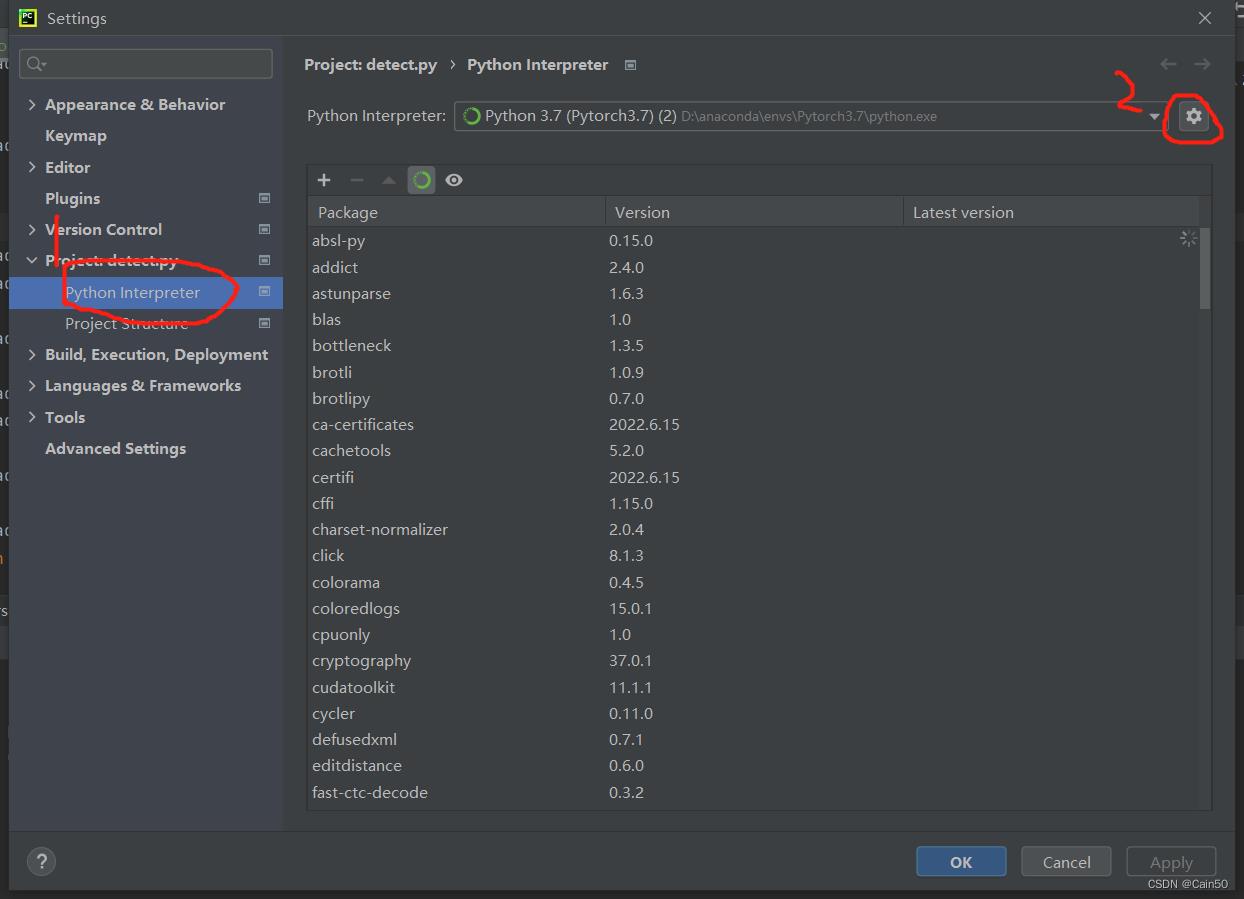
(4)、加入环境
选择Conda Environment–Existing environment–Interpreter,Interpreter的路径选择格式为(anaconda根目录/envs/Pytorch(自定义环境名)/python.exe),选择完以后按OK就完啦
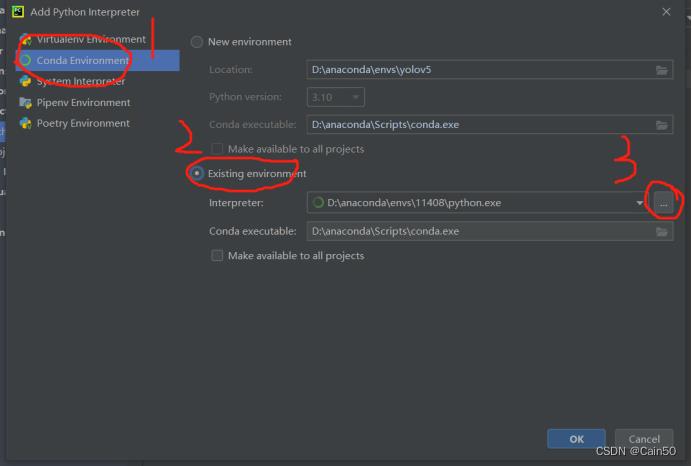
(5)、设置环境为Pytorch
在Pycharm右下角设置Interpreter为刚才加进去的环境
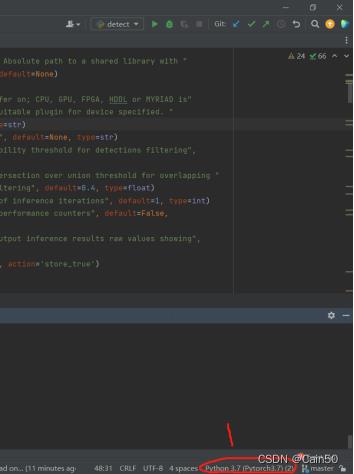
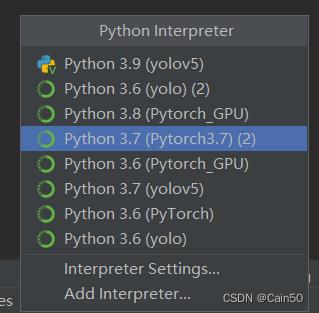
这样也就大功告成啦
4、pt模型转onnx模型
(1)、安装openvino工具
官网安装:https://www.intel.com/content/www/us/en/developer/tools/openvino-toolkit/download.html
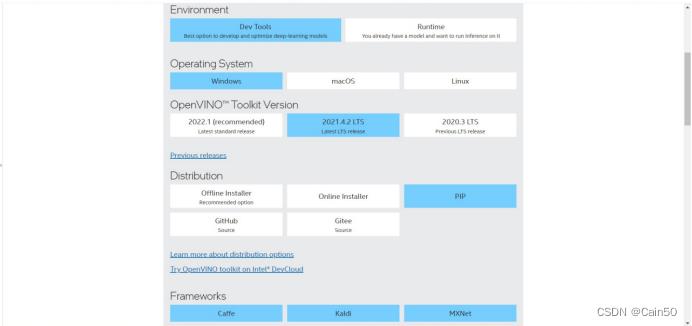
我看到网上很多人都是希望别人按照官网的指示去做,但是根据我在官网的踩坑经历我觉得还是要说一说怎么装,首先Dev工具和Runtime都要装,前面一个是转onnx模型为IR模型需要用到的,后面一个是运行IR文件不可或缺的组件,Dev工具用offline安装,Runtime用pip install命令执行:
首先是Dev工具,其选择的组件如下:
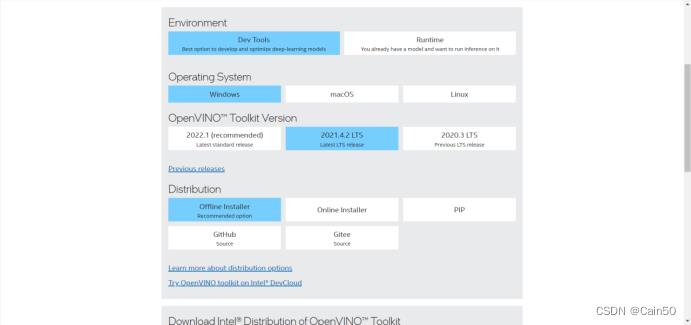
安装为2021.4.2版本,要不然会出现很奇怪的报错;
往下拉就按Download安装安装包:

之后运行安装包,在安装过程不用想着修改安装路径,因为这个安装包不可以修改安装路径,况且这个东西也占不了多大空间,对C盘影响微乎其微,别多虑。安装路径默认为C:\\Program Files (x86)\\Intel
其次是Runtime工具,其选择组件如下所示:
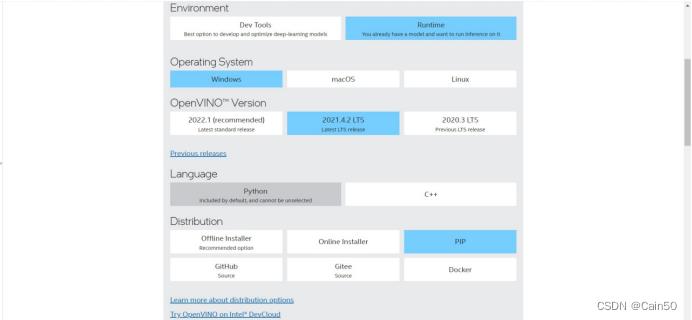
也是2021.04.02版本,继续往下拉会有安装指令

指令是在自己构建的环境下运行
补充:如果之后运行起来还有错误的话可以试试加入环境变量,环境变量名称和内容参考以下链接:
https://www.intel.sg/content/www/xa/en/support/articles/000033440/software/development-software.html
(2)、转换onnx文件
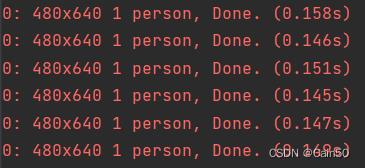
这里的话因为我们用的是yolov5,所以我们不需要那么多麻烦的步骤去转换onnx模型,我们只需要运行yolov5自带的export.py函数即可转换,这里我们将第567行的代码中default参数改成ROOT/'自己的pt模型的位置',之后运行代码,就可以在yolov5根目录下生成onnx模型

每一帧平均检测时间为0.15s(150ms)
(3)、运行onnx模型
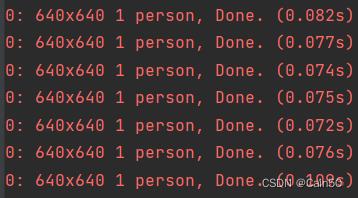
虽说这不是我们的最终目的,不过也可以看一下这个模型的运行效果,将yolov5的detect.py函数修改一下参数,第213行的default参数改成ROOT/’转化成的onnx模型的位置’,第214行的default参数从ROOT/’data/images’改成ROOT/’0’,后者修改的意义就在于能调用摄像头,运行之后会发现推理时间对比用pt模型快了一倍,每一帧平均检测时间为0.075s(75ms)

5、onnx模型转为IR模型
(1)、使用netron网页版app查看onnx模型的节点信息
网址如下:https://netron.app/
(2)、打开转换的onnx模型
拉到很下面很下面的位置,如图
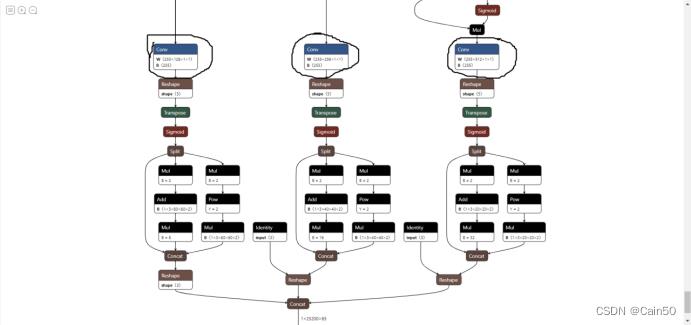
点击三个Conv节点,会在右侧弹出窗口,分别把这三个节点的信息记下来,下图画红圈的位置,记下三个节点的这个信息
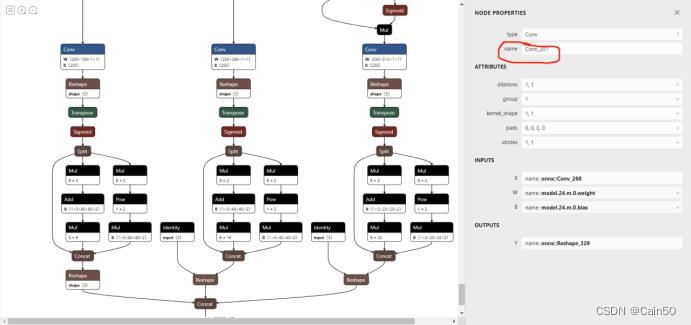
(3)、转换为IR模型
在Dev工具里的mo.py函数里运行指令转换IR模型,这里我以自带的yolov5为例子给出指令,这个指令需要在自己安装的环境下先cd到mo函数的位置,为C:\\Program Files (x86)\\Intel\\openvino_2021\\deployment_tools\\model_optimizer,之后运行指令
python mo.py --input_model C:\\Users\\11408\\yolov5\\yolov5s.onnx -s 255 --reverse_input_channels --output_dir C:\\Users\\11408\\yolov5 --output Conv_201,Conv_220,Conv_239
两个路径位置对应自己的onnx文件位置和保存IR文件的位置,指令最后面的三个Conv是刚刚记录下来的三个节点名称
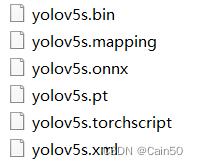
可以在yolov5根目录下找到生成的IR文件(IR文件本质上为以bin、mapping、xml为后缀的文件),如图:
6、部署IR文件到openvino上
该过程需要在yolov5的文件夹上加入新的函数,yolo_openvino_demo.py
代码来源:https://raychiu.blog.csdn.net/article/details/121300602
代码如下:
#!/usr/bin/env python
"""
Copyright (C) 2018-2019 Intel Corporation
Licensed under the Apache License, Version 2.0 (the "License");
you may not use this file except in compliance with the License.
You may obtain a copy of the License at
http://www.apache.org/licenses/LICENSE-2.0
Unless required by applicable law or agreed to in writing, software
distributed under the License is distributed on an "AS IS" BASIS,
WITHOUT WARRANTIES OR CONDITIONS OF ANY KIND, either express or implied.
See the License for the specific language governing permissions and
limitations under the License.
"""
from __future__ import print_function, division
import logging
import os
import sys
from argparse import ArgumentParser, SUPPRESS
from time import time
import cv2
import ngraph
import numpy as np
from openvino.inference_engine import IENetwork, IECore
logging.basicConfig(format="[ %(levelname)s ] %(message)s", level=logging.INFO, stream=sys.stdout)
log = logging.getLogger()
def build_argparser():
parser = ArgumentParser(add_help=False)
args = parser.add_argument_group('Options')
args.add_argument('-h', '--help', action='help', default=SUPPRESS, help='Show this help message and exit.')
args.add_argument("-m", "--model", default="yolov5s.xml",help="Required. Path to an .xml file with a trained model.",
required=False, type=str)
args.add_argument("-at", "--architecture_type",default="yolov5", help='Required. Specify model\\' architecture type.',
type=str, required=False,
choices=('yolov3', 'yolov4', 'yolov5', 'yolov4-p5', 'yolov4-p6', 'yolov4-p7'))
args.add_argument("-i", "--input",default=".0", help="Required. Path to an image/video file. (Specify 'cam' to work with "
"camera)", required=False, type=str)
args.add_argument("-l", "--cpu_extension",
help="Optional. Required for CPU custom layers. Absolute path to a shared library with "
"the kernels implementations.", type=str, default=None)
args.add_argument("-d", "--device",
help="Optional. Specify the target device to infer on; CPU, GPU, FPGA, HDDL or MYRIAD is"
" acceptable. The sample will look for a suitable plugin for device specified. "
"Default value is CPU", default="CPU", type=str)
args.add_argument("--labels", help="Optional. Labels mapping file", default=None, type=str)
args.add_argument("-t", "--prob_threshold", help="Optional. Probability threshold for detections filtering",
default=0.5, type=float)
args.add_argument("-iout", "--iou_threshold", help="Optional. Intersection over union threshold for overlapping "
"detections filtering", default=0.4, type=float)
args.add_argument("-ni", "--number_iter", help="Optional. Number of inference iterations", default=1, type=int)
args.add_argument("-pc", "--perf_counts", help="Optional. Report performance counters", default=False,
action="store_true")
args.add_argument("-r", "--raw_output_message", help="Optional. Output inference results raw values showing",
default=False, action="store_true")
args.add_argument("--no_show", help="Optional. Don't show output", action='store_true')
return parser
class YoloParams:
# ------------------------------------------- Extracting layer parameters ------------------------------------------
# Magic numbers are copied from yolo samples
def __init__(self, param, side, yolo_type):
self.coords = 4 if 'coords' not in param else int(param['coords'])
self.classes = 80 if 'classes' not in param else int(param['classes'])
self.side = side
if yolo_type == 'yolov4':
self.num = 3
self.anchors = [12.0, 16.0, 19.0, 36.0, 40.0, 28.0, 36.0, 75.0, 76.0, 55.0, 72.0, 146.0, 142.0, 110.0,
192.0, 243.0,
459.0, 401.0]
elif yolo_type == 'yolov4-p5':
self.num = 4
self.anchors = [13.0, 17.0, 31.0, 25.0, 24.0, 51.0, 61.0, 45.0, 48.0, 102.0, 119.0, 96.0, 97.0, 189.0,
217.0, 184.0,
171.0, 384.0, 324.0, 451.0, 616.0, 618.0, 800.0, 800.0]
elif yolo_type == 'yolov4-p6':
self.num = 4
self.anchors = [13.0, 17.0, 31.0, 25.0, 24.0, 51.0, 61.0, 45.0, 61.0, 45.0, 48.0, 102.0, 119.0, 96.0, 97.0,
189.0,
97.0, 189.0, 217.0, 184.0, 171.0, 384.0, 324.0, 451.0, 324.0, 451.0, 545.0, 357.0, 616.0,
618.0, 1024.0, 1024.0]
elif yolo_type == 'yolov4-p7':
self.num = 5
self.anchors = [13.0, 17.0, 22.0, 25.0, 27.0, 66.0, 55.0, 41.0, 57.0, 88.0, 112.0, 69.0, 69.0, 177.0, 136.0,
138.0,
136.0, 138.0, 287.0, 114.0, 134.0, 275.0, 268.0, 248.0, 268.0, 248.0, 232.0, 504.0, 445.0,
416.0, 640.0, 640.0,
812.0, 393.0, 477.0, 808.0, 1070.0, 908.0, 1408.0, 1408.0]
else:
self.num = 3
self.anchors = [10.0, 13.0, 16.0, 30.0, 33.0, 23.0, 30.0, 61.0, 62.0, 45.0, 59.0, 119.0, 116.0, 90.0, 156.0,
198.0, 373.0, 326.0]
def log_params(self):
params_to_print = 'classes': self.classes, 'num': self.num, 'coords': self.coords, 'anchors': self.anchors
[log.info(" :8: ".format(param_name, param)) for param_name, param in params_to_print.items()]
def letterbox(img, size=(640, 640), color=(114, 114, 114), auto=True, scaleFill=False, scaleup=True):
# Resize image to a 32-pixel-multiple rectangle https://github.com/ultralytics/yolov3/issues/232
shape = img.shape[:2] # current shape [height, width]
w, h = size
# Scale ratio (new / old)
r = min(h / shape[0], w / shape[1])
if not scaleup: # only scale down, do not scale up (for better test mAP)
r = min(r, 1.0)
# Compute padding
ratio = r, r # width, height ratios
new_unpad = int(round(shape[1] * r)), int(round(shape[0] * r))
dw, dh = w - new_unpad[0], h - new_unpad[1] # wh padding
if auto: # minimum rectangle
dw, dh = np.mod(dw, 64), np.mod(dh, 64) # wh padding
elif scaleFill: # stretch
dw, dh = 0.0, 0.0
new_unpad = (w, h)
ratio = w / shape[1], h / shape[0] # width, height ratios
dw /= 2 # divide padding into 2 sides
dh /= 2
if shape[::-1] != new_unpad: # resize
img = cv2.resize(img, new_unpad, interpolation=cv2.INTER_LINEAR)
top, bottom = int(round(dh - 0.1)), int(round(dh + 0.1))
left, right = int(round(dw - 0.1)), int(round(dw + 0.1))
img = cv2.copyMakeBorder(img, top, bottom, left, right, cv2.BORDER_CONSTANT, value=color) # add border
top2, bottom2, left2, right2 = 0, 0, 0, 0
if img.shape[0] != h:
top2 = (h - img.shape[0]) // 2
bottom2 = top2
img = cv2.copyMakeBorder(img, top2, bottom2, left2, right2, cv2.BORDER_CONSTANT, value=color) # add border
elif img.shape[1] != w:
left2 = (w - img.shape[1]) // 2
right2 = left2
img = cv2.copyMakeBorder(img, top2, bottom2, left2, right2, cv2.BORDER_CONSTANT, value=color) # add border
return img
def scale_bbox(x, y, height, width, class_id, confidence, im_h, im_w, resized_im_h=640, resized_im_w=640):
gain = min(resized_im_w / im_w, resized_im_h / im_h) # gain = old / new
pad = (resized_im_w - im_w * gain) / 2, (resized_im_h - im_h * gain) / 2 # wh padding
x = int((x - pad[0]) / gain)
y = int((y - pad[1]) / gain)
w = int(width / gain)
h = int(height / gain)
xmin = max(0, int(x - w / 2))
ymin = max(0, int(y - h / 2))
xmax = min(im_w, int(xmin + w))
ymax = min(im_h, int(ymin + h))
# Method item() used here to convert NumPy types to native types for compatibility with functions, which don't
# support Numpy types (e.g., cv2.rectangle doesn't support int64 in color parameter)
return dict(xmin=xmin, xmax=xmax, ymin=ymin, ymax=ymax, class_id=class_id.item(), confidence=confidence.item())
def entry_index(side, coord, classes, location, entry):
side_power_2 = side ** 2
n = location // side_power_2
loc = location % side_power_2
return int(side_power_2 * (n * (coord + classes 以上是关于openvino+yolov5的检测优化及其在考勤机上的应用的主要内容,如果未能解决你的问题,请参考以下文章
无人机上仅使用CPU实时运行Yolov5?(OpenVINO帮你实现)(上篇)
YOLOv5 在最新 OpenVINO 2021R02 版本的部署与代码演示详解