Day121.ElasticSearch:概述安装基本操作DSL高级查询
Posted 焰火青年·
tags:
篇首语:本文由小常识网(cha138.com)小编为大家整理,主要介绍了Day121.ElasticSearch:概述安装基本操作DSL高级查询相关的知识,希望对你有一定的参考价值。
一、ElasticSearch概述
Elasticsearch(ES) 是一个分布式、RESTful 风格的搜索和数据分析引擎。全文搜索引擎。
官网:免费且开放的搜索:Elasticsearch、ELK 和 Kibana 的开发者 | Elastic
官方文档:Elasticsearch Guide [7.8] | Elastic

1. 查询和分析:
- 能够执行及合并多种类型的搜索(结构化数据、非结构化数据、地理位置、指标)。
- 分析大规模数据
2. 查询速度:
- 近实时搜索,通过有限状态转换器实现了用于全文检索的倒排索引,实现了用于存储数值数据和地理位置数据的 BKD 树,以及用于分析的列存储。
3. 可扩展性:
- 快速扩容,水平扩展
4. 内容相关度:
- 基于各项元素(从词频或新近度到热门度等)对搜索结果进行排序。
5. 弹性设计:
- 硬件故障。网络分割。Elasticsearch 运行在一个分布式的环境中,跨集群复制功能,辅助集群可以作为热备份随时投入使用
全文检索搜索引擎
Google,百度类的网站搜索,它们都是根据网页中的关键字生成索引,我们在搜索的时候输入关键字,它们会将该关键字即索引匹配到的所有网页返回;还有常见的项目中应用日志的搜索等等。对于这些非结构化的数据文本,关系型数据库搜索不是能很好的支持。
一般传统数据库,全文检索都实现的很鸡肋,因为一般也没人用数据库存文本字段。进行全文检索需要扫描整个表,如果数据量大的话即使对SQL的语法优化,也收效甚微。建立了索引,但是维护起来也很麻烦,对于 insert 和 update 操作都会重新构建索引。
这里说到的全文搜索引擎指的是目前广泛应用的主流搜索引擎。它的工作原理是计算机索引程序通过扫描文章中的每一个词,对每一个词建立一个索引,指明该词在文章中出现的次数和位置,当用户查询时,检索程序就根据事先建立的索引进行查找,并将查找的结果反馈给用户的检索方式。这个过程类似于通过字典中的检索字表查字的过程。
Elasticsearch和Solr的底层:lucene Java信息检索程序库
elasticsearch、solr对比
ES随着数据流增加,没有明显变化,solr实时建立索引会产生io阻塞,查询效率变差。对已有数据进行搜索时,solr更快
应用场景
| 操作 | 请求方式 |
|---|---|
| 保存 | PUT |
| 删除 | DELETE |
| 更新 | POST |
| 查询 | GET |
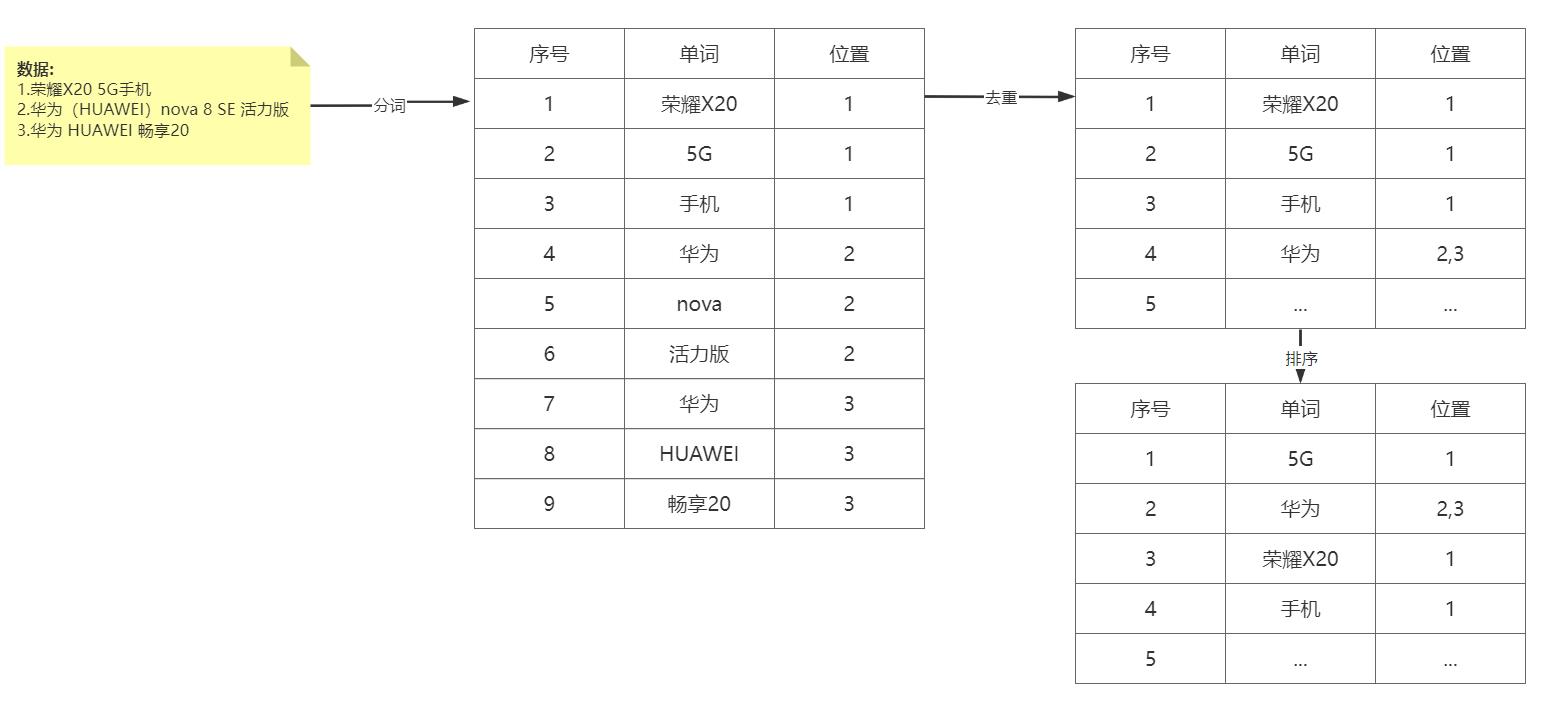
2、倒排索引
正排索引:根据id查询记录
倒排索引:根据记录分词去找ID
- 数据根据词条进行分词,同时记录文档索引位置
- 将词条相同的数据化进行合并
- 对词条进行排序
先将搜索词语进行分词,分词后再倒排索引列表查询文档位置(docId)。根据docId查询文档数据。

3、ElasticSearch 核心概念 ★
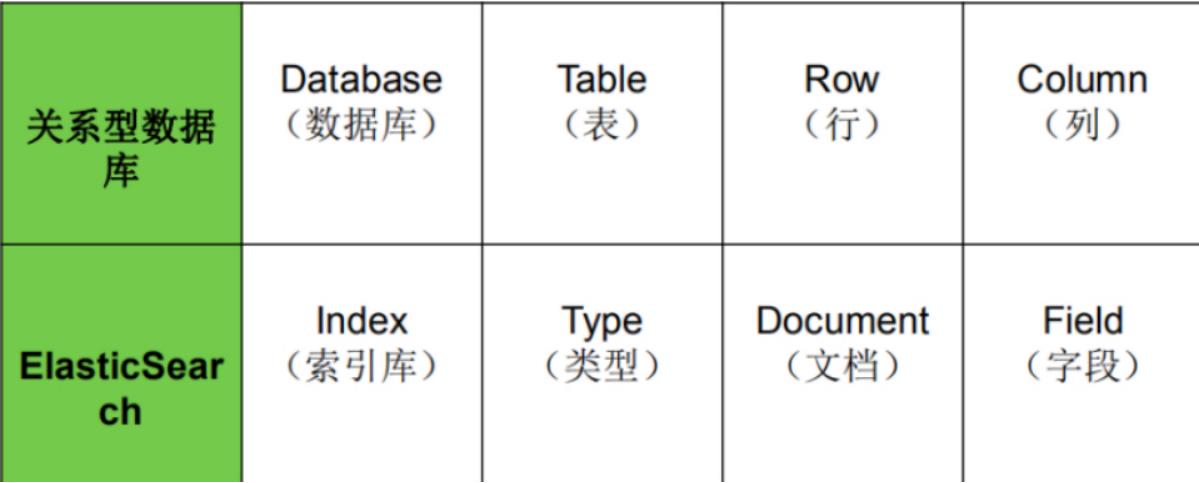
1. es对照数据库

2. 索引库 (Index):一个索引就是一个拥有几分相似特征的文档的集合。
3. 类型表 (Type):在一个索引中,你可以定义一种或多种类型。7.x 弱化,为了全文检索
| 版本 | Type |
|---|---|
| 5.x | 支持多种type |
| 6.x | 只能有一种type |
| 7.x | 默认不再支持自定义索引类型(默认类型为:_doc) |
4. 文档 (Document):一个文档是一个可被索引的基础信息单元,也就是一条数据。文档以JSON(javascript Object Notation)格式来表示。
5. 字段 (Field):相当于是数据表的字段,名值对,对文档数据根据不同属性进行的分类标识。
6. 映射(Mapping):处理数据的方式和规则方面做一些限制,如:某个字段的数据类型、默认值、分析器、是否被索引等等。
ElasticSearch | 相关工具安装
下载地址:Past Releases of Elastic Stack Software | Elastic
1、ES7.8 安装(Win),解压即可

2. 修改配置
修改 config/jvm.options,内存配置,减少内存使用

3. 准备好java环境,双击运行win批处理


2、kibana7.8 安装
elasticsearch服务是一个restful风格的http服务。官方提供了kibana 客户端。
1. 安装,解压即可 (复制到指定文件夹再解压)

2. 修改配置config/kibana.yml

 //允许远程访问

3. bin目录下,cmd启动 elasticsearch.bat

4. 访问:http://localhost:5601/
左侧选框,访问控制台:
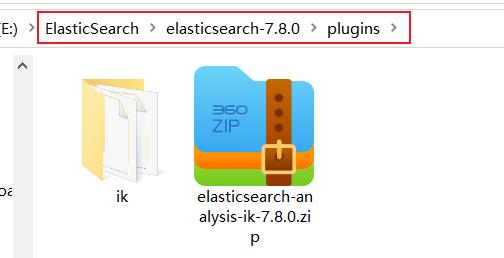
3、ik7.8 分词器安装 (中文分词)
1. 解压即可

2. 复制到指定目录,修改名称ik(可选),删除压缩包,重启后生效

3. 重启ElasticSearch、kibana,访问控制台测试
POST _analyze

  "analyzer": "ik_smart",
  "text": "我是中国人"

二、ElasticSearch 基本操作
1. ik 分词器

POST _analyze

  "analyzer": "ik_smart",
  "text": "我是中国人"

POST _analyze

  "analyzer": "ik_max_word",
  "text": "我是中国人"

POST _analyze

  "analyzer": "standard",
  "text": "我是中国人"
2. 索引、文档操作
实际上是发送了RESTful请求,省略了ip端口号
| ElasticSearch | 命令 |
|---|---|
| 查看所有索引 | GET /_cat/indices?v |
| 查看指定索引 | GET /索引名 |
| 创建索引 | PUT /索引名 |
| 删除指定索引 | DELETE /索引名 |
| 创建文档 | PUT /索引名称/_doc/id jsonbody |
| 修改文档 | PUT /索引名称/_doc/id jsonbody |
| 查看文档 | GET /索引名称/_doc/id |
| 修改局部字段 这种更新只能使用post方式。 | POST /索引名称/_update/docId "doc": "属性": "值" |
| 删除文档 (不会立刻删除 版本提升) | DELETE /索引名称/_doc/id |
| 批量操作 actionName可以有CREATE、DELETE等。 | "actionName":"_index":"indexName", "_type:"typeName","_id":"id" "field1":"value1", "field2":"value2" |
| 查看映射 | GET /索引名称/_mapping |

3. 映射
静态映射:静态映射是在Elasticsearch中也可以事先定义好映射,即手动映射,包含文档的各字段类型、分词器等,这称为静态映射。
type分类如下:
- 字符串:text(支持分词)和 keyword(不支持分词)。
- text:该类型被用来索引长文本,在创建索引前会将这些文本进行分词,转化为词的组合,建立索引;允许es来检索这些词,text类型不能用来排序和聚合。
- keyword:该类型不能分词,可以被用来检索过滤、排序和聚合,keyword类型不可用text进行分词模糊检索。
数值型:long、integer、short、byte、double、float
日期型:date
布尔型:boolean
#删除原创建的索引
DELETE /my_index
#创建索引,并同时指定映射关系和分词器等。
PUT /my_index

  "mappings":
    "properties":
      "title":
        "type": "text",
        "index": true,
        "store": true,
        "analyzer": "ik_max_word",
        "search_analyzer": "ik_smart"
      ,
      "category":
        "type": "keyword",
        "index": true,
        "store": true
      ,
      "images":
        "type": "keyword",
        "index": true,
        "store": true
      ,
      "price":
        "type": "integer",
        "index": true,
        "store": true
动态映射:在文档第一次写入Elasticsearch时,会根据文档字段自动识别类型,这种机制称之为动态映射。
| 数据 | 对应的类型 |
|---|---|
| null | 字段不添加 |
| true|flase | boolean |
| 字符串 | text |
| 数值 | long |
| 小数 | float |
| 日期 | date |
三、DSL高级查询
Query DSL: Domain Specific Language(领域专用语言),Elasticsearch提供了基于JSON的DSL来定义查询。

准备数据:
"create":"_index":"my_index","_id":1
"id":1,"title":"华为笔记本电脑","category":"华为","images":"http://www.gulixueyuan.com/xm.jpg","price":5388
"create":"_index":"my_index","_id":2
"id":2,"title":"华为手机","category":"华为","images":"http://www.gulixueyuan.com/xm.jpg","price":5500
"create":"_index":"my_index","_id":3
"id":3,"title":"VIVO手机","category":"vivo","images":"http://www.gulixueyuan.com/xm.jpg","price":3600
1. 查询所有文档:match_all
#可简写
POST /my_index/_search
POST /my_index/_search
"query":
"match_all":
2.1 匹配查询:match
由于title字段,映射设置的分词解析是ik_smart,分词为华为|智能手机,所以vivo手机并没有命中
POST /my_index/_search
"query":
"match":
"title": "华为智能手机"
2.2 补充条件删除:_delete_by_query
POST /my_index/_delete_by_query
"query":
"match":
"title": "vivo"
4. 多字段匹配:multi_match
POST my_index/_search
"query":
"multi_match":
"query": "华为智能手机",
"fields": ["title","category"]
5. 前缀匹配: prefix
指定字段属于分词的前缀,才可以命中
POST my_index/_search
"query":
"prefix":
"title":
"value": "手"
6. 关键字精确查询:term
term:关键字不会进行分词。而数据库倒排索引已经做了分词,所以匹配不到
POST my_index/_search
"query":
"term":
"title":
"value": "华为手机"
7. 多关键字精确查询:terms
POST /my_index/_search
"query":
"terms":
"title": [
"华为手机",
"华为"
]
8. 范围查询: range
gte: 大于等于、lte: 小于等于;gt: 大于、lt: 小于
POST my_index/_search
"query":
"range":
"price":
"gte": 3000,
"lte": 5000
9. 指定返回字段:_source
query同级增加_source进行过滤。
POST my_index/_search
"query":
"match":
"title": "华为"
, "_source": ["id","title"]
组合查询(bool)
bool 各条件之间有and,or或not的关系
-
must: 各个条件都必须满足,所有条件是and的关系
-
should: 各个条件有一个满足即可,即各条件是or的关系
-
must_not: 不满足所有条件,即各条件是not的关系
-
filter: 与must效果等同,但是它不计算得分(_score为0),效率更高点。
如果should和must同时存在,他们之间是and关系
POST my_index/_search
"query":
"bool":
"must": [
"match":
"title": "手机"
,
"range":
"price":
"gte": 3000,
"lte": 5000
]
聚合查询(aggs) (aggregation)
聚合允许使用者对es文档进行统计分析,类似与关系型数据库中的group by (效率也差不多)。
指标聚合=》 max:最大、min:最小、sum:总和、avg:平均数、value_count:统计数量、stats:所有状态 (Statistics 统计分析)
桶聚合=》 terms:桶聚合相当于sql中的group by语句
POST /my_index/_search

  "query":
    "match_all":
,
"size": 0,
"aggs":
"最高价格":
"max":
"field": "price"
,
"最低价格":
"min":
"field": "price"
桶聚合 (groupby_category)
POST /my_index/_search

  "query":
    "match_all":
  ,
  "size": 0,
  "aggs":
    "桶聚合":
      "terms":
        "field": "category",
        "size": 10
还可以对桶继续下钻:
POST /my_index/_search

  "query":
    "match_all":
  ,
  "size": 0,
  "aggs":
    "groupby_category":
      "terms":
        "field": "category",
        "size": 10
      ,
      "aggs":
        "avg_price":
          "avg":
            "field": "price"
排序(sort)、分页查询(from、size)、scoll分页
排序
POST /my_index/_search

  "query":
    .....
  ,
  "sort": [

      "price":
        "order": "asc"

    ,

      "_score":
        "order": "desc"


  ]
from: 当前页的起始索引,默认从0开始。 from = (pageNum - 1) * size
size: 每页显示多少条
POST /my_index/_search

  "query":
    "match_all":
  ,
  "from": 0,
  "size": 2
scoll分页(scroll=)
第一次使用分页查询: 返回一个文档(封装在内存中),剩余结果保存时间,该时间内,数据有变动不受影响。
POST /my_index/_search?scroll=1m

  "query":
    "match_all":
  ,
  "size": 1
接着就滚动查询,用第一次返回的_scroll_id接着查:
POST my_index/_search?scroll=1m

  "scroll_id":"FGluY2x1ZGVfY29udGV4dF91dWlkDXF1ZXJ5QW5kRmV0Y2gBFG5pQUVjNElCbVI3eHFlSFhoRjVoAAAAAAAAGlgWT2pHNlZjdzlUQ0NYMG1MTEN3SFJlZw=="
高亮查询、 近似查询
高亮查询:highlight
在进行关键字搜索时,搜索出的内容中的关键字会显示不同的颜色,称之为高亮。
POST /my_index/_search

  "query":
    "match":
      "title": "华为"

  ,
  "highlight":
    "pre_tags": "<b style='color:red'>",
    "post_tags": "</b>",
    "fields":
      "title":

近似查询 (只适用英文)
返回包含与搜索字词相似的字词的文档。编辑距离是将一个术语转换为另一个术语所需的一个字符更改的次数。这些更改可以包括:
更改字符(box → fox)
删除字符(black → lack)
插入字符(sic → sick)
转置两个相邻字符(act → cat)
#fuzzy查询
POST /test/_search

  "query":
    "fuzzy":
      "title":
        "value": "word"
五、高级客户端 (JAVA API 操作ES )
官方文档:Getting started | Java REST Client [7.8] | Elastic
1、准备工作
1. 新建elasticsearch_demo Maven工程
    <parent>
        <groupId>org.springframework.boot</groupId>
        <artifactId>spring-boot-starter-parent</artifactId>
        <version>2.3.6.RELEASE</version>
        <relativePath/>
    </parent>

    <properties>
        <java.version>1.8</java.version>
    </properties>

    <dependencies>
        <!--elasticsearch的高级别rest客户端-->
        <dependency>
            <groupId>org.elasticsearch.client</groupId>
            <artifactId>elasticsearch-rest-high-level-client</artifactId>
            <version>7.8.0</version>
        </dependency>
        <!--elasticsearch的rest客户端-->
        <dependency>
            <groupId>org.elasticsearch.client</groupId>
            <artifactId>elasticsearch-rest-client</artifactId>
            <version>7.8.0</version>
        </dependency>
        <!--elasticsearch的核心jar包-->
        <dependency>
            <groupId>org.elasticsearch</groupId>
            <artifactId>elasticsearch</artifactId>
            <version>7.8.0</version>
        </dependency>

        <dependency>
            <groupId>org.springframework.boot</groupId>
            <artifactId>spring-boot-starter</artifactId>
        </dependency>

        <!--json转换的jar包-->
        <dependency>
            <groupId>com.fasterxml.jackson.core</groupId>
            <artifactId>jackson-databind</artifactId>
            <version>2.9.9</version>
        </dependency>

        <!-- https://mvnrepository.com/artifact/com.alibaba/fastjson -->
        <dependency>
            <groupId>com.alibaba</groupId>
            <artifactId>fastjson</artifactId>
            <version>1.2.76</version>
        </dependency>

        <dependency>
            <groupId>org.springframework.boot</groupId>
            <artifactId>spring-boot-devtools</artifactId>
            <scope>runtime</scope>
            <optional>true</optional>
        </dependency>
        <dependency>
            <groupId>org.springframework.boot</groupId>
            <artifactId>spring-boot-configuration-processor</artifactId>
            <optional>true</optional>
        </dependency>
        <dependency>
            <groupId>org.projectlombok</groupId>
            <artifactId>lombok</artifactId>
            <optional>true</optional>
        </dependency>
        <dependency>
            <groupId>org.springframework.boot</groupId>
            <artifactId>spring-boot-starter-test</artifactId>
            <scope>test</scope>
        </dependency>
    </dependencies>

    <build>
        <plugins>
            <plugin>
                <groupId>org.springframework.boot</groupId>
                <artifactId>spring-boot-maven-plugin</artifactId>
            </plugin>
        </plugins>
    </build>
2. 创建配置文件 application.properties
elasticsearch.host=localhost
elasticsearch.port=9200
3. 创建主目录,启动类

@SpringBootApplication
public class Application
    public static void main(String[] args)
        SpringApplication.run(Application.class);
4. 创建配置类
@Configuration
@ConfigurationProperties(prefix = "elasticsearch")
public class ElasticSearchConfig

    private String host;
    private Integer port;

    public String getHost()
        return host;


    public void setHost(String host)
        this.host = host;


    public Integer getPort()
        return port;


    public void setPort(Integer port)
        this.port = port;


    @Bean
    public RestHighLevelClient restHighLevelClient()
        RestHighLevelClient restHighLevelClient =
                new RestHighLevelClient(RestClient.builder(new HttpHost(host,port,"http")));
        return restHighLevelClient;
5. 创建测试实体
1. 准备实体
@Data
public class Student implements Serializable
private String name;
private Integer age;
private String remark;
6. 创建测试类
@RunWith(SpringRunner.class)
@SpringBootTest
public class ElasticSearchTest

    @Autowired
    RestHighLevelClient client;

    @Test
    public void testResthightLevelClient() throws Exception
        System.out.println("restHighLevelClient = " + client);
2、索引操作
//创建索引
    @Test
    public void createIndex()
        //指定索引名,注意导包:高级客户端
        CreateIndexRequest createIndexRequest = new CreateIndexRequest("person");
        try
            //设置
            createIndexRequest.mapping("\\n" +
                    "    \\"properties\\": \\n" +
                    "      \\"name\\": \\n" +
                    "        \\"type\\": \\"keyword\\",\\n" +
                    "        \\"index\\": true,\\n" +
                    "        \\"store\\": true\\n" +
                    "      ,\\n" +
                    "      \\"age\\": \\n" +
                    "        \\"type\\": \\"integer\\",\\n" +
                    "        \\"index\\": true,\\n" +
                    "        \\"store\\": true\\n" +
                    "      ,\\n" +
                    "      \\"remark\\": \\n" +
                    "        \\"type\\": \\"text\\",\\n" +
                    "        \\"index\\": true,\\n" +
                    "        \\"store\\": true,\\n" +
                    "        \\"analyzer\\": \\"ik_max_word\\",\\n" +
                    "        \\"search_analyzer\\": \\"ik_smart\\"\\n" +
                    "      \\n" +
                    "    \\n" +
                    "  ", XContentType.JSON);
            CreateIndexResponse createIndexResponse = restHighLevelClient.indices().create(createIndexRequest, RequestOptions.DEFAULT);
            System.out.println(createIndexResponse.isAcknowledged());
         catch (IOException e)
            e.printStackTrace();


    //查看索引
    @Test
    public void getIndex()
        GetIndexRequest request = new GetIndexRequest("person");
        try
            GetIndexResponse getIndexResponse = restHighLevelClient.indices().get(request, RequestOptions.DEFAULT);
            System.out.println(getIndexResponse.getMappings());
            System.out.println(getIndexResponse.getSettings());
         catch (IOException e)
            e.printStackTrace();


    //删除索引
    @Test
    public void deleteIndex()
        DeleteIndexRequest request = new DeleteIndexRequest("person");
        AcknowledgedResponse acknowledgedResponse = null;
        try
            acknowledgedResponse = restHighLevelClient.indices().delete(request, RequestOptions.DEFAULT);
         catch (IOException e)
            e.printStackTrace();

        System.out.println(acknowledgedResponse.isAcknowledged());
3、文档操作
@RunWith(SpringRunner.class)
@SpringBootTest
public class ElasticSearchDocTest

    @Autowired
    RestHighLevelClient restHighLevelClient;

    @Test
    public void testResthightLevelClient() throws Exception
        System.out.println("restHighLevelClient = " + restHighLevelClient);


    //1.创建文档
    @Test
    public void createDoc()
        //创建请求对象,索引不存在,会自动创建
        IndexRequest request = new IndexRequest("student");
        request.id("1");

        Student student = new Student();
        student.setAge(18);
        student.setName("robin");
        student.setRemark("good man");

        request.source(JSONObject.toJSONString(student), XContentType.JSON);

        IndexResponse indexResponse = null;
        try
            indexResponse = restHighLevelClient.index(request, RequestOptions.DEFAULT);
         catch (IOException e)
            e.printStackTrace();

        System.out.println(indexResponse.getResult());//CREATED


    //2.修改文档
    @Test
    public void updateDoc()
        UpdateRequest request = new UpdateRequest("student", "1");
        Student student = new Student();
        student.setRemark("very good man");
        //doc,指定字段修改
        request.doc(JSONObject.toJSONString(student), XContentType.JSON);
        try
            UpdateResponse updateResponse = restHighLevelClient.update(request, RequestOptions.DEFAULT);
            System.out.println(updateResponse.getResult());//UPDATED
         catch (IOException e)
            e.printStackTrace();


    //3.修改文档
    @Test
    public void getDoc()
        GetRequest request = new GetRequest("student", "1");
        try
            GetResponse response = restHighLevelClient.get(request, RequestOptions.DEFAULT);
            System.out.println(response.getSourceAsString());//"age":18,"name":"robin","remark":"very good man"
         catch (IOException e)
            e.printStackTrace();


    //4.批量操作
    @Test
    public void bulkDocument()
        BulkRequest bulkRequest = new BulkRequest();
        Student student = new Student();
        for(int i=0;i<10;i++)
            student.setAge(18 + i);
            student.setName("robin" + i);
            student.setRemark("good man " + i);
            bulkRequest.add(new IndexRequest("student")
                    .id(String.valueOf(10 + i))
                    .source(JSONObject.toJSONString(student), XContentType.JSON));

        try
            BulkResponse response = restHighLevelClient.bulk(bulkRequest, RequestOptions.DEFAULT);
            for(BulkItemResponse itemResponse : response.getItems())
                System.out.println(itemResponse.isFailed());

         catch (IOException e)
            e.printStackTrace();


    //5.删除文档
    @Test
    public void deleteDoc()
        DeleteRequest request = new DeleteRequest("student", "1");
        try
            DeleteResponse delete = restHighLevelClient.delete(request, RequestOptions.DEFAULT);
            System.out.println(delete.getResult());//DELETED
         catch (IOException e)
            e.printStackTrace();
4、DSL操作
@RunWith(SpringRunner.class)
@SpringBootTest
public class ElasticSearchDSLTest

    private static final String MY_INDEX = "my_index";
    @Autowired
    RestHighLevelClient restHighLevelClient;
    @Test
    public void testResthightLevelClient() throws Exception
        System.out.println("restHighLevelClient = " + restHighLevelClient);


    /**
     * dsl查询文档:
     * POST /my_index/_search
     *
     *   "query":
     *     "match":
     *       "title": "华为智能手机"
     *
     *
     *
     * */
    @Test
    public void search()
        //创建请求
        SearchRequest searchRequest = new SearchRequest(MY_INDEX);
        //通过构造器封装构造条件
        SearchSourceBuilder builder = new SearchSourceBuilder();
        builder.query(QueryBuilders.matchQuery("title","华为智能手机"));

        searchRequest.source(builder);

        try
            //高级客户端发送请求,设置默认参数
            SearchResponse searchResponse = restHighLevelClient.search(searchRequest, RequestOptions.DEFAULT);

            for(SearchHit hit : searchResponse.getHits().getHits())
                System.out.println(hit.getSourceAsString());

         catch (IOException e)
            e.printStackTrace();


    //高亮查询
    @Test
    public void highlightSearch()
        SearchRequest request = new SearchRequest(MY_INDEX);
        SearchSourceBuilder builder = new SearchSourceBuilder();
        builder.query(QueryBuilders.matchQuery("title","华为智能手机"));
        HighlightBuilder highlightBuilder = new HighlightBuilder();
        highlightBuilder.field("title");
        highlightBuilder.preTags("<b style='color:red'>");
        highlightBuilder.postTags("</b>");
        builder.highlighter(highlightBuilder);
        request.source(builder);
        try
            SearchResponse response = restHighLevelClient.search(request, RequestOptions.DEFAULT);
            for(SearchHit hit : response.getHits().getHits())
                System.out.println(hit.getSourceAsMap().get("title") + ":" +hit.getHighlightFields().get("title").fragments()[0].string());
                //华为手机:<b style='color:red'>华为</b>手机
                //华为笔记本电脑:<b style='color:red'>华为</b>笔记本电脑

         catch (IOException e)
            e.printStackTrace();


    //聚合查询
    @Test
    public void aggsSearch()
        SearchRequest request = new SearchRequest(MY_INDEX);
        SearchSourceBuilder builder = new SearchSourceBuilder();
        builder.query(QueryBuilders.matchAllQuery());
        AggregationBuilder aggregationBuilder = AggregationBuilders
                .terms("groupby_category").field("category");//桶聚合
        aggregationBuilder.subAggregation(AggregationBuilders.avg("avg_price").field("price"));
        builder.aggregation(aggregationBuilder);
        request.source(builder);
        try
            SearchResponse response = restHighLevelClient.search(request, RequestOptions.DEFAULT);
            Aggregations aggregations = response.getAggregations();
            Terms terms = aggregations.get("groupby_category");
            terms.getBuckets().forEach(bucket ->
                Avg avg = bucket.getAggregations().get("avg_price");
                System.out.println(bucket.getKeyAsString() + ":" + bucket.getDocCount() + "," + avg.getValue());
                //华为:2,5444.0
                //vivo:1,3600.0
            );
         catch (IOException e)
            e.printStackTrace();
SpringDataElasticsearch
Spring Data 是一个用于简化数据库、非关系型数据库、索引库访问,并支持云服务的开源框架。其主要目标是使得对数据的访问变得方便快捷。
官网:Spring Data

Spring Data Elasticsearch 基于 spring data API 简化 Elasticsearch操作,将原始操作Elasticsearch的客户端API 进行封装 。

搭建工程
<parent>
    <groupId>org.springframework.boot</groupId>
    <artifactId>spring-boot-starter-parent</artifactId>
    <version>2.3.6.RELEASE</version>
    <relativePath/>
</parent>
<dependencies>
    <dependency>
        <groupId>org.springframework.boot</groupId>
        <artifactId>spring-boot-starter-web</artifactId>
    </dependency>
    <dependency>
        <groupId>org.projectlombok</groupId>
        <artifactId>lombok</artifactId>
        <optional>true</optional>
    </dependency>
    <dependency>
        <groupId>org.springframework.boot</groupId>
        <artifactId>spring-boot-starter-test</artifactId>
        <scope>test</scope>
    </dependency>
    <dependency>
        <groupId>org.springframework.boot</groupId>
        <artifactId>spring-boot-starter-data-elasticsearch</artifactId>
    </dependency>
</dependencies>
<build>
    <plugins>
        <!-- java编译插件 -->
        <plugin>
            <groupId>org.apache.maven.plugins</groupId>
            <artifactId>maven-compiler-plugin</artifactId>
            <version>3.2</version>
            <configuration>
               <source>1.8</source>
               <target>1.8</target>
               <encoding>UTF-8</encoding>
            </configuration>
        </plugin>
    </plugins>
</build>
application.properties
# es服务地址
elasticsearch.host=127.0.0.1
# es服务端口
elasticsearch.port=9200
# 配置日志级别,开启debug日志
logging.level.com.atguigu=debug
启动类
@SpringBootApplication
public class Application
    public static void main(String[] args)
        SpringApplication.run(Application.class,args);
config
@ConfigurationProperties(prefix = "elasticsearch")
@Configuration
public class ElasticsearchConfig extends AbstractElasticsearchConfiguration
    private String host ;
    private Integer port ;

    //重写父类方法
    @Override
    public RestHighLevelClient elasticsearchClient()
        RestClientBuilder builder = RestClient.builder(new HttpHost(host, port));
        RestHighLevelClient restHighLevelClient = new RestHighLevelClient(builder);
        return restHighLevelClient;


    //get/set…
实体类 bean
@Data
@Document(indexName = "product",shards = 1, replicas = 1)
public class Product implements Serializable
    @Id
    private Long id;
    @Field(type = FieldType.Text, analyzer = "ik_max_word")
    private String productName;
    @Field(type = FieldType.Integer)
    private Integer store;
    @Field(type = FieldType.Double, index = true, store = false)
    private double price;
dao 数据访问层
@Repository
public interface ProductDao extends ElasticsearchRepository<Product,Long>
测试类
@RunWith(SpringRunner.class)
@SpringBootTest
public class ElasticsearchTest
    @Autowired
    private ElasticsearchRestTemplate elasticsearchTemplate;

    @Autowired
    private ProductDao productDao;
    /**
     * 添加文档
     * */
    @Test
    public void saveTest()
        Product product = new Product();
        product.setId(1L);
        product.setProductName("华为手机");
        product.setStore(100);
        product.setPrice(5000.00);
        productDao.save(product);
        System.out.println("添加成功...");
以上是关于Day121.ElasticSearch:概述安装基本操作DSL高级查询的主要内容,如果未能解决你的问题,请参考以下文章
