SpringCloud 学习笔记总结
Posted IT_Holmes
tags:
篇首语:本文由小常识网(cha138.com)小编为大家整理,主要介绍了SpringCloud 学习笔记总结相关的知识,希望对你有一定的参考价值。
文章目录
- 1. zuul 与 Gateway
- 2. Gateway 之 简介
- 3. Gateway 之 核心概念 + 架构流程
- 4. Gateway 之 搭建Gateway服务器 + 测试
- 5. Gateway 之 路由的两种配置方式
- 6. Gateway 之 配置动态路由
- 7. Gateway 之 Predicate分类
- 8. Gateway 之 Filter(GatewayFilter)
- 9. SpringCloud Config 之 分布式配置中心(介绍)
- 10. SpringCloud Config 之 配置总控中心搭建(服务端)
- 11. SpringCloud Config 之 配置总控中心配置与测试(客户端)
- 12. SpringCloud Config 之 配置中心 如何解决动态刷新的问题?
1. zuul 与 Gateway
netflix公司研发出了zuul。
zuul现在已经停止更新,之前要出zuul2,zuul2的研发也一直延迟。
zuul一直做网关的效果。
Gateway是SpringCloud公司自研发的第二代微服务网关,代替了zuul。
2. Gateway 之 简介
Gateway的位置:
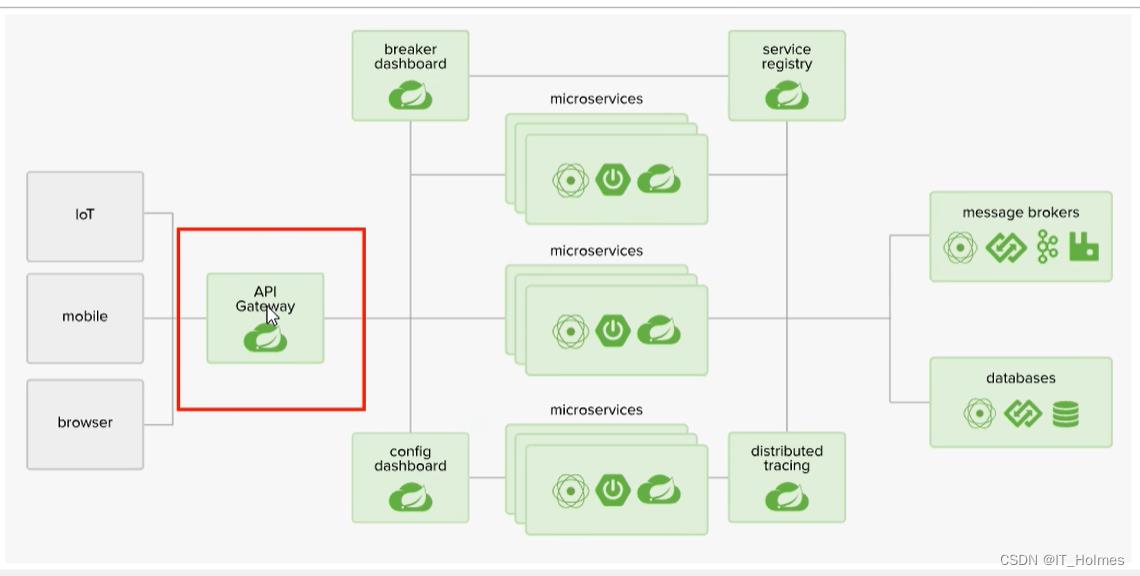
SpringCloud Gateway网关底层用了netty通讯框架:

webflux是什么?
- WebFlux 模块的名称是spring-webflux,名称中的Flux 来源Reactor中的类Flux。Spring webflux 有一个全新的非堵塞的函数式 Reactive Web 框架,可以用来构建异步的、非堵塞的、事件驱动的服务,在伸缩性方面表现非常好。
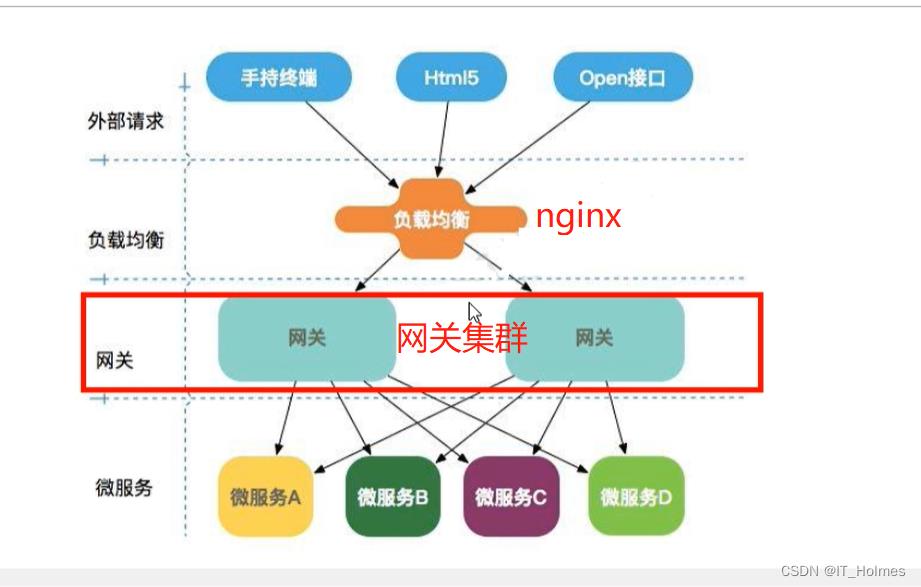
项目架构图:
- 请求一般想通过nginx负载均衡,之后进入网关集群中。
3. Gateway 之 核心概念 + 架构流程
网关gateway的三个核心概念:
Gateway网关架构图:
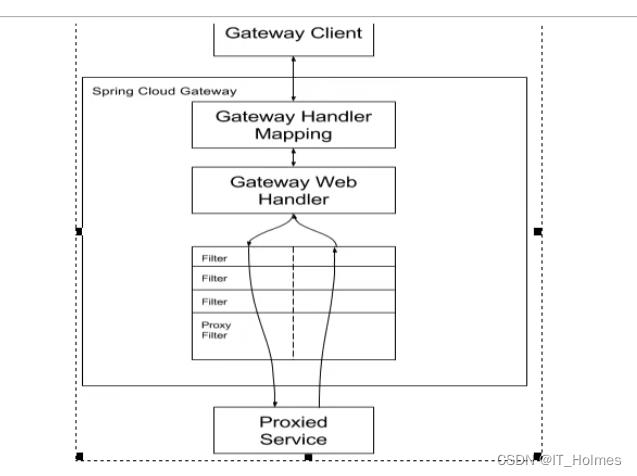
- 核心逻辑就是:
路由转发 + 执行过滤器链。

官方架构图:
4. Gateway 之 搭建Gateway服务器 + 测试
第一步:创建项目,配置依赖。
<!--引入gateway依赖-->
<dependency>
    <groupId>org.springframework.cloud</groupId>
    <artifactId>spring-cloud-starter-gateway</artifactId>
</dependency>

<!--添加eureka-client客户端-->
<dependency>
    <groupId>org.springframework.cloud</groupId>
    <artifactId>spring-cloud-starter-netflix-eureka-client</artifactId>
</dependency>
第二步:修改application.yml文件,添加路由ID,路由地址,断言。
server:
  port: 9527

spring:
  application:
    name: cloud-gateway
  cloud:
    gateway:
      routes:
        - id: payment_routh # 路由ID。 没有固定规则但要求唯一,建议配合服务名。
          uri: http://localhost:8001 # 路由地址。 匹配后提供服务的路由地址。
          predicates:
            - Path=/payment/get/** # 断言。 路径相匹配的进行路由。

        - id: payment_routh2 # 路由ID。 没有固定规则但要求唯一,建议配合服务名。
          uri: http://localhost:8001 # 路由地址。 匹配后提供服务的路由地址。
          predicates:
            - Path=/payment/lb/** # 断言。 路径相匹配的进行路由。


eureka:
  instance:
    hostname: cloud-gateway-service
  client:
    service-url:
      # 表示是否将自己注册进EurekaServer默认为true
      register-with-eureka: true
      # 是否从eurekaServer抓取已有的注册信息,默认为true。单节点无所谓,集群必须设置为true才能配合ribbon使用负载均衡
      fetch-registry: true
      # 入驻地址是哪个
      defaultZone: http://eureka7001.com:7001/eureka # 单机
注意事项:
- Gateway网关不要引入springboot web 和 actuator依赖。
第三步:启动项目,进行测试。

5. Gateway 之 路由的两种配置方式
第一种:就是上面演示的,在配置文件yml里面配置。
spring:
  application:
    name: cloud-gateway
  cloud:
    gateway:
      routes:
        - id: payment_routh # 路由ID。 没有固定规则但要求唯一,建议配合服务名。
          uri: http://localhost:8001 # 路由地址。 匹配后提供服务的路由地址。
          predicates:
            - Path=/payment/get/** # 断言。 路径相匹配的进行路由。

        - id: payment_routh2 # 路由ID。 没有固定规则但要求唯一,建议配合服务名。
          uri: http://localhost:8001 # 路由地址。 匹配后提供服务的路由地址。
          predicates:
            - Path=/payment/lb/** # 断言。 路径相匹配的进行路由。
第二种:代码注入routeLocator的bean。
- 案例访问百度的地址。
package com.itholmes.springcloud.config;

import org.springframework.cloud.gateway.route.RouteLocator;
import org.springframework.cloud.gateway.route.builder.RouteLocatorBuilder;
import org.springframework.context.annotation.Bean;
import org.springframework.context.annotation.Configuration;

@Configuration
public class GateWayConfig

    //使用注入bean的方式来修改网关的路由
    @Bean
    public RouteLocator customRouteLocator(RouteLocatorBuilder routeLocatorBuilder)
        RouteLocatorBuilder.Builder routes = routeLocatorBuilder.routes();

        // 这里映射百度的地址 , 目录为https://news.baidu.com/guonei
        //这样访问http://localhost:9527/guonei 就会 访问到 https://news.baidu.com/guonei的信息
        routes.route("path_route_itholmes",
                r -> r.path("/guonei")
                .uri("https://news.baidu.com/guonei"));

        return routes.build();
6. Gateway 之 配置动态路由
以上我们配置的路由都是写死的,默认情况下Gateway会根据注册中心注册的服务列表,以注册中心上微服务名为路径创建动态路由进行转发,从而实现动态路由的功能。
- 先开启从注册中心动态创建路由的功能,利用微服务名进行路由。
- uri 配置成注册中心对应的微服务名称。
server:
  port: 9527

spring:
  application:
    name: cloud-gateway
  cloud:
    gateway:
      discovery:
        locator:
          # 开启从注册中心动态创建路由的功能,利用微服务名进行路由。
          enabled: true
      routes:
        - id: payment_routh # 路由ID。 没有固定规则但要求唯一,建议配合服务名。
          # uri: http://localhost:8001 # 路由地址。 匹配后提供服务的路由地址。
          uri: lb://CLOUD-PAYMENT-SERVICE
          predicates:
            - Path=/payment/get/** # 断言。 路径相匹配的进行路由。

        - id: payment_routh2 # 路由ID。 没有固定规则但要求唯一,建议配合服务名。
          # uri: http://localhost:8001 # 路由地址。 匹配后提供服务的路由地址。
          uri: lb://CLOUD-PAYMENT-SERVICE
          predicates:
            - Path=/payment/lb/** # 断言。 路径相匹配的进行路由。


eureka:
  instance:
    hostname: cloud-gateway-service
  client:
    service-url:
      # 表示是否将自己注册进EurekaServer默认为true
      register-with-eureka: true
      # 是否从eurekaServer抓取已有的注册信息,默认为true。单节点无所谓,集群必须设置为true才能配合ribbon使用负载均衡
      fetch-registry: true
      # 入驻地址是哪个
      defaultZone: http://eureka7001.com:7001/eureka # 单机
7. Gateway 之 Predicate分类
Predicate断言有多种,就像加了where条件一样,来判断该路由是否符合条件:
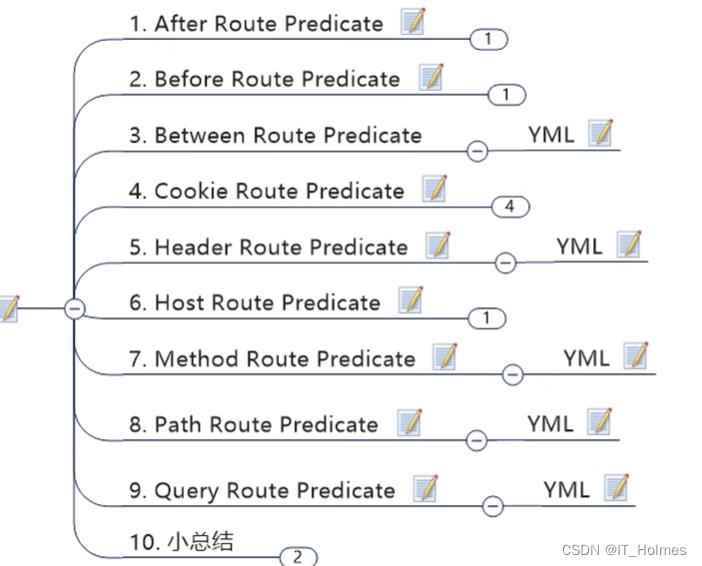
对于三个时间范围的route predicate,时间范围内符合的路由请求:
spring:
  application:
    name: cloud-gateway
  cloud:
    gateway:
      discovery:
        locator:
          # 开启从注册中心动态创建路由的功能,利用微服务名进行路由。
          enabled: true
      routes:
        - id: payment_routh2 # 路由ID。 没有固定规则但要求唯一,建议配合服务名。
          # uri: http://localhost:8001 # 路由地址。 匹配后提供服务的路由地址。
          uri: lb://CLOUD-PAYMENT-SERVICE
          predicates:
            - Path=/payment/lb/** # 断言。 路径相匹配的进行路由。
            - After=2022-07-01T09:42:44.070+08:00[Asia/Shanghai] # 在这个时间之后的请求,才能正常通过路由。
            - before=2022-07-01T09:42:44.070+08:00[Asia/Shanghai] # 在这个时间之前的请求,才能正常通过路由。
            - Between=2022-07-01T09:42:44.070+08:00[Asia/Shanghai],2022-07-01T09:42:44.070+08:00[Asia/Shanghai] # 在这个时间之间,才能正常通过路由。
Cookie Route Predicate参数:
predicates:
  - Path=/payment/lb/** # 断言。 路径相匹配的进行路由。
  - Cookie=username,zzyy # cookie,key是username,value是zzyy

通过curl可以测试有cookie请求和没有cookie请求的效果:

Header Route Predicate参数:
- 下图意思:请求中要有一个X-Request-Id的请求头,值必须符合\\d+(正则,数字)。

同上:


Query Route Predicate:

8. Gateway 之 Filter(GatewayFilter)
这里指的是Spring框架中GatewayFilter的实例,使用过滤器,可以在请求被路由前或者之后对请求进行修改。
Spring Cloud Gateway的filter的生命周期:
- pre 和 post。前置,后置。
Spring Cloud Gateway的filter的种类:
- 两种:GatewayFilter 和 GlobalFilter 两种。
对于GatewayFilter 和 GlobalFilter的过滤器有很多种不同的类型。
自定义全局GatewayFilter过滤器:
- 两个主要接口:GloalFilter , Ordered。
- ordered就是决定优先级顺序,那个过滤器先被执行。
- 通过exchange获取,request和response,修改一系列的操作。
package com.itholmes.springcloud.filter;

import lombok.extern.slf4j.Slf4j;
import org.springframework.cloud.gateway.filter.GatewayFilterChain;
import org.springframework.cloud.gateway.filter.GlobalFilter;
import org.springframework.core.Ordered;
import org.springframework.http.HttpStatus;
import org.springframework.stereotype.Component;
import org.springframework.web.server.ServerWebExchange;
import reactor.core.publisher.Mono;

import java.util.Date;

@Component
@Slf4j
public class MyLogGateWayFilter implements GlobalFilter, Ordered

    @Override
    public Mono<Void> filter(ServerWebExchange exchange, GatewayFilterChain chain)

        log.info("*******come in MyLogGateWayFilter: "+new Date());
        //exchange.getRequest()
        String uname = exchange.getRequest().getQueryParams().getFirst("uname");

        if (uname == null)
            log.info("*********用户名为null,非法用户!");
            //exchange.getResponse() , HttpStatus.NOT_ACCEPTABLE是不可用请求。
            exchange.getResponse().setStatusCode(HttpStatus.NOT_ACCEPTABLE);
            Mono<Void> voidMono = exchange.getResponse().setComplete();
            return voidMono;

        //放行,去下一个过滤链
        return chain.filter(exchange);


    @Override
    public int getOrder()
        //order就是顺序,一般是数字越小,优先级越高。
        return 0;
9. SpringCloud Config 之 分布式配置中心(介绍)
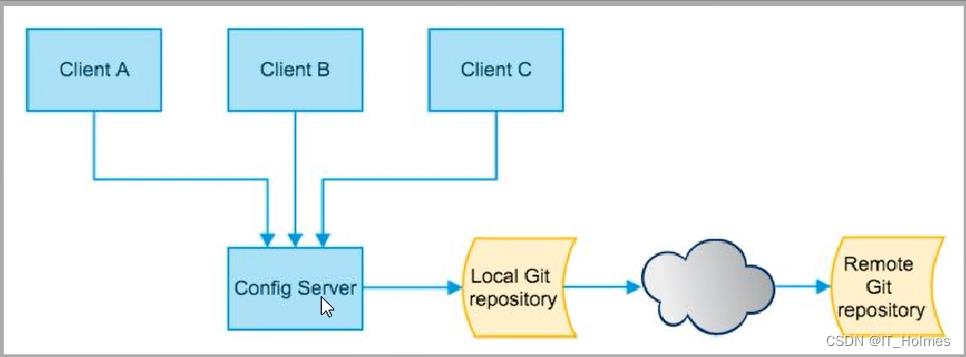
多个微服务之间都需要进行必要的配置信息才能运行,所以要有一套集中式的,动态的配置管理设施是必不可少的(意思就是可以统一的配置application.yml)。
官方解释:

SpringCloud Config 分为 服务端 和 客户端两部分。

Spring cloud config的几个作用:

SpringCloud Config默认使用Git来存储配置文件(也有其他方式SVN,本地文件),推荐还是使用Git。
10. SpringCloud Config 之 配置总控中心搭建(服务端)
也就是搭建下面服务器:

第一步:在Github上新建一个名为springcloud-config的新Repository仓库。获取git地址。并且将仓库clone克隆下来。

第二步:创建项目,添加依赖。
<!--springcloud config配置中心的依赖-->
<dependency>
    <groupId>org.springframework.cloud</groupId>
    <artifactId>spring-cloud-config-server</artifactId>
</dependency>

<!--添加eureka-client客户端-->
<dependency>
    <groupId>org.springframework.cloud</groupId>
    <artifactId>spring-cloud-starter-netflix-eureka-client</artifactId>
</dependency>
第三步:修改application.yml文件。
- 配置config 的 git相关操作。
server:
  port: 3344
spring:
  application:
    name: cloud-config-center # 微服务名称
  cloud:
    config:
      server:
        git:
          uri: https://gitee.com/lixiaogou/sprincloud-config.git #GitHub上面的git仓库名字
          search-paths: #搜索目录
            - springcloud-config
      label: master #读取分支

# 服务注册到eureka地址
eureka:
  client:
    service-url:
      defaultZone: http://localhost:7001/eureka
第四步:添加启动类,添加@EnableConfigServer //开启config服务。
package com.itholmes.springcloud;

import org.springframework.boot.SpringApplication;
import org.springframework.boot.autoconfigure.SpringBootApplication;
import org.springframework.cloud.config.server.EnableConfigServer;

@SpringBootApplication
@EnableConfigServer //开启config服务
public class ConfigCenterMain3344
    public static void main(String[] args)
        SpringApplication.run(ConfigCenterMain3344.class,args);
对应公式如下:

官方公式:
- 建议使用第三个。

11. SpringCloud Config 之 配置总控中心配置与测试(客户端)
SpringCloud Config有客户端和服务端。
第一步:创建项目,添加SpringCloud Config客户端依赖。
<dependency>
    <groupId>org.springframework.cloud</groupId>
    <artifactId>spring-cloud-starter-config</artifactId>
</dependency>
第二步:创建bootstrap.yml配置文件。
- 什么是bootstrap.yml配置文件?
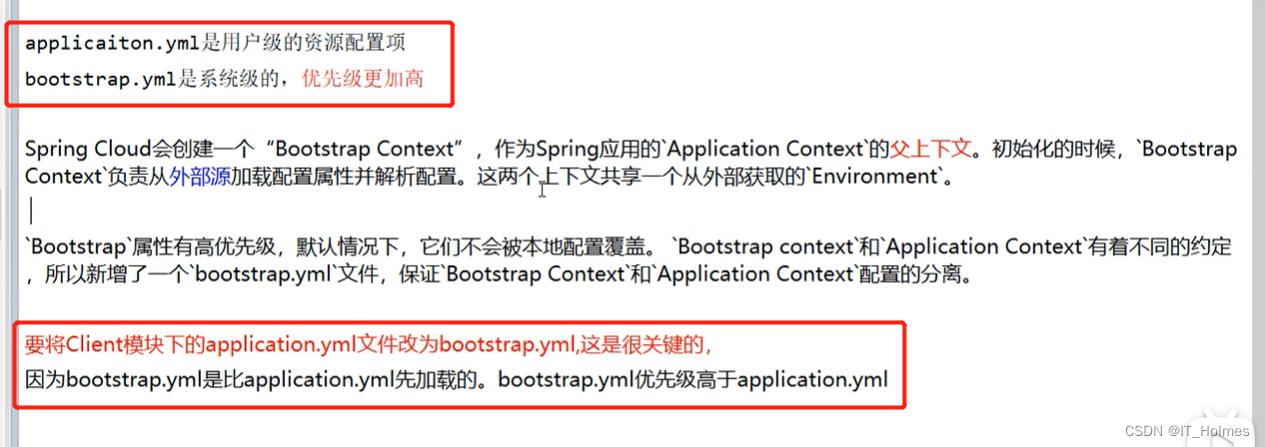
server:
  port: 3355

spring:
  application:
    name: config-client
  cloud:
    # SpringCloud Config 客户端配置
    config:
      label: master # 分支名称
      name: config # 配置文件名称
      profile: dev # 读取后缀名称
      # 上述三个综合: master分支上config-dev.yml的配置文件被读取http://config-3344.com:3344/master/config-dev.yml
      uri: http://localhost:3344 # 配置中心地址

# 服务注册到eureka地址
eureka:
  client:
    service-url:
      defaultZone: http://localhost:7001/eureka
- 其实config客户端就是先去找config服务端,对应的信息如下:

第三步:测试接口,http://localhost:3355/configInfo。
package com.itholmes.springcloud.controller;

import org.springframework.beans.factory.annotation.Value;
import org.springframework.web.bind.annotation.GetMapping;
import org.springframework.web.bind.annotation.RestController;

@RestController
public class ConfigClientController

    @Value("$config.info")
    private String configInfo;

    @GetMapping("/configInfo")
    public String getConfigInfo()
        return configInfo;
最大的问题就是分布式配置的动态刷新问题:
- 意思就是当我们修改git上面的信息后,config服务端会立刻响应对应修改的数据,config客户端却没有任何响应(除非将客户端系统重新启动)!
12. SpringCloud Config 之 配置中心 如何解决动态刷新的问题?
第一步:添加actuator监控依赖。
<dependency>
    <groupId>org.springframework.boot</groupId>
    <artifactId>spring-boot-starter-actuator</artifactId>
</dependency>
第二步:暴露监控端点。
server:
  port: 3355

spring:
  application:
    name: config-client
  cloud:
    # SpringCloud Config 客户端配置
    config:
      label: master # 分支名称
      name: config # 配置文件名称
      profile: dev # 读取后缀名称
      # 上述三个综合: master分支上config-dev.yml的配置文件被读取http://config-3344.com:3344/master/config-dev.yml
      uri: http://localhost:3344 # 配置中心地址

# 服务注册到eureka地址
eureka:
  client:
    service-url:
      defaultZone: http://localhost:7001/eureka

# 暴露监控端点
management:
  endpoints:
    web:
      exposure:
        include: "*"
第三步:controller层添加@RefreshScope注解。
- 添加了这个注解就具备了刷新的能力。
package com.itholmes.springcloud.controller;

import org.springframework.beans.factory.annotation.Value;
import org.springframework.cloud.context.config.annotation.RefreshScope;
import org.springframework.web.bind.annotation.GetMapping;
import org.springframework.web.bind.annotation.RestController;

@RestController
@RefreshScope
public class ConfigClientController

    @Value("$config.info")
    private String configInfo;

    @GetMapping("/configInfo")
    public String getConfigInfo()
        return configInfo;
注意:配置上以上内容,并不能动态刷新,还必须由运维人员发送Post请求刷新3355才行!
第四步:由运维人员发送Post请求刷新3355。
- 执行 curl -X POST “http://localhost:3355/actuator/refresh” 命令进行刷新。
这样的配置是优缺点:
- 多个服务器需要台台发送请求,很麻烦。
- 再个就是100台机器,我想要其中的几台变更,这样也是没法实现很麻烦。
以上是关于SpringCloud 学习笔记总结的主要内容,如果未能解决你的问题,请参考以下文章