基于 Amazon Amplify 构建自己的首个 iOS 应用程序
Posted Data-Mining
tags:
篇首语:本文由小常识网(cha138.com)小编为大家整理,主要介绍了基于 Amazon Amplify 构建自己的首个 iOS 应用程序相关的知识,希望对你有一定的参考价值。
目录
4.6 在 GraphQL 数据模型和应用程序模型之间添加桥接
《基于 Amazon Amplify 构建自己的首个 iOS 应用程序(一)》
三、添加身份验证
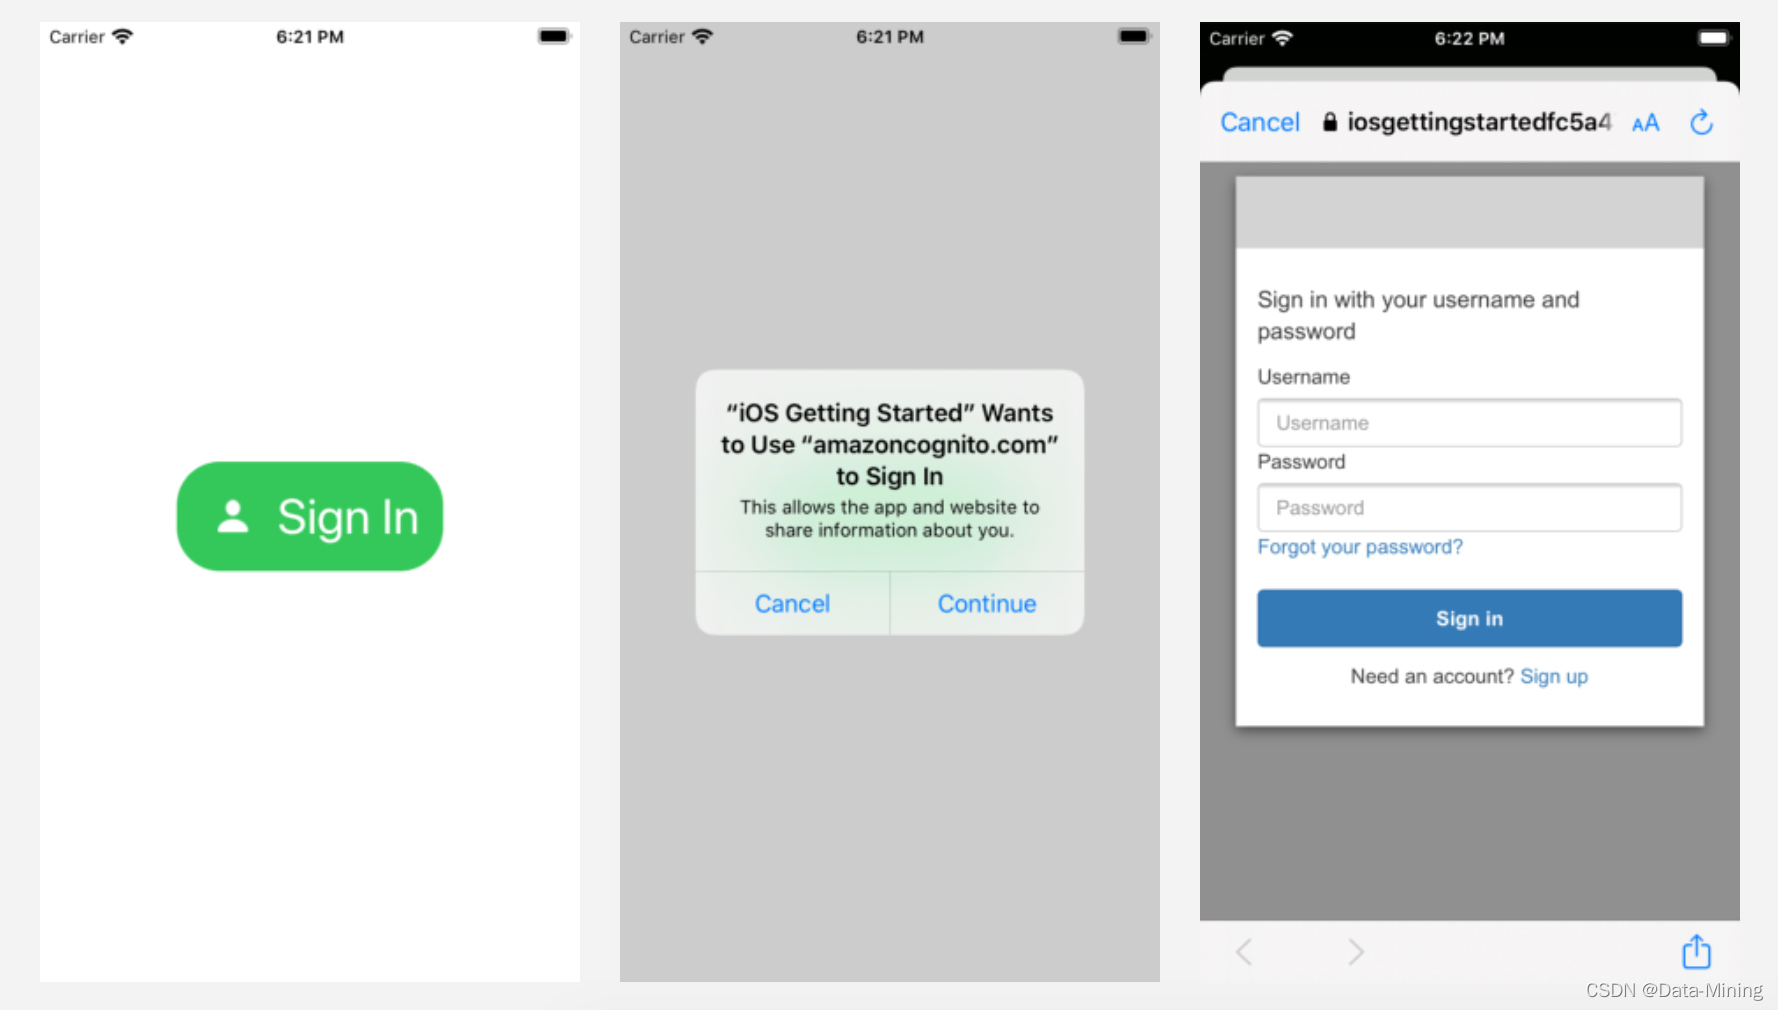
接下来,我们了解如何使用 Amplify CLI 和库对用户进行身份验证,以利用托管用户身份提供商 Amazon Cognito。另外,知道如何使用 Cognito 托管用户界面展示整个用户身份验证流,从而使用户只需几行代码即可注册、登录和重置密码。使用“托管用户界面”意味着应用程序利用 Cognito 网页登录和注册用户界面流。应用程序的用户将重定向到 Cognito 托管的网页,并在登录后重定向回应用程序。当然,Cognito 和 Amplify 也支持本机 UI。
3.1 创建身份验证服务
创建身份验证服务,打开一个命令行终端,然后执行如下命令:
amplify add auth
输出结果出现 successful 字样表示创建成功。
3.2 部署身份验证服务
现在,我们已在本地配置身份验证服务,我们可以将它部署到云。在终端中,在项目目录中执行以下命令:
amplify push
3.3 向项目添加 Amplify 身份验证库
在转至代码之前,将 Amplify 身份验证库添加到项目的依赖项中。打开 Podfile 文件,然后使用 AmplifyPlugins/AWSCognitoAuthPlugin 添加行,或者复制并粘贴以下整个文件。
# you need at least version 13.0 for this tutorial, more recent versions are valid too
platform :ios, '13.0'

target 'getting started' do
  # Comment the next line if you don't want to use dynamic frameworks
  use_frameworks!

  # Pods for getting started
  pod 'Amplify', '~> 1.0'                             # required amplify dependency
  pod 'Amplify/Tools', '~> 1.0'                       # allows to call amplify CLI from within Xcode

  pod 'AmplifyPlugins/AWSCognitoAuthPlugin', '~> 1.0' # support for Cognito user authentication

end
在终端中执行以下命令:
pod install
3.4 在运行时配置 Amplify 身份验证库
返回到 Xcode,打开 Backend.swift 文件,其完整代码如下所示:
// at the top of the file
import AmplifyPlugins

private init ()
  // initialize amplify
  do
     try Amplify.add(plugin: AWSCognitoAuthPlugin())
     try Amplify.configure()
     print("Initialized Amplify")
   catch
     print("Could not initialize Amplify: \\(error)")
构建项目,保证不报错即可。
3.5 在运行时触发身份验证
其余代码更改会跟踪用户的状态,并在用户未登录时触发登录/注册用户界面。 添加登录和注销代码,在后端类中的任意位置,添加以下三种方法:
// signin with Cognito web user interface
public func signIn()

    _ = Amplify.Auth.signInWithWebUI(presentationAnchor: UIApplication.shared.windows.first!)  result in
        switch result
        case .success(_):
            print("Sign in succeeded")
        case .failure(let error):
            print("Sign in failed \\(error)")


// signout
public func signOut()

    _ = Amplify.Auth.signOut()  (result) in
        switch result
        case .success:
            print("Successfully signed out")
        case .failure(let error):
            print("Sign out failed with error \\(error)")


// change our internal state, this triggers an UI update on the main thread
func updateUserData(withSignInStatus status : Bool)
    DispatchQueue.main.async()
        let userData : UserData = .shared
        userData.isSignedIn = status
为了跟踪身份验证状态的变化,我们添加了代码以订阅由 Amplify 发送的身份验证事件。我们在 Backend.init() 方法中初始化该中心。在收到身份验证事件时,我们将调用 updateUserData() 方法。此方法可使 UserData 对象保持同步。UserData.isSignedIn 属性为 @Published,这意味着当值更改时,用户界面会自动刷新。 我们可以添加代码以在应用程序启动时检查以前的身份验证状态。当应用程序启动时,它会检查 Cognito 会话是否已存在,并相应地更新 UI。
在 Backend.init() 中,请在 Amplify 初始化后添加以下代码:
// in private init() function
// listen to auth events.
// see https://github.com/aws-amplify/amplify-ios/blob/master/Amplify/Categories/Auth/Models/AuthEventName.swift
_ = Amplify.Hub.listen(to: .auth)  (payload) in

    switch payload.eventName

    case HubPayload.EventName.Auth.signedIn:
        print("==HUB== User signed In, update UI")
        self.updateUserData(withSignInStatus: true)

    case HubPayload.EventName.Auth.signedOut:
        print("==HUB== User signed Out, update UI")
        self.updateUserData(withSignInStatus: false)

    case HubPayload.EventName.Auth.sessionExpired:
        print("==HUB== Session expired, show sign in UI")
        self.updateUserData(withSignInStatus: false)

    default:
        //print("==HUB== \\(payload)")
        break


// let's check if user is signedIn or not
 _ = Amplify.Auth.fetchAuthSession  (result) in
     do
         let session = try result.get()

// let's update UserData and the UI
     self.updateUserData(withSignInStatus: session.isSignedIn)

      catch
          print("Fetch auth session failed with error - \\(error)")
代码中的最后一个更改与用户界面相关,我们将 ZStack 添加到 ContentView。根据UserData.isSignedIn 的值,UI 将显示 SigninButton 或主列表视图。打开 ContentView.swift 并替换 ContentView 结构中的正文:
var body: some View

    ZStack
        if (userData.isSignedIn)
            NavigationView
                List
                    ForEach(userData.notes)  note in
                        ListRow(note: note)


                .navigationBarTitle(Text("Notes"))
                .navigationBarItems(leading: SignOutButton())

         else
            SignInButton()
在同一文件中,添加 SignInButton 和 SignOutButton 视图:
struct SignInButton: View
    var body: some View
        Button(action:  Backend.shared.signIn() )
            HStack
                Image(systemName: "person.fill")
                    .scaleEffect(1.5)
                    .padding()
                Text("Sign In")
                    .font(.largeTitle)

            .padding()
            .foregroundColor(.white)
            .background(Color.green)
            .cornerRadius(30)


struct SignOutButton : View
    var body: some View
        Button(action:  Backend.shared.signOut() )
                Text("Sign Out")
最后,我们必须确保在 Cognito 托管用户界面提供的 Web 身份验证序列结束时启动我们的应用程序。我们将 gettingstarted URI 方案添加到应用程序的 Info.plist 文件中。在 Xcode 中,选择 Info.plist 文件,右键单击该文件,然后选择“打开为源代码”。
另外,在顶部 <dict> 元素内添加以下 <key> 和 <array> 元素。
<plist version="1.0">

    <dict>
    <!-- YOUR OTHER PLIST ENTRIES HERE -->

    <!-- ADD AN ENTRY TO CFBundleURLTypes for Cognito Auth -->
    <!-- IF YOU DO NOT HAVE CFBundleURLTypes, YOU CAN COPY THE WHOLE BLOCK BELOW -->
    <key>CFBundleURLTypes</key>
    <array>
        <dict>
            <key>CFBundleURLSchemes</key>
            <array>
                <string>gettingstarted</string>
            </array>
        </dict>
    </array>

    <!-- ... -->
    </dict>
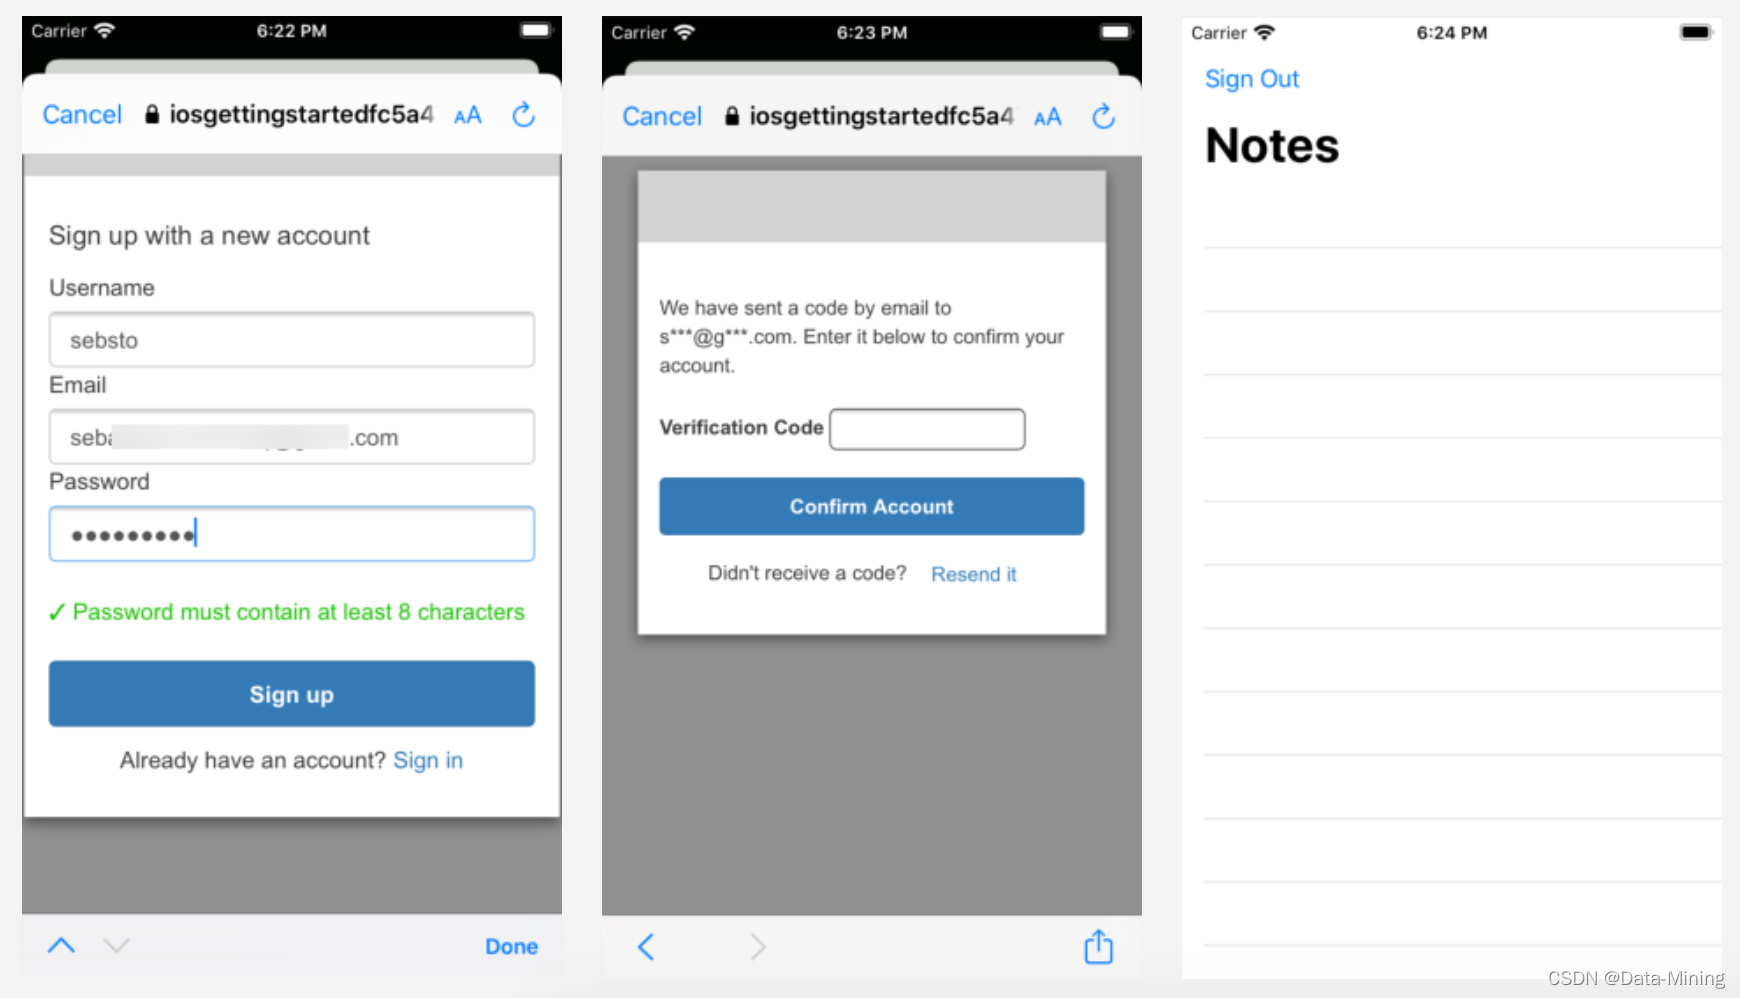
然后,运行程序看看效果,整个注册流程如下图所示:
四、添加 API 和数据库
现在,我们已经创建并配置了带用户身份验证功能的应用程序。接下来,我们要在数据库中添加 API 以及“创建”、“读取”、“更新”、“删除”(CRUD) 操作。
4.1 创建 GraphQL API 及数据库
要创建 GraphQL API 及其数据库,打开一个命令行终端,然后从项目目录中执行如下命令:
amplify add api
初始化项目时选择的默认文本编辑器 (amplify init) 将使用预构建数据 schema 打开。删除此 schema,并使用我们的应用程序 GraphQL schema 替换:
type NoteData
@model
@auth (rules: [  allow: owner  ])
    id: ID!
    name: String!
    description: String
    image: String
4.2 生成客户端代码
根据我们刚刚创建的 GraphQL 数据模型定义,Amplify 会生成客户端代码(即 Swift 代码)以代表我们应用程序中的数据。要生成代码,在终端执行以下命令:
amplify codegen models
在 Finder 中找到新生成的文件,然后将其拖放到 Xcode 的项目中。
4.3 部署 API 服务和数据库
要部署我们刚刚创建的后端 API 和数据库,打开终端,然后执行如下命令:
amplify push
4.4 将 API 客户端库添加到 Xcode 项目中
在转至代码之前,将 Amplify API 库添加到项目的依赖项中。打开 Podfile 文件,然后使用 AmplifyPlugins/AWSAPIPlugin 添加行,或者复制并粘贴以下整个文件。
# you need at least version 13.0 for this tutorial, more recent versions are valid too
platform :ios, '13.0'

target 'getting started' do
  # Comment the next line if you don't want to use dynamic frameworks
  use_frameworks!

  # Pods for getting started
  pod 'Amplify', '~> 1.0'                             # required amplify dependency
  pod 'Amplify/Tools', '~> 1.0'                       # allows to call amplify CLI from within Xcode

  pod 'AmplifyPlugins/AWSCognitoAuthPlugin', '~> 1.0' # support for Cognito user authentication
  pod 'AmplifyPlugins/AWSAPIPlugin', '~> 1.0'         # support for GraphQL API

end
然后,执行如下命令:
pod install
4.5 在运行时初始化 Amplify 库
返回到 Xcode,打开 Backend.swift,然后在私有 init() 方法的 Amplify 初始化序列中添加一行。完整代码块应如下所示:
// initialize amplify
do
   try Amplify.add(plugin: AWSCognitoAuthPlugin())
   try Amplify.add(plugin: AWSAPIPlugin(modelRegistration: AmplifyModels()))
   try Amplify.configure()
   print("Initialized Amplify")
 catch
   print("Could not initialize Amplify: \\(error)")
4.6 在 GraphQL 数据模型和应用程序模型之间添加桥接
我们的项目已经有一个数据模型来表示备注。因此,可以继续使用该模型,并提供一种将 NoteData 转换为备注的简单方法。打开 ContentView.swift 并将此初始化程序添加到备注类中。
convenience init(from data: NoteData)
    self.init(id: data.id, name: data.name, description: data.description, image: data.image)

    // store API object for easy retrieval later
    self._data = data


fileprivate var _data : NoteData?

// access the privately stored NoteData or build one if we don't have one.
var data : NoteData

    if (_data == nil)
        _data = NoteData(id: self.id,
                            name: self.name,
                            description: self.description,
                            image: self.imageName)


    return _data!
4.7 将 API CRUD 方法添加到后端类中
我们添加 3 种方法来调用 API:一种查询 Note 的方法,一种创建新 Note 的方法,以及一种删除 Note 的方法。请注意,这些方法适用于应用程序数据模型(备注),以便从用户界面轻松交互。这些方法可透明地将 Note 转换为 GraphQL 的 NoteData 对象。
打开 Backend.swift 文件,然后在后端类末尾添加以下 snipet:
// MARK: API Access

    func queryNotes()

        _ = Amplify.API.query(request: .list(NoteData.self))  event in
            switch event
            case .success(let result):
                switch result
                case .success(let notesData):
                    print("Successfully retrieved list of Notes")

                    // convert an array of NoteData to an array of Note class instances
                    for n in notesData
                        let note = Note.init(from: n)
                        DispatchQueue.main.async()
                            UserData.shared.notes.append(note)


                case .failure(let error):
                    print("Can not retrieve result : error  \\(error.errorDescription)")

            case .failure(let error):
                print("Can not retrieve Notes : error \\(error)")


    func createNote(note: Note)

        // use note.data to access the NoteData instance
        _ = Amplify.API.mutate(request: .create(note.data))  event in
            switch event
            case .success(let result):
                switch result
                case .success(let data):
                    print("Successfully created note: \\(data)")
                case .failure(let error):
                    print("Got failed result with \\(error.errorDescription)")

            case .failure(let error):
                print("Got failed event with error \\(error)")


    func deleteNote(note: Note)

        // use note.data to access the NoteData instance
        _ = Amplify.API.mutate(request: .delete(note.data))  event in
            switch event
            case .success(let result):
                switch result
                case .success(let data):
                    print("Successfully deleted note: \\(data)")
                case .failure(let error):
                    print("Got failed result with \\(error.errorDescription)")

            case .failure(let error):
                print("Got failed event with error \\(error)")
在同一 Backend.swift 文件中,更新 updateUserData(withSignInStatus:) 方法如下所示:
// change our internal state, this triggers an UI update on the main thread
func updateUserData(withSignInStatus status : Bool)
    DispatchQueue.main.async()
        let userData : UserData = .shared
        userData.isSignedIn = status

        // when user is signed in, query the database, otherwise empty our model
        if status
            self.queryNotes()
         else
            userData.notes = []
现在,只需创建一个用户界面即可创建新 Note 和从列表中删除 Note。
4.8 添加“Edit”按钮以添加备注
现在,后端和数据模型已到位,最后一步是让用户创建新的 Note 然后将其删除。在 Xcode 中,打开 ContentView.swift,在 ContentView 结构中,添加绑定到用户界面的状态变量。
// add at the begining of ContentView class
@State var showCreateNote = false

@State var name : String        = "New Note"
@State var description : String = "This is a new note"
@State var image : String       = "image"
在文件中的任何位置,添加视图结构,以允许用户创建新的备注:
struct AddNoteView: View
    @Binding var isPresented: Bool
    var userData: UserData

    @State var name : String        = "New Note"
    @State var description : String = "This is a new note"
    @State var image : String       = "image"
    var body: some View
        Form

            Section(header: Text("TEXT"))
                TextField("Name", text: $name)
                TextField("Name", text: $description)


            Section(header: Text("PICTURE"))
                TextField("Name", text: $image)


            Section
                Button(action:
                    self.isPresented = false
                    let noteData = NoteData(id : UUID().uuidString,
                                            name: self.$name.wrappedValue,
                                            description: self.$description.wrappedValue)
                    let note = Note(from: noteData)

                    // asynchronously store the note (and assume it will succeed)
                    Backend.shared.createNote(note: note)

                    // add the new note in our userdata, this will refresh UI
                    self.userData.notes.append(note)
                )
                    Text("Create this note")
在导航栏上添加“+”按钮演示数据表以创建备注,返回 ContentView 结构,将 navigationBarItems(leading SignOutButton()) 替换为:
    .navigationBarItems(leading: SignOutButton(),
                        trailing: Button(action:
        self.showCreateNote.toggle()
    )
        Image(systemName: "plus")
    )
.sheet(isPresented: $showCreateNote)
    AddNoteView(isPresented: self.$showCreateNote, userData: self.userData)
4.9 添加“滑动删除”行为
最后,在 ContentView 中添加“轻扫以删除”行为:将 .onDelete 方法添加到 ForEach 结构中:
ForEach(userData.notes)  note in
    ListRow(note: note)
.onDelete  indices in
    indices.forEach
        // removing from user data will refresh UI
        let note = self.userData.notes.remove(at: $0)

        // asynchronously remove from database
        Backend.shared.deleteNote(note: note)
4.10 构建和测试
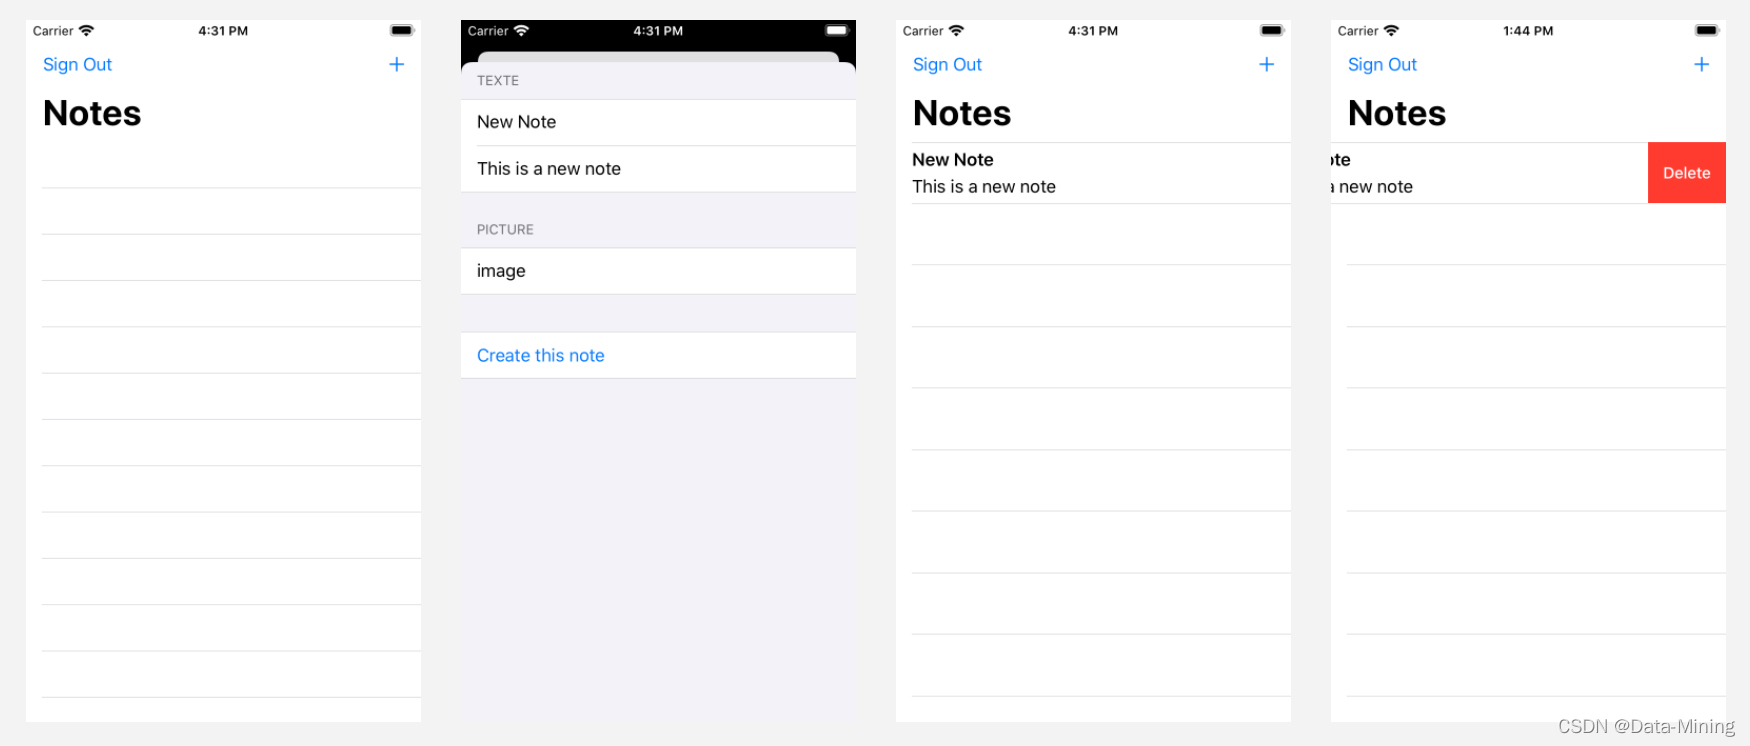
首先,编译程序,保证不出现报错。然后,运行程序,整个完整流程如下图所示:
五、添加存储
现在,我们的备注应用程序已在运行,接下来添加将图像与每个备注关联的功能。在本模块中,将使用 Amplify CLI 和库来创建利用 Amazon S3 的存储服务。最后,将更新 iOS 应用程序以启用图像上传、获取和渲染。
5.1 创建存储服务
要添加图像存储功能,我们将使用 Amplify 存储类别,执行如下命令:
amplify add storage
5.2 部署存储服务
要部署我们刚刚创建的存储服务,打开终端,然后执行以下命令:
amplify push
5.3 向Xcode项目中添加 Amplify 存储库
在转至代码之前,将 Amplify 存储库添加到项目的依赖项中。打开 Podfile 文件,然后使用 AmplifyPlugins/AWSS3StoragePlugin 添加行,或者复制并粘贴以下整个文件。
# you need at least version 13.0 for this tutorial, more recent versions are valid too
platform :ios, '13.0'

target 'getting started' do
  # Comment the next line if you don't want to use dynamic frameworks
  use_frameworks!

  # Pods for getting started
  pod 'Amplify', '~> 1.0'                             # required amplify dependency
  pod 'Amplify/Tools', '~> 1.0'                       # allows to call amplify CLI from within Xcode

  pod 'AmplifyPlugins/AWSCognitoAuthPlugin', '~> 1.0' # support for Cognito user authentication
  pod 'AmplifyPlugins/AWSAPIPlugin', '~> 1.0'         # support for GraphQL API
  pod 'AmplifyPlugins/AWSS3StoragePlugin', '~> 1.0'   # support for Amazon S3 storage

end
然后,执行如下命令:
pod install
5.4 在运行时初始化 Amplify 存储插件
返回 Xcode,打开 Backend.swift,然后在私有 init() 方法的 Amplify 初始化序列中添加一行。完整代码块应如下所示:
// initialize amplify
do
   try Amplify.add(plugin: AWSCognitoAuthPlugin())
   try Amplify.add(plugin: AWSAPIPlugin(modelRegistration: AmplifyModels()))
   try Amplify.add(plugin: AWSS3StoragePlugin())
   try Amplify.configure()
   print("Initialized Amplify");
 catch
   print("Could not initialize Amplify: \\(error)")
5.5 将 Image CRUD 方法添加到后端类
打开 Backend.Swift。在后端类中的任意位置,添加以下方法:
func storeImage(name: String, image: Data)

//        let options = StorageUploadDataRequest.Options(accessLevel: .private)
    let _ = Amplify.Storage.uploadData(key: name, data: image,// options: options,
        progressListener:  progress in
            // optionlly update a progress bar here
        , resultListener:  event in
            switch event
            case .success(let data):
                print("Image upload completed: \\(data)")
            case .failure(let storageError):
                print("Image upload failed: \\(storageError.errorDescription). \\(storageError.recoverySuggestion)")

    )


func retrieveImage(name: String, completed: @escaping (Data) -> Void)
    let _ = Amplify.Storage.downloadData(key: name,
        progressListener:  progress in
            // in case you want to monitor progress
        , resultListener:  (event) in
            switch event
            case let .success(data):
                print("Image \\(name) loaded")
                completed(data)
            case let .failure(storageError):
                print("Can not download image: \\(storageError.errorDescription). \\(storageError.recoverySuggestion)")


    )


func deleteImage(name: String)
    let _ = Amplify.Storage.remove(key: name,
        resultListener:  (event) in
            switch event
            case let .success(data):
                print("Image \\(data) deleted")
            case let .failure(storageError):
                print("Can not delete image: \\(storageError.errorDescription). \\(storageError.recoverySuggestion)")


    )
5.6 API 检索数据时加载图像
现在,后端函数已经可用,我们接下来在 API 调用返回结果时加载图像。添加此行为的中心位置是,应用程序通过 API 返回的 NoteData 构造备注 UI 时。打开 ContentView.swift 并更新备注的初始化程序(添加第 8 行至第 17 行):
// add a publishable's object property
@Published var image : Image?

// update init's code
convenience init(from data: NoteData)
    self.init(id: data.id, name: data.name, description: data.description, image: data.image)

    if let name = self.imageName
        // asynchronously download the image
        Backend.shared.retrieveImage(name: name)  (data) in
            // update the UI on the main thread
            DispatchQueue.main.async()
                let uim = UIImage(data: data)
                self.image = Image(uiImage: uim!)


    // store API object for easy retrieval later
    self._data = data
当备注实例中存在图像名称时,代码将调用 retrieveImage,它是一个异步函数。下载图像时需要调用一个函数,该函数创建一个图像 UI 对象并将其分配给备注实例。请注意,此分配会触发用户界面更新,因此会在应用程序的主线程中使用 DispatchQueue.main.async 进行更新。
5.7 添加 UI 代码以捕获图像
首先,我们添加通用代码以支持图像捕获。此代码可在许多应用程序中重复使用;它显示了一个图像选择器,允许用户从其图像库中选择图像。在 Xcode 中,创建新的 Swift 文件(⌘N,然后选择 Swift)。命名 CaptureImageView.swift 文件,然后添加此代码:
import Foundation
import UIKit
import SwiftUI

struct CaptureImageView

  /// MARK: - Properties
  @Binding var isShown: Bool
  @Binding var image: UIImage?

  func makeCoordinator() -> Coordinator
    return Coordinator(isShown: $isShown, image: $image)


class Coordinator: NSObject, UINavigationControllerDelegate, UIImagePickerControllerDelegate
  @Binding var isCoordinatorShown: Bool
  @Binding var imageInCoordinator: UIImage?
  init(isShown: Binding<Bool>, image: Binding<UIImage?>)
    _isCoordinatorShown = isShown
    _imageInCoordinator = image

  func imagePickerController(_ picker: UIImagePickerController,
                didFinishPickingMediaWithInfo info: [UIImagePickerController.InfoKey : Any])
     guard let unwrapImage = info[UIImagePickerController.InfoKey.originalImage] as? UIImage else  return
     imageInCoordinator = unwrapImage
     isCoordinatorShown = false

  func imagePickerControllerDidCancel(_ picker: UIImagePickerController)
     isCoordinatorShown = false


extension CaptureImageView: UIViewControllerRepresentable
    func makeUIViewController(context: UIViewControllerRepresentableContext<CaptureImageView>) -> UIImagePickerController
        let picker = UIImagePickerController()
        picker.delegate = context.coordinator

        // picker.sourceType = .camera // on real devices, you can capture image from the camera
        // see https://medium.com/better-programming/how-to-pick-an-image-from-camera-or-photo-library-in-swiftui-a596a0a2ece

        return picker


    func updateUIViewController(_ uiViewController: UIImagePickerController,
                                context: UIViewControllerRepresentableContext<CaptureImageView>)
5.8 创建备注时存储图像
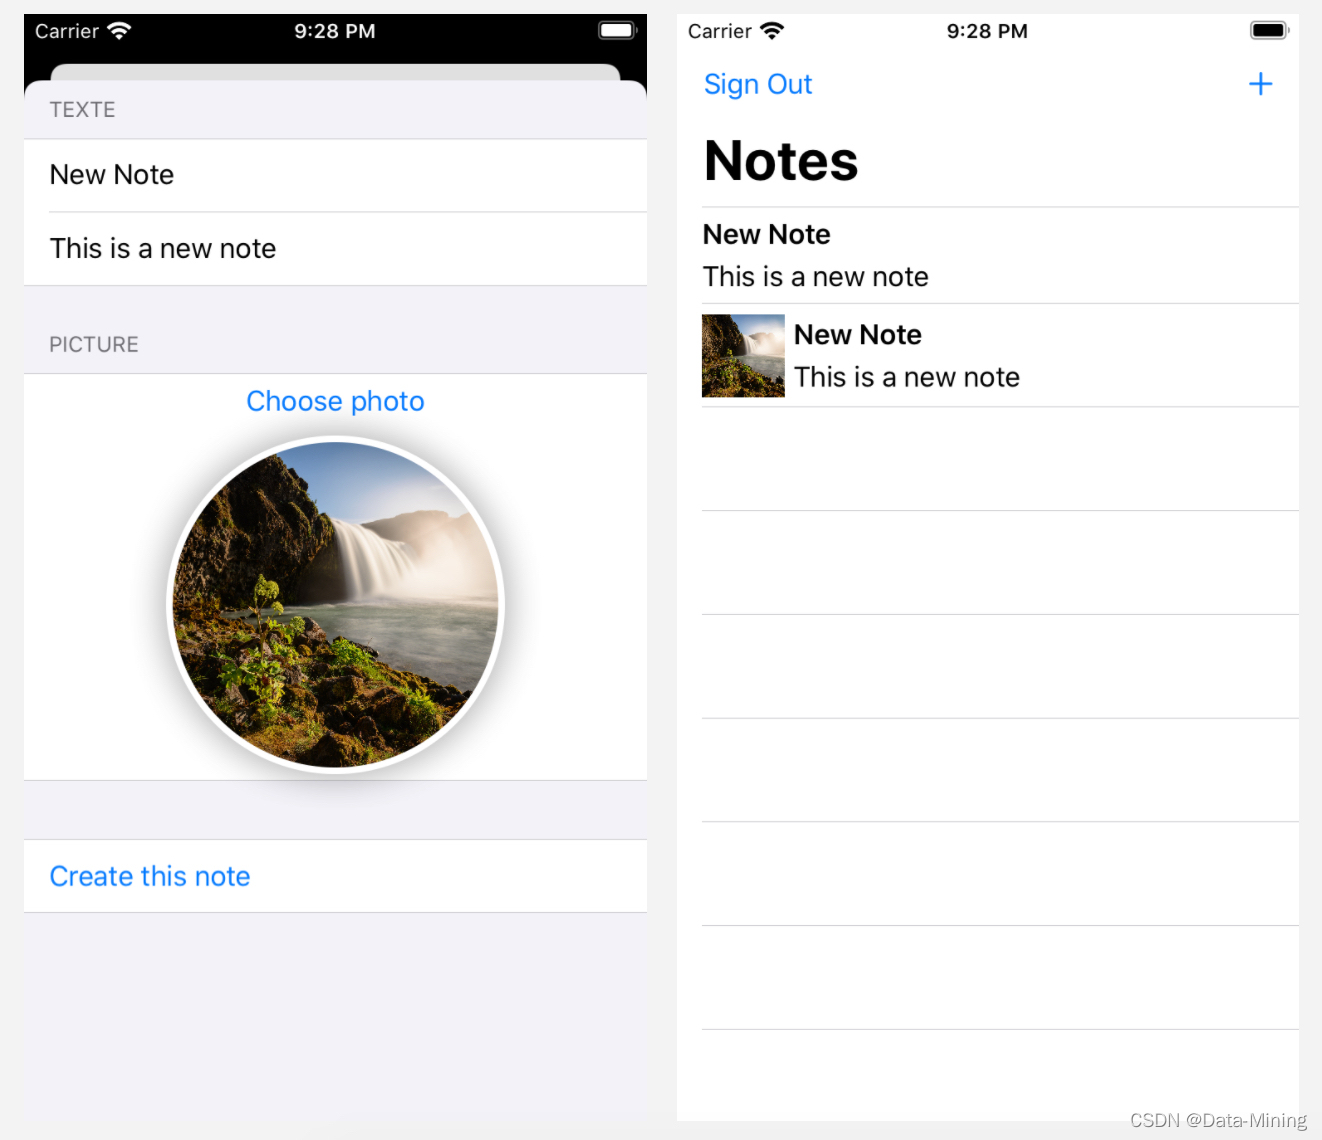
创建备注时,我们从后端调用存储方法。打开 ContentView.swift 并修改 AddNoteView 以添加 ImagePicker 组件:
// at the start of the Content View struct
@State var image : UIImage? // replace the previous declaration of image
@State var showCaptureImageView = false

// in the view, replace the existing PICTURE section
Section(header: Text("PICTURE"))
    VStack
        Button(action:
            self.showCaptureImageView.toggle()
        )
            Text("Choose photo")
        .sheet(isPresented: $showCaptureImageView)
            CaptureImageView(isShown: self.$showCaptureImageView, image: self.$image)

        if (image != nil )
            HStack
                Spacer()
                Image(uiImage: image!)
                    .resizable()
                    .frame(width: 250, height: 200)
                    .clipShape(Circle())
                    .overlay(Circle().stroke(Color.white, lineWidth: 4))
                    .shadow(radius: 10)
                Spacer()
修改“创建备注”部分以存储图像和备注:
Section
    Button(action:
        self.isPresented = false

        let note = Note(id : UUID().uuidString,
                        name: self.$name.wrappedValue,
                        description: self.$description.wrappedValue)

        if let i = self.image
            note.imageName = UUID().uuidString
            note.image = Image(uiImage: i)

            // asynchronously store the image (and assume it will work)
            Backend.shared.storeImage(name: note.imageName!, image: (i.pngData())!)


        // asynchronously store the note (and assume it will succeed)
        Backend.shared.createNote(note: note)

        // add the new note in our userdata, this will refresh UI
        withAnimation  self.userData.notes.append(note)
    )
        Text("Create this note")
5.9 构建和测试
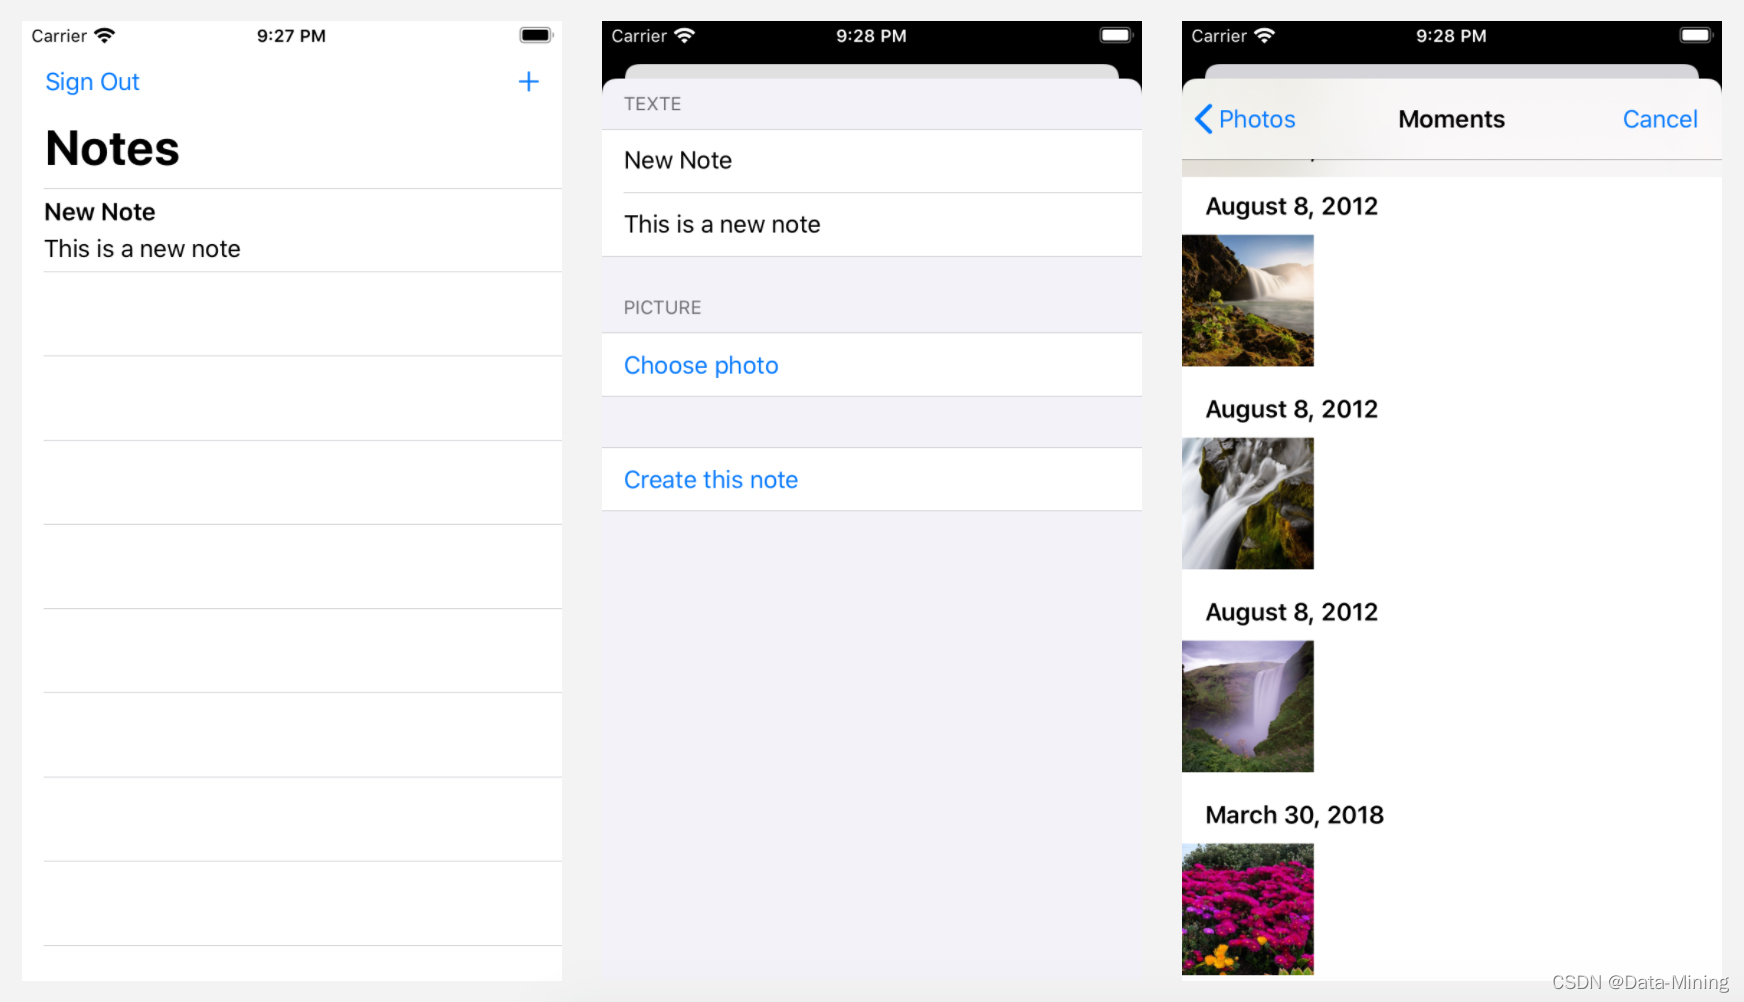
首先,编译程序,保证不出现报错。然后,运行程序,整个完整流程如下图所示:
结论
至此,我们已经体验了使用 Amazon Amplify 构建 iOS 应用程序的过程! 在应用程序中添加了身份验证,用户可以注册、登录和管理其账户。该应用程序还使用 Amazon DynamoDB 数据库配置了一个可扩展的 GraphQL API,用户可以创建和删除备注。另外,还使用 Amazon S3 添加了文件存储,从而使用户可以上传图像并在其应用程序中查看它们。但是,使用过程中也出现了很多小插曲,非常耽误时间,由于篇幅的限制,我简单说两点:一、Xcode 版本兼容性问题。最开始我使用低于11.5的版本,遇到了很多编译错误,最后升级到11.5才解决。因此,体验时要保证一个较高的Xcode版本,这一点应该在官方文档中说明;二、信用卡注册问题。服务中国客户,亚马逊应该入乡随俗,提供更加人性化的注册方式,可以考虑支付宝或者微信登陆注册,这样会比较符合大家的习惯。别的方面还比较顺利,感兴趣的话,小伙伴们就自己动手尝试一下吧!
另外,亚马逊云科技专为开发者们打造了多种学习平台:
1. 入门资源中心:从0到1 轻松上手云服务,内容涵盖:成本管理,上手训练,开发资源。AWS入门_AWS入门使用教程_AWS云计算资源-AWS云服务
2. 架构中心:亚马逊云科技架构中心提供了云平台参考架构图表、经过审查的架构解决方案、Well-Architected 最佳实践、模式、图标等。AWS架构中心部署说明_AWS云架构白皮书-AWS云服务
3. 构建者库:了解亚马逊云科技如何构建和运营软件。Amazon Builders' Library
4. 用于在亚马逊云科技平台上开发和管理应用程序的工具包:aws工具下载_aws开发工具_资源下载-AWS云服务
【专属福利】
福利一:100余种产品免费套餐。其中,计算资源Amazon EC2首年12个月免费,750小时/月;存储资源 Amazon S3 首年12个月免费,5GB标准存储容量。
福利二:最新优惠大礼包,200$数据与分析抵扣券,200$机器学习抵扣券,200$微服务与应用开发抵扣券。最新优惠活动_云服务器促销 - 亚马逊云科技
福利三:解决方案CloudFormation一键部署模版库
作者简介:😄大家好,我是 Data-Mining(liuzhen007),是一位典型的音视频技术爱好者,前后就职于传统广电巨头和音视频互联网公司,具有丰富的音视频直播和点播相关经验,对 WebRTC、FFmpeg 和 Electron 有非常深入的了解,😄公众号:玩转音视频。同时也是 CSDN 博客专家、华为云享专家(共创编辑)、InfoQ 签约作者,欢迎关注我分享更多干货!😄
以上是关于基于 Amazon Amplify 构建自己的首个 iOS 应用程序的主要内容,如果未能解决你的问题,请参考以下文章