kubernetes集群之调度系统
Posted 江湖有缘
tags:
篇首语:本文由小常识网(cha138.com)小编为大家整理,主要介绍了kubernetes集群之调度系统相关的知识,希望对你有一定的参考价值。
kubernetes集群之调度系统
一、kube-scheduler介绍
1.kube-scheduler简介
1.Kubernetes Scheduler 是 Kubernetes 控制平面的核心组件之一。
2.Scheduler 在控制平面内运行,并将工作负载分配给 Kubernetes 集群。
3.kube-scheduler会根据 Kubernetes 的调度原则和我们的配置选项选择最佳节点来运行pod,
2.k8s的调度系统作用
1.资源使用率最大化
2.满足用户指定的调度需求
3.满足自定义优先级要求
4.调度效率高,能够根据资源情况快速做出决策
5.能够根据负载的变化调整调度策略
6.充分考虑各种层级的公平性
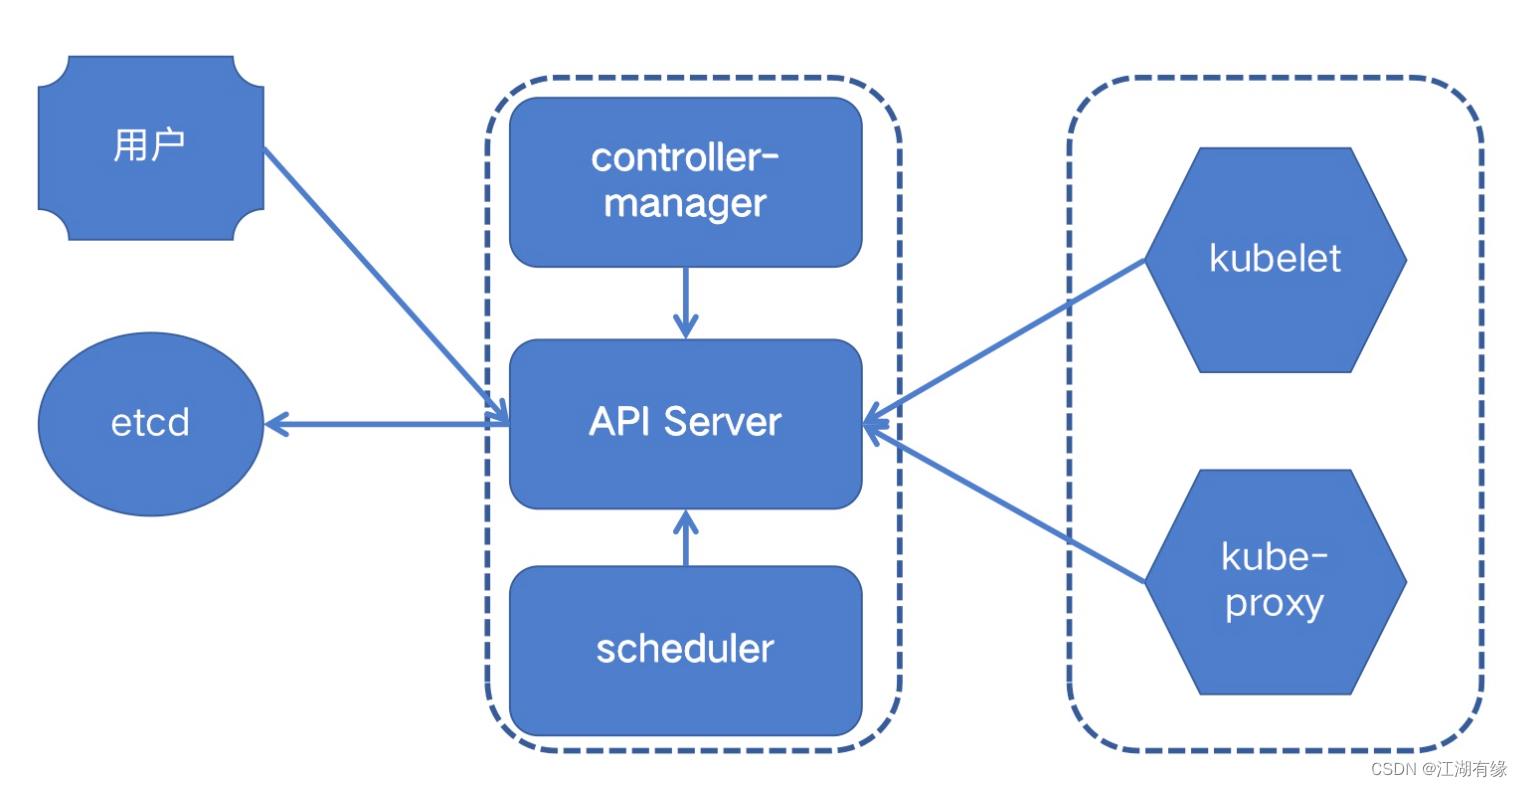
3.kubernetes组件示意图

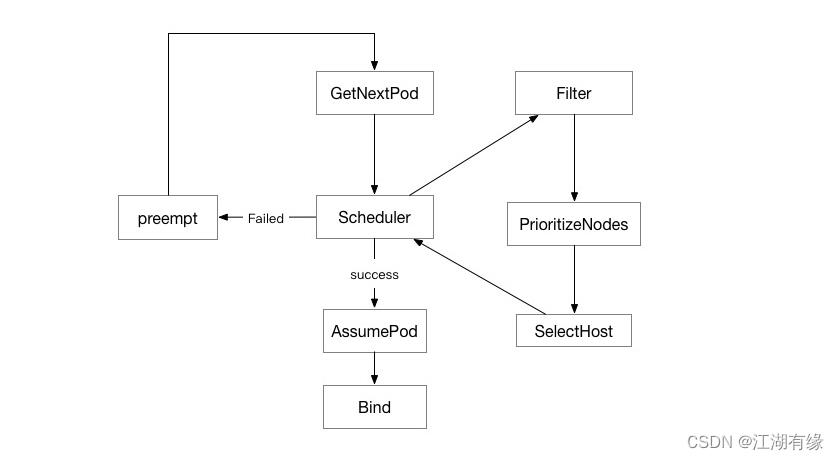
4.schedule调度器工作示意图

二、查看kubernetes状态
[root@k8s-master ~]# kubectl get nodes -owide
NAME         STATUS   ROLES                  AGE   VERSION   INTERNAL-IP     EXTERNAL-IP   OS-IMAGE                KERNEL-VERSION          CONTAINER-RUNTIME
k8s-master   Ready    control-plane,master   39h   v1.23.1   192.168.3.201   <none>        CentOS Linux 7 (Core)   3.10.0-957.el7.x86_64   containerd://1.6.6
k8s-node01   Ready    worker                 39h   v1.23.1   192.168.3.202   <none>        CentOS Linux 7 (Core)   3.10.0-957.el7.x86_64   containerd://1.6.6
k8s-node02   Ready    <none>                 39h   v1.23.1   192.168.3.203   <none>        CentOS Linux 7 (Core)   3.10.0-957.el7.x86_64   containerd://1.6.6
三、kube-scheduler的选择节点流程
1.预选
.预选环节主要作用是用于排除不满足条件的节点。
#一个pod中容器运行的资源按要求
resources:
    request:
       cpu: 1
       memory: 1Gi
2.优选
优选环节主要是对满足条件的节点进行打分。
打分的参考项
1.节点的实际资源占用
2.节点中pod的个数
3.节点中的cpu负载情况
4.节点中内存的使用情况
.......
3.终选
终选环节对节点按照打分做排序,找到分数最高节点,进行调度.
四、干预调度方法-标签选择器
1.标签选择器介绍
1.为指定的node打标签
2.为pod指定调度带有特定标签的节点
2.标签选择器的yaml写法
①查看所有节点标签
[root@k8s-master ~]# kubectl get nodes --show-labels
NAME         STATUS   ROLES                  AGE   VERSION   LABELS
k8s-master   Ready    control-plane,master   40h   v1.23.1   beta.kubernetes.io/arch=amd64,beta.kubernetes.io/os=linux,kubernetes.io/arch=amd64,kubernetes.io/hostname=k8s-master,kubernetes.io/os=linux,node-role.kubernetes.io/control-plane=,node-role.kubernetes.io/master=,node.kubernetes.io/exclude-from-external-load-balancers=
k8s-node01   Ready    worker                 40h   v1.23.1   beta.kubernetes.io/arch=amd64,beta.kubernetes.io/os=linux,kubernetes.io/arch=amd64,kubernetes.io/hostname=k8s-node01,kubernetes.io/os=linux,node-role.kubernetes.io/worker=
k8s-node02   Ready    <none>                 40h   v1.23.1   beta.kubernetes.io/arch=amd64,beta.kubernetes.io/os=linux,kubernetes.io/arch=amd64,kubernetes.io/hostname=k8s-node02,kubernetes.io/os=linux,type=dell730
②在yaml文件中选择标签
volumes:
- name: rootdir
  hostPath:
      path: /data/mysql
nodeSelector:
  #disk: ssd
  kubernetes.io/hostname=k8s-node01  #可以选择系统内置的独一无二的标签
containers:
- name: mysql
  image: mysql:5.7
  volumeMounts:
  - name: rootdir
    mountPath: /var/lib/mysql
3.运行一个完整pod示例
cat ./label.yaml
apiVersion: apps/v1
kind: Deployment
metadata:
  creationTimestamp: null
  labels:
    app: mysql
  name: mysql
spec:
  replicas: 1
  selector:
    matchLabels:
      app: mysql
  strategy:
  template:
    metadata:
      creationTimestamp: null
      labels:
        app: mysql
    spec:
      volumes:
      - name: datadir
        hostPath:
           path: /data/mysql
      nodeSelector:
        disk: ssd
        nodeType: cpu
      containers:
      - image: mysql:5.7
        name: mysql
        env:
        - name: MYSQL_ROOT_PASSWORD
          value: "redhat"
        volumeMounts:
        - name: datadir
          mountPath: /var/lib/mysql
4.给node02节点添加标签
[root@k8s-master ~]# kubectl label nodes k8s-node02 disk=ssd
node/k8s-node02 labeled
[root@k8s-master ~]# kubectl label nodes k8s-node02 nodeType=cpu
node/k8s-node02 labeled
5.创建pod
[root@k8s-master ~]# kubectl apply -f ./label.yaml
deployment.apps/mysql created
6.查看pod所在节点
[root@k8s-master ~]# kubectl get pod -owide |grep node02
elasticsearch-master-0                    1/1     Running   2 (7m54s ago)    29h   10.244.58.224   k8s-node02   <none>           <none>
fb-filebeat-lj5p7                         1/1     Running   3 (7m54s ago)    28h   10.244.58.221   k8s-node02   <none>           <none>
kb-kibana-5c46dbc5dd-htw7n                1/1     Running   1 (7m54s ago)    25h   10.244.58.222   k8s-node02   <none>           <none>
metric-metricbeat-5h5g5                   1/1     Running   2 (7m53s ago)    27h   192.168.3.203   k8s-node02   <none>           <none>
metric-metricbeat-758c5c674-ldgg4         1/1     Running   2 (7m54s ago)    27h   10.244.58.225   k8s-node02   <none>           <none>
mysql-59c6fc696d-qrjx9                    1/1     Running   0                13m   10.244.58.223   k8s-node02   <none>           <none>
五、干预调度方法——污点
1.污点taint介绍
污点:当一个节点被打伤taint标记时,默认情况下,任何pod都不会调度到该节点,即使这个节点被指定了标签选择器,必须选择这个节点,pod也不会运行到该节点,此时pod会pending。
2.污点类型
* preferNoSchedule:
尽可能的不调度

* NoSchedule: 不调度
当前node如果打伤污点之前已经有一些pod运行正在上面,当打上污点后,新的pod不会调度其上;但是已经运行的pod不会被驱逐

* NoExecute: 不调度 .
当前node如果打上污点之前已经有一些pod运行正在上面,当打上污点后,会立即驱逐现有pod
3.为工作节点创建污点
[root@k8s-master ~]# kubectl taint node k8s-node02 key1=value:NoSchedule
node/k8s-node02 tainted
[root@k8s-master ~]# kubectl taint node k8s-node02 key2=value:NoExecute
node/k8s-node02 tainted
4.删除工作节点上污点
kubectl taint node k8s-node02 key1-
5.查看某个节点的污点
[root@k8s-master ~]# kubectl describe nodes k8s-node02 |grep -i tain -A2 -B2
                    nodeType=cpu
                    type=dell730
Annotations:        kubeadm.alpha.kubernetes.io/cri-socket: /run/containerd/containerd.sock
                    node.alpha.kubernetes.io/ttl: 0
                    projectcalico.org/IPv4Address: 192.168.3.203/24
--
                    volumes.kubernetes.io/controller-managed-attach-detach: true
CreationTimestamp:  Sun, 03 Jul 2022 01:14:11 +0800
Taints:             key2=value:NoExecute
                    key1=value:NoSchedule
Unschedulable:      false
--
  Operating System:           linux
  Architecture:               amd64
  Container Runtime Version:  containerd://1.6.6
  Kubelet Version:            v1.23.1
  Kube-Proxy Version:         v1.23.1
六、干预调度方法——容忍
1.容忍toerations介绍
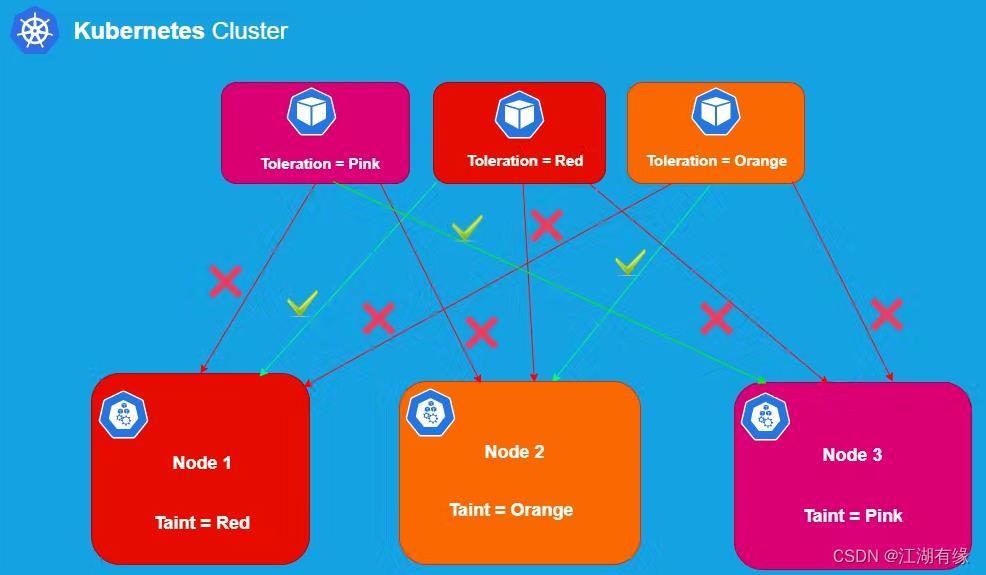
1.容忍:当一个pod能够容忍节点上的污点时,不代表,它就会选择这个节点,而对该pod而言,该节点和其他没有污点的节点一样.。
2.一个pod可以容忍多个污点,当一个节点上存在多个污点时,只有该pod容忍这个节点上所有的污点时,这个节点在这个pod面前才能表现的跟没有污点的节点一样。
2.容忍和污点的pod选择

3.在yaml文件中容忍用法
apiVersion: v1
kind: Pod
metadata:
  name: nginx
  labels:
    app: nginx
spec:
  containers:
  - name: nginx
    image: nginx:1.5.2
  tolerations:
  - key: "check"
    operator: "Equal"
    value: "xtaint"
    effect: "NoExecute"
    tolerationSeconds: 3600
4.容忍相关参数解释
tolerations:----------->容忍
- key: "check" ----------->容忍的键
  operator: "Equal"----------->操作符"等于"
  value: "xtaint"----------->容忍的键对应的键值
  effect: "NoExecute"----------->容忍的键对应的影响效果
  tolerationSeconds: 3600----------->容忍3600秒。这个pod也不会像普通pod那样立即被驱逐,而是再等上3600秒才被删除。
以上是关于kubernetes集群之调度系统的主要内容,如果未能解决你的问题,请参考以下文章