mask rcnn onnxruntime c++ 学习笔记
Posted 东东就是我
tags:
篇首语:本文由小常识网(cha138.com)小编为大家整理,主要介绍了mask rcnn onnxruntime c++ 学习笔记相关的知识,希望对你有一定的参考价值。
https://www.zhihu.com/question/37608201/answer/72766337
https://www.zhihu.com/question/31128857/answer/2183474280
1.指针和引用
1.1定义
C++primer中对 对象的定义:对象是指一块能存储数据并具有某种类型的内存空间一个对象a,它有值和地址&a,运行程序时,计算机会为该对象分配存储空间,来存储该对象的值,我们通过该对象的地址,来访问存储空间中的值指针p也是对象,它同样有地址&p和存储的值p,只不过,p存储的数据类型是数据的地址。如果我们要以p中存储的数据为地址,来访问对象的值,则要在p前加解引用操作符"",即p。对象有常量(const)和变量之分,既然指针本身是对象,那么指针所存储的地址也有常量和变量之分,指针常量是指,指针这个对象所存储的地址是不可以改变的,而指向常量的指针的意思是,不能通过该指针来改变这个指针所指向的对象。我们可以把引用理解成变量的别名。定义一个引用的时候,程序把该引用和它的初始值绑定在一起,而不是拷贝它。计算机必须在声明r的同时就要对它初始化,并且,r一经声明,就不可以再和其它对象绑定在一起了。实际上,你也可以把引用看做是通过一个常量指针来实现的,它只能绑定到初始化它的对象上。
1 .2 代码
引用的主要功能是传递函数的参数和返回值。C++语言中,函数的参数和返回值的传递方式有三种:值传递、指针传递和引用传递。
①:以下是“值传递”的示例程序。由于Func1 函数体内的x 是外部变量n 的一份拷贝,改变x 的值不会影响n, 所以n 的值仍然是0void Func1(int x)
    x = x + 10;

int n = 0;
Func1(n);
cout << “n = ” << n << endl; // n = 0
②:以下是“指针传递”的示例程序。由于Func2 函数体内的x 是指向外部变量n 的指针,改变该指针的内容将导致n 的值改变,所以n 的值成为10void Func2(int *x)
    (* x) = (* x) + 10;

⋯
int n = 0;
Func2(&n);
cout << “n = ” << n << endl; // n = 10
③:以下是“引用传递”的示例程序。由于Func3 函数体内的x 是外部变量n 的引用,x和n 是同一个东西,改变x 等于改变n,所以n 的值成为10void Func3(int &x)
    x = x + 10;

⋯
int n = 0;
Func3(n);
cout << “n = ” << n << endl; // n = 10
2.关键字
2.1 static
可以修饰全局变量、局部变量和函数,都表示范围的限定
2.1const
表示只读的意思,不可修改
https://www.jb51.net/article/216790.htm
https://blog.csdn.net/u014779536/article/details/111239643
3.vector
empty(); //判断容器是否为空
capacity(); //容器的容量 capacity一定会大于等于size
size(); //返回容器中元素的个数
resize(int num); //重新指定容器的长度为num,若容器变长,则以默认值填充新的位置;若容器变短,则末尾超出的元素被删除
resize(int num,elem); //重新指定容器的长度为num,若容器变长,则以elem数值填充新的位置;若容器变短,则末尾超出的元素被删除
push_back(elem); //尾部插入元素elem
pop_back(); //删除最后一个元素
insert(const_iterator pos, elem); //迭代器指向位置pos插入元素elem
insert(const_iterator pos, int count,elem); //迭代器指向位置pos插入count个元素elem
erase(const_iterator pos); //删除迭代器指向的元素
erase(const_iterator start,const_iterator end); //删除迭代器start到end之间的元素
clear(); //删除容器中所有元素
std::vector::emplace_back (C++11)
在序列尾部生成一个元素。
emplace_back() 的执行效率比 push_back() 高。因此,在实际使用时,建议大家优先选用 emplace_back()。
vector.reserve的优势 申请n个元素的内存空间
https://blog.csdn.net/qq_21033779/article/details/78921997
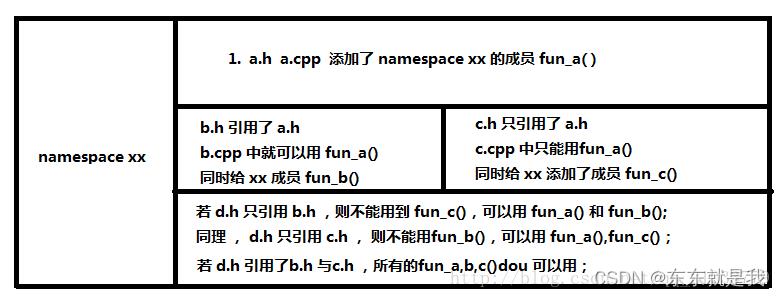
4.namesapce
5.std
5.1 std::pair
std::pair主要的作用是将两个数据组合成一个数据,两个数据可以是同一类型或者不同类型。
pair实质上是一个结构体,其主要的两个成员变量是first和second,
5.2 std::move
从实现上讲,std::move基本等同于一个类型转换:
5.3 std::optional
std::optional用来包装可以为空的类型
std::optional或者为空,或者包含一个有效值
std::optional emptyDouble = std::nullopt;
https://blog.csdn.net/lemonxiaoxiao/article/details/108603916
5.4 std::unique_ptr
unique_ptr独占管理对象,只有移动语义。
unique_ptr可以不占用对象,即为空。可以通过reset()或者赋值nullptr释放管理对象。
标准库早期版本中定了auto_ptr,它具有unique_ptr的部分特征,但不是全部。例如不能在容器中保存auto_ptr,不能从函数中返回auto_ptr等等,这也是unique_ptr主要的使用场景。
https://blog.csdn.net/qq_36268040/article/details/107292201
6.for
有以下几种形式:
1) for(auto elem : range)
创建range的拷贝,遍历时无法修改range中的元素。
2) for(auto& elem : range)
不创建range的拷贝,可以直接修改range中的元素,但一般用以下这种形式。
for(auto&& elem : range)
3)) for(const auto & elem : range)
不创建range的拷贝,只读range中的元素。
7.推理代码
//
// Copyright note: Redistribution and use in source, with or without modification, are permitted.
//
// Created: August 2017
//
// @author:  Andreas Richert
// @author:  Marco Dierschke
// SICK AG, Waldkirch
// email: TechSupport0905@sick.de

#include <cstdio>
#include <iostream>
#include <memory>
#include <sstream>

#include <boost/shared_ptr.hpp>
#include <boost/make_shared.hpp>

#include "VisionaryControl.h"
#include "CoLaParameterReader.h"
#include "CoLaParameterWriter.h"
#include "VisionarySData.h"    // Header specific for the Stereo data
#include "VisionaryDataStream.h"
#include "PointXYZ.h"
#include "PointCloudPlyWriter.h"

#include <chrono>
#include <thread>

#include <windows.h>
#include <windowsx.h>
#include "opencv.hpp" //opencv 的头文件
#include <opencv2/core/core.hpp>
#include <opencv2/opencv.hpp>
#include <opencv2/highgui/highgui.hpp>
#include <opencv2/imgproc/imgproc.hpp>

#include <vector>
#include <stdlib.h>
#include <algorithm>
#include <fstream>
#include <assert.h>
#include <iomanip>
#include <onnxruntime_cxx_api.h>
#include <cuda_provider_factory.h>
#include <onnxruntime_c_api.h>
#include <math.h>

using namespace cv;
using namespace std;
const float maskThreshold = 0.5;
const float classconfThresh = 0.5;
std::vector<Ort::Value> ort_inputs;
const cv::Scalar& meanVal = cv::Scalar(123.7, 116.8, 103.9);
std::array<float, 14> input_meta_ =  0, 640, 512, 3, 640, 512, 3, 0, 0, 640, 512, 1, 0, 0 ;
std::array<float, 1 * 640 * 512 * 3> input_images_;
std::array<float, 1 * 81840 * 4> input_anchors_;
std::vector<int64_t> anchors_dim =  1, 81840, 4 ;
std::vector<int64_t> images_dim =  1, 640, 512, 3 ;
std::vector<int64_t> metas_dim =  1, 14 ;
Ort::Value anchors_input_tensor_ nullptr ;
Ort::Value images_input_tensor_ nullptr ;
Ort::Value metas_input_tensor_ nullptr ;
using DataOutputType = std::pair<float*, std::vector<int64_t>>;


inline cv::Mat visualizeOneImageWithMask(const cv::Mat& img, const std::vector<std::array<float, 4>>& bboxes,
	const std::vector<uint64_t>& classIndices, const std::vector<cv::Mat>& masks, std::vector<PointXYZ>& pointCloud,const float maskThreshold = 0.5)

	cv::Mat result = img.clone();

	for (size_t i = 0; i < bboxes.size(); ++i)
		const auto& curBbox = bboxes[i];
		cv::Mat curMask = masks[i].clone();
		const cv::Scalar& curColor =  0,0,255 ;
		const std::string curLabel = "box";

		cv::rectangle(result, cv::Point(curBbox[0], curBbox[1]), cv::Point(curBbox[2], curBbox[3]), curColor, 2);

		int baseLine = 0;
		cv::Size labelSize = cv::getTextSize(curLabel, cv::FONT_HERSHEY_COMPLEX, 0.35, 1, &baseLine);
		cv::rectangle(result, cv::Point(curBbox[0], curBbox[1]),
			cv::Point(curBbox[0] + labelSize.width, curBbox[1] + static_cast<int>(1.3 * labelSize.height)),
			curColor, -1);
		cv::putText(result, curLabel, cv::Point(curBbox[0], curBbox[1] + labelSize.height), cv::FONT_HERSHEY_COMPLEX,
			0.35, cv::Scalar(255, 255, 255));

		// ---------------------------------------------------------------------//
		// Visualize masks

		const cv::Rect curBoxRect(cv::Point(curBbox[0], curBbox[1]), cv::Point(curBbox[2], curBbox[3]));

		cv::resize(curMask, curMask, curBoxRect.size());


		cv::Mat finalMask = (curMask > maskThreshold);

		cv::Mat coloredRoi = (0.3 * curColor + 0.7 * result(curBoxRect));

		coloredRoi.convertTo(coloredRoi, CV_8UC3);


		cv::Mat hierarchy;
		finalMask.convertTo(finalMask, CV_8U);
		std::vector<cv::Mat> contours;
		cv::findContours(finalMask, contours, hierarchy, cv::RETR_TREE, cv::CHAIN_APPROX_SIMPLE);
		for (auto elem : contours)
			//绘制轮廓的最小外接矩形  以curboxrect左上角坐标为00点
			RotatedRect rect = minAreaRect(elem);
			Point2f P[4];
			rect.points(P);
			vector<int> X_Contours;

			for (int j = 0; j <= 3; j++)

				line(result(curBoxRect), P[j], P[(j + 1) % 4], Scalar(255, 255, 255), 2);

			Point2f center=rect.center;
			float center_x = center.x+ curBbox[0];
			float center_y = center.y+ curBbox[1];
			Size2f wh=rect.size;
			float w = wh.width;
			float h = wh.height;
			float angle=rect.angle;
			PointXYZ xyz=pointCloud.at(center_x * img.rows + center_y);
			printf("中心点:x=%f,y=%f\\n", center_x, center_y);
			printf("长度:h=%f,w=%f\\n", h, w);
			printf("角度:angle=%f\\n", angle);
			printf("现实坐标:x=%f,y=%f,z=%f\\n", xyz.x,xyz.y,xyz.z);


		cv::drawContours(coloredRoi, contours, -1, curColor, 5, cv::LINE_8, hierarchy, 100);
		coloredRoi.copyTo(result(curBoxRect), finalMask);


	return result;


void OrtDetection(Mat& img, Ort::Session& session, std::vector<PointXYZ> & pointCloud)


	///1.Prepare for the "input_image"//

	cv::Mat img_;
	img.convertTo(img_, CV_32FC3);
	img_ -= meanVal;
	float* image_output = input_images_.data();
	fill(input_images_.begin(), input_images_.end(), 0.f);
	for (int i = 0; i < img.rows; ++i)
		for (int j = 0; j < img.cols; ++j)
			for (int c = 0; c < 3; ++c)
				image_output[c * img.rows * img.cols + i * img.cols + j] = img_.ptr<float>(i, j)[c];


	auto allocator_info = Ort::MemoryInfo::CreateCpu(OrtArenaAllocator, OrtMemTypeDefault);
	images_input_tensor_ = Ort::Value::CreateTensor<float>(allocator_info, input_images_.data(), input_images_.size(), images_dim.data(), images_dim.size());
	/2.Prepare for the "input_anchors"/

	std::ifstream data("anchors.txt");
	float* anchors_output = input_anchors_.data();
	fill(input_anchors_.begin(), input_anchors_.end(), 0.f);
	for (int c = 0; c < 1; c++)
		for (int i = 0; i < 81840; i++)
			for (int j = 0; j < 4; j++)
				data >> setprecision(20) >> anchors_output[c * 81840 * 4 + i * 4 + j]; //We load the matrix from TXT for the calculation process of anchors
																				 //is too complex to be tranferred from Python.


	anchors_input_tensor_ = Ort::Value::CreateTensor<float>(allocator_info, input_anchors_.data(), input_anchors_.size(), anchors_dim.data(), anchors_dim.size());

	/3.Prepare for the "input_image_meta"/

	metas_input_tensor_ = Ort::Value::CreateTensor<float>(allocator_info, input_meta_.data(), input_meta_.size(), metas_dim.data(), metas_dim.size());

	/4.Prepare for the model Inputs & Outputs indications/

	ort_inputs.push_back(std::move(images_input_tensor_));
	ort_inputs.push_back(std::move(metas_input_tensor_));
	ort_inputs.push_back(std::move(anchors_input_tensor_));

	std::vector<const char*> input_names =  "input_image", "input_image_meta", "input_anchors" ;
	const char* const output_names[] =  "mrcnn_detection", "mrcnn_class", "mrcnn_bbox" , "mrcnn_mask", "ROI", "rpn_class", "rpn_bbox" ;
	//for (size_t i = 0; i < 10; i++)
	//
	double timeStart = (double)cv::getTickCount();
	std::vector<Ort::Value> ort_outputs = session.Run(Ort::RunOptions nullptr , input_names.data(),
		ort_inputs.data(), ort_inputs.size(),
		output_names, 7);
	double nTime = ((double)cv::getTickCount() - timeStart) / cv::getTickFrequency以上是关于mask rcnn onnxruntime c++ 学习笔记的主要内容,如果未能解决你的问题,请参考以下文章