Android 进阶8:进程通信之 Binder 机制浅析
Posted 拭心
tags:
篇首语:本文由小常识网(cha138.com)小编为大家整理,主要介绍了Android 进阶8:进程通信之 Binder 机制浅析相关的知识,希望对你有一定的参考价值。
读完本文你将了解:
上篇文章 Android 进阶7:进程通信之 AIDL 中我们虽然跨进程通信成功,但是还是有很多疑问的,比如:
- AIDL 帮我们做了什么?
- 为什么要这么写?
- 什么是 Binder?
知其然还要知其所以然,一切都要从 Binder 讲起。
IBinder
Binder 继承自 IBinder,所以我们先来了解下它。
public class Binder implements IBinder ...
public interface IBinder ...
IBinder 是一个接口,它代表了一种跨进程传输的能力。只要实现了这个接口,就能将这个对象进行跨进程传递。
IBinder 是高性能、轻量级远程调用机制的核心部分,它定义了远程操作对象的基本接口。
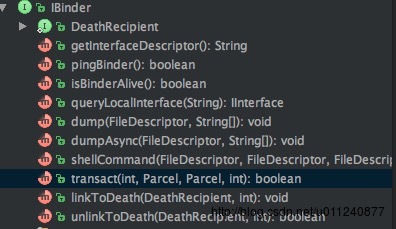
这些方法中最关键的一个是 transact():
public boolean transact(int code, Parcel data, Parcel reply, int flags)
    throws RemoteException;
与它对应的是 Binder.onTransact()
protected boolean onTransact(int code, Parcel data, Parcel reply,
        int flags) throws RemoteException ...
可以看到这两个方法非常相似,介绍一下方法中的各个参数:
code:要执行的动作,类似 Handler 的 msg.what,IBinder 中定义了以下几个 code
PING_TRANSACTION,表示要调用pingBinder()方法DUMP_TRANSACTION,表示要获取 Binder 内部状态SHELL_COMMAND_TRANSACTION,执行一个 shell 命令INTERFACE_TRANSACTION,询问被调用方的接口描述符号TWEET_TRANSACTIONLIKE_TRANSACTION- 如果我们需要自定义 code,code 的值范围需要在
FIRST_CALL_TRANSACTION(0x00000001) 和LAST_CALL_TRANSACTION(0x00ffffff) 之间
data,reply:传入的参数和返回的值flags:表示是否需要阻塞等待返回值,有两个值
- 0
FLAG_ONEWAY(0x00000001),表示 Client 的transact()是单向调用,执行后立即返回
①经常的场景是,我们调用 IBinder.transact() 给一个 IBinder 对象发送请求,然后经过 Binder Binder.onTransact() 得到调用,接着远程操作的目标得到对应的调用。
这个过程不仅在同一进程中可以进行,在跨进程(IPC)间也可以完成。
IBinder.transact()方法是同步的,它被调用后一直到Binder.onTransact()调用完成后才返回。
②通过 IBinder.transact() 方法传输的数据被保存为一个 Parcel 对象,Parcel 中保存了数据以及描述数据的元数据,元数据在缓存区中保持了 IBinder 对象的引用,这样不同进程都可以访问同一个数据。
因此在一个 IBinder 对象写入 Parcel 对象然后发送到另一个进程时,另外那进程将这个 IBinder 对象发送回去时,原本进程接收到的 IBinder 对象和开始发送出去的是同一个引用。
在跨进程传输后引用没有改变,这是非常关键的一点,这就使得 IBinder/Binder 对象在跨进程通信时可以作为唯一的标识(比如作为 token 什么的)。
③系统在每个进程中都有一个处理事物的线程池,这些线程用于调度其他进程对当前进程的跨进程访问。
比如说进程 A 对进程 B 发起 IPC 时,A 中调用 transact() 的线程会阻塞。B 中的事物线程池收到 A 的 IPC,调用目标对象的 Binder.onTransact() 方法,然后返回带结果的 Parcel。一旦接收到结果,A 中阻塞的线程得以继续执行。
这个过程和线程通信非常相似吧。
④Binder 机制还支持进程间的递归调用。
比如,进程 A 向进程 B 发起 IPC,而进程 B 在其 Binder.onTransact() 中又用 transact() 向进程 A 发起 IPC,那么进程 A 在等待它发出的调用返回的同时,也会响应 B 的调用,对调用的对象执行 Binder.onTransact() 方法。
这种机制可以让我们觉得到跨进程的调用与进程内的调用没什么区别,这是非常重要的。
⑤在跨进程通信时,我们常常想要知道另外进程是否可用,IBinder 提供了三个检查的方法:
transact()
- 当你调用的 IBinder 所在进程不存在时,会抛出
RemoteException异常
- 当你调用的 IBinder 所在进程不存在时,会抛出
pingBinder()
- 当远程进程不存在时该方法返回 false
linkToDeath()
- 这个方法可以向 IBinder 中注册一个
IBinder.DeathRecipient,它将在 IBinder 所在的进程退出时被调用
- 这个方法可以向 IBinder 中注册一个
/**
 * 检查远程 Binder 对象是否存在
 *
 * 当不存在时返回 false
 */
public boolean pingBinder();
/**
 * 注册一个 Binder 销毁的监听
   如果一个 Binder 被销毁(通常是它所在的进程被关闭),会回调 DeathRecipient 的 BinderDied 方法
 * 注意,只会监听远程的 Binder,本地 Binder 一般不会销毁,除非当前进程退出
 *
 * 如果要注册的 Binder 进程已经销毁,就抛出 RemoteException
 */
public void linkToDeath(DeathRecipient recipient, int flags)
        throws RemoteException;

/**
 * linkToDeath 注册监听回调的接口
 */
public interface DeathRecipient
    public void binderDied();
Binder
官方文档中建议:
日常开发中一般不需要我们再实现 IBinder,直接使用系统提供的 Binder 即可。
Binder 实现了 IBinder 定义的操作,它是 android IPC 的基础,平常接触到的各种 Manager(ActivityManager, ServiceManager 等),以及绑定 Service 时都在使用它进行跨进程操作。
它的存在不会影响一个应用的生命周期,只要创建它的进程在运行它就一直可用。
通常我们需要在顶级的组件(Service, Activity, ContentProvider)中使用它,这样系统才知道你的进程应该一直被保留。
下面介绍 Binder 的几个关键方法:
实现 IBinder 的 transact() 方法:
public final boolean transact(int code, Parcel data, Parcel reply,
        int flags) throws RemoteException
    if (false) Log.v("Binder", "Transact: " + code + " to " + this);

    if (data != null)
        data.setDataPosition(0);

    boolean r = onTransact(code, data, reply, flags);
    if (reply != null)
        reply.setDataPosition(0);

    return r;
可以看到,这个方法就是调用 onTransact() ,然后将返回的结果再返回回去。
接着看看 onTransact() 方法:
protected boolean onTransact(int code, Parcel data, Parcel reply,
        int flags) throws RemoteException
    if (code == INTERFACE_TRANSACTION)     //获取接口描述
        reply.writeString(getInterfaceDescriptor());
        return true;
     else if (code == DUMP_TRANSACTION)     //获取当前状态
        ParcelFileDescriptor fd = data.readFileDescriptor();
        String[] args = data.readStringArray();
        if (fd != null)
            try
                dump(fd.getFileDescriptor(), args);
             finally
                IoUtils.closeQuietly(fd);


        // Write the StrictMode header.
        if (reply != null)
            reply.writeNoException();
         else
            StrictMode.clearGatheredViolations();

        return true;
     else if (code == SHELL_COMMAND_TRANSACTION)     //执行 shell 脚本
        ParcelFileDescriptor in = data.readFileDescriptor();
        ParcelFileDescriptor out = data.readFileDescriptor();
        ParcelFileDescriptor err = data.readFileDescriptor();
        String[] args = data.readStringArray();
        ResultReceiver resultReceiver = ResultReceiver.CREATOR.createFromParcel(data);
        try
            if (out != null)
                shellCommand(in != null ? in.getFileDescriptor() : null,
                        out.getFileDescriptor(),
                        err != null ? err.getFileDescriptor() : out.getFileDescriptor(),
                        args, resultReceiver);

         finally
            IoUtils.closeQuietly(in);
            IoUtils.closeQuietly(out);
            IoUtils.closeQuietly(err);
            // Write the StrictMode header.
            if (reply != null)
                reply.writeNoException();
             else
                StrictMode.clearGatheredViolations();


        return true;

    return false;
也没看出什么特别的,系统的 Binder.onTransact() 方法只定义了系统要进行的操作,我们如果创建自己的 Binder 时,就需要重写这个方法,根据 code 对传入的参数 data 做相应的处理,然后写入 reply,这样就能返回操作后的数据。
另外一个关键的方法 attachInterface:
public void attachInterface(IInterface owner, String descriptor)
    mOwner = owner;
    mDescriptor = descriptor;

/* mObject is used by native code, do not remove or rename */
private long mObject;
private IInterface mOwner;
private String mDescriptor;
这个方法的作用是将一个描述符、特定的 IInterface 与当前 Binder 绑定起来,这样后续调用 queryLocalInterface 就可以拿到这个 IInterface,那 IInterface 又是什么呢?
public interface IInterface

    /**
     * Retrieve the Binder object associated with this interface.
     * You must use this instead of a plain cast, so that proxy objects
     * can return the correct result.
     */
    public IBinder asBinder();
其实看名字就可以大概猜出来,IInterface 应该就是进程间通信定义的通用接口,我们通过定义接口,然后再服务端实现接口、客户端调用接口,就可以实现跨进程通信。
IInterface 里只定义了一个 asBinder() 方法,这个方法可以返回当前接口关联的 Binder 对象。
Binder 通信机制
上面介绍了 Binder 类以及相关的方法,但是这只是 Binder 机制的最基础部分。
我们平常看的文章或者面试时,说的 Binder 其实是范围更大的整个 “Binder 消息通信机制”。
借用老罗的 Android进程间通信(IPC)机制Binder简要介绍和学习计划 中对 Binder 通信机制的介绍:
在 Android 系统的 Binder 机制中,由四个组件组成,分别是:
- Client
- Server
- ServiceManager:提供辅助管理 Server 的功能
- Binder 驱动程序:整个机制的核心
Binder 驱动
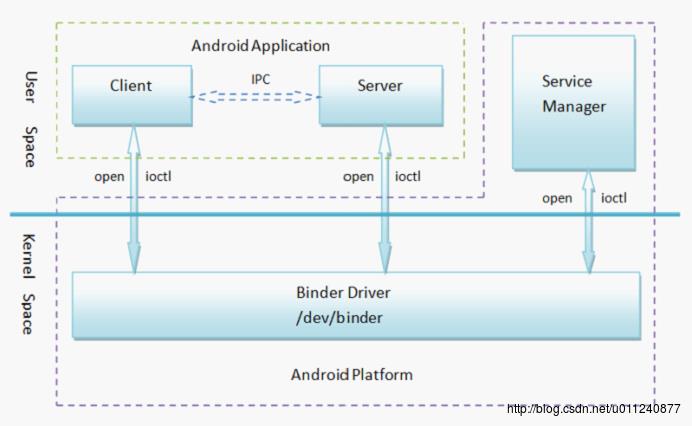
驱动程序一般指的是设备驱动程序(Device Driver),是一种可以使计算机和设备通信的特殊程序。相当于硬件的接口,操作系统只有通过这个接口,才能控制硬件设备的工作。
我们知道,在 Linux 系统中,内存空间分为两部分:
- 用户空间:运行着应用程序
- 内核空间:运行着系统内核和驱动

用户空间中的进程无法直接访问内核空间,需要通过上图中的 System Call Interface (系统调用接口),通过这个统一入口,所有资源访问都是在内核的控制下执行,这样可以避免用户程序对系统资源的越权访问,从而保障了系统的安全和稳定。
同样的,用户空间中的进程直接也不可以直接访问数据,需要通过内核空间进行中转。
在 Binder 机制中,由 Binder 驱动负责完成这个中转操作,主要过程如下:
- 当 Client 向 Server 发起 IPC 请求时,Client 会先将请求数据从用户空间拷贝到内核空间
- 数据被拷贝到内核空间之后,驱动程序将内核空间中的数据拷贝到 Server 位于用户空间的缓存中
这样,就成功的将 Client 进程中的请求数据传递到了 Server 进程中。
实际上,Binder 驱动是整个 Binder 机制的核心。除了实现数据传输之外,Binder 驱动还是实现线程控制(通过中断等待队列实现线程的等待/唤醒),以及 UID/PID 等安全机制的保证。
http://wangkuiwu.github.io/2014/09/01/Binder-Introduce/
Service Manager
ServiceManager 运行在用户空间,它负责管理 Service 注册与查询。
看下 ServiceManager 的代码:
public final class ServiceManager
    private static final String TAG = "ServiceManager";

    private static IServiceManager sServiceManager;
    private static HashMap<String, IBinder> sCache = new HashMap<String, IBinder>();

    private static IServiceManager getIServiceManager()
        if (sServiceManager != null)
            return sServiceManager;


        // Find the service manager
        sServiceManager = ServiceManagerNative.asInterface(BinderInternal.getContextObject());
        return sServiceManager;


    /**
     * 根据 Service 名称获取 Service
     */
    public static IBinder getService(String name)
        try
            IBinder service = sCache.get(name);
            if (service != null)
                return service;
             else
                //如果不存在就去 IServiceManager 中找,这时可能会阻塞
                return getIServiceManager().getService(name);

         catch (RemoteException e)
            Log.e(TAG, "error in getService", e);

        return null;


    /**
     * 添加一个 Service 到 Manager 中
     */
    public static void addService(String name, IBinder service)
        try
            getIServiceManager().addService(name, service, false);
         catch (RemoteException e)
            Log.e(TAG, "error in addService", e);


    /**
     * 添加一个 Service 到 Manager 中,如果 allowIsolated 为 true 表示运行在沙盒中的进程也可以访问这个 Service

     */
    public static void addService(String name, IBinder service, boolean allowIsolated)
        try
            getIServiceManager().addService(name, service, allowIsolated);
         catch (RemoteException e)
            Log.e(TAG, "error in addService", e);


    /**
     * Retrieve an existing service called @a name from the
     * service manager.  Non-blocking.
     */
    public static IBinder checkService(String name)
        try
            IBinder service = sCache.get(name);
            if (service != null)
                return service;
             else
                return getIServiceManager().checkService(name);

         catch (RemoteException e)
            Log.e(TAG, "error in checkService", e);
            return null;


    /**
     * 获取 Service 列表
     */
    public static String[] listServices()
        try
            return getIServiceManager().listServices();
         catch (RemoteException e)
            Log.e(TAG, "error in listServices", e);
            return null;


    /**
     * 当前进程首次被 activity manager 创建时调用这个方法
     */
    public static void initServiceCache(Map<String, IBinder> cache)
        if (sCache.size() != 0)
            throw new IllegalStateException("setServiceCache may only be called once");

        sCache.putAll(cache);
可以看到 ServiceManager 提供了 Service 的添加和查询,其中主要操作都是通过 IServiceManager,它是何方神圣?
public interface IServiceManager extends IInterface

    /**
     * 获取一个 Service,不存在就会阻塞几秒
     */
    public IBinder getService(String name) throws RemoteException;

    /**
     * 不阻塞的获取 Service
     */
    public IBinder checkService(String name) throws RemoteException;

    public void addService(String name, IBinder service, boolean allowIsolated)
                throws RemoteException;

    public String[] listServices() throws RemoteException;

    /**
     * 为 Service Manager 添加权限,具体作用暂不追究
     */
    public void setPermissionController(IPermissionController controller)
            throws RemoteException;

    static final String descriptor = "android.os.IServiceManager";

    //定义了一些用于调用 transact() 方法的 code
    int GET_SERVICE_TRANSACTION = IBinder.FIRST_CALL_TRANSACTION;
    int CHECK_SERVICE_TRANSACTION = IBinder.FIRST_CALL_TRANSACTION+1;
    int ADD_SERVICE_TRANSACTION = IBinder.FIRST_CALL_TRANSACTION+2;
    int LIST_SERVICES_TRANSACTION = IBinder.FIRST_CALL_TRANSACTION+3;
    int CHECK_SERVICES_TRANSACTION = IBinder.FIRST_CALL_TRANSACTION+4;
    int SET_PERMISSION_CONTROLLER_TRANSACTION = IBinder.FIRST_CALL_TRANSACTION+5;
可以看到 IServiceManager 是一个接口,它定义了管理 Service 的一些方法,同时继承了 IInterface。最常见的实现是 BnServiceManager.getDefault()。
Binder 机制跨进程通信流程
上面两节简单介绍了 Binder 机制中非常重要的两部分,ServiceManager 和 Binder 驱动。
在 Binder 机制的四个部分中, Client、Server 和 ServiceManager 运行在用户空间,Binder 驱动程序运行内核空间。
Binder 就是一种把这四个组件粘合在一起的粘结剂。
这个流程是如何进行的呢?
借用 Android Binder机制(一) Binder的设计和框架 的图片:
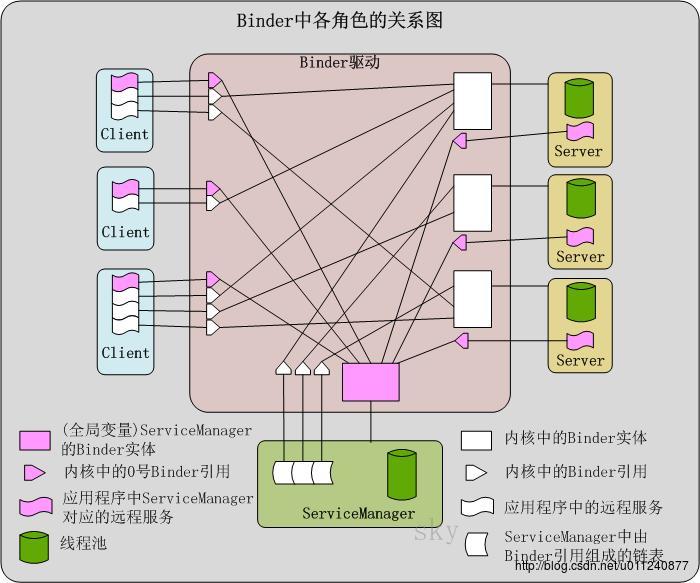
上图简单介绍(节选自 http://wangkuiwu.github.io/2014/09/01/Binder-Introduce/):
- Binder实体
- Binder 实体实际上是内核中
binder_node结构体的对象,它的作用是在内核中保存 Server 和ServiceManager 的信息(例如,Binder 实体中保存了 Server 对象在用户空间的地址) - Binder 实体是 Server 在 Binder 驱动中的存在形式,内核通过 Binder 实体可以找到用户空间的Server对象
- 在上图中,Server 和 ServiceManager 在 Binder 驱动中都对应的存在一个 Binder 实体
- Binder 实体实际上是内核中
- Binder 引用
- Binder引用实际上是内核中
binder_ref结构体的对象,是某一个 Binder 实体的引用,通过Binder 引用可以在内核中找到对应的 Binder 实体 - 如果将 Server 看作是 Binder 实体的话,那么 Client 就好比 Binder 引用,Client 通过保存一个Server 对象的 Binder 引用,再通过该 Binder 引用在内核中找到对应的 Binder 实体,进而找到Server 对象,然后将通信内容发送给 Server 对象
- Binder引用实际上是内核中
- 远程服务
- 本地服务的代理,通过调用远程服务可以间接调用本地服务
1.Client、Server 和 ServiceManager 处于用户空间的不同进程。
2.Binder 实体和 Binder 引用都是内核(即 Binder 驱动)中的数据结构。
它们的关系如下:

每一个 Server 在内核中就表现为一个 Binder 实体,而每一个 Client 则表现为一个 Binder 引用。这样,每个 Binder 引用都对应一个 Binder 实体,而每个 Binder 实体则可以多个 Binder 引用。
Binder 跨进程通讯流程主要为如下 4 步:
- ServiceManager 初始化
- 当该应用程序启动时,ServiceManager 会和 Binder 驱动进行通信,告诉 Binder 驱动它是服务管理者
- Binder 驱动新建 ServiceManager 对应的 Binder 实体
- Server 向 ServiceManager 注册自己
- Server 向 Binder 驱动发起注册请求,Binder 为它创建 Binder 实体
- 然后如果 ServiceManager 中没有这个 Server 时就添加 Server 名称与 Binder 引用到它的 Binder 引用表
- Client 获取远程服务
- Client 首先会向 Binder 驱动发起获取服务的请求,传递要获取的服务名称
- Binder 驱动将该请求转发给 ServiceManager 进程
- ServiceManager 查找到 Client 需要的 Server 对应的 Binder 实体的 Binder 引用信息,然后通过 Binder 驱动反馈给 Client
- Client 收到 Server 对应的 Binder 引用后,会创建一个 Server 对应的远程服务(即 Server 在当前进程的代理)
- Client 通过代理调用 Server
- Client 调用远程服务,远程服务收到 Client 请求之后,会和 Binder 驱动通信
- 因为远程服务中有 Server 的 Binder 引用信息,因此驱动就能轻易的找到对应的 Server,进而将Client 的请求内容发送 Server
Binder 机制的优点
对比 Linux 上的其他进程通信方式(管道/消息队列/共享内存/信号量/Socket),Binder 机制的优点有以下几点:
高效简单
- 通过驱动在内核空间拷贝数据,不需要额外的同步处理
- 对比 Socket 等传输效率高
安全
- Binder 机制为每个进程分配了 UID/PID 来作为鉴别身份的标示,并且在 Binder 通信时会根据UID/PID 进行有效性检测
Client/Server 架构
- 这种架构使得通讯更为简单
总结
Binder 机制的学习过程是痛苦的 T.T,即使光看 Java 层也费了不少功夫,这可能是由于我实战中没有遇到,光看源码和抽象概念掌握太慢的原因吧。
本文简单介绍了 Binder 机制,参考了很多优秀的文章,真佩服他们!
借用《Android 开发艺术探索》对 Binder 的概括:
- 从代码角度来看,Binder 是一个类,实现了 IBinder 接口;
- 从来源看,Binder 来自于 OpenBinder,是 Android IPC 机制中的一种,Binder 还可以理解成一个虚拟物理设备,设备驱动是dev/binder;
- 从 Framework 层看,Binder 是 Service Manager 连接各种Manager(ActivityManager,PackageManager…) 和相应Service (ActivityManagerService, PackageManagerService…) 的桥梁;
- 从客户端看,Binder 是客户端服务器通讯的媒介
在对 Binder 有了一定理解后,下篇文章我们就去看看 AIDL 帮我们做了什么。
Thanks
《Android 开发艺术探索》
https://developer.android.com/reference/android/os/IBinder.html
http://blog.csdn.net/luoshengyang/article/details/6618363
http://blog.csdn.net/luoshengyang/article/details/6642463
http://weishu.me/2016/01/12/binder-index-for-newer/
http://wangkuiwu.github.io/2014/09/01/Binder-Introduce/
http://blog.csdn.net/u010132993/article/details/72582655
以上是关于Android 进阶8:进程通信之 Binder 机制浅析的主要内容,如果未能解决你的问题,请参考以下文章