Pytorch学习笔记——Sequential类参数管理与GPU
Posted raelum
tags:
篇首语:本文由小常识网(cha138.com)小编为大家整理,主要介绍了Pytorch学习笔记——Sequential类参数管理与GPU相关的知识,希望对你有一定的参考价值。
目录
一、torch.nn.Sequential
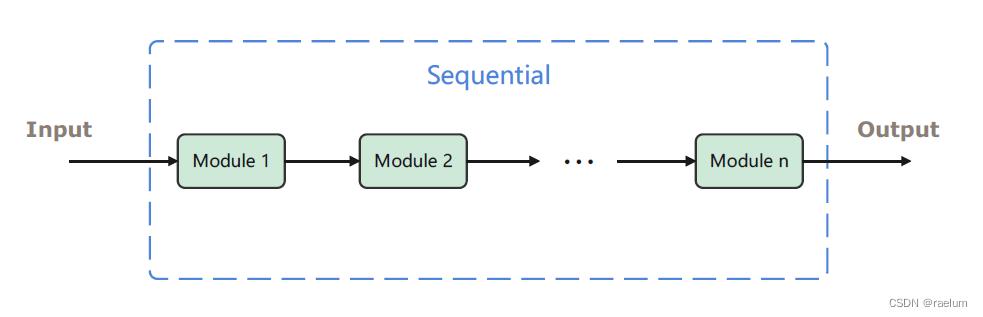
Sequential 本质是一个模块(即 Module),根据Pytorch中的约定,模块中可以继续添加模块。这意味着我们可以在 Sequential 中添加其它的模块(自然也就可以添加其他的 Sequential)。添加完成后,Sequential 会将这些模块组成一个流水线,输入将依次通过这些模块得到一个输出,如下图所示:
对应的代码如下:
from torch import nn

myseq = nn.Sequential(
    # Module 1
    # Module 2
    # ...
    # Module n
)
因为 nn.Linear 和 nn.ReLU 也都是模块,所以我们可以将这些模块稍加组合放进 myseq 中以构建一个简单的神经网络。
以单隐层网络为例,假设输入层、隐层和输出层神经元的个数分别为 20 , 10 , 5 20, 10, 5 20,10,5,隐层激活函数采用 ReLU,则我们的网络可写为
net = nn.Sequential(
    nn.Linear(20, 10),
    nn.ReLU(),
    nn.Linear(10, 5)
)
在训练场景下,我们可以向定义好的 net 投喂一个 batch 的样本,假设 batch 的大小为
3
3
3,net 将返回一个 batch 的输出
torch.manual_seed(42)
X = torch.randn(3, 20)
net(X)
# tensor([[ 0.0092, -0.3154, -0.1202, -0.2654,  0.1336],
#         [-0.0042, -0.2338, -0.1788, -0.5513, -0.6258],
#         [ 0.0731, -0.4427, -0.3108,  0.1791,  0.1614]],
#        grad_fn=<AddmmBackward0>)
1.1 Sequential 的基础操作
通过打印 Sequential 对象来查看它的结构
print(net)
# Sequential(
#   (0): Linear(in_features=20, out_features=10, bias=True)
#   (1): ReLU()
#   (2): Linear(in_features=10, out_features=5, bias=True)
# )
像对待Python列表那样,我们可以使用索引来查看其子模块,也可以查看 Sequential 有多长
print(net[0])
# Linear(in_features=20, out_features=10, bias=True)
print(net[1])
# ReLU()
print(len(net))
# 3
当然,我们还可以修改、删除、添加子模块:
net[1] = nn.Sigmoid()
print(net)
# Sequential(
#   (0): Linear(in_features=20, out_features=10, bias=True)
#   (1): Sigmoid()
#   (2): Linear(in_features=10, out_features=5, bias=True)
# )

del net[2]
print(net)
# Sequential(
#   (0): Linear(in_features=20, out_features=10, bias=True)
#   (1): Sigmoid()
# )

net.append(nn.Linear(10, 2))  # 均会添加到末尾
print(net)
# Sequential(
#   (0): Linear(in_features=20, out_features=10, bias=True)
#   (1): Sigmoid()
#   (2): Linear(in_features=10, out_features=2, bias=True)
# )
目前(Version 1.11.0),如果使用
del删除的子模块不是最后一个,可能就会出现一些 bug? 例如索引不连续,无法继续添加子模块等。
当然,Sequential 对象本身就是一个可迭代对象,所以我们还可以使用 for 循环来打印所有子模块:
net = nn.Sequential(
    nn.Linear(20, 10),
    nn.ReLU(),
    nn.Linear(10, 5)
)

for sub_module in net:
    print(sub_module)
# Linear(in_features=20, out_features=10, bias=True)
# ReLU()
# Linear(in_features=10, out_features=5, bias=True)
1.2 手动实现一个 Sequential
为了加深理解,接下来我们从0开始手动实现 Sequential (当然不会与官方的一样,只是为了便于理解)。
我们需要先完成最基础的功能,即将各个模块传入 Sequential 后,Sequential 能对这些模块进行组装并拥有正向传播功能:
class MySeq(nn.Module):
    def __init__(self, *args):
        super().__init__()
        for idx, module in enumerate(args):
            self._modules[str(idx)] = module

    def forward(self, inputs):
        for module in self._modules.values():
            inputs = module(inputs)
        return inputs
尝试正向传播:
torch.manual_seed(42)
myseq = MySeq(nn.Linear(20, 10), nn.ReLU(), nn.Linear(10, 5))
X = torch.rand(3, 20)
myseq(X)
# tensor([[ 0.2056, -0.5307, -0.0023, -0.0309,  0.1289],
#         [ 0.0681, -0.4473,  0.2085, -0.1179,  0.1157],
#         [ 0.1187, -0.5331,  0.0530, -0.0466,  0.0874]],
#        grad_fn=<AddmmBackward0>)
可以看出我们实现的 MySeq 能够得到正确的输出。但很显然,目前实现的 MySeq 功能太少,还需要实现索引、赋值、删除、添加等操作:
class MySeq(nn.Module):

    def __init__(self, *args):
        super().__init__()
        for idx, module in enumerate(args):
            self._modules[str(idx)] = module

    def __getitem__(self, idx):
        return self._modules[str(idx)]

    def __setitem__(self, idx, module):
    	assert idx < len(self)
        self._modules[str(idx)] = module

    def __delitem__(self, idx):
        for i in range(idx, len(self) - 1):
            self._modules[str(i)] = self._modules[str(i + 1)]
        del self._modules[str(len(self) - 1)]

    def __len__(self):
        return len(self._modules)

    def append(self, module):
        new_idx = int(list(self._modules.keys())[-1]) + 1
        self._modules[str(new_idx)] = module

    def forward(self, inputs):
        for module in self._modules.values():
            inputs = module(inputs)
        return inputs
到这里,我们的 MySeq 就算大功告成了,并且使用 del 方法不会出现bug。
1.3 Sequential 嵌套
Sequential 本身就是一个模块,而模块可以嵌套模块,这说明 Sequential 可以嵌套 Sequential。
例如,在一个 Sequential 中嵌套两个 Sequential:
seq_1 = nn.Sequential(nn.Linear(15, 10), nn.ReLU(), nn.Linear(10, 5))
seq_2 = nn.Sequential(nn.Linear(25, 15), nn.Sigmoid(), nn.Linear(15, 10))
seq_3 = nn.Sequential(seq_1, seq_2)
print(seq_3)
# Sequential(
#   (0): Sequential(
#     (0): Linear(in_features=15, out_features=10, bias=True)
#     (1): ReLU()
#     (2): Linear(in_features=10, out_features=5, bias=True)
#   )
#   (1): Sequential(
#     (0): Linear(in_features=25, out_features=15, bias=True)
#     (1): Sigmoid()
#     (2): Linear(in_features=15, out_features=10, bias=True)
#   )
# )
我们依然可以像列表那样使用多级索引进行访问:
print(seq_3[1])
# Sequential(
#   (0): Linear(in_features=25, out_features=15, bias=True)
#   (1): Sigmoid()
#   (2): Linear(in_features=15, out_features=10, bias=True)
# )
print(seq_3[0][1])
# ReLU()
还可以使用双重循环进行遍历:
for seq in seq_3:
    for module in seq:
        print(module)
# Linear(in_features=15, out_features=10, bias=True)
# ReLU()
# Linear(in_features=10, out_features=5, bias=True)
# Linear(in_features=25, out_features=15, bias=True)
# Sigmoid()
# Linear(in_features=15, out_features=10, bias=True)
可能会有读者好奇,给定输入 inputs,它是如何在 seq_3 中进行传递的呢?
其实很显然,inputs 首先会进入 seq_1 通过一系列模块得到一个输出,该输出会作为 seq_2 的输入,然后通过 seq_2 的一系列模块后又可以得到一个输出,而这个输出就是最终的输出了。
注意,本节的例子并不能将输入转化为输出,因为形状不匹配,需要修改成类似于如下这种:
seq_1 = nn.Sequential(nn.Linear(30, 25), nn.ReLU(), nn.Linear(25, 20))
seq_2 = nn.Sequential(nn.Linear(20, 15), nn.Sigmoid(), nn.Linear(15, 10))
seq_3 = nn.Sequential(seq_1, seq_2)
1.4 自定义层
Sequential 中的模块又称为层,我们完全不必局限于 torch.nn 中提供的各种层,通过继承 nn.Module 我们可以自定义层并将其添加到 Sequential 中。
1.4.1 不带参数的层
定义一个中心化层,它能够将输入减去其均值后再返回:
class CenteredLayer(nn.Module):
    def __init__(self):
        super().__init__()

    def forward(self, X):
        return X - X.mean()
我们可以来检验一下该层是否真的起到了作用:
torch.manual_seed(42)
net = nn.Sequential(nn.Linear(64, 30), CenteredLayer())
X = torch.randn(3, 64)
print(net(X).mean())
# tensor(-5.2982e-09, grad_fn=<MeanBackward0>)
输出结果足够小可以近似视为0,说明自定义层起到了作用。
1.4.2 带参数的层
依旧以单隐层网络为例,大多数时候,我们希望自定义每个层的神经元个数,因此在自定义层时需要传入相应的参数。
class Net(nn.Module):
    def __init__(self, input_nodes, hidden_nodes, output_nodes):
        super().__init__()
        self.inodes = input_nodes
        self.hnodes = hidden_nodes
        self.onodes = output_nodes
        self.model = nn.Sequential(
            nn.Linear(self.inodes, self.hnodes),
            nn.ReLU(),
            nn.Linear(self.hnodes, self.onodes)
        )

    def forward(self, inputs):
        return self.model(inputs)
分别设置输出层、隐层和输出层结点数为 784 , 256 , 8 784,256,8 784,256,8:
torch.manual_seed(42)
net = Net(784, 256, 8)
X = torch.randn(5, 784)
print(net(X))
# tensor([[ 0.2291, -0.3913, -0.1745, -0.2685, -0.2684,  0.0760,  0.0071, -0.0337],
#         [ 0.2084,  0.1235, -0.1054, -0.0508,  0.0194, -0.0429, -0.3269,  0.1890],
#         [-0.0756, -0.4335, -0.1643, -0.1817, -0.2376, -0.1399,  0.2710, -0.3719],
#         [ 0.4110, -0.2428, -0.1021, -0.1019, -0.0550, -0.0890,  0.1430,  0.0881],
#         [ 0.0626, -0.4117,  0.0130,  0.1339, -0.2529, -0.1106, -0.2586,  0.2205]],
#        grad_fn=<AddmmBackward0>)
二、参数管理
2.1 nn.Parameter
nn.Parameter 是 Tensor 的子类,可以被视为一种特殊的张量,它可被用作模块的参数,具体使用格式如下:
nn.Parameter(data, requires_grad=True)
其中 data 为待传入的 Tensor,requires_grad 默认为 True。
事实上,torch.nn 中提供的模块中的参数均是 nn.Parameter 类,例如:
module = nn.Linear(3, 3)
type(module.weight)
# torch.nn.parameter.Parameter
type(module.bias)
# torch.nn.parameter.Parameter
在我们自定义的模块中,只有使用 nn.Parameter 构建的参数才会被视为模块的参数,此时调用 parameters() 方法会显示这些参数。读者可自行体会以下两端代码:
""" 代码片段一 """
class Net(nn.Module):
    def __init__(self):
        super().__init__()
        self.weight = torch.randn(3, 3)
        self.bias = torch.randn(3)

    def forward(self, inputs):
        pass


net = Net()
print(list(net.parameters()))
# []


""" 代码片段二 """
class Net(nn.Module):
    def __init__(self):
        super().__init__()
        self.weight = nn.Parameter(torch.randn(3, 3))
        self.bias = nn.Parameter(torch.randn(3))

    def forward(self, inputs):
        pass


net = Net()
print(list(net.parameters()))
# [Parameter containing:
# tensor([[-0.4584,  0.3815, -0.4522],
#         [ 2.1236,  0.7928, -0.7095],
#         [-1.4921, -0.5689, -0.2342]], requires_grad=True), Parameter containing:
# tensor([-0.6971, -0.7651,  0.7897], requires_grad=True)]
从以上结果可以得知,如果自定义模块中有些参数必须要手动构建而不能使用现成的模块,则最好使用 nn.Parameter 去构建。这样后续查看模块的参数或使用优化器更新模块的参数只需调用 parameters() 方法即可。
nn.Parameter 相当于把传入的数据包装成一个参数,如果要直接访问/使用其中的数据而非参数本身,可对 nn.Parameter 对象调用 data 属性:
a = torch.tensor([1, 2, 3]).to(torch.float32)
param = nn.Parameter(a)
print(param)
# Parameter containing:
# tensor([1., 2., 3.], requires_grad=True)
print(param.data)
# tensor([1., 2., 3.])
2.2 参数访问
nn.Module 中有 state_dict() 方法(官网链接),该方法将以字典形式返回模块的所有状态,包括模块的参数和 persistent buffers (博主目前还不太理解后者,暂时略过),字典的键就是对应的参数/缓冲区的名称。
由于所有模块都继承 nn.Module,因此我们可以对任意的模块调用 state_dict() 方法以查看状态:
linear_layer = nn.Linear(2, 2)
print(linear_layer.state_dict())
# OrderedDict([('weight', tensor([[ 0.2602, -0.2318],
#         [-0.5192,  0.0130]])), ('bias', tensor([0.5890, 0.2476]))])
print(linear_layer.state_dict().keys())
# odict_keys(['weight', 'bias'])
对于线性层,除了 state_dict() 之外,我们还可以对其直接调用相应的属性,如下:
linear_layer = nn.Linear(2, 1)
print(linear_layer.weight)
# Parameter containing:
# tensor([[-0.1990,  0.3394]], requires_grad=True)
print(linear_layer.bias)
# Parameter containing:
# tensor([0.2697], requires_grad=True)
需要注意的是以上返回的均为参数对象,如需使用其中的数据,可调用 data 属性。
当然我们还可以对 nn.Linear 实例调用 parameters() 和 named_parameters() 方法来获取其中的参数(对任何模块都可以调用这两个方法),具体可参考我的上一篇笔记,这里不再赘述。
2.3 参数初始化
以神经网络为例,当我们创建一个 nn.Linear(a, b) 的实例后,其中的参数就自动初始化了,其权重和偏置均从均匀分布
U
(
−
1
/
a
,
1
/
a
)
U(-1/\\sqrta,1/\\sqrta)
U(−1/a,1/a) 中随机采样而来。
但有些时候,我们可能想使用其他的分布进行初始化,这时候可以考虑Pytorch中内置的初始化器 torch.nn.init 或自定义初始化。
2.3.1 使用内置初始化
对于下面的单隐层网络,我们想对其中的两个线性层应用内置初始化器
class Net(nn.Module):
    def __init__(self):
        super().__init__()
        self.layers = nn.Sequential(
            nn.Linear(3, 2),
            nn.ReLU(),
            nn.Linear(2, 3),
        )

    def forward(self, X):
        return self.layers(X)
假设权重从 N ( 0 , 1 ) \\mathcalN(0,1) N(0,1) 中采样,偏置全部初始化为 0 0 0,则初始化代码如下
def init_normal(module):
    # 需要判断子模块是否为nn.Linear类,因为激活函数没有参数
    if type(module) == nn.Linear:
        nn.init.normal_(module.weight, mean=0, std=1)
        nn.init.zeros_(module.bias)
net = Net()
net.apply(init_normal)
for param in net.parameters():
    print(param)
# Parameter containing:
# tensor([[-0.3560,  0.8078, -2.4084],
#         [ 0.1700, -0.3217, -1.3320]], requires_grad=True)
# Parameter containing:
# tensor([0., 0.], requires_grad=True)
# Parameter containing:
# tensor([[-0.8025, -1.0695],
#         [-1.7031, -0.3068],
#         [-0.3499,  0.4263]], requires_grad=True)
# Parameter containing:
# tensor([0., 0., 0.], requires_grad=True)
对 net 调用 apply 方法则会递归地对其下所有的子模块应用 init_normal 函数。
2.3.2 自定义初始化
如果我们想要自定义初始化,例如使用以下的分布来初始化网络的权重:
w
∼
U
(
5
,
10
以上是关于Pytorch学习笔记——Sequential类参数管理与GPU的主要内容,如果未能解决你的问题,请参考以下文章