微信应用号开发知识贮备之altjs的Action和Store
Posted 天地会珠海分舵
tags:
篇首语:本文由小常识网(cha138.com)小编为大家整理,主要介绍了微信应用号开发知识贮备之altjs的Action和Store相关的知识,希望对你有一定的参考价值。
天地会珠海分舵注:随着微信应用号的呼之欲出,相信新一轮的APP变革即将发生。作为行业内人士,我们很应该去拥抱这个趋势。其中Reactjs相信是开发webapp的佼佼者,这段时间将会通过改造官方实例alt-tutorial来学习Reactjs相关的知识。
通过上一篇文章《微信应用号开发知识贮备之打通React Component任督二脉》我们学习了AltContainer是如何通过对Component职责的解绑,让Component的尽可能的关注在如何进行页面渲染的逻辑上去,而不需要去管该如何获取数据,该如何监听状态是否改变是否需要重新渲染的逻辑,从而让整个组件更容易重用
今天我们将会对altjs框架的Action和Store进行学习。同时会对alt-tutorial的代码进行重构,让其更简洁且职责分明。
1. alt Action
1.1 flux Action vs. alt Action
上一篇我们接触的View是负责页面的渲染,而这一篇谈及的Action,在flux中则代表着一个命令,一个携带了数据的命令。这个命令会被View在适当的时候通知要发射,然后由Dispatcher发放出去,最后由监听的Store所接收处理。
而在alt中,alt的Action事实上包含了以上的两个方面:
- flux意义上的Action: 作为一个View和Store之间的命令和数据传递的载体
- flux意义上的Dispatcher: 封装了Dispatcher的功能
所以通过alt框架来编写项目的时候:
- 我们根本不需要处理如何调用Dispatcher
- 我们也不需要编写Dispatcher,因为alt的Store本身就包含了Dispatcher的功能
1.2. 从creatActions到generateActions
根据官方文档,alt提供了两个api来进行Action的创建:
- createActions
- generateActions
根据官方的API文档所阐述,它们有一定的联系和区别。其中createActions:
- 接受的是一个定义了各种Actions的Class作为参数。
- 所定义的各个Action需要指定dispatch到store的数据。
最终返回是:
- 返回一个对象,该对象包含了所定义的所有Actions。
我们的alt-tutorial其实就是用了这种方式来对Actions进行创建。我们打开源码src/LocationActions.js:
var alt = require('../alt');

class LocationActions
  updateLocations(locations)
    return locations;


  fetchLocations()
    return null;


  locationsFailed(errorMessage)
    return errorMessage;


  favoriteLocation(location)
    return location;


module.exports = alt.createActions(LocationActions);
其实alt还提供了另外一种更简介的创建Actions的方式,那就是generateActions。通过这个api,我们不需要为各种Actions创建一个类,而只需要指定这些Actions的名字就好了,其它一切都会由alt来帮我们搞定。
相对createActions来说generateActions有这些特点:
- 接受一个由Action名称组成的列表作为参数,而不是一个Class。
- 不需要像createActions一样需要显式指定任何dispatch的数据,因为genreateActions内部已经帮我们处理好。
可以看出来,使用genreateActions来创建Actions将会让代码更加简单。
下面我们将上面的LocationActions的Actions创建方式从createActions改写成genreateActions:
var alt = require('../alt');
module.exports  = alt.generateActions(
    'updateLocations',
    'fetchLocations',
    'locationsFailed',
    'favoriteLocation'
);
通过执行运行命令:
npm run dev我们就可以看到最终的执行效果,和我们前几章描述的没有什么区别。
1.3. Action全局标志符CONSTANT
1.3.1. CONSTANT的作用
当alt的Dispatcher去dispatch一个action,以及当Store去监听一个action的时候,将需要用到这个action的一个全局标志符,官方叫法就是:constant。
action.CONSTANT
A constant is automatically available at creation time. This is a unique identifier for the constant that can be used for dispatching and listening.
我们在下面说到Store的重构的时候将会谈及Store是如何通过一个action的全局标志符来监听这个action的。
现在我们先看下这个constant大概长什么样子。假如有这样一个Action Class:
class MyActions
  updateName()
创建MyActions后,我们在Store中监听这个action的时候就可以通过以下这种方式来唯一指定它:
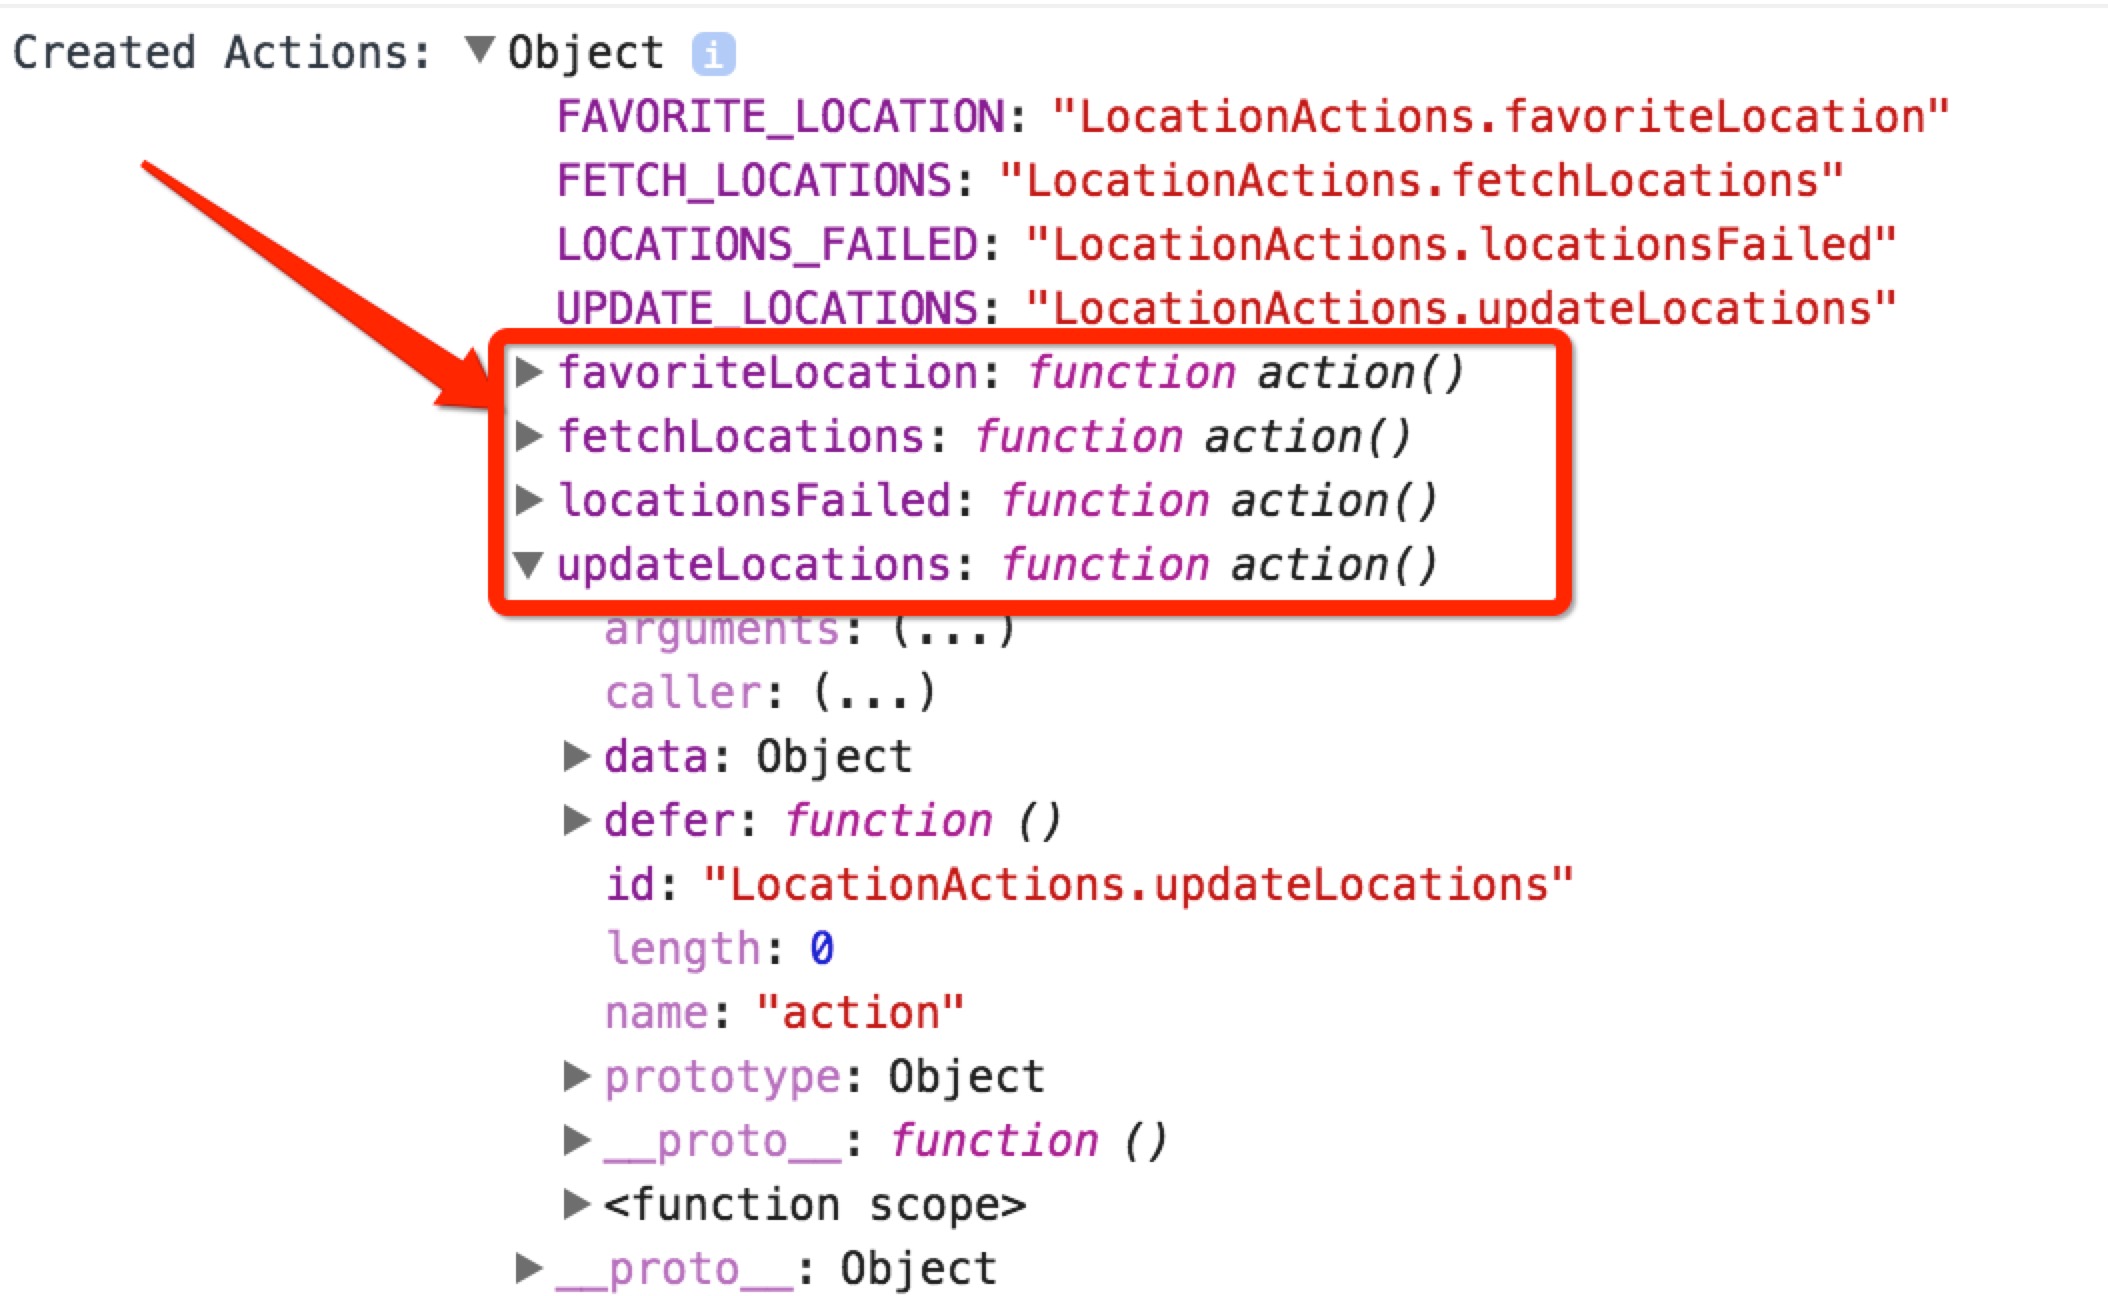
myActions.UPDATE_NAME其实我们将alt的createActions的返回值打印出来就能印证:

可以看到,每个action都会有自己的constant,且这个constant的值是由Class的类名跟上该action的名称组成的,如:
FAVORITE_LOCATION: "LocationActions.favoriteLocation"所以我们的Store在监听的时候既可以使用locationActions.FAVORITE_LOCATION的方式来指定要监听的action,也可以直接指定它的值“LocationActions.favoriteLocation”,其中LocationActions又叫做这个action的命名空间(namespace)。
但是,我们通过alt的generateActions来创建Actions时并没有指定一个Class,那么何来的类名呢?那么它的namespace又是怎样的呢?
同样,我们可以将generateActions的返回值打印出来:

从中我们可以看到,alt会自动用“global“作为每个action的constant的值的namespace。
1.3.2. Constant的命名规则
那么Action的全局标志符constant的命名规则是怎样的呢?这里我们可以分析下其源码:
    function formatAsConstant(name)
      return name.replace(/[a-z]([A-Z])/g, function (i)
        return String(i[0]) + '_' + String(i[1].toLowerCase());
      ).toUpperCase();
其中接受的输入参数就是aciton的名称,比如”updateLocations”。
该函数的意义就是,通过正则表达式来比对输入参数,每当发现输入参数字串中小写字母后面出现大写字母的,就在它们之间插入一个下划线”_”, 然后将整个调整后的字串转成大写。
所以,如果输入的是“updateLocations“,那么输出的结果就是”UPDATE_LOCATIONS”;如果输入的是“updateLocationsSuccess”,输出的就是“UPDATE_LOCATIONS_SUCCESS”。
1.4. Dispatch Actions
从flux的数据流程示意图来看,我们可以看到Action是由Dispatcher给dispatch给Store的。

但是纵观我们的alt-tutorial的代码,并没有看到有相关调用dispatch的地方。
其实这就是alt强大的地方,通过跟踪代码,我们可以看到在createActions和generateActions的过程中,alt就已经为我们创建好整一套dispatch的code,我们只需要调用创建Actions后返回对象中相应的action函数就能完成action的dispatch:

源码在node_modules/alt/lib/actions/index.js:
function makeAction(alt, namespace, name, implementation, obj)
  ...
  var dispatch = function dispatch(payload)
    return alt.dispatch(id, payload, data);
  ;

  // the action itself
  var action = function action()
   ...
    // async functions that return promises should not be dispatched
    if (invocationResult !== undefined && !(0, _isPromise2['default'])(invocationResult))
      ...
       else
        dispatch(invocationResult);


    ...
    return actionResult;
  ;
 ...
  // generate a constant
  var constant = utils.formatAsConstant(namespaceId);
  container[constant] = id;

  return action;
以上代码我尽量把不相关的部分都省略掉了,所以,从理解上来说应该还算直观。整个逻辑就是为一个action创建一个函数引用(就是代码中action那个function,最终通过createActions或者generateActions返回),该函数会把传入到该action的参数通过alt.dispatch分发出去。
该方法最后还通过上面分析的formatAsConstant来生成对应Action的CONSTANT并保存起来。
2. alt Store
alt Action负责命令和数据的构建,以及将数据dispatch出去。那么,谁来接收并处理这些数据呢?这就是Store要做的事情了。
总体来说,alt的Store和flux规范的Store并没有太大的区别,主要做的事情就是:
- 监听Action
- 当Action过来时,进行相应的处理
2.1. bindListeners vs. bindAction
alt框架提供了两个监听Action的方式,一个就是bindListeners,另外一个就是bindActions。
官方的alt-tutorial实例用的就是第一种方式:
var alt = require('../alt');
var LocationActions = require('../actions/LocationActions');
...

class LocationStore
  constructor()
    this.locations = [];
    this.errorMessage = null;

    this.bindListeners(
      handleUpdateLocations: LocationActions.UPDATE_LOCATIONS,
      handleFetchLocations: LocationActions.FETCH_LOCATIONS,
      handleLocationsFailed: LocationActions.LOCATIONS_FAILED,
      setFavorites: LocationActions.FAVORITE_LOCATION
    );

    ...


  handleUpdateLocations(locations)
    this.locations = locations;
    this.errorMessage = null;


  ...


module.exports = alt.createStore(LocationStore, 'LocationStore');
从代码中可以看到,bindListeners接受的是一个由键值对组成的列表,其中的键是aciton的处理函数,而值就是我们上面提到的该action的CONSTANT这个Action的唯一标志符。
通过bindListeners,我们可以:
- 很灵活的指定一个action应该由哪个handler来处理,
- 且这些handler的名字可以自由发挥。
除了bindListeners,alt还提供了另外一个方法来简化我们的监听代码,那就是bindActions。
相比bindListeners,bindActions有这些特性:
- 输入的是通过上面的createActions或者generateActions返回的Actions对象
- 每个Action的handler的名称必须要满足规则:”on” + Action的名称;或者直接是:Action的名称。比如updateLocations这个Action, 在Store中的处理函数handler的名称就只能写成onUpdateLocations或者updateLocations,而不能像binListener那样随性发挥。
2.2. Store代码重构
所以最终我们可以将以上LocationStore的的代码重构一下:
var alt = require('../alt');
var LocationActions = require('../actions/LocationActions');
...

class LocationStore
  constructor()
    this.locations = [];
    this.errorMessage = null;

    this.bindActions(LocationActions);

    ...


  onUpdateLocations(locations)
    this.locations = locations;
    this.errorMessage = null;


  ...


module.exports = alt.createStore(LocationStore, 'LocationStore');
这样看上去就会简洁很多。
2.3. alt Store的getter
通常我们获取一个Store的数据是通过store的实例调用getState这个reactjs方法,将所有的数据都取回来。
但我们经常需要像getter一样从Store中获取一些指定的数据,这个时候怎么办呢?
2.3.1 exportPublicMethods
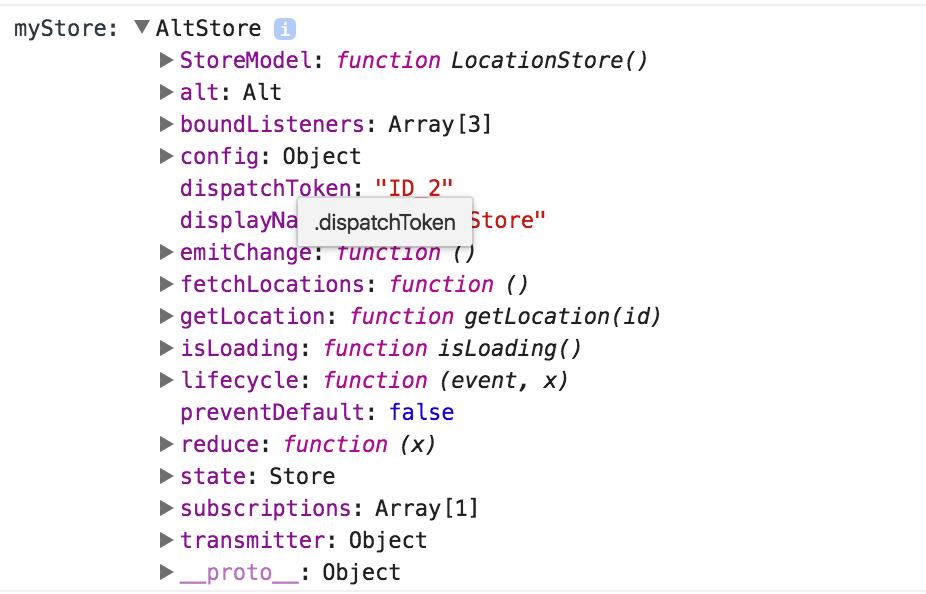
你要知道,通过alt建立的Store类的成员函数默认是没有暴露出来的。我们可以将alt-tutorial中LocationStore的创建结果打印出来作为印证:
var alt = require('../alt');
var LocationActions = require('../actions/LocationActions');
var LocationSource = require('../sources/LocationSource');
var FavoritesStore = require('./FavoritesStore');

class LocationStore
  constructor()
    this.locations = [];
    this.errorMessage = null;

    this.bindActions(LocationActions);

    this.exportPublicMethods(
      getLocation: this.getLocation
    );

    this.exportAsync(LocationSource);


  onUpdateLocations(locations)
    this.locations = locations;
    this.errorMessage = null;


  onFetchLocations()
    this.locations = [];


  onLocationsFailed(errorMessage)
    this.errorMessage = errorMessage;


  resetAllFavorites()
    this.locations = this.locations.map((location) =>
      return
        id: location.id,
        name: location.name,
        has_favorite: false
      ;
    );


  onSetFavorites(location)
    this.waitFor(FavoritesStore);

    var favoritedLocations = FavoritesStore.getState().locations;

    this.resetAllFavorites();

    favoritedLocations.forEach((location) =>
      // find each location in the array
      for (var i = 0; i < this.locations.length; i += 1)

        // set has_favorite to true
        if (this.locations[i].id === location.id)
          this.locations[i].has_favorite = true;
          break;


    );


  getLocation(id)
    var  locations  = this.getState();
    for (var i = 0; i < locations.length; i += 1)
      if (locations[i].id === id)
        return locations[i];


    return null;


let myStore = alt.createStore(LocationStore, 'LocationStore');
console.log("myStore:",myStore);
module.exports = myStore;
通过Chrome的开发者调试工具,我们看下打印的结果:

从中我们可以看到,LocationStore中定义的成员方法onSetFavorites等都是没有暴露出来的。
但是,getLocation这个成员方法是有暴露出来的,这里的关键就是exportPublicMethods这个方法:
    this.exportPublicMethods(
      getLocation: this.getLocation
    );
这个方法的作用就是将Store的一个成员方法(左边的this.getLocation)暴露出去(暴露成左边的getLocation方法)。
2.3.2. Source的exportAsync 和 registerAsync
从上面的图片我们可以看到,创建 LocationStore返回的对象中除了暴露出来一个 getLocation的成员方法,还暴露出来一个fectchLocations的成员方法。
事实上这个成员方法是一个异步数据获取的方法,在alt框架中还专门把它们归类叫做Source。下面就是LocationStore用到的数据源LocationSource的实现:
var LocationSource =
  fetchLocations()
    return
      remote()
        return new Promise(function (resolve, reject)
          // simulate an asynchronous flow where data is fetched on
          // a remote server somewhere.
          setTimeout(function ()

            // change this to `false` to see the error action being handled.
            if (true)
              // resolve with some mock data
              resolve(mockData);
             else
              reject('Things have broken');

          , 250);
        );
      ,

      local()
        // Never check locally, always fetch remotely.
        return null;
      ,

      success: LocationActions.updateLocations,
      error: LocationActions.locationsFailed,
      loading: LocationActions.fetchLocations


;对于数据的Source,更详尽的描述请参考官网:http://alt.js.org/docs/async/。 这里我只是想指出,将fetchLocations这个source中获取远程数据的方法,作为LocationStore的一个成员方法暴露出去的关键代码就是LocationStore的构造函数中:
this.exportAsync(LocationSource);alt除了提供exportAsync方法让我们将一个获取远程数据的一部方法暴露出去之外,还提供一个叫做registerAsync的方法。事实上这个方法的使用方式是一样的,究竟要用哪个,那就看个人喜好了。
3. 源码获取
除了上面的一些改动,我还将alt-tutorial上面原来的LocationActions分成了LocationActions和FavoriteActions,前者负责页面上面的所有Locaitons的命令构建和派送,后者负责页面下面的Favorite Locations的命令构建和派送。
最终的代码大家可以从https://github.com/kzlathander/alt-tutorial-webpack.git中获得。
git clone https://github.com/kzlathander/alt-tutorial-webpack.git
cd alt-tutorial-webpack
git checkout 03
npm install
npm run dev
<未完待续>
注:更多文章请关注公众号:techgogogo或个人博客http://techgogogo.com。当然,也非常欢迎您直接微信(zhubaitian1)勾搭。本文由天地会珠海分舵创作,转载请自觉。
以上是关于微信应用号开发知识贮备之altjs的Action和Store的主要内容,如果未能解决你的问题,请参考以下文章