用 JSP 连接 MySQL 登入注册项目实践(JSP + HTML + CSS + MySQL)
Posted 一个名叫追的程序猿
tags:
篇首语:本文由小常识网(cha138.com)小编为大家整理,主要介绍了用 JSP 连接 MySQL 登入注册项目实践(JSP + HTML + CSS + MySQL)相关的知识,希望对你有一定的参考价值。
目录
相关文章
| jsp实现简单登入注册界面功能 | 用jsp实现简单登入注册界面功能(css美化)(软件idea)_一个名叫追的程序猿的博客-CSDN博客_jsp登陆注册界面 |
| JDBC 连接 mysql | 不会吧不会吧,这博主居然用了1.6w+字来讲 JDBC 连接 MySQL,还花了好几个晚上写出来的 |
一、写在前面
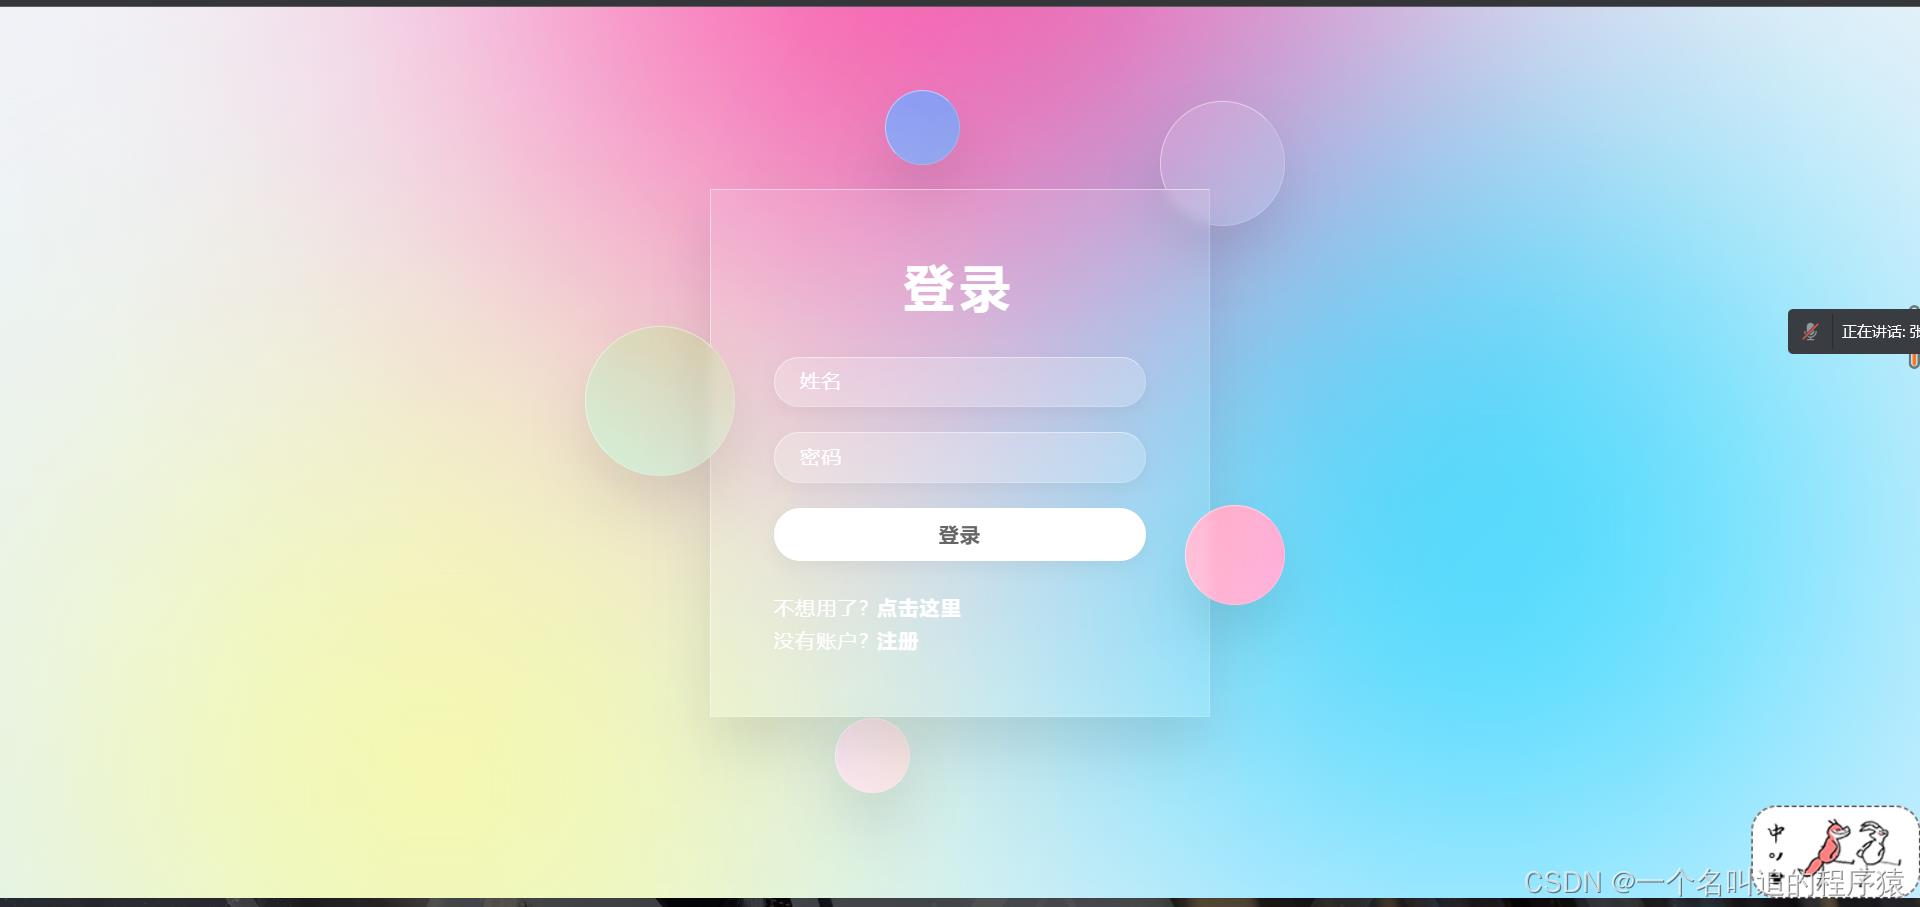
哈喽~大家好,这篇呢我们来看看用 JSP 连接 MySQL 登入注册项目实践,这里就可能有人问了,唉?追桑~前些天不是写了 jsp 登入注册的项目吗?怎么这次还在写呢?哈哈,您别担心,这次呢,肯定和上次不同,我们先来看看效果吧!

二、效果图

数据库界面
感觉是不是不一样了,哈哈哈,那么接下来我们来看看是怎么实现的。
三、实现思路
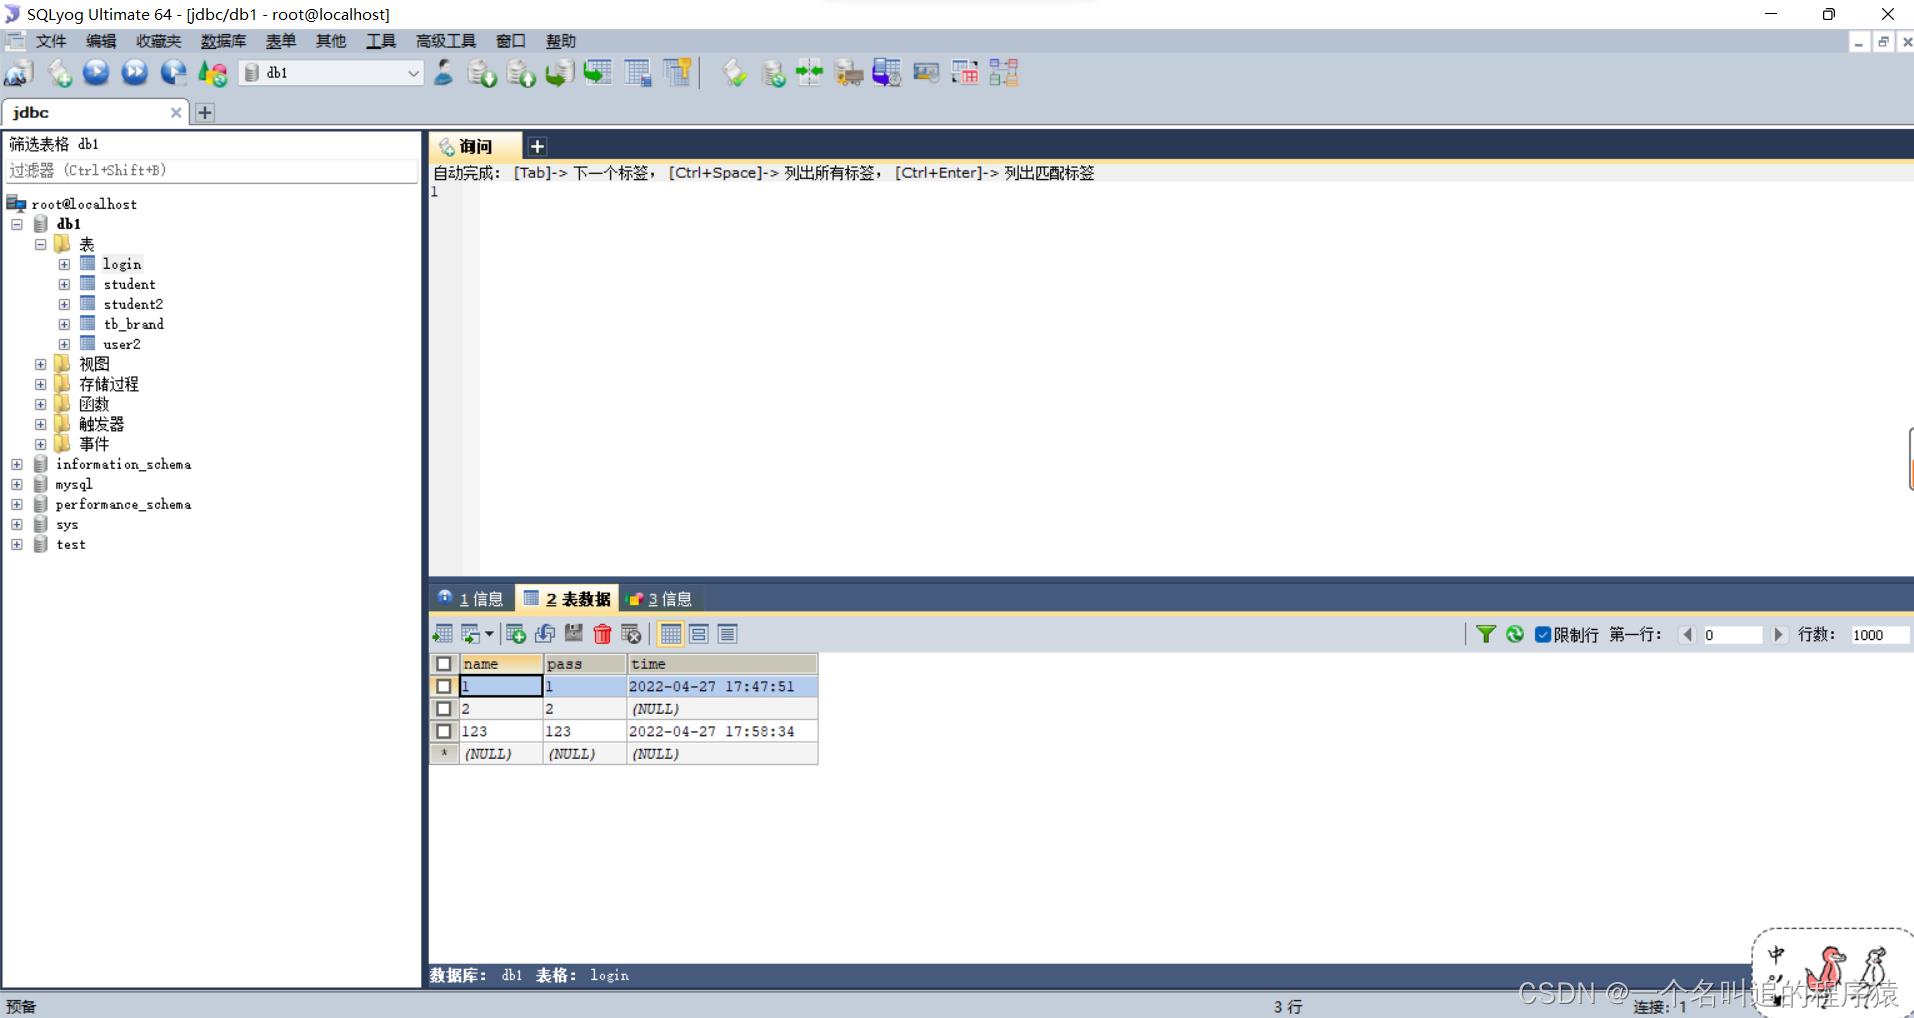
首先我们这里很明显,有四个总页面分别是 login(登入界面)、logout(注销界面)、amend(修改界面)、register(注册界面),这四个总页面分别对应着检查页面(check)、成功页面(success)、失败页面(fail)。建立之好后,通过 from 的 action 来进行跳转,我们先来看看 MySQL (数据库)表名叫 login。
我们这里数据库共三列,第一列叫 name (用户名)、pass(密码)、time(注册时间),name 与 pass 都是 int(整型) 类型的,time 是 varchar (可变长类型),如图。
四、实现代码
1、login总界面
首先我们先有个页面,有基本的用户名框,密码框,两按钮,一个注册,一个注销,通过 from进行跳转,代码如下
    <form method="post" action="check.jsp">
        <input type="text" name="user" style="width: 300px;height: 50px" placeholder="请输入用户名:"
        > <br>
        <input type="password" name="pass" style="width: 300px;height: 50px" placeholder="请输入密码:" > <br>
        <button type="submit" style="width:80px;height:40px; font-size: 20px" class="clear">登录</button>
        <button type="reset" style="width:80px;height:40px; font-size: 20px" class="clear">重置</button>
        <br>
        没有账号?<a href="register.jsp">点击注册</a><br>
        不想用了?<a href="logout.jsp">点击注销</a>
    </form>
用 check 连接数据库(如何连接数据库,前面文章已经给出了,有兴趣的小伙伴可以看看前面写的文章,也放在前面了) 同样的道理,还是那五个步骤(这里就不过多的解释,可以看看上面表格给出的文章),先来看看代码。

        String user = request.getParameter("user"); // getParameter  与 getAttribute  区别
        String pass = request.getParameter("pass");
        // String getParameter(String name):根据参数名称获取参数值
        // getAttribute()获取的是服务器设置的数据。getAttribute() 方法返回指定属性名的属性值。

        try
            Class.forName("com.mysql.cj.jdbc.Driver");
            String url = "jdbc:mysql://localhost:3306/db1?useUnicode=true&characterEncoding=utf-8&useSSL=false&serverTimezone=UTC";
            String user1 = "root";
            String pass1 = "123456";
            Connection connection = DriverManager.getConnection(url,user1,pass1);
            String sql = "select * from login where name=? and pass=?";

            PreparedStatement ps = connection.prepareStatement(sql);
            ps.setString(1,user);
            ps.setString(2,pass);
            ResultSet re = ps.executeQuery();

            if (re.next())
                response.sendRedirect("loginsuccess.jsp");
                session.setAttribute("user",user);
            else
                response.sendRedirect("loginfail.jsp");


         catch (ClassNotFoundException e)
            e.printStackTrace();
         catch (SQLException e)
            e.printStackTrace();
这里 response.sendRedirect 跳转了两个页面一个 loginsuccess 和 loginfail 的两个界面,下面我们来看看,这两个文件(其实很简单)
loginsuccess 代码
<div class="form">
<h2> <h22>登录成功</h22><br>
</h2>
<fon>恭喜您成功登入 <br> 欢迎使用 <br>
<a class="a1" href="login.jsp">返回登入界面</a>
</fon>
</div>loginfail 代码:
                <h2> <h22>登录失败</h22><br>
                </h2>
                <fon>宝~是不是账号或密码记错惹? <br>
                    <a class="a1" href="login.jsp">返回登入界面</a><br>
                    <p1><a href="amend.jsp">点击修改密码</a></p1>
                </fon>
这里我们点击运行看看效果

这里我们用两个升级 大装备(html)(css) 来美化一下我们的页面,这里我们页面美化的,用的是这位大佬的页面(博主名为键盘奏鸣曲),大家可以来看看,点击链接
HTML 代码
<%@ page contentType="text/html;charset=UTF-8" language="java" %>
<head>
    <meta charset="UTF-8">
    <meta name="viewport" content="width=device-width, initial-scale=1.0">
    <link rel="stylesheet" href="css.css">
    <title>123</title>


</head>
<body>

<section>
    <div class="color"></div>
    <div class="color"></div>
    <div class="color"></div>
    <div class="box">
        <div class="circle" style="--x:0"></div>
        <div class="circle" style="--x:1"></div>
        <div class="circle" style="--x:2"></div>
        <div class="circle" style="--x:3"></div>
        <div class="circle" style="--x:4"></div>
        <div class="container">
            <div class="form">
                <h2>登录</h2>
                <form method="post" action="check.jsp">
                    <div class="inputBox">
                        <input type="text" placeholder="姓名" name="user">

                    </div>
                    <div class="inputBox">
                        <input type="password" placeholder="密码" name="pass">

                    </div>
                    <div class="inputBox">
                        <input type="submit" value="登录">

                    </div>
                    <p class="forget">不想用了?<a href="logout.jsp">
                        点击这里
                    </a></p>
                    <p class="forget">没有账户?<a href="register.jsp">
                        注册
                    </a></p>
                </form>
            </div>
        </div>
    </div>
</section>
</body>

</html>
CSS 代码
/*.center*/
/*    text-align:center;*/
/*    margin-top: 50px;*/
/**/
.fon
    font-size: 40px;

/*body*/
/*    background: url("images/image-2.jpg") no-repeat 0 0;*/
/*    background-size: 100% 100%;*/
/*    text-decoration:none;*/
/**/

/*input */
/*    background-color: transparent;*/
/*    outline: none;*/
/*    color: black;*/
/**/
/*.clear*/
/*    opacity:0.3;*/
/**/

*
    margin: 0;
    padding: 0;
    box-sizing: border-box;


/* 使用flex布局,让内容垂直和水平居中 */

section
    /* 相对定位 */
    position: relative;
    overflow: hidden;
    display: flex;
    justify-content: center;
    align-items: center;
    min-height: 100vh;
    /* linear-gradient() 函数用于创建一个表示两种或多种颜色线性渐变的图片 */
    background: linear-gradient(to bottom, #f1f4f9, #dff1ff);


/* 背景颜色 */

section .color
    /* 绝对定位 */
    position: absolute;
    /* 使用filter(滤镜) 属性,给图像设置高斯模糊*/
    filter: blur(200px);


/* :nth-child(n) 选择器匹配父元素中的第 n 个子元素 */

section .color:nth-child(1)
    top: -350px;
    width: 600px;
    height: 600px;
    background: #ff359b;


section .color:nth-child(2)
    bottom: -150px;
    left: 100px;
    width: 500px;
    height: 500px;
    background: #fffd87;


section .color:nth-child(3)
    bottom: 50px;
    right: 100px;
    width: 500px;
    height: 500px;
    background: #00d2ff;


.box
    position: relative;


/* 背景圆样式 */

.box .circle
    position: absolute;
    background: rgba(255, 255, 255, 0.1);
    /* backdrop-filter属性为一个元素后面区域添加模糊效果 */
    backdrop-filter: blur(5px);
    box-shadow: 0 25px 45px rgba(0, 0, 0, 0.1);
    border: 1px solid rgba(255, 255, 255, 0.5);
    border-right: 1px solid rgba(255, 255, 255, 0.2);
    border-bottom: 1px solid rgba(255, 255, 255, 0.2);
    border-radius: 50%;
    /* 使用filter(滤镜) 属性,改变颜色。
    hue-rotate(deg)  给图像应用色相旋转
    calc() 函数用于动态计算长度值
    var() 函数调用自定义的CSS属性值x*/
    filter: hue-rotate(calc(var(--x) * 70deg));
    /* 调用动画animate,需要10s完成动画,
    linear表示动画从头到尾的速度是相同的,
    infinite指定动画应该循环播放无限次*/
    animation: animate 10s linear infinite;
    /* 动态计算动画延迟几秒播放 */
    animation-delay: calc(var(--x) * -1s);


/* 背景圆动画 */

@keyframes animate
    0%, 100%
        transform: translateY(-50px);

    50%
        transform: translateY(50px);


.box .circle:nth-child(1)
    top: -50px;
    right: -60px;
    width: 100px;
    height: 100px;


.box .circle:nth-child(2)
    top: 150px;
    left: -100px;
    width: 120px;
    height: 120px;
    z-index: 2;


.box .circle:nth-child(3)
    bottom: 50px;
    right: -60px;
    width: 80px;
    height: 80px;
    z-index: 2;


.box .circle:nth-child(4)
    bottom: -80px;
    left: 100px;
    width: 60px;
    height: 60px;


.box .circle:nth-child(5)
    top: -80px;
    left: 140px;
    width: 60px;
    height: 60px;


/* 登录框样式 */

.container
    position: relative;
    width: 400px;
    min-height: 400px;
    background: rgba(255, 255, 255, 0.1);
    display: flex;
    justify-content: center;
    align-items: center;
    backdrop-filter: blur(5px);
    box-shadow: 0 25px 45px rgba(0, 0, 0, 0.1);
    border: 1px solid rgba(255, 255, 255, 0.5);
    border-right: 1px solid rgba(255, 255, 255, 0.2);
    border-bottom: 1px solid rgba(255, 255, 255, 0.2);


.form
    position: relative;
    width: 100%;
    height: 100%;
    padding: 50px;


/* 登录标题样式 */

.form h2
    text-align: center;
    position: relative;
    color: #fff;
    font-size: 40px;
    font-weight: 600;
    letter-spacing: 5px;
    margin-bottom: 30px;
    cursor: pointer;


.form h2 h22
    top: -40px;
    text-align: center;
    position: relative;
    color: #fff;
    font-size: 40px;
    font-weight: 600;
    letter-spacing: 5px;
    margin-bottom: 30px;
    cursor: pointer;


.form .a1, .form p1
    bottom: -90px;
    left: 50px;
    position: relative;
    color: #fff;
    font-size: 18px;
    font-weight: 600;
    letter-spacing: 5px;
    /*margin-bottom: 10px;*/
    cursor: pointer;
    text-decoration: none;


.form p1 a

    position: relative;
    color: #fff;
    font-size: 18px;
    font-weight: 600;
    letter-spacing: 5px;
    /*margin-bottom: 10px;*/
    cursor: pointer;
    text-decoration: none;


.form fon
    top: -30px;
    left: 30px;
    position: relative;
    color: #fff;
    font-size: 28px;
    font-weight: 600;
    letter-spacing: 5px;
    margin-bottom: 30px;
    cursor: pointer;

/* 登录标题的下划线样式 */

.form h2::before
    content: "";
    position: absolute;
    left: 0;
    bottom: -10px;
    width: 0px;
    height: 3px;
    background: #fff;
    transition: 0.5s;


.form h2 h22::before
    content: "";
    position: absolute;
    /*left: 0;*/
    /*bottom: -10px;*/
    /*width: 0px;*/
    /*height: 3px;*/
    /*background: #fff;*/
    /*transition: 0.5s;*/


.form h2:hover:before
    width: 53px;


.form .inputBox
    width: 100%;
    margin-top: 20px;


/* 输入框样式 */

.form .inputBox input
    width: 100%;
    padding: 10px 20px;
    background: rgba(255, 255, 255, 0.2);
    outline: none;
    border: none;
    border-radius: 30px;
    border: 1px solid rgba(255, 255, 255, 0.5);
    border-right: 1px solid rgba(255, 255, 255, 0.2);
    border-bottom: 1px solid rgba(255, 255, 255, 0.2);
    font-size: 16px;
    letter-spacing: 1px;
    color: #fff;
    box-shadow: 0 5px 15px rgba(0, 0, 0, 0.05);


.form .inputBox input::placeholder
    color: #fff;


/* 登录按钮样式 */

.form .inputBox input[type="submit"],.form .inputBox input[type="reset"]
    background: #fff;
    color: #666;
    max-width: 100%;
    margin-bottom: 20px;
    font-weight: 600;
    cursor: pointer;


.forget
    margin-top: 6px;
    color: #fff;
    letter-spacing: 1px;


.forget a
    color: #fff;
    font-weight: 600;
    text-decoration: none;
同样的道理我们来升级一下 loginsuccess 与 loginfail 。
loginsuccess 代码
<%@ page contentType="text/html;charset=UTF-8" language="java" %>
<html>
<head>
<title>登入成功界面</title>
<link rel="stylesheet" href="css.css" type="text/css">
</head>
<body>
<%--<div class="center">--%>
<%-- <p class="fon">登入成功界面</p>--%>
<%-- <p class="fon1">恭喜您成功登入,欢迎使用</p>--%>
<%-- <a href="login.jsp">点击退出,返回登入界面</a>--%>
<%--</div>--%>
<section>
<div class="color"></div>
<div class="color"></div>
<div class="color"></div>
<div class="box">
<div class="circle" style="--x:0"></div>
<div class="circle" style="--x:1"></div>
<div class="circle" style="--x:2"></div>
<div class="circle" style="--x:3"></div>
<div class="circle" style="--x:4"></div>
<div class="container">
<div class="form">
<h2> <h22>登录成功</h22><br>
</h2>
<fon>恭喜您成功登入 <br> 欢迎使用 <br>
<a class="a1" href="login.jsp">返回登入界面</a>
</fon>
</div>
</div>
</div>
</section>
</body>
</html>
loginfail 代码
<%@ page contentType="text/html;charset=UTF-8" language="java" %>
<html>
<head>
    <title>登入失败界面</title>
    <link rel="stylesheet" href="css.css" type="text/css">
</head>
<body>
<%--<div class="center">--%>
<%--    <p class="fon">登入失败界面</p>--%>
<%--    <p class="fon1">对不起,您账号或密码有误,请返回登入界面</p>--%>
<%--    <a href="login.jsp">返回登入界面</a><br>--%>
<%--    忘记密码?<a href="amend.jsp">点击修改密码</a>--%>
<%--</div>--%>

<section>
    <div class="color"></div>
    <div class="color"></div>
    <div class="color"></div>
    <div class="box">
        <div class="circle" style="--x:0"></div>
        <div class="circle" style="--x:1"></div>
        <div class="circle" style="--x:2"></div>
        <div class="circle" style="--x:3"></div>
        <div class="circle" style="--x:4"></div>
        <div class="container">
            <div class="form">
                <h2> <h22>登录失败</h22><br>
                </h2>
                <fon>宝~是不是账号或密码记错惹? <br>
                    <a class="a1" href="login.jsp">返回登入界面</a><br>
                    <p1><a href="amend.jsp">点击修改密码</a></p1>
                </fon>

            </div>
        </div>
    </div>
</section>

</body>
</html>
点击运行,我们来看看效果
那么这里我们是完成了,login总界面的效果,同样的道理,代码都差不多,我们直接 cv 大法,这里就给出重点要改的代码。
2、registercheck总代码
里面要重点改的代码,一个是 sql 语句插入,另一个是时间格式转换。
String sql = "insert into login(name, pass,time)VALUES(?,?,?)";SimpleDateFormat formatter = new SimpleDateFormat("yyyy-MM-dd HH:mm:ss");// 时间转换,要不然就会是国际时间格式
String data = formatter.format(new Date());// 记录的是当前的时间
ps.setString(3,data);3、logoutcheck总代码
里面要重点改的代码,是 sql 语句删除。
String sql = "DELETE FROM login WHERE name =? and pass =?";4、amendcheck总代码
里面要重点改的代码,是 sql 语句更新。
String sql = "update login set pass='"+pass+"'";然后分别是各个总页面的 success 与 fail 页面来实现好,这里有一个小细节,我们在作抛出异常,这里可以 out.println 来打印出信息来测试,可以输出在网页上,这样可以方便知道那里有异常。

catch (ClassNotFoundException e)
            e.printStackTrace();
            out.println("1");
            // response.sendRedirect("registerfail.jsp");
         catch (SQLException e)
            e.printStackTrace();
            out.println("2");
            // response.sendRedirect("registerfail.jsp");
好了,点击运行,完成总效果。

(求关注)持续更新中……
以上是关于用 JSP 连接 MySQL 登入注册项目实践(JSP + HTML + CSS + MySQL)的主要内容,如果未能解决你的问题,请参考以下文章