前端技术——8——前端技术总结补疑
Posted kaoa000
tags:
篇首语:本文由小常识网(cha138.com)小编为大家整理,主要介绍了前端技术——8——前端技术总结补疑相关的知识,希望对你有一定的参考价值。
html、CSS、JS以及JQuery总结:
现在的HTML主要是实现内容的呈现,CSS是对内容进行布局和装饰,JS以及jQuery是对内容的操作,即实现内容的动态改变。
前后端的交互,现在学到的主要是HTML的form表单:
<form action="url" method="GET | POST" enctype="multipart/form-data">
<input type="file" name="f"> //如果有file类型字段,form标签中要有enctype="multipart/form-data"
<input type="submit">
</form>
能够向后台传递个字段主要有:input标签 type=“text、radio、checkbox、file、hidden、password”等,select标签,textarea标签,这几个标签必须设置name属性,name的值就是设置传递数据的key,标签的value是传递的数据的值,后台接收的是字典,key就是前端标签的name值,value就是前端标签的value值。
CSS主要的是float:
清除浮动——:after的用法
<!DOCTYPE html>
<html lang="en">
<head>
    <meta charset="UTF-8">
    <title>Title</title>
    <style>
        .left
            float: left;

        .container
            background-color: rosybrown;

        .container .item
            width: 180px;
            height: 150px;
            background-color: #336699;
            border: 1px solid red;

        .clearfix:after
            content: "ooo"; /*//增加的内容,在页面上显示,但不能选定*/
            display: block; /*以块级标签显示*/
            clear: both;  /*清除浮动,撑起外层div*/
            visibility: hidden; /*不想显示content增加的内容,但是占据位置,display:none则是不显示内容,也不占据位置*/
            height: 0; /*这样浏览器上外观显示就没有ooo这个内容,也不占位置了,但在文档流中还有的*/

        /*//.container:after 是在container标签内部的沉底部位增加内容*/
        /*以后只要在对应的标签中增加class=“clearfix”就能撑起这个标签,好处是一直在标签的最底部增加,即使是动态增加子标签*/
    </style>
</head>
<body>
<div class="container clearfix">
    <div class="item left"></div>
    <div class="item left"></div>
    <div class="item left"></div>
    <div class="item left"></div>
<!--    <div style="clear: both"></div> /* 以前的做法,在.container内部增加一个div,清除浮动,撑起container*/-->
</div>
</body>
</html>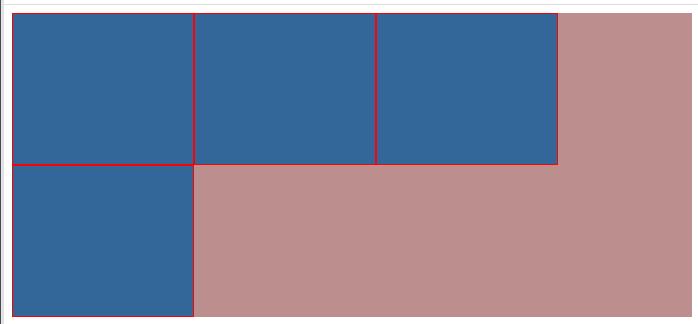
1、已知外层高度,内元素浮动时,外层按照已知已设置的高度被撑开
2、未知外层高度
-- 原来做法:在内元素沉底位置增加<div style="clear:both";> </div>
-- 推荐做法:写一个样式,如上的:
.clearfix:after
content: "ooo";
display: block;
clear: both;
visibility: hidden;
height: 0;
然后在需要的标签上增加class为clearfix就可以。
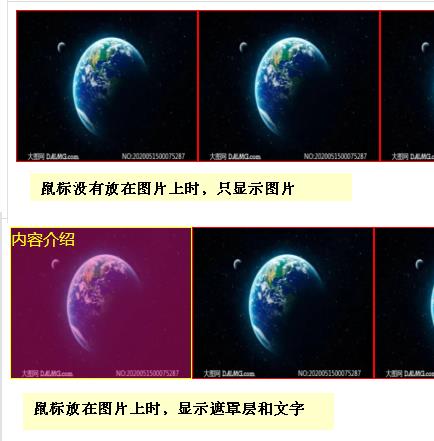
hover的应用:
.c1
background-color:red;
.c1:hover
background-color:pink;
以上样式,当鼠标放在.c1标签上时,背景色变为pink;鼠标移出标签,背景色变为red。
.c1:hover .c2
background-color:blue;
以上样式,是当鼠标放在c1上时,c2的样式改变。
实现一个鼠标进入和离开时改变的例子:
<!DOCTYPE html>
<html lang="en">
<head>
    <meta charset="UTF-8">
    <title>Title</title>
    <style>
        .clearfix:after
            content: "ooo";
            display: block;
            clear: both;
            visibility: hidden;
            height: 0;

        .container
            background-color: red;

        .container .item
            width: 180px;
            height: 150px;
            background-color: #336699;
            border: 1px solid red;
            overflow: hidden;
            position: relative;//加上这一条,是为了给遮罩层定位用的


        .left
            float: left;


        .container .item:hover  /*当鼠标放在item标签上时,item自身改变*/
            border: 1px solid yellow;

        .container .item .text
            display: none;

        .container .item:hover .text
            display: block;
        /*当鼠标选中item时,item下的text标签发生改变*/
    </style>
</head>
<body>
<div class="container clearfix">
    <div class="item left">
        <div class="bg">
            <img src="1.jpg" style="height: 150px;width: 180px">
        </div>
        <div class="text">
            <div style="z-index:9;position: absolute;left: 0;right: 0;top:0;bottom: 0;background-color: deeppink;opacity: 0.4;"></div>
            //上面的div为遮罩层,其定位,需要一个position:relative
            <div style="z-index:10;position: absolute;left: 0;right: 0;top: 0;bottom: 0;color: yellow">内容介绍</div>
            //上面的div为遮罩层上的文字层,其定位,也需要一个position:relative
        </div>
    </div>
    <div class="item left">
        <div class="bg">
            <img src="1.jpg" style="height: 150px;width: 180px">
        </div>
        <div class="text">
            <div style="z-index:9;position: absolute;left: 0;right: 0;top:0;bottom: 0;background-color: deeppink;opacity: 0.4;"></div>
            //上面的div定位,需要一个position:relative
            <div style="z-index:10;position: absolute;left: 0;right: 0;top: 0;bottom: 0;color: yellow">内容介绍</div>
        </div>
    </div>
</div>
</body>
</html>
主要应用了:hover .class
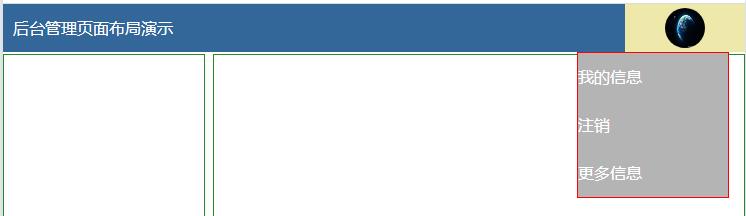
另一个应用:类似下拉菜单栏的例子:
<!DOCTYPE html>
<html lang="en">
<head>
    <meta charset="UTF-8">
    <title>Title</title>
    <style>
        *
            margin: 0;

        .left
            float: left;

        .right
            float: right;

        .pg-header
            height: 48px;
            background-color: #336699;
            color: white;
            line-height: 48px;

        .pg-header .logo
            width: 200px;
            align-content: center;
            margin-left: 10px;

        .pg-header .user
            padding: 0 40px;
            height: 48px;
            position: relative;

        .pg-header .user:hover
            background-color: palegoldenrod;


        .pg-header .user .au img
            width: 40px;
            height: 40px;
            margin-top: 4px;
            border-radius: 50%;

        .pg-header .user .more
            position: absolute;
            width: 150px;
            top: 48px;
            right: 16px;
            border: 1px solid red;
            background-color: #b4b4b4;
            display: none;
            z-index: 90;

        .pg-header .user .more a
            display: block;

        .pg-header .user:hover .more
            display: block;

        .pg-body .body-menu
            position: absolute;
            top: 50px;
            bottom: 0;
            left: 0;
            width: 200px;
            border: 1px solid forestgreen;

        .pg-body .body-content
            position: absolute;
            top: 50px;
            bottom: 0;
            left: 210px;
            right: 0;
            border: 1px solid forestgreen;
            overflow: auto;
            z-index: 10;

    </style>
</head>
<body>
<div class="pg-header">
    <div class="logo left">后台管理页面布局演示</div>
    <div class="user right">
        <a class="au">
            <img src="1.jpg">
        </a>
        <div class="more">
            <a>我的信息</a>
            <a>注销</a>
            <a>更多信息</a>
        </div>
    </div>
</div>
<div class="pg-body">
    <div class="body-menu"></div>
    <div class="body-content"></div>
</div>
</body>
</html>javascript总结补充:
作用域和作用域链:
Java/C#中,代码块作为作用域,Python中以函数作为作用域。
而JavaScript中,以函数作为作用域;函数在被调用之前,作用域链已经存在。
<script>
xo = 'alex';
function f1()
var xo = 'eric';
function f2()
console.log(xo);
return f2
var xxxxx = f1()
xxxxx()
// eirc
</script>
声明提前:
function func()
console.log(ox);
var ox = ' '
var ox = ' '
func()
jQuery:找元素(直接,间接);操作(属性、增加、删除、修改。。。)
事件绑定方式:
DOM下绑定事件:
1)、<p id="p1" οnclick="func1(this);">hello p</p>
2)、var ele=document.getElementById("p1");
ele.οnclick=function()alert (this.innerHTML);
jQuery下绑定事件:
1)、$("p").click(function()$(this).css("color","red");)
$(document).ready(function() //当js代码放在HTNL文档开头时,使用这个格式等待HTML加载完成在执行代码,就不会出现元素找不到的情况。
简写方式:$(function() )
事件相对于DOM,将前面的on去掉
2)、$("p").bind("click",function()) //不推荐使用了
3)、$("P").on("click","li",function())
<!DOCTYPE html>
<html lang="en">
<head>
    <meta charset="UTF-8">
    <title>Title</title>
</head>
<body>
<ul>
    <li>11111</li>
    <li>22222</li>
    <li>33333</li>
    <li>44444</li>
</ul>
<input type="button" value="+" onclick="add();">
<p>pppppppppppppppp</p>
<script src="jquery-3.6.0.js"></script>
<script>
    function add()
        $("ul").append("<li>555555</li>");

    // $("ul li").click(function ()
    //     alert(456);
    // )
    // //上面的绑定事件的方式,为直接使用事件click(),对动态添加的标签无法绑定
    $("ul").on("click","li",function ()
        alert(666);
    )
    //上面的绑定事件方式,为使用on方式,动态添加的元素也能生效。
    function myHandler(event)
        alert(event.data.foo);

    $("p").on("click",foo:"bar",myHandler);
    //上面标签绑定事件,传递一个字典作为参数,在事件函数中,定义event参数,通过event来获取这个参数

</script>
</body>
</html>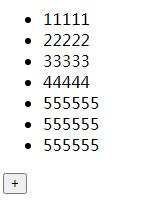
on方式的绑定,叫做事件委托,将绑定到li上的事件,委托给ul。on有四个参数。
面板拖动示例:
<!DOCTYPE html>
<html lang="en">
<head>
    <meta charset="UTF-8">
    <title>Title</title>
</head>
<body>
<div style="border: 1px solid #ddd;width: 600px;position: absolute">
    <div id="title" style="background-color: black;height: 40px;color: white">
        标题
    </div>
    <div style="height: 300px;">
        内容
    </div>
</div>
<script src="jquery-3.6.0.js"></script>
<script>
    $("#title").mouseover(function ()
        $(this).css("cursor","move").mousedown(function (event)
            var start_x = event.screenX;
            var start_y = event.screenY;
            var parent_left = $(this).parent().offset().left;
            var parent_top = $(this).parent().offset().top;

            $(this).on("mousemove",function (event2)
                var new_x = event2.screenX;
                var new_y = event2.screenY;

                var new_parent_x = parent_left + new_x - start_x;
                var new_parent_y = parent_top + new_y -start_y;

                $(this).parent().css("left",new_parent_x+"px");
                $(this).parent().css("top",new_parent_y+"px");
            ).mouseup(function ()
                $(this).off("mousemove");

            );
        );
    );

</script>
</body>
</html>
鼠标按住标题栏拖动
动画显示隐藏示例:
<!DOCTYPE html>
<html lang="en">
<head>
    <meta charset="UTF-8">
    <title>Title</title>
</head>
<body>
<p>hello world</p>
<input id="show" type="button" value="显示">
<input id="hide" type="button" value="隐藏">
<input id="toggle" type="button" value="切换">
<script src="jquery-3.6.0.js"></script>
<script>
    $("#show").click(function ()
        $("p").show(2000);
    )//显示,有一个慢动作的拉幕效果
    $("#hide").click(function ()
        $("p").hide(2000);
    )//隐藏,有一个慢动作的收幕效果
    $("#toggle").click(function ()
        $("p").toggle(5000);
    )//实现上述显示和隐藏功能,当前是显示的,则隐藏,当前是隐藏的则显示
</script>
</body>
</html>
淡入淡出动画示例:
<!DOCTYPE html>
<html lang="en">
<head>
    <meta charset="UTF-8">
    <title>Title</title>
</head>
<body>
<div id="div1" style="display: none;width: 200px;height: 200px;background-color: forestgreen;"></div>
<input id="In" type="button" value="fadeIn">
<input id="Out" type="button" value="fadeOut">
<input id="Toggle" type="button" value="fadeToggle">
<input id="To" type="button" value="fadeTo">
<script src="jquery-3.6.0.js"></script>
<script>
    $("#In").click(function ()
        $("div").fadeIn(2000);
    )
    $("#Out").click(function ()
        $("div").fadeOut(2000);
    )
    $("#Toggle").click(function ()
        $("div").fadeToggle(2000);
    )
    $("#To").click(function ()
        $("div").fadeTo(2000,0.3);
    )//最后出来的背景透明度为0.3
</script>
</body>
</html>
滑动动画:slideDown()、slideUp()、slideToggle()
回调函数:
$("#show").click(function ()
$("p").show(2000,function() 。。。 );
)
当show方法2秒完成后,即show方法完成了动作,然后调用函数,这里的function就是回调函数,即定义的动作或事件完成后,再调用的函数。
jQuery扩展:使用extend()方法
<!DOCTYPE html>
<html lang="en">
<head>
    <meta charset="UTF-8">
    <title>Title</title>
</head>
<body>
<p>hello pppp</p>
<script src="jquery-3.6.0.js"></script>
<script>
    $.extend(
        getmax:function (a,b)
            return a>b ? a:b;

    );//直接在jQuery上扩展,调用时是$加上点调用
    alert($.getmax(5,6));

    $.fn.extend(
        print:function ()
            alert($(this).html());

    );//这种扩展,调用时必须是一个标签
    $("p").print();
</script>
</body>
</html>
<!DOCTYPE html>
<html lang="en">
<head>
<meta charset="UTF-8">
<title>Title</title>
</head>
<body>
<script>
var f = function (a)
alert(a);
;
f(123);
//上下等同
(function (a)
alert(a);
)(123);
//将扩展方法放在自执行函数中,属于私有域,避免重名变量冲突
(function ()
$.fn.extend(
print:function()
console.log($(this).html());
;
);
)();
</script>
</body>
</html>以上是关于前端技术——8——前端技术总结补疑的主要内容,如果未能解决你的问题,请参考以下文章