Java程序员学深度学习 DJL上手4 NDArray基本操作
Posted 编程圈子
tags:
篇首语:本文由小常识网(cha138.com)小编为大家整理,主要介绍了Java程序员学深度学习 DJL上手4 NDArray基本操作相关的知识,希望对你有一定的参考价值。
Java程序员学深度学习 DJL上手4 NDArray基本操作
一、介绍NDArray
NDArray是一个基于Java的N维数组工具,我觉得最直观的理解可以认为它是Numpy里的NDArray的Java实现。
NDArray是DJL的核心数据结构,包含超过 60+ 个在Java中的方式实现与NumPy相同的结果。
另外NDArray支持硬件加速,如在CPU上的 MKLDNN 加速以及GPU上的CUDA 加速。
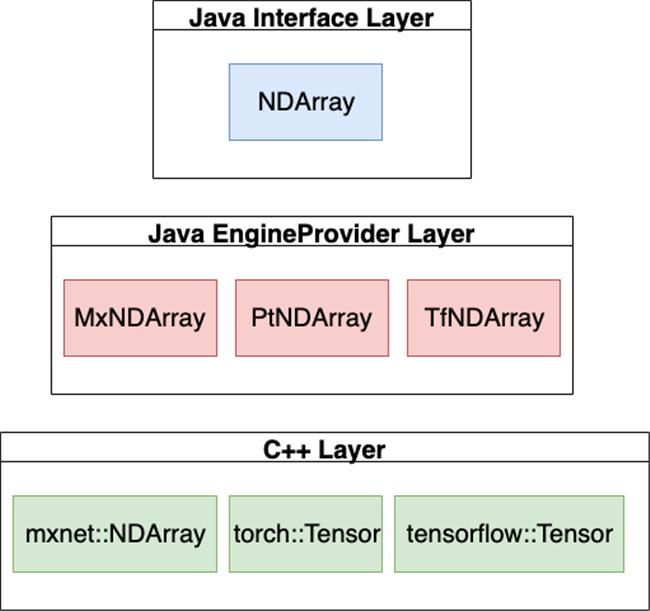
NDArray在DJL中的内部结构:

NDArray包含三个关键的层:
- 界面层
- DJL各种深度学习算法为NDArray开发的引擎
- C++层
二、准备环境
- idea
- maven
1. 创建项目

2. pom.xml
<?xml version="1.0" encoding="UTF-8"?>
<project xmlns="http://maven.apache.org/POM/4.0.0" xmlns:xsi="http://www.w3.org/2001/XMLSchema-instance"
         xsi:schemaLocation="http://maven.apache.org/POM/4.0.0 http://maven.apache.org/xsd/maven-4.0.0.xsd">
    <modelVersion>4.0.0</modelVersion>

    <groupId>com.xundh</groupId>
    <artifactId>djl-learning</artifactId>
    <version>0.1-SNAPSHOT</version>

    <properties>
        <maven.compiler.source>1.8</maven.compiler.source>
        <maven.compiler.target>1.8</maven.compiler.target>
        <java.version>8</java.version>
        <djl.version>0.13.0-SNAPSHOT</djl.version>
    </properties>

    <dependencyManagement>
        <dependencies>
            <dependency>
                <groupId>ai.djl</groupId>
                <artifactId>bom</artifactId>
                <version>$djl.version</version>
                <type>pom</type>
                <scope>import</scope>
            </dependency>
        </dependencies>
    </dependencyManagement>
    <dependencies>
        <dependency>
            <groupId>ai.djl</groupId>
            <artifactId>api</artifactId>
        </dependency>
        <dependency>
            <groupId>ai.djl</groupId>
            <artifactId>basicdataset</artifactId>
        </dependency>
        <dependency>
            <groupId>ai.djl</groupId>
            <artifactId>model-zoo</artifactId>
        </dependency>
        <!-- Pytorch -->
        <dependency>
            <groupId>ai.djl.pytorch</groupId>
            <artifactId>pytorch-engine</artifactId>
        </dependency>
        <dependency>
            <groupId>ai.djl.pytorch</groupId>
            <artifactId>pytorch-native-auto</artifactId>
            <version>1.7.0</version>
        </dependency>
    </dependencies>
</project>
3. NDArrayLearning.java
package com.xundh;

import ai.djl.ndarray.NDArray;
import ai.djl.ndarray.NDManager;
import ai.djl.ndarray.types.Shape;

public class NDArrayLearning
    public static void main(String[] args)
        try(NDManager manager = NDManager.newBaseManager())
            // 创建 NDArray
            NDArray nd = manager.ones(new Shape(2, 3));
            System.out.println(nd);
三、创建数组
1. 创建全1的N维数组
NDArray nd = manager.ones(new Shape(2, 3));
结果:
ND: (2, 3) cpu() float32
[[1., 1., 1.],
 [1., 1., 1.],
]
2. 创建随机数的N维数组
NDArray nd = manager.randomUniform(0, 1, new Shape(1, 1, 4));
结果:
ND: (1, 1, 4) cpu() float32
[[[0.5488, 0.5928, 0.7152, 0.8443],
 ],
]
3. 创建全0数组
            NDArray nd = manager.zeros(new Shape(2,3), DataType.INT64);
            System.out.println(nd);
结果:
ND: (2, 3) cpu() int64
[[ 0,  0,  0],
 [ 0,  0,  0],
]
4. 创建对角为1的矩阵
            NDArray nd = manager.eye(3,-1);
            System.out.println(nd);
结果:
ND: (3, 3) cpu() float32
[[0., 0., 0.],
 [1., 0., 0.],
 [0., 1., 0.],
]
5. 创建顺序数组
            NDArray nd = manager.arange(2,5);
            System.out.println(nd);
结果:
ND: (3) cpu() int32
[ 2,  3,  4]
6. 计算大小和形状
            NDArray nd = manager.arange(2,5);
            System.out.println(nd);
            System.out.println(nd.size());
            System.out.println(nd.getShape());
结果:
ND: (3) cpu() int32
[ 2,  3,  4]
3
(3)
ND: (2, 3) cpu() float32
[[1., 1., 1.],
 [1., 1., 1.],
]
结果:
6
(2, 3)
NDManager支持多达20种在NumPy中NDArray创建的方法,更多参见:
https://javadoc.io/doc/ai.djl/api/latest/ai/djl/ndarray/NDManager.html
四、数组计算
1. 转置
NDArray nd = manager.arange(1, 10).reshape(3, 3);
nd = nd.transpose();
结果:
ND: (3, 3) cpu() int32
[[ 1,  2,  3],
 [ 4,  5,  6],
 [ 7,  8,  9],
]

ND: (3, 3) cpu() int32
[[ 1,  4,  7],
 [ 2,  5,  8],
 [ 3,  6,  9],
]
2. 所有元素加
            NDArray nd = manager.arange(1, 10).reshape(3, 3);
            // 加10
            nd = nd.add(10);
            System.out.println(nd);
结果:
ND: (3, 3) cpu() int32
[[11, 12, 13],
 [14, 15, 16],
 [17, 18, 19],
]
3. 转换形状
            NDArray nd = manager.arange(12);
            System.out.println(nd);
            System.out.println(nd.getShape());
            System.out.println(nd.reshape(3,4));
结果:
ND: (12) cpu() int32
[ 0,  1,  2,  3,  4,  5,  6,  7,  8,  9, 10, 11]

(12)
ND: (3, 4) cpu() int32
[[ 0,  1,  2,  3],
 [ 4,  5,  6,  7],
 [ 8,  9, 10, 11],
]
4. 两个数组相加
            NDArray x = manager.create(new float[]1f, 2f, 4f, 8f);
            NDArray y = manager.create(new float[]2f, 2f, 2f, 2f);
            System.out.println(x.add(y));
结果:
ND: (4) cpu() float32
[ 3.,  4.,  6., 10.]
5. 取幂运算
x.exp();
6. 两个数组连接
x = manager.arange(12f).reshape(3, 4);
y = manager.create(new float[]2, 1, 4, 3, 1, 2, 3, 4, 4, 3, 2, 1, new Shape(3, 4));
x.concat(y) // default axis = 0
默认x轴位置在0结果:
ND: (6, 4) gpu(0) float32
[[ 0.,  1.,  2.,  3.],
 [ 4.,  5.,  6.,  7.],
 [ 8.,  9., 10., 11.],
 [ 2.,  1.,  4.,  3.],
 [ 1.,  2.,  3.,  4.],
 [ 4.,  3.,  2.,  1.],
]
7. 判断相等
x.eq(y)
结果示例:
[[false,  true, false,  true],
 [false, false, false, false],
 [false, false, false, false],
]
更多支持的计算函数参见:
https://javadoc.io/doc/ai.djl/api/latest/ai/djl/ndarray/NDArray.html
五、Get和Set
1. 筛选大于10的
            NDArray nd = manager.arange(5, 14);

            System.out.println(nd);
            nd = nd.get(nd.gte(10));
            System.out.println(nd);
结果:
ND: (9) cpu() int32
[ 5,  6,  7,  8,  9, 10, 11, 12, 13]

ND: (4) cpu() int32
[10, 11, 12, 13]
2. 一个3×3的矩阵,把第二列的数据都乘以2
            NDArray nd = manager.arange(1, 10).reshape(3, 3);
            System.out.println(nd);
            nd.set(new NDIndex(":, 1"), array -> array.mul(2));
            System.out.println(nd);
结果:
ND: (3, 3) cpu() int32
[[ 1,  2,  3],
 [ 4,  5,  6],
 [ 7,  8,  9],
]

ND: (3, 3) cpu() int32
[[ 1,  4,  3],
 [ 4, 10,  6],
 [ 7, 16,  9],
]
以上是关于Java程序员学深度学习 DJL上手4 NDArray基本操作的主要内容,如果未能解决你的问题,请参考以下文章