Android安卓四大组件之Activity
Posted woodwhale
tags:
篇首语:本文由小常识网(cha138.com)小编为大家整理,主要介绍了Android安卓四大组件之Activity相关的知识,希望对你有一定的参考价值。
【android】安卓四大组件之Activity(一)
前言
Activity是Android学习中的一个重要组件,想要对其进行系统的了解可以分为几块内容,这一大章节的内容是有关于activity之间的页面跳转和数据传递,之后还有activity中的生命周期讲解。
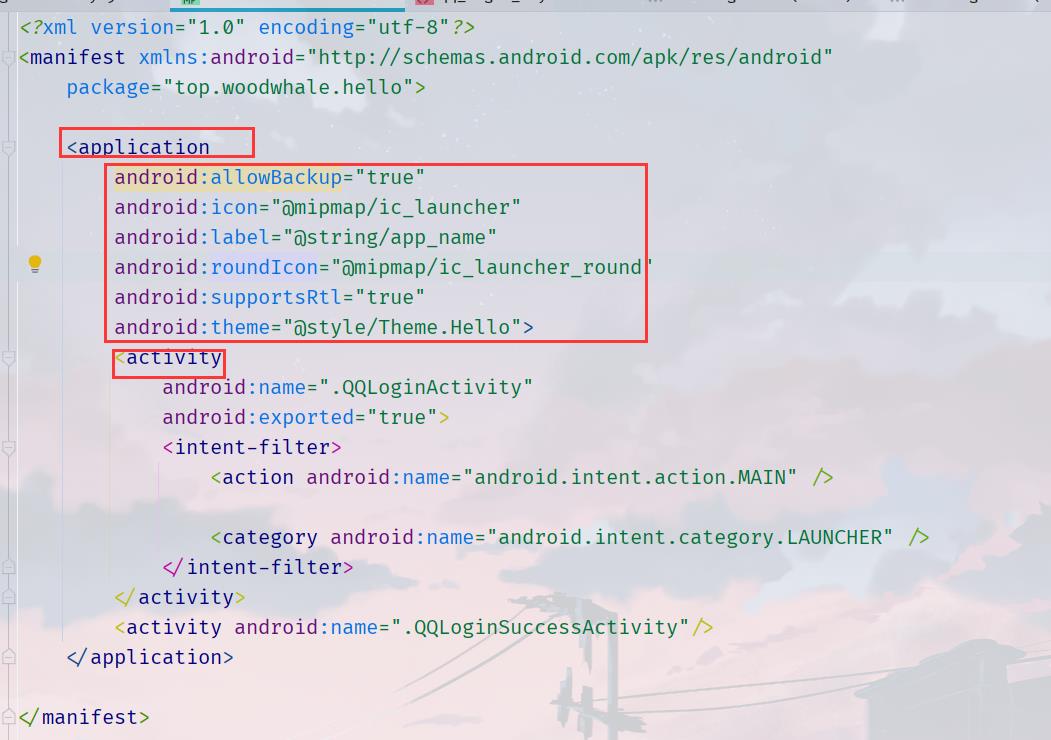
1、认识AndroidManifest.xml
一个Manifest.xml最外层用manifest标签包裹,下面可以是application,当然我们之前也学过uses-permission,可以与application同级
application中设置属性,allowBackup是允许备份,icon是app图标,label是app的名字,roundIcon是圆角app图标,supportsRtl是声明你的application是否愿意支持从右到左(原来RTL就是right-to-left 的缩写…)的布局。theme当然就是主题啦!
Rtl到底是个啥玩意?有没有在QQ中见过使用阿拉伯语的,使用这些语言都是从右向左读的,所以需要从右向左适配。就是这样!
activity就是这次学习的重点,是一个活动,也可以当作不同的活跃页面(大致理解),我们app中不同的界面就可以通过activity之间的跳转实现!
至于intent-filter,就是一个意图过滤器,其中的action就是activity进行的一个action,而category可以理解为这个意图的类别,我们APP的主界面的category就是LAUNCHER
2、如何实现activity之间的跳转?
我们可以使用startActivity()方法或者startActivityForResult()方法来跳转页面,这一小节就只讲startActivity与intent配合使用进行数据单项传递,在第4小节回讲到如何使用startActivityForResult进行数据回传。
2.1 通过显式Intent来跳转同一个APP中的activity
显式Intent:按照名称(完全限定了类名)来指定要启动的组件。
可以看到下面的xml中注册了两个activity分别对应两个activity类
<application
        android:allowBackup="true"
        android:icon="@mipmap/ic_launcher"
        android:label="@string/app_name"
        android:roundIcon="@mipmap/ic_launcher_round"
        android:supportsRtl="true"
        android:theme="@style/Theme.Hello">
        <activity
            android:name=".QQLoginActivity"
            android:exported="true">
            <intent-filter>
                <action android:name="android.intent.action.MAIN" />

                <category android:name="android.intent.category.LAUNCHER" />
            </intent-filter>
        </activity>
        <activity android:name=".QQLoginSuccessActivity"/>
    </application>
需要注意的是,创建显式Intent启动Activity,系统将立刻启动Intent对象中指定的应用组件。
那么我来实际操作一个例子看看显式Intent如何跳转!
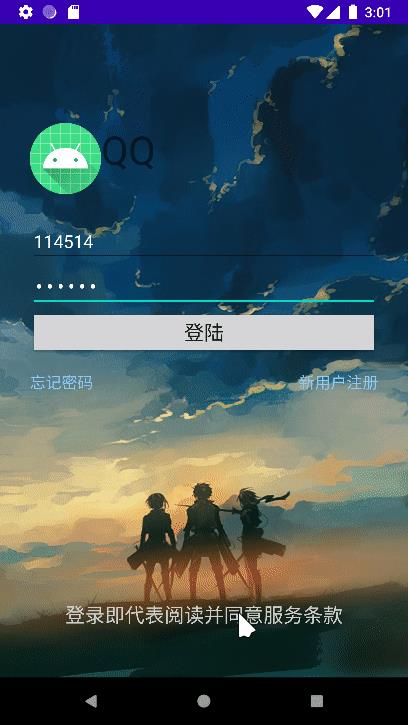
我们写一个登录页面的跳转测试用例,如果登录成功,就跳转到另一个activity页面中显示登录的信息!
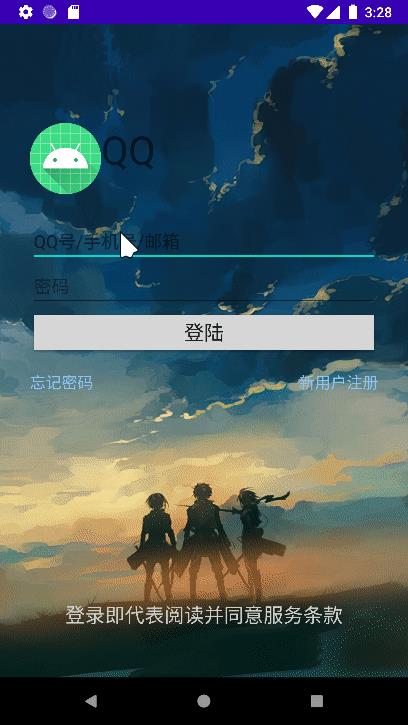
第一个页面:登录界面xml
<?xml version="1.0" encoding="utf-8"?>
<RelativeLayout xmlns:android="http://schemas.android.com/apk/res/android"
    xmlns:tools="http://schemas.android.com/tools"
    android:layout_width="match_parent"
    android:layout_height="match_parent"
    xmlns:app="http://schemas.android.com/apk/res-auto"
    android:background="@mipmap/bk">

    <LinearLayout
        android:layout_width="match_parent"
        android:layout_height="wrap_content"
        android:layout_marginTop="70dp"
        android:padding="30dp"
        android:orientation="vertical">

        <TextView
            android:layout_width="wrap_content"
            android:layout_height="wrap_content"
            android:drawableLeft="@mipmap/ic_launcher_round"
            android:text="QQ"
            android:textSize="40sp"/>
        <EditText
            android:id="@+id/et_account"
            android:layout_marginTop="25dp"
            android:layout_width="match_parent"
            android:layout_height="match_parent"
            android:textColor="@color/white"
            android:hint="QQ号/手机号/邮箱"/>

        <EditText
            android:password="true"
            android:id="@+id/et_pwd"
            android:layout_width="match_parent"
            android:layout_height="match_parent"
            android:hint="密码"
            android:textColor="@color/white"
            tools:ignore="Deprecated" />

        <Button
            android:id="@+id/bt_login"
            android:layout_width="match_parent"
            android:layout_height="wrap_content"
            android:text="登陆"
            android:textSize="20sp"/>

        <RelativeLayout
            android:layout_marginTop="15dp"
            android:layout_width="match_parent"
            android:layout_height="wrap_content">
            <TextView
                android:layout_width="wrap_content"
                android:layout_height="wrap_content"
                android:text="忘记密码"
                android:textSize="16dp"
                android:textColor="#87C6F8"/>
            <TextView
                android:layout_width="wrap_content"
                android:layout_height="wrap_content"
                android:layout_alignParentRight="true"
                android:text="新用户注册"
                android:textSize="16dp"

                android:textColor="#87C6F8"/>

        </RelativeLayout>

    </LinearLayout>

    <TextView
        android:layout_width="wrap_content"
        android:layout_height="wrap_content"
        android:layout_alignParentBottom="true"
        android:layout_centerHorizontal="true"
        android:layout_marginBottom="50dp"
        android:text="登录即代表阅读并同意服务条款"
        android:textColor="#CCCFCF"
        android:textSize="20sp" />

</RelativeLayout>
对应的activity java类
package top.woodwhale.hello;

import android.app.Activity;
import android.content.Intent;
import android.os.Bundle;
import android.text.TextUtils;
import android.view.View;
import android.widget.Button;
import android.widget.EditText;
import android.widget.Toast;

import androidx.annotation.Nullable;

public class QQLoginActivity extends Activity implements View.OnClickListener

    private EditText account;
    private EditText passwd;
    private Button login;

    @Override
    protected void onCreate(@Nullable Bundle savedInstanceState)
        super.onCreate(savedInstanceState);
        setContentView(R.layout.qq_login_layout);
        initViews();


    private void initViews()
        account = this.findViewById(R.id.et_account);
        passwd = this.findViewById(R.id.et_pwd);
        login = this.findViewById(R.id.bt_login);
        // 添加监听器
        login.setOnClickListener(this);


    @Override
    public void onClick(View v)
        if (v == login && login != null)
            String ac = account.getText().toString();
            String pwd = passwd.getText().toString();
            if (TextUtils.isEmpty(ac))
                Toast.makeText(this, "账号不能为空", Toast.LENGTH_SHORT).show();
                return;

            if (TextUtils.isEmpty(pwd))
                Toast.makeText(this,"密码不能为空", Toast.LENGTH_SHORT).show();
                return;

            // 如果都填写正确,那么跳转
            Intent intent = new Intent(this,QQLoginSuccessActivity.class);
            intent.putExtra("ac",ac);
            intent.putExtra("pwd",pwd);
            // 当前act跳转到目的act中,也就是登录成功界面
            this.startActivity(intent);
这一部分是跳转实现的代码:

new一个intent,然后如果需要设置键值对信息,就使用putExtra()方法设置键值对,最后调用当前activity类中的startActivity()方法跳转到下一个activity中!
第二个页面:登录成功xml
<?xml version="1.0" encoding="utf-8"?>
<FrameLayout xmlns:android="http://schemas.android.com/apk/res/android"
    android:layout_width="match_parent"
    android:layout_height="match_parent">

    <Button
        android:id="@+id/bt_ac_and_pwd"
        android:layout_width="wrap_content"
        android:layout_height="wrap_content"
        android:layout_gravity="center"
        android:text="账号:*** 密码:###"/>

</FrameLayout>
对应的activity java类
package top.woodwhale.hello;

import android.app.Activity;
import android.content.Intent;
import android.os.Bundle;
import android.view.View;
import android.widget.Button;

import androidx.annotation.Nullable;

public class QQLoginSuccessActivity extends Activity

    private Button btn;

    @Override
    protected void onCreate(@Nullable Bundle savedInstanceState)
        super.onCreate(savedInstanceState);
        setContentView(R.layout.frame_layout);

        Intent intent = getIntent();
        String ac = intent.getStringExtra("ac");
        String pwd = intent.getStringExtra("pwd");
        btn = findViewById(R.id.bt_ac_and_pwd);
        btn.setText(btn.getText().toString().replace("***",ac).replace("###",pwd));
这里通过getStringExtra()方法获取之前activity中我们设置的键值对

测试效果:

效果完成!
2.2 通过隐式Intent来跳转同一个APP中的activity
隐式Intent:不会指定特定的组件,而是会声明要执行的组件,从而允许其他应用中的组件来处理它。
举个例子,我们现在要调用一个app中的另一个页面,使用隐式意图的方式,可以这样:
// 隐式意图进行跳转
Intent intent = new Intent();
intent.setAction("top.woodwhale.qqlogin.LOGIN_INFO");
intent.addCategory(Intent.CATEGORY_DEFAULT);
intent.putExtra("ac",ac);
intent.putExtra("pwd",pwd);
this.startActivity(intent);
使用setAction()的方法,将action设置了,这里的action是什么呢?
我们看看最开始的manifest.xml
<activity
          android:name=".QQLoginActivity"
          android:exported="true">
    <intent-filter>
        <action android:name="android.intent.action.MAIN" />
        <category android:name="android.intent.category.LAUNCHER" />
    </intent-filter>
</activity>

<activity android:name=".QQLoginSuccessActivity">
    <intent-filter>
        <action android:name="top.woodwhale.qqlogin.LOGIN_INFO"/>
        <category android:name="android.intent.category.DEFAULT"/>
    </intent-filter>
</activity>
这里我们与显式意图不同,我们变更了QQLoginSuccessActivity这个activity中的<intent-filter>,也就是意图过滤器,我们在其中的action中设置了一个name为top.woodwhale.qqlogin.LOGIN_INFO,而与我们java代码中的intent.setAction("top.woodwhale.qqlogin.LOGIN_INFO");对应!并且category也是一样,使用的是DEFAULT,也与intent.addCategory(Intent.CATEGORY_DEFAULT);对应。
通过这样的intent的设置方式,我们其实就是将这个Intent对象设置成为了QQLoginSuccessActivity这个activity!
2.3 通过显式Intent跳转到其他APP
我们在使用浏览器访问知乎、csdn等网页的时候,是不是会让我们跳转到APP内使用?其实这就是不同app之间的跳转,也就是通过浏览器这个app,跳转到了csdn这个app。
上述的跳转操作也可以通过Intent实现,我们首先用显式Intent实现:
比如我现在点击登录,需要跳转到Chrome这个app中,那么显式Intent需要知道Chrome这个app的packageName和一个activity的className。我们可以使用logcat来抓取这两个String值,如下图所示:
首先选择system_process系统进程,在搜索cmp也就是ComponentName的缩写。然后在avd上打开Chrome,logcat就可以抓取到啦

那么我们跳转的核心代码就是:
Intent intent = new Intent();
intent.setClassName("com.android.chrome","com.google.android.apps.chrome.Main");
this.startActivity(intent);
当然,你也可以这样,通过ComponentName作为中间件
Intent intent = new Intent();
ComponentName cmp = new ComponentName("com.android.chrome","com.google.android.apps.chrome.Main");
intent.setComponent(cmp);
this.startActivity(intent);
测试一下
2.4 通过隐式Intent跳转到其他APP
一般跳转到其他APP都是使用隐式Intent来完成的,而Intent类中已经很多的常量给我们选择APP
比如Intent.ACTION_DIAL就是电话拨号action,而我们使用setData()方法,给一个tel的值,那么就会拨号这个号码,注意setData中传递的参数是Uri类型的,需要使用Uri.parse()方法转化一下格式
Intent intent = new Intent();
intent.setAction(Intent.ACTION_DIAL);
intent.setData(Uri.parse("tel:"+ac));
this.startActivity(intent);
那么这样的效果就是如下图所示:
2.5 对Intent的总结:
显式Intent的常见方法:
setClass( Context packageContext, Class ClassNmae.class), 此方法不能实现跨应用调用setClass( String packageName, String classname ), 此方法能够实现跨应用调用setComponent(ComponentName component),此方法能够实现跨应用调用
隐式Intent的常见方法:
setAction(String action)addCategory(String category)setData(Uri data)
当然,Intent用的最多的是putExtra()方法,可以传递Extra的数据!
总结一下,隐式Intent和显式Intent的区别是什么呢?
- 显式Intent需要给出指定的class,也就是限定了类名
- 隐式Intent需要给出action、category,可以隐式的调用其他activity
说的直白一点:隐式Intent通过给出的action和category来与特定的activity对应起来,而显式Intent就是指定了一个activity.class
那么,什么情况用什么Intent呢?
显示Intent一般用来完成同一个APP之间的跳转隐式Intent一般用来完成调用其他APP- 上述并非绝对,显示Intent也能完成不同APP跳转,隐式Intent也能完成同一个APP内的跳转
3、activity之间的数据如何单向传递?
这里说的传递数据就是分为两种,一种普通数据,另一种是对象数据
对于activity之间的数据传递,都是通过Intent中的putExtra()方法实现,或者setData()方法实现
putExtra其实就是将一个键值对放入了intent对象中,取出这个值就通过getXXXExtra()方法就可以实现
而setData其实是给了在intent-filter中设置的data属性一个数据
下面我们就来讲讲这两种方式如何传递数据!
3.1 putExtra()方法传递
3.1.1 普通数据传输
对于普通的数据类型:
// 隐式意图进行跳转
String ac = account.getText