Spring5框架 笔记总结
Posted IT_Holmes
tags:
篇首语:本文由小常识网(cha138.com)小编为大家整理,主要介绍了Spring5框架 笔记总结相关的知识,希望对你有一定的参考价值。
文章目录
1. Spring5 事务
什么是事务?
事务是数据库操作最基本单元。在逻辑上,就是一组操作。要么都成功,如果有一个失败那么都失败。
事务的四个特性:
原子性,一致性,隔离性,持久性。
我们经常遇到的一个案例,就是银行转账的问题。
就像下面一个转账的时候,就应该一个是加钱,一个是减钱,才对。但是如果中间出现问题了!那么就使用事务来做一个回滚操作!
案例如下:
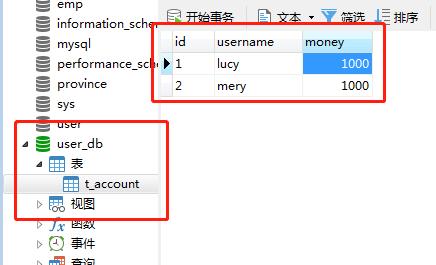
先创建一个数据库来测试使用:
之后,在pom.xml中,导入响应的包:
<?xml version="1.0" encoding="UTF-8"?>
<project xmlns="http://maven.apache.org/POM/4.0.0"
         xmlns:xsi="http://www.w3.org/2001/XMLSchema-instance"
         xsi:schemaLocation="http://maven.apache.org/POM/4.0.0 http://maven.apache.org/xsd/maven-4.0.0.xsd">
    <modelVersion>4.0.0</modelVersion>

    <groupId>org.example</groupId>
    <artifactId>spring5_atguigu_transaction</artifactId>
    <version>1.0-SNAPSHOT</version>

    <properties>
        <maven.compiler.source>8</maven.compiler.source>
        <maven.compiler.target>8</maven.compiler.target>
    </properties>

    <dependencies>
        <!-- https://mvnrepository.com/artifact/org.springframework/spring-webmvc -->
        <dependency>
            <groupId>org.springframework</groupId>
            <artifactId>spring-webmvc</artifactId>
            <version>5.3.14</version>
        </dependency>
        <!-- https://mvnrepository.com/artifact/mysql/mysql-connector-java -->
        <dependency>
            <groupId>mysql</groupId>
            <artifactId>mysql-connector-java</artifactId>
            <version>8.0.22</version>
        </dependency>
        <!-- https://mvnrepository.com/artifact/com.alibaba/druid -->
        <dependency>
            <groupId>com.alibaba</groupId>
            <artifactId>druid</artifactId>
            <version>1.2.6</version>
        </dependency>

        <!-- https://mvnrepository.com/artifact/org.springframework/spring-jdbc -->
        <dependency>
            <groupId>org.springframework</groupId>
            <artifactId>spring-jdbc</artifactId>
            <version>5.3.13</version>
        </dependency>

        <!--spring tx 不知道干啥的。-->
        <dependency>
            <groupId>org.springframework</groupId>
            <artifactId>spring-tx</artifactId>
            <version>5.2.6.RELEASE</version>
        </dependency>
        <!--spring orm 不知道干啥的-->
        <dependency>
            <groupId>org.springframework</groupId>
            <artifactId>spring-orm</artifactId>
            <version>5.2.6.RELEASE</version>
        </dependency>
        <!-- https://mvnrepository.com/artifact/org.aspectj/aspectjweaver -->
        <dependency>
            <groupId>org.aspectj</groupId>
            <artifactId>aspectjweaver</artifactId>
            <version>1.9.6</version>
        </dependency>


    </dependencies>

</project>
配置好beans.xml文件,注意在idea中beans.xml命名时,前方有空格是不会报错的!一定注意不要有空格。
<?xml version="1.0" encoding="UTF-8"?>
<beans xmlns="http://www.springframework.org/schema/beans"
       xmlns:context="http://www.springframework.org/schema/context"
       xmlns:aop="http://www.springframework.org/schema/aop"
       xmlns:xsi="http://www.w3.org/2001/XMLSchema-instance"
       xsi:schemaLocation="
       http://www.springframework.org/schema/beans
       http://www.springframework.org/schema/beans/spring-beans.xsd
       http://www.springframework.org/schema/context
       http://www.springframework.org/schema/context/spring-context.xsd
       http://www.springframework.org/schema/aop
       http://www.springframework.org/schema/aop/spring-aop.xsd">

    <context:component-scan base-package="com.itholmes"/>

    <bean id="dataSource" class="com.alibaba.druid.pool.DruidDataSource" destroy-method="close">
        <property name="url" value="jdbc:mysql://localhost:3306/user_db?ServerTimezone=Aisa/shanghai"/>
        <property name="username" value="root"/>
        <property name="password" value="0818"/>
        <property name="driverClassName" value="com.mysql.cj.jdbc.Driver"/>
    </bean>

    <bean id="jdbcTemplate" class="org.springframework.jdbc.core.JdbcTemplate">
        <property name="dataSource" ref="dataSource"/>
    </bean>

</beans>
创建dao层一个接口一个实现类,来操作数据库中的内容:
package com.itholmes.dao;

public interface UserDao

    public void addMoney();
    public void reduceMoney();
package com.itholmes.dao;

import org.springframework.beans.factory.annotation.Autowired;
import org.springframework.jdbc.core.JdbcTemplate;
import org.springframework.stereotype.Repository;

@Repository
public class UserDaoImpl implements UserDao

    @Autowired
    private JdbcTemplate jdbcTemplate;

    //少钱(lucy转账100)
    @Override
    public void reduceMoney()
        String sql = "update t_account set money=money-? where username=?";
        jdbcTemplate.update(sql, 100, "lucy");


    //多钱(mery收账100)
    @Override
    public void addMoney()
        String sql = "update t_account set money=money+? where username=?";
        jdbcTemplate.update(sql, 100, "mery");
再创建service层中的UserService类,这里为了方便不设置接口来实现了,都一样:
package com.itholmes.service;

import com.itholmes.dao.UserDao;
import org.springframework.beans.factory.annotation.Autowired;
import org.springframework.stereotype.Service;

@Service
public class UserService

    //注入dao
    @Autowired
    private UserDao userDao;

    //在service业务逻辑层中调用转账方法
    public void accountMoney()


        //lucy转账100
        userDao.reduceMoney();

        //模拟异常,比如断电了,断网了等等。
        int i = 1 / 0;

        //mery收账100
        userDao.addMoney();
测试类来测试:
import com.itholmes.service.UserService;
import org.springframework.context.ApplicationContext;
import org.springframework.context.support.ClassPathXmlApplicationContext;

public class Test
    public static void main(String[] args)

        ApplicationContext context = new ClassPathXmlApplicationContext("beans.xml");
        UserService bean = context.getBean("userService", UserService.class);
        bean.accountMoney();
就像上面的效果,这个时候就需要在service使用事务来处理了!!!事务在哪层都可以,但是我们最好是使用在业务逻辑service层的。
2. Spring5 事务操作
通常我们事务是添加到Service层(业务逻辑层)。
在Spring 进行事务管理操作有两种方式:
- 编程式事务管理
- 声明式事务管理(使用最多)
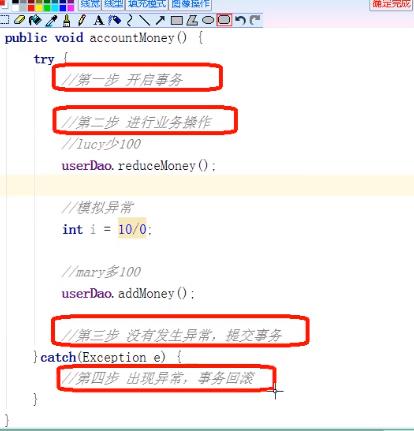
编程式事务管理就是使用代码一步一步来进行事务的操作,这种方式很麻烦!并且代码非常冗余。
就像try-catch方法一样,来处理如下面情况:
声明式事务管理又分为基于注解方式(最常用)和基于xml配置文件方式。
而在Spring中进行声明式事务管理,底层使用的是AOP原理,很合理!AOP就是面向切面编程,在不改变源代码的情况下,可以增强代码功能,那么平时面试问到Spring中使用AOP的底层原理有哪些,就可以回到Spring的声明式事务管理了。
Spring事务管理API:
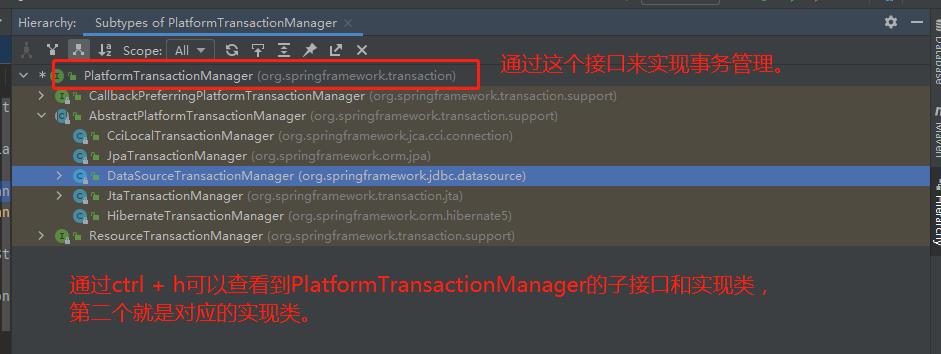
- 提供一个PlatformTransactionManager接口,代表事务管理器,这个接口针对不同的框架提供不同的实现类。
PlatformTransactionManager接口的结构层次了解:
我们可以通过ctrl + H来查看结构类的层次。
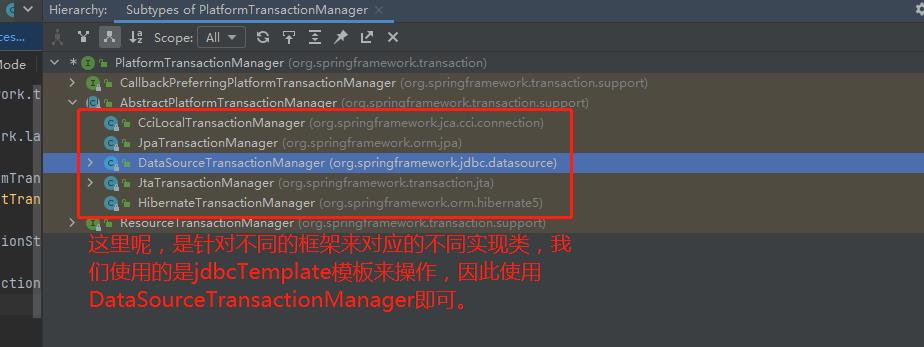
3. Spring5 声明式事务管理(注解方式)
第一步:在Spring配置文件来配置事务管理器。
因为,刚刚上面说到,不同框架对应实现了PlatformTransactionManager的不同实现类。
这里说的事务管理器,听起来很高大尚,实际上就是在beans.xml文件中创建对应的实现类就可,就像下面id为transactionManager的bean标签内容。
<?xml version="1.0" encoding="UTF-8"?>
<beans xmlns="http://www.springframework.org/schema/beans"
       xmlns:context="http://www.springframework.org/schema/context"
       xmlns:aop="http://www.springframework.org/schema/aop"
       xmlns:xsi="http://www.w3.org/2001/XMLSchema-instance"
       xsi:schemaLocation="
       http://www.springframework.org/schema/beans
       http://www.springframework.org/schema/beans/spring-beans.xsd
       http://www.springframework.org/schema/context
       http://www.springframework.org/schema/context/spring-context.xsd
       http://www.springframework.org/schema/aop
       http://www.springframework.org/schema/aop/spring-aop.xsd">

    <context:component-scan base-package="com.itholmes"/>

    <bean id="dataSource" class="com.alibaba.druid.pool.DruidDataSource" destroy-method="close">
        <property name="url" value="jdbc:mysql://localhost:3306/user_db?ServerTimezone=Aisa/shanghai"/>
        <property name="username" value="root"/>
        <property name="password" value="0818"/>
        <property name="driverClassName" value="com.mysql.cj.jdbc.Driver"/>
    </bean>

    <bean id="jdbcTemplate" class="org.springframework.jdbc.core.JdbcTemplate">
        <property name="dataSource" ref="dataSource"/>
    </bean>


    <!--创建事务管理器,因为我们使用的是jdbcTemplate,因此我们要创建DataSourceTransactionManager事务管理器。-->
    <bean id="transactionManager" class="org.springframework.jdbc.datasource.DataSourceTransactionManager">

        <!--通过查看DataSourceTransactionManager源码不难看出,有个setDataSource方法的,因此要注入数据源dataSource!-->
        <!--
            注入数据源datasource 。
                这里容易混淆,name的dataSource是指向源码内部的setDataSource方法(注入),
                ref的dataSource指向上面的德鲁伊druid的dataSource!
        -->
        <property name="dataSource" ref="dataSource"></property>

    </bean>


</beans>
第二步:在Spring配置文件,开启事务注解。
- 1.在spring配置文件beans.xml中引入名称空间tx。
(这里的tx,就是我们之前导入的spring tx包。Spring-tx模块负责在spring框架中实现事务管理功能。以aop切面的方式将事务注入到业务代码中,并实现不同类型的事务管理器。)
xmlns:tx="http://www.springframework.org/schema/tx"
xsi:schemaLocation="
	http://www.springframework.org/schema/tx
	http://www.springframework.org/schema/tx/spring-tx.xsd"
- 2.开启事务的注解,在配置文件beans.xml中开启事务注解。
<!--开启事务注解-->
<!--transaction-manager来指定哪一个事务管理器。-->
<tx:annotation-driven transaction-manager="transactionManager"></tx:annotation-driven>
完整版beans.xml效果如下:
<?xml version="1.0" encoding="UTF-8"?>
<beans xmlns="http://www.springframework.org/schema/beans"
       xmlns:context="http://www.springframework.org/schema/context"
       xmlns:aop="http://www.springframework.org/schema/aop"
       xmlns:tx="http://www.springframework.org/schema/tx"
       xmlns:xsi="http://www.w3.org/2001/XMLSchema-instance"
       xsi:schemaLocation="
       http://www.springframework.org/schema/beans
       http://www.springframework.org/schema/beans/spring-beans.xsd
       http://www.springframework.org/schema/context
       http://www.springframework.org/schema/context/spring-context.xsd
       http://www.springframework.org/schema/aop
       http://www.springframework.org/schema/aop/spring-aop.xsd
       http://www.springframework.org/schema/tx
       http://www.springframework.org/schema/tx/spring-tx.xsd">

    <context:component-scan base-package="com.itholmes"/>

    <bean id="dataSource" class="com.alibaba.druid.pool.DruidDataSource" destroy-method="close">
        <property name="url" value="jdbc:mysql://localhost:3306/user_db?ServerTimezone=Aisa/shanghai"/>
        <property name="username" value="root"/>
        <property name="password" value="0818"/>
        <property name="driverClassName" value="com.mysql.cj.jdbc.Driver"/>
    </bean>

    <bean id="jdbcTemplate" class="org.springframework.jdbc.core.JdbcTemplate">
        <property name="dataSource" ref="dataSource"/>
    </bean>


    <!--创建事务管理器,因为我们使用的是jdbcTemplate,因此我们要创建DataSourceTransactionManager事务管理器。-->
    <bean id="transactionManager" class="org.springframework.jdbc.datasource.DataSourceTransactionManager">

        <!--通过查看DataSourceTransactionManager源码不难看出,有个setDataSource方法的,因此要注入数据源dataSource!-->
        <!--
            注入数据源datasource 。
                这里容易混淆,name的dataSource是指向源码内部的setDataSource方法(注入),
                ref的dataSource指向上面的德鲁伊druid的dataSource!
        -->
        <property name="dataSource" ref="dataSource"></property>

    </bean>

    <!--开启事务注解-->
    <!--transaction-manager来指定哪一个事务管理器。-->
    <tx:annotation-driven transaction-manager="transactionManager"></tx:annotation-driven>

</beans>
第三步:在service类上面(或者service类里面方法上面) 添加事务注解。
- @Transactional注解,既可以添加到类上面也可以添加到方法上面。
- 添加到类上面,那么这个类里面所有的方法都给他们添加事务。
- 添加到方法上面,那么仅仅是给这个方法添加事务。
package com.itholmes.service;
import com.itholmes.dao.UserDao;
import org.springframework.beans.factory.annotation.Autowired;
import org.springframework.stereotype.Service;
import