# 后端接口限流实现
Posted MarlonBrando1998
tags:
篇首语:本文由小常识网(cha138.com)小编为大家整理,主要介绍了# 后端接口限流实现相关的知识,希望对你有一定的参考价值。
接口限流的实现学习
业务场景
在短时间内,接口承载成千上万的请求,首先要考虑程序的并发性。大流量会直接将系统打垮,无法对外提供服务。那为了防止出现这种情况最常见的解决方案之一就是限流,当请求达到一定的并发数或速率,就进行等待、排队、降级、拒绝服务等。
限流方法
计数器限流
计数器算法
对于接口指定一段时间段内的访问次数不能超过100个,在接收到第一个请求的时候,可以设置一个计数器counter,每当一个请求过来的时候,counter就加1,如果counter的值大于100并且该请求与第一个 请求的间隔时间还在1分钟之内,那么说明请求数过多;如果该请求与第一个请求的间隔时间大于1分钟,且counter的值还在限流范围内,那么就重置 counter
Java 实现
固定窗口计数器限流
-
固定时间内访问受限。
-
限流对象
public abstract class CounterLimit

    // 限制时间
    protected long limitTime;
    // 限制时间单位
    protected TimeUnit timeUnit;
    // 时间段内限制请求的次数
    protected int limitCount;
    // 当前是否为受限制状态
    protected volatile boolean limited;

    public CounterLimit(long limitTime, TimeUnit timeUnit, int limitCount)
        this.limitTime = limitTime;
        this.timeUnit = timeUnit;
        this.limitCount = limitCount;


    protected CounterLimit()


    /**
     * 计数器加 1 返回 true 能够正常访问接口,false 表示访问受限
     *
     * @return
     */
    protected abstract boolean count();
- 限流的实现:开启一个线程维护当前计数器,当到达限流的时间的时候,重置计数器
public class FixedWindowCounterLimiting extends CounterLimit

    private static final Logger logger = LoggerFactory.getLogger(CounterLimit.class);

    /**
     * 计数器
     */
    private final AtomicInteger counter = new AtomicInteger();

    public FixedWindowCounterLimiting(long limitTime, int limitCount, TimeUnit timeUnit)
        this.limitTime = limitTime;
        this.limitCount = limitCount;
        this.timeUnit = timeUnit;
        // 开启一个线程维护计数器当到达限流时间的时候重置计数器
        new Thread(new CounterResetThread()).start();


    /**
     * 计数器加 1 返回 true 能够正常访问接口,false 表示访问受限
     *
     * @return
     */
    @Override
    public boolean count()
        while (true)
            // 当前受限状态
            if (limited)
                return false;
             else
                int currentCount = counter.get();
                // 计数器达到限流的状态
                if (currentCount == limitCount)
                    logger.info("限流:", LocalTime.now().toString());
                    limited = true;
                    return false;
                 else
                    if (counter.compareAndSet(currentCount, currentCount + 1))
                        return true;


    private class CounterResetThread implements Runnable
        @Override
        public void run()
            while (true)
                try
                    timeUnit.sleep(limitTime);
                    // 计数器清 0
                    counter.compareAndSet(limitCount, 0);
                    logger.info("=====> 计数器重置......");
                    // 修改当前请求状态为不受限
                    limited = false;
                 catch (Exception e)
                    logger.error("Error Occur:0", e);
- 存在的问题:限流不均匀,计数器不精确
滑动窗口计数器限流
- 测试代码
public class LeakyBucketLimiter

    private static final Logger logger = LoggerFactory.getLogger(LeakyBucketLimiter.class);

    private static final Map<String, List<Long>> map = new ConcurrentHashMap<>();

    private LeakyBucketLimiter()


    /**
     * 滑动时间窗口限流算法
     * 在指定时间窗口,指定限制次数内,是否允许通过
     *
     * @param listId     队列id
     * @param count      限制次数
     * @param timeWindow 时间窗口大小
     * @return 是否允许通过
     */
    public static synchronized boolean whetherThrough(String listId, int count, long timeWindow)
        // 获取当前时间
        long nowTime = System.currentTimeMillis();
        // 根据队列id,取出对应的限流队列,若没有则创建
        List<Long> list = map.computeIfAbsent(listId, k -> new LinkedList<>());
        // 如果队列还没满,则允许通过,并添加当前时间戳到队列开始位置
        if (list.size() < count)
            list.add(0, nowTime);
            return true;

        // 队列已满(达到限制次数),则获取队列中最早添加的时间戳
        Long farTime = list.get(count - 1);
        // 用当前时间戳 减去 最早添加的时间戳
        if (nowTime - farTime <= timeWindow)
            // 若结果小于等于timeWindow,则说明在timeWindow内,通过的次数大于count
            // 不允许通过
            return false;
         else
            // 若结果大于timeWindow,则说明在timeWindow内,通过的次数小于等于count
            // 允许通过,并删除最早添加的时间戳,将当前时间添加到队列开始位置
            list.remove(count - 1);
            list.add(0, nowTime);
            return true;


    public static void main(String[] args) throws InterruptedException
        while (true)
            // 任意10秒内,只允许2次通过
            logger.info(LocalTime.now().toString() + "==========" + LeakyBucketLimiter.whetherThrough("ListId", 2, 10000L));
            // 睡眠0-10秒
            Thread.sleep(1000 * new Random().nextInt(10));
漏桶算法

当请求的总数达到一定的数量的时候,后续的请求直接拒绝。
漏桶算法实现
实现思路
- 定义桶的大小
- 定义流速
- 记录上次操作完成后的时间以及桶的剩余量,用来记录后续计算当前桶的容量
public class BucketAlgorithm

    private static final Logger logger = LoggerFactory.getLogger(BucketAlgorithm.class);

    /**
     * 流出的速度 每秒
     */
    private int rate;

    /**
     * 桶大小
     */
    private int bucketSize;

    /**
     * 刷新时间
     */
    private long refreshTime;

    /**
     * 当前桶容量大小
     */
    private int currentSize;

    public BucketAlgorithm(int rate, int bucketSize)
        this.rate = rate;
        this.bucketSize = bucketSize;


    /**
     * 刷新当前桶容量
     */
    private void refreshCurrentSize()
        long now = System.currentTimeMillis();
        // 当前桶的容量等于 当前容量-(当前时间-上次记录时间)*速率
        currentSize = (int) Math.max(0, currentSize - (now - refreshTime) * rate);
        // 记录最近更新的时间
        refreshTime = now;


    public synchronized boolean tryAcquire()
        logger.info("当前线程信息: -------- 当前桶容量为 ", Thread.currentThread().getId(), currentSize);
        refreshCurrentSize();
        if (currentSize < bucketSize)
            currentSize++;
            return true;
         else
            return false;


    public static void main(String[] args)
        BucketAlgorithm bucketAlgorithm = new BucketAlgorithm(1, 20);
        for (int i = 0; i < 1000; i++)
            new Thread(() -> logger.info(String.valueOf(bucketAlgorithm.tryAcquire()))).start();
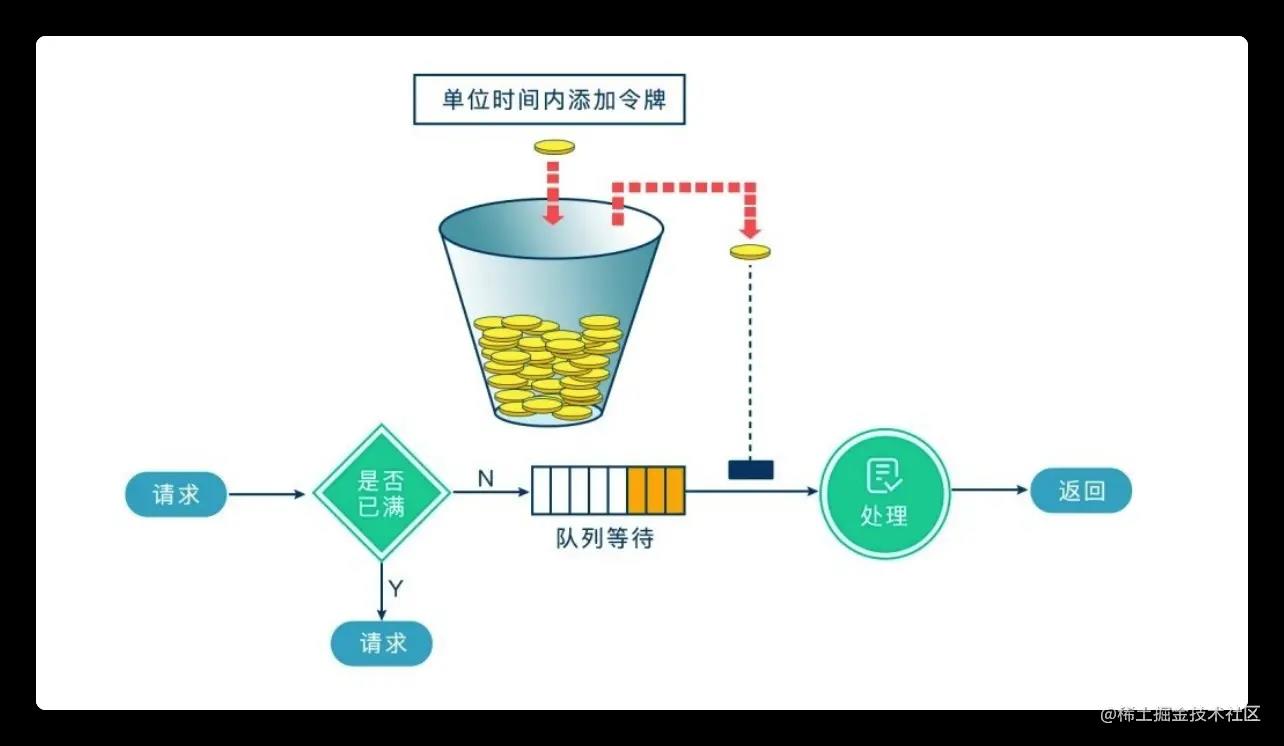
令牌桶算法
- 图片来源:https://juejin.cn/post/7017650057293856805

系统会以一个恒定的速度往桶里放入令牌,而如果请求需要被处理,则需要先从桶里获取一个令牌,当桶里没有令牌可取时,则拒绝服务。 当桶满时,新添加的令牌被丢弃。令牌桶是一个存放固定容量令牌(token)的桶,按照固定速率往桶里添加令牌。
简单实现
public class TokenLimiter

    private static final Logger logger = LoggerFactory.getLogger(TokenLimiter.class);

    /**
     * 最后一次令牌发放时间
     */
    public long timeStamp = System.currentTimeMillis();
    /**
     * 桶的容量
     */
    public int capacity = 10;
    /**
     * 令牌生成速度10/s
     */
    public int rate = 10;
    /**
     * 当前令牌数量
     */
    public int tokens;


    public void acquire() throws InterruptedException
        //  模拟 1000 个请求
        for (int i = 0; i < 1000; i++)
            long now = System.currentTimeMillis();
            Thread.sleep(4000);
            // 当前令牌数
            tokens = Math.min(capacity, (int) (tokens + (now - timeStamp) * rate / 1000));
            //每隔 0.5 秒发送随机数量的请求
            int permits = (int) (Math.random() * 9) + 1;
            logger.info("请求令牌数:" + permits + ",当前令牌数:" + tokens);
            timeStamp = now;
            if (tokens < permits)
                // 若不到令牌,则拒绝
                logger.info("限流了");
             else
                // 还有令牌,领取令牌
                tokens -= permits;
                logger.info("剩余令牌=" + tokens);


    public static void main(String[] args) throws InterruptedException
        TokenLimiter tokensLimiter = new TokenLimiter();
        tokensLimiter.acquire();
基于Guava工具类实现限流
引入依赖
<!-- Guaua -->
<dependency>
    <groupId>com.google.guava</groupId>
    <artifactId>guava</artifactId>
    <version>30.1-jre</version>
</dependency>
接口限流测试代码
@RestController
@RequestMapping("/request")
public class RequestController

    private static final Logger logger = LoggerFactory.getLogger(RestController.class);

    /**
     * 限流策略 : 1秒钟2个请求
     */
    private final RateLimiter limiter = RateLimiter.create(1.0);

    private final DateTimeFormatter formatter = DateTimeFormatter.ofPattern("yyyy-MM-dd HH:mm:ss");

    @GetMapping("/test1")
    public String testLimiter()
        // 100 毫秒内,没拿到令牌,就直接进入服务降级
        boolean tryAcquire = limiter.tryAcquire(100, TimeUnit.MILLISECONDS);
        if (!tryAcquire)
            logger.warn("进入服务降级,时间", LocalDateTime.now().format(formatter));
            return "当前排队人数较多,请稍后再试!";

        logger.info("获取令牌成功,时间", LocalDateTime.now().format(formatter));
        return "请求成功";
Aop 接口Guaua 注解限流
注解
@Target(ElementType.METHOD)
@Retention(RetentionPolicy.RUNTIME)
@Documented
public @interface LimitFlag

    /**
     * 资源的 key ,唯一
     * 作用:不同的接口,不同的流量控制
     */
    String key() default "key_one";

    /**
     * 最多的访问限制次数
     */
    double permitsPerSecond() default 1;

    /**
     * 获取令牌最大等待时间
     */
    long timeout() default 500;

    /**
     * 获取令牌最大等待时间,单位(例:分钟/秒/毫秒) 默认:毫秒
     */
    TimeUnit timeunit() default TimeUnit.MILLISECONDS;

    /**
     * 得不到令牌的提示语
     */
    String message() default "系统繁忙,请稍后再试.";
切面拦截实现
@Aspect
@Component
public class RequestLimitAspect

    private static final Logger logger = LoggerFactory.getLogger(RequestLimitAspect.class);

    /**
     * 不同的接口,不同的流量控制
     * map的key为 Limiter.key
     */
    private final Map<String, RateLimiter> limitMap = Maps.newConcurrentMap();

    /**
     * 业务层切点
     */
    @Pointcut("@annotation(com.li.springbootproject.config.requestlimit.LimitFlag)")
    public void limitPointCut()


    @Around("limitPointCut()")
    public Object around(ProceedingJoinPoint joinPoint) throws Throwable
        MethodSignature signature = (MethodSignature) joinPoint.getSignature();
        Method method = signature.getMethod();
        //拿limit的注解
        LimitFlag limit = method.getAnnotation(LimitFlag.class);
        if (limit != null)
            //key作用:不同的接口,不同的流量控制
            String key = limit.key();
            RateLimiter rateLimiter;
            //验证缓存是否有命中key
            if (!limitMap.containsKey(key))
                // 创建令牌桶
                rateLimiter = RateLimiter.create(limit.permitsPerSecond());
                limitMap.put(key, rateLimiter);
                logger.info("新建了令牌桶=,容量=", key, limit.permitsPerSecond());

            rateLimiter = limitMap.get(key);
            // 拿令牌
            boolean acquire = rateLimiter.tryAcquire(limit.timeout(), limit.timeunit());
            // 拿不到命令,直接返回异常提示
            if (!acquire)
                throw new Exception(limit.message());


        return joinPoint.proceed();
以上是关于# 后端接口限流实现的主要内容,如果未能解决你的问题,请参考以下文章