SpringCould整合oauth2
Posted 捡黄金的少年
tags:
篇首语:本文由小常识网(cha138.com)小编为大家整理,主要介绍了SpringCould整合oauth2相关的知识,希望对你有一定的参考价值。
1、创建认证微服务端
创建mengxuegu-blog-oauth2微服务工程,做认证使用
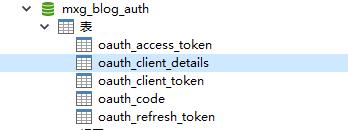
认证服务器表结构默认如下

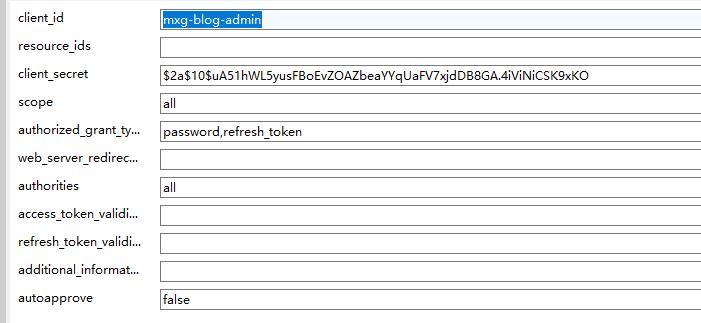
 最主要表就是这个oauth_client_details

生成 client_sercet密码
@RunWith(SpringRunner.class)
@SpringBootTest
public class TestAuthApplication
 @Test
 public void testPwd()
 System.out.println(new BCryptPasswordEncoder().encode("123456"));
主要添加依赖
<!-- Spring Security、OAuth2 和JWT等 -->
 <dependency>
 <groupId>org.springframework.cloud</groupId>
 <artifactId>spring-cloud-starter-oauth2</artifactId>
 </dependency>
因为登录要调用其他微服务模块的接口,所以先封装接口
feign封装的接口
1、 findUserByUsername (通过用户名查询用户信息)
2、findMenuByUserId(通过用户的ID查询用户所有权限)
@ApiImplicitParam(name="username", value="用户名", required=true)
 @ApiOperation("Feign接口-通过用户名查询用户信息")
 @GetMapping("/api/feign/user/username")
 SysUser findUserByUsername(@PathVariable("username") String username);
 @ApiImplicitParam(name="username", value="用户ID", required=true)
 @ApiOperation("Feign接口-通过用户id查询拥有权限")
 @GetMapping("/api/feign/menu/userId")
 List<SysMenu> findMenuByUserId(@PathVariable("userId") String userId);
(1)、实现 UserDetailsService
逻辑 1. 因为 UserDetailsService 接口中有一个 UserDetails loadUserByUsername(String username) 抽象方法, 它的返回值 UserDetails 接口,我们要创建一个 JwtUser 类实现这个接口。
注意:isAccountNonExpired 声明了 boolean 类型,但是在构造器是 Integer 类型接收, 原因是 数据库 sys_user 表中存储的是整型,所以我们然后转 boolean,即 : this.isAccountNonExpired = isAccountNonExpired == 1 ? true: false;
@JSONField(serialize = false) // 忽略转json ,因为 后面我们要将这个类对象转成json。
package com.jhj.blog.oauth2.service;

import org.springframework.security.core.GrantedAuthority;
import org.springframework.security.core.userdetails.UserDetails;
import com.alibaba.fastjson.annotation.JSONField;
import io.swagger.annotations.ApiModelProperty;
import lombok.Data;
import java.util.List;

/**
 * @program: jhj-blog
 * @ClassName JwtUser
 * @description:
* @create: 2022-01-04 20:45
 * @Version 1.0
 **/

@Data
public class JwtUser implements UserDetails

    @ApiModelProperty(value = "用户ID")
    private String uid;
    @ApiModelProperty(value = "用户名")
    private String username;
    @JSONField(serialize = false) // 忽略转json
    @ApiModelProperty(value = "密码,加密存储, admin/1234")
    private String password;
    @ApiModelProperty(value = "昵称")
    private String nickName;
    @ApiModelProperty(value = "头像url")
    private String imageUrl;
    @ApiModelProperty(value = "注册手机号")
    private String mobile;
    @ApiModelProperty(value = "注册邮箱")
    private String email;
    // 1 true 0 false
    @JSONField(serialize = false) // 忽略转json
    @ApiModelProperty(value = "帐户是否过期(1 未过期,0已过期)")
    private boolean isAccountNonExpired; // 不要写小写 boolean
    @JSONField(serialize = false) // 忽略转json
    @ApiModelProperty(value = "帐户是否被锁定(1 未过期,0已过期)")
    private boolean isAccountNonLocked;
    @JSONField(serialize = false) // 忽略转json
    @ApiModelProperty(value = "密码是否过期(1 未过期,0已过期)")
    private boolean isCredentialsNonExpired;
    @JSONField(serialize = false) // 忽略转json
    @ApiModelProperty(value = "帐户是否可用(1 可用,0 删除用户)")
    private boolean isEnabled;
    /**
     * 封装用户拥有的菜单权限标识
     */
    @JSONField(serialize = false) // 忽略转json
    private List<GrantedAuthority> authorities;
    // isAccountNonExpired 是 Integer 类型接收,然后转 boolean
    public JwtUser(String uid, String username, String password,
                   String nickName, String imageUrl, String mobile, String email,
                   Integer isAccountNonExpired, Integer isAccountNonLocked,
                   Integer isCredentialsNonExpired, Integer isEnabled,
                   List<GrantedAuthority> authorities)
        this.uid = uid;
        this.username = username;
        this.password = password;
        this.nickName = nickName;
        this.imageUrl = imageUrl;
        this.mobile = mobile;
        this.email = email;
        this.isAccountNonExpired = isAccountNonExpired == 1 ? true: false;
        this.isAccountNonLocked = isAccountNonLocked == 1 ? true: false;
        this.isCredentialsNonExpired = isCredentialsNonExpired == 1 ? true: false;
        this.isEnabled = isEnabled == 1 ? true: false;
        this.authorities = authorities;
(2)、创建UserDetailsServiceImpl 实现 UserDetailsService接口。
调用feign接口,查看用户信息并把用户信息封装到UserDetails 中
package com.jhj.blog.oauth2.service;

import com.baomidou.mybatisplus.core.toolkit.CollectionUtils;
import com.jhj.blog.entities.SysMenu;
import com.jhj.blog.entities.SysUser;
import org.apache.commons.lang.StringUtils;

import com.jhj.blog.feign.IFeignSystemController;
import org.springframework.beans.factory.annotation.Autowired;
import org.springframework.security.authentication.BadCredentialsException;
import org.springframework.security.core.GrantedAuthority;
import org.springframework.security.core.authority.SimpleGrantedAuthority;
import org.springframework.security.core.userdetails.UserDetails;
import org.springframework.security.core.userdetails.UserDetailsService;
import org.springframework.security.core.userdetails.UsernameNotFoundException;
import org.springframework.stereotype.Service;

import java.util.ArrayList;
import java.util.List;

/**
 * @program: jhj-blog
 * @ClassName UserDetailsServiceImpl
 * @description:
 * @create: 2022-01-04 20:44
 * @Version 1.0
 **/
@Service
public class UserDetailsServiceImpl implements UserDetailsService


    @Autowired // 检查启动类注解 @EnableFeignClients
    private IFeignSystemController feignSystemController;

    @Override
    public UserDetails loadUserByUsername(String username) throws UsernameNotFoundException
        // 1. 判断用户名是否为空
        if(StringUtils.isEmpty(username))
            throw new BadCredentialsException("用户名不能为空");

        SysUser sysUser = feignSystemController.findByUsername(username);
        if(sysUser == null)
            throw new BadCredentialsException("用户名或密码错误");

        // 3. 通过用户id去查询数据库的拥有的权限信息
        List<SysMenu> menuList =
                feignSystemController.findMenuByUserId(sysUser.getId());
        // 4. 封装权限信息(权限标识符code)
        List<GrantedAuthority> authorities = null;
        if(CollectionUtils.isNotEmpty(menuList))
            authorities = new ArrayList<>();
            for(SysMenu menu: menuList)
                // 权限标识
                String code = menu.getCode();
//                将权限标识封装起来比如 article:delete 文章删除权限
                authorities.add(new SimpleGrantedAuthority(code));


        // 5. 构建UserDetails接口的实现类JwtUser对象
        JwtUser jwtUser = new JwtUser(
                sysUser.getId(), sysUser.getUsername(), sysUser.getPassword(),
                sysUser.getNickName(), sysUser.getImageUrl(), sysUser.getMobile(),
                sysUser.getEmail(),
                sysUser.getIsAccountNonExpired(), sysUser.getIsAccountNonLocked(),
                sysUser.getIsCredentialsNonExpired(), sysUser.getIsEnabled(),
                authorities );
        return jwtUser;
(3)添加密码配置类到Spring容器中
@Configuration //标注配置类
public class PasswordEncoderConfig

    @Bean
    public PasswordEncoder passwordEncoder()
        return  new BCryptPasswordEncoder();
(4)配置 Jwt 管理令牌
JSON Web Token(JWT)是一个开放的行业标准(RFC 7519),它定义了一种紧凑且独立的方式,用于在各方之 间作为JSON对象安全地传输信息。此信息可以通过数字签名进行验证和信任。JWT可以使用密码(使用HMAC算 法)或使用RSA或ECDSA的公钥/私钥对进行签名 ,防止被篡改。
JWT令牌生成采用非对称加密算法.
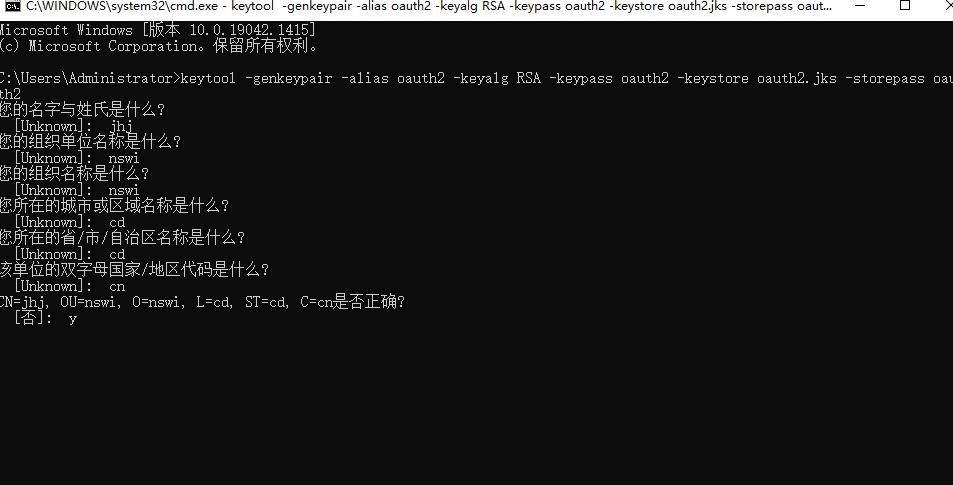
别名为 oauth2,秘钥算法为 RSA,秘钥口令为 oauth2,秘钥库(文件)名称为 oauth2.jks,秘钥库(文 件)口令为 oauth2。输入命令回车后,后面还问题需要回答,最后输入 y 表示确定 :
keytool -genkeypair -alias oauth2 -keyalg RSA -keypass oauth2 -keystore oauth2.jks -storepass oauth2
将生成的 oauth2.jks 文件 拷贝到认证微服务服务器 mengxuegu-blog-oauth2 的 resources 文件夹下:
使用JWT管理令牌
import org.springframework.context.annotation.Bean;
import org.springframework.context.annotation.Configuration;
import org.springframework.core.io.ClassPathResource;
import org.springframework.security.oauth2.provider.token.TokenStore;
import org.springframework.security.oauth2.provider.token.store.JwtAccessTokenConverter;
import org.springframework.security.oauth2.provider.token.store.JwtTokenStore;
import org.springframework.security.oauth2.provider.token.store.KeyStoreKeyFactory;

/**
 * @program: jhj-blog
 * @ClassName JwtTokenStoreConfig
 * @description:
 * @create: 2022-01-05 10:08
 * @Version 1.0
 * 第三步
 * JWT管理信息类配置
 *
 **/
@Configuration
public class JwtTokenStoreConfig
    @Bean
    public JwtAccessTokenConverter jwtAccessTokenConverter()
        JwtAccessTokenConverter converter = new JwtAccessTokenConverter();
        // 采用非对称加密jwt
        // 第1个参数就是密钥证书文件,第2个参数 密钥库口令, 私钥进行签名
        KeyStoreKeyFactory factory = new KeyStoreKeyFactory(
                new ClassPathResource("oauth2.jks"), "oauth2".toCharArray());
        converter.setKeyPair(factory.getKeyPair("oauth2"));
        return converter;

    @Bean
    public TokenStore tokenStore()
        // Jwt管理令牌
        return new JwtTokenStore(jwtAccessTokenConverter());
(5)、扩展认证的响应数据(将用户信息userinfo响应给前端)
@Component // 不要少了
public class JwtTokenEnhancer implements TokenEnhancer

    @Override
    public OAuth2AccessToken enhance(OAuth2AccessToken oAuth2AccessToken, OAuth2Authentication oAuth2Authentication)
// 扩展令牌内容
        JwtUser user = (JwtUser) oAuth2Authentication.getPrincipal();
        Map<String, Object> map = new LinkedHashMap<>();
        map.put("userInfo", JSON.toJSON(user));

        //设置附加信息
        ((DefaultOAuth2AccessToken)oAuth2AccessToken).setAdditionalInformation(map);

        return oAuth2AccessToken;
(6)、加载中文响应信息
全局搜索messages_zh_CN,找到springscurity的jar包解压,拿到messages_zh_CN.properties文件,放到resource目录下面,因为底层会加上properties,所以不加上后缀。
@Configuration
public class ReloadMessageConfig
    @Bean // 加载中文的认证提示信息
    public ReloadableResourceBundleMessageSource messageSource()
        ReloadableResourceBundleMessageSource messageSource = new
                ReloadableResourceBundleMessageSource();
        //.properties 不要加到后面
// messageSource.setBasename("classpath:org/springframework/security/messages_zh_CN");
        messageSource.setBasename("classpath:messages_zh_CN");//不要.properties
        return messageSource;
(7)、创建认证服务器配置类
1、配置数据源,2、配置密码模式,3配置扩展响应数据等
@Configuration
@EnableAuthorizationServer // 开启了认证服务器
public class AuthorizationServerConfig extends AuthorizationServerConfigurerAdapter
    @Autowired // 1. 数据源
    private DataSource dataSource;

    @Bean // 1. 客户端使用 jdbc 管理
    public ClientDetailsService jdbcClientDetailsService()

        return new JdbcClientDetailsService(dataSource);


    /**
     * 1. 配置被允许访问此认证服务器的客户端信息: 数据库方式
     * 如:门户客户端,后台客户端
     */
    @Override
    public void configure(ClientDetailsServiceConfigurer clients) throws Exception
        // jdbc 管理客户端
        clients.withClientDetails(jdbcClientDetailsService());


    // 2. 在 SpringSecurityConfig 中添加到容器了, 密码模式需要
    @Autowired
    private AuthenticationManager authenticationManager;
    @Autowired
    private UserDetailsService userDetailsService;
    @Autowired // token管理方式,引用 JwtTokenStoreConfig 配置的
    private TokenStore tokenStore;
    @Autowired // jwt 转换器
    private JwtAccessTokenConverter jwtAccessTokenConverter;


    /**
     * 注入扩展器
     */
    @Autowired
    private TokenEnhancer jwtTokenEnhancer;

    /**
     * 关于认证服务器端点配置
     *
     * @param endpoints
     * @throws Exception
     */
    @Override
    public void configure(AuthorizationServerEndpointsConfigurer endpoints) throws Exception
        endpoints.authenticationManager(authenticationManager);
        // 刷新令牌时需要使用
        endpoints.userDetailsService(userDetailsService);
        // 令牌的管理方式
        endpoints.tokenStore(tokenStore).accessTokenConverter(jwtAccessTokenConverter);

        // 添加扩展器 +++++++ ++++++++++++++++++++++++++++
        TokenEnhancerChain enhancerChain = new TokenEnhancerChain();
        List<TokenEnhancer> enhancerList = new ArrayList<>();
        enhancerList.add(jwtTokenEnhancer);
        enhancerList.add(jwtAccessTokenConverter);
        enhancerChain.setTokenEnhancers(enhancerList);
        endpoints.tokenEnhancer(enhancerChain).accessTokenConverter(jwtAccessTokenConverter);


    @Override
    public void configure(AuthorizationServerSecurityConfigurer security) throws Exception
        // /oauth/check_token 解析令牌,默认情况 下拒绝访问
        security.checkTokenAccess("permitAll()");
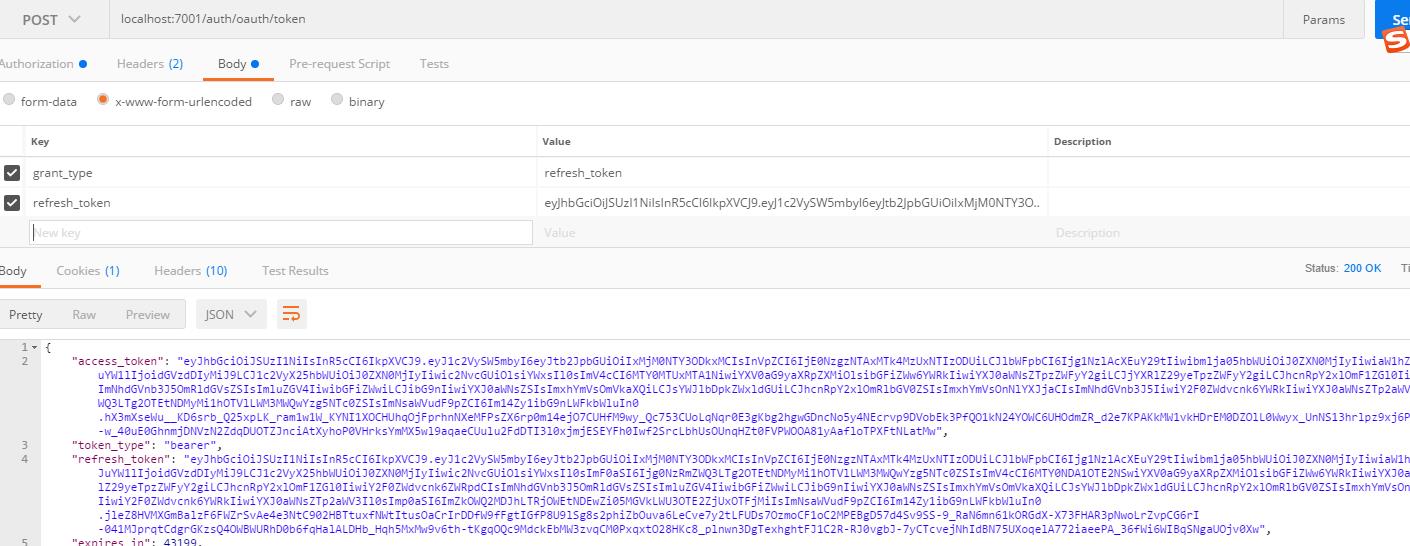
1、密码模式响应用户信息
localhost:7001/auth/oauth/token

密码模式响应用户信息

通过刷新令牌获取用户信息

以上是关于SpringCould整合oauth2的主要内容,如果未能解决你的问题,请参考以下文章