如何在colab配置openmmlab环境(目前网上资料较少,避免踩坑)
Posted 何时能够变强
tags:
篇首语:本文由小常识网(cha138.com)小编为大家整理,主要介绍了如何在colab配置openmmlab环境(目前网上资料较少,避免踩坑)相关的知识,希望对你有一定的参考价值。
1.colab简介
colab是谷歌云服务器,作为一款免费的云服务器谷歌可以说是非常良心,可以享受高配置的gpu运行环境,对于我自己而言我自己电脑只能用cpu跑深度学习的代码可以说时间和效率都非常低。接下来根据自己两天的踩坑经验给大家发一款openmmlab在colab的配置教程。但是每次打开记笔记刷新以后都要重新配置,大约十分钟!
2.注意torch和gpu的版本
!sudo lsb_release -a # 查看系统版本
!nvcc -V #或者!nvidia-smi # 查看cuda版本
!gcc --version # 查看GCC版本
``——————————————————手动分割线————————————————
#输出
No LSB modules are available.
Distributor ID:	Ubuntu
Description:	Ubuntu 18.04.5 LTS
Release:	18.04
Codename:	bionic
nvcc: NVIDIA (R) Cuda compiler driver
Copyright (c) 2005-2020 NVIDIA Corporation
Built on Wed_Jul_22_19:09:09_PDT_2020
Cuda compilation tools, release 11.0, V11.0.221
Build cuda_11.0_bu.TC445_37.28845127_0
gcc (Ubuntu 7.5.0-3ubuntu1~18.04) 7.5.0
Copyright (C) 2017 Free Software Foundation, Inc.
This is free software; see the source for copying conditions.  There is NO
warranty; not even for MERCHANTABILITY or FITNESS FOR A PARTICULAR PURPOSE.
1.观察可知Ubuntu18.04,cuda11.0,GCC7.5.0
import torch, torchvision
print(torch.__version__, torch.cuda.is_available())
2.随着时间的推移大家的版本可能都不太一样,我这里是1.9.0 cuda版本是10.2,笔记本设置选择gpu,否则gpu可能是false。
3.可以看到硬件的配置和cuda的版本是不一致的这个时候我们要卸载原来的torch环境,安装指定版本的torch
#卸载原有的pytorch
!pip uninstall torch torchvision -y
#线上安装新的pytorch
!pip install -U torch==1.8.1+cu111 torchvision==0.9.1+cu111 -f https://download.pytorch.org/whl/torch_stable.html
4.把Google云盘挂载到colab上
# 把Google云盘挂载到colab上
from google.colab import drive
drive.mount('/content/gdrive',force_remount=True) #这一步会让你点击链接获取验证码
#目录"/content/gdrive/MyDrive/"就指向你的谷歌云盘了
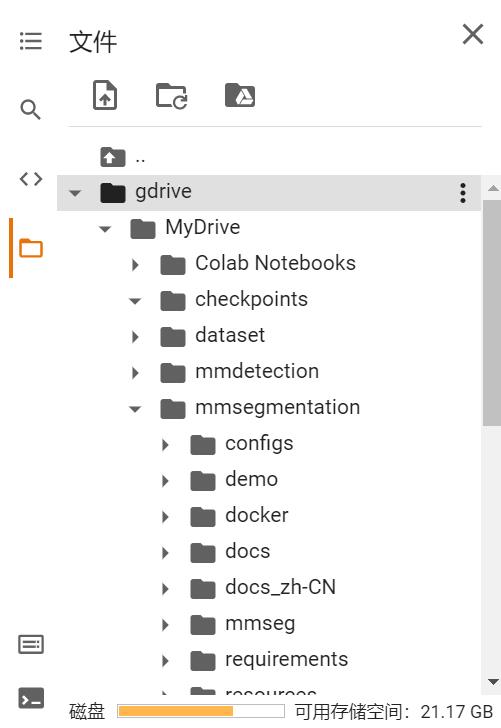
5.成功挂载以后左侧文件应该是这样的,当然这里你们还没有mmdet等文件夹。

6.挂载成功以后进入MyDrive文件夹
%cd /content/gdrive/MyDrive/
7.进行mmoepnlab的配置
#安装mmdetection
#安装mmdetection
!rm -rf mmdetection #如果有mmdetection文件夹就删掉,下面新建
!git clone https://github.com/open-mmlab/mmdetection.git
%cd mmdetection

!pip install mmcv-full
!pip install -e .
# install Pillow 7.0.0 back in order to avoid bug in colab
!pip install Pillow==7.0.0
#静候安装完成,预计10min
import os
os.kill(os.getpid(), 9)
%cd /content/gdrive/MyDrive/
#上一步cd主要是为了把mmseg放在MyDrive里面。
!rm -rf mmsegmentation
!git clone https://github.com/open-mmlab/mmsegmentation.git
%cd mmsegmentation
8.检查是否安装成功
import torch, torchvision
print(torch.__version__, torch.cuda.is_available())

# Check MMDetection installation
import mmdet
print(mmdet.__version__)

# Check mmcv installation
from mmcv.ops import get_compiling_cuda_version, get_compiler_version
print(get_compiling_cuda_version())
print(get_compiler_version())
如果是下面这样就是安装成功的。

3.示例程序检测(学会配置config)
config的配置大家需要下载指定的模型保存到checkpoints文件夹中,大家可以根据路径的不同进行调整
** 示例的model下载链接

大家下载模型成功以后安装到云盘根据路径进行config配置就可以了,记得cd到MyDrive
from mmseg.apis import init_segmentor, inference_segmentor, show_result_pyplot
from mmseg.core.evaluation import get_palette
import mmcv
from google.colab.patches import cv2_imshow
from google.colab.patches import cv2
from matplotlib import pyplot as plt

config_file = 'mmsegmentation/configs/pspnet/pspnet_r50-d8_512x1024_40k_cityscapes.py'
checkpoint_file = 'checkpoints/pspnet_r50-d8_512x1024_40k_cityscapes_20200605_003338-2966598c.pth'

# 从一个 config 配置文件和 checkpoint 文件里创建分割模型
model = init_segmentor(config_file, checkpoint_file, device='cuda:0')

# 测试一张样例图片并得到结果
img = 'test.jpg'  # 或者 img = mmcv.imread(img), 这将只加载图像一次.
result = inference_segmentor(model, img)
# 在新的窗口里可视化结果
show_result_pyplot(model, img, result, get_palette('cityscapes'))

以上是关于如何在colab配置openmmlab环境(目前网上资料较少,避免踩坑)的主要内容,如果未能解决你的问题,请参考以下文章