Shiro权限管理
Posted funyoung
tags:
篇首语:本文由小常识网(cha138.com)小编为大家整理,主要介绍了Shiro权限管理相关的知识,希望对你有一定的参考价值。
1.简介
Apache Shiro是Java的一个安全框架,对比Spring Security,没有Spring Security功能强大,但在实际工作时可能并不需要那么复杂,所以使用小而简单的Shiro就足够了.
Shiro可以非常容易的开发出足够好的应用,其不仅可以用在JavaSE环境,也可以用在JavaEE环境.
shiro满足的功能:
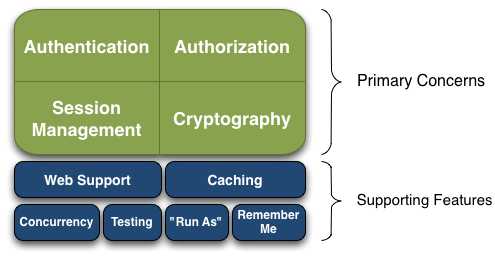
Shiro可以帮助我们完成:认证、授权、会话管理、加密等,并且提供与web集成、缓存、rememberMed等功能.
2.Shiro的工作模型
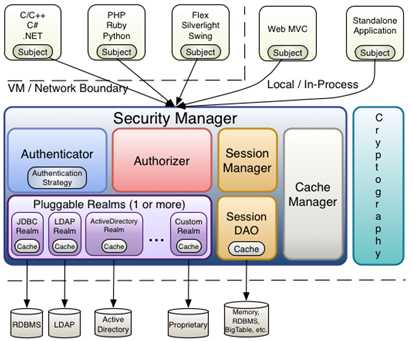
应用程序直接与Shiro中的Subject进行交互,Shiro的对外API就是Subject.
Subject: 代表当前用户,所有Subject都将绑定到SecurityManager, 与Subject的所有交互都会委托给SecurityManager.
SecurityManager:所有与安全相关的操作都由SecurityManager进行统一管理,负责与shiro的相关组件进行交互,类似前端控制器.
Realm: 为SecurityManager提供安全数据, 如用户的身份、角色信息等,类似安全数据源.
SessionManager:会话管理,会话可以是普通JavaSE环境的,也可以是Web环境的.
SessionDAO:用于会话的CRUD.
CacheManager:缓存管理器,可以将从Realm中获取的数据放入缓存中管理.
Cryptography:Shiro提供了常见的加密工具类用于密码的加密.
3.Shiro的组件
3.1 Subject
Subject接口声明了获取当前用户信息的方法,其只有DelegatingSubject实现类.
*SecurityUtils.getSubject()方法返回代表当前用户的Subject对象
Subject API:
//获取Session实例
Session getSession()
//判断subject是否已经认证
boolean isAuthenticated()

//判断当前用户是否通过RememberMe形式登录
boolean isRememberMe()

//执行登录,实际是调用SecurityManager的login方法
void login(AuthenticationToken token)

//判断subject是否拥有某个角色
boolean hasRole(String role)

//判断subject是否拥有某个功能
boolean isPermitted(String permission)

//执行注销操作
void logout()
3.2 SecurityManager
SecurityManager接口声明了用于认证、注销、创建subject的方法
*使用SecurityUtils.getSecurityManager()方法可以获取SecurityManager实例
//认证操作
Subject login(Subject subject, AuthenticationToken authenticationToken)

//注销操作
void logout(Subject subject);

//Subject的创建
Subject createSubject(SubjectContext context);
AuthenticationToken
AuthenticationToken接口是用于封装principal与Credential,有UsernamePasswordToken实现类.
*principal:代表用户的身份,可以是用户名、邮箱、手机号码等.
*Credential:凭证,一般是密码.
*在执行登录操作时需要传递AuthenticationToken的实现类,其包含了用户的身份以及凭证信息.
3.3 Realm
Realm接口为SecurityManager提供安全数据, Shiro中提供了很多Realm接口的抽象实现类
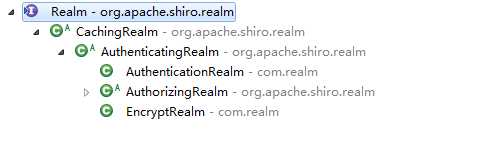
AuthenticatingRealm抽象类声明了用于认证的方法:
//认证操作
protected abstract AuthenticationInfo doGetAuthenticationInfo(AuthenticationToken token)
AuthorizingRealm抽象类声明了用于授权的方法:
//授权操作,PrincipalCollection封装了用户的身份信息,使用其getPrimaryPrincipal()方法获取当前登录用户的身份,返回Object类型.
protected abstract AuthorizationInfo doGetAuthorizationInfo(PrincipalCollection principals)
*若应用中只需要认证的功能,则自定义Realm继承AuthenticatingRealm,实现其doGetAuthenticationInfo方法, 若应用中需要用到认证与授权功能,则自定义Realm继承AuthorizingRealm,实现其doGetAuthenticationInfo、doGetAuthorizationInfo方法.
*doGetAuthenticationInfo(AuthenticationToken token) 与 doGetAuthorizationInfo(PrincipalCollection principals)方法都是由SecurityManager自动调用.
4.shiro的使用
4.1 导入相关依赖
<dependency>
    <groupId>org.apache.shiro</groupId>
    <artifactId>shiro-core</artifactId>
    <version>1.4.0</version>
</dependency>
<dependency>
    <groupId>net.sf.ehcache</groupId>
    <artifactId>ehcache</artifactId>
    <version>2.10.4</version>
</dependency>
<dependency>
    <groupId>org.springframework</groupId>
    <artifactId>spring-webmvc</artifactId>
    <version>4.3.17.RELEASE</version>
</dependency>
*由于shiro在认证与授权时会使用到缓存,其使用Ehcache缓存框架,因此需要添加Ehcache的依赖以及配置文件.
*一般使用Shiro时都会与Spring进行集成,因此需要导入Spring的依赖.
4.2 配置Spring提供的过滤器代理
在web.xml中配置DelegatingFilterProxy并指定targetBeanName.
<filter>
    <filter-name>shiroFilter</filter-name>
    <filter-class>org.springframework.web.filter.DelegatingFilterProxy</filter-class>
     <init-param>
          <param-name>targetBeanName</param-name>
          <param-value>shiroFilter</param-value>
     </init-param>
</filter>

<filter-mapping>
    <filter-name>shiroFilter</filter-name>
    <url-pattern>/*</url-pattern>
</filter-mapping>
*DelegatingFilterProxy是一个标准的Filter代理,通过targetBeanName指定其要代理的Filter的bean的id(默认情况下将代理bean id为filter-name的Filter).
4.3 创建自定义Realm
1.认证
AuthenticatingRealm抽象类声明了用于认证的方法:
//认证操作
protected abstract AuthenticationInfo doGetAuthenticationInfo(AuthenticationToken token)
AuthenticationInfo接口用于封装用户的身份与凭证信息 ,Shiro为AuthenticationInfo提供了以下实现类:
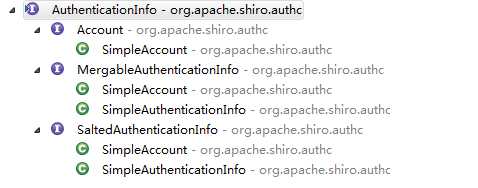
一般使用SimpleAuthenticationInfo实现类,只需将AuthenticationToken包含的用户名以及通过数据库查询得到的密码进行封装返回即可.
*SecurityManager会调用该Realm的doGetAuthenticationInfo方法获取用户认证信息,根据AuthenticationToken的Credential与从Realm中获取的AuthenticationInfo中的Credential进行校验(密码的比对是由shiro自动完成)
/**
 * SecurityManager会到该Reaml获取安全数据.
 * @author ZHUANGHAOTANG
 *
 */
public class AuthenticationRealm extends AuthenticatingRealm {

    @Autowired
    private UserService userService;

    /**
     * 获取Reaml中数据的方法,返回AuthencationInfo存放安全数据,供SecurityManager使用.
     */
    @Override
    protected AuthenticationInfo doGetAuthenticationInfo(AuthenticationToken token) throws AuthenticationException {
        //获取用户填写的用户名
        String username = ((UsernamePasswordToken)token).getUsername();
        //根据用户名查询数据库用户表的记录.
        User user = userService.findByOne(username);
        //若不存在此用户,则手动抛出未知身份异常.
        if(user == null){
            throw new UnknownAccountException();
        }else{
            //返回AuthencationInfo接口类型,使用SimpleAuthenticationInfo实现类,参数是AuthenticationToken传递的用户名、通过用户名查询的密码、Realm的名称.
            return new SimpleAuthenticationInfo(username, user.getPassword(),this.getName());
        }
    }

}
<!-- 进行认证的Realm -->
<bean id="authenticationRealm" class="com.realm.AuthenticationRealm"/>
*当认证失败时在subject.login()方法进行异常的捕获(控制层),根据异常类型的不同返回相应的提示给前端.
//未知的账号异常(需手动抛出)
UnknownAccountException

//非法的凭证异常(校验失败自动抛出)
IncorrectCredentialsException
加密
由于数据库中保存的密码通常是密文,而用户传递过来时是明文,因此就需要让SecurityManager在进行认证时自动对AuthenticationToken中的Credential进行加密后再与AuthenticationInfo中的Credential进行比对.
*SecurityManager是通过AuthenticatingRealm的CredentialsMatcher(凭证匹配器)进行密码的比对.
Shiro为CredentialsMatcher凭证匹配器提供了以下实现类:
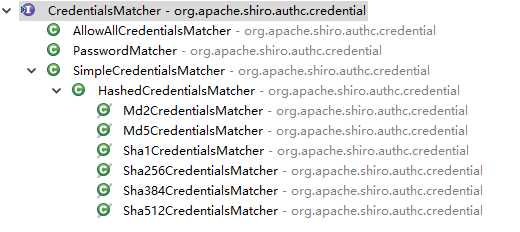
*默认情况下AuthenticatingRealm使用SimpleCredentialsMatcher实现类,SecurityManager不会对AuthenticationToken中的Credential进行加密 , 若使用HashedCredentialsMatcher实现类,则会对AuthenticationToken中的Credential进行加密.
HashedCredentialsMatcher提供了hashAlgorithm、hashIterations属性分别设置加密的算法以及次数.
<!-- 进行认证(加密)的Realm -->
<bean id="authenticationRealm" class="com.realm.AuthenticationRealm">
    <property name="CredentialsMatcher" >
       <!-- HashedCredentialsMatcher -->
       <bean class="org.apache.shiro.authc.Credential.HashedCredentialsMatcher">
        <!-- 支持md和sha系列 -->
        <property name="hashAlgorithmName" value="md5"/>
        <property name="hashIterations" value="1024"/>
       </bean>
     </property>
 </bean>
HashedCredentialsMatcher内部是使用SimpleHash工具类进行加密的,其提供的构造方法:
public SimpleHash(String algorithmName, Object source)

public SimpleHash(String algorithmName, Object source, Object salt, int hashIterations)

public SimpleHash(String algorithmName, Object source, Object salt)

public SimpleHash(String algorithmName, Object source, Object salt, int hashIterations)
algorithmName:加密算法(MD系列或SHA系列)
source:目标
salt:盐值
hashIterations:加密次数
使用SimpleHash实例的toHex()方法用于获取加密后的值,其toString()方法内部调用toHex()方法.
*SimpleHash可用于在注册时,对用户提交的密码进行加密,认证时把AuthenticationToken中的密码使用与注册时相同的加密规则加密后再与数据库中的密码进行比对.
盐值加密
若两个用户的密码一样,则经过MD或SHA系列算法加密后的密文仍然一样(哈希函数),数据库中就保存着两个相同的密文.
盐值加密:在原有加密规则的基础上添加自定义的盐(salt,一般使用用户的唯一标识代替),则可以保证两个用户的密码相同,但经过散列后的密文不同,因为它们的盐值不一样.
在Realm中的doGetAuthenticationInfo方法中使用SimpleAuthenticationInfo带盐值的构造方法进行返回, SecurityManager就会对AuthenticationToken中的Credential进行盐值加密,然后再与AuthenticationInfo中的Credential进行比对.
/**
 * 盐值加密
 * @author ZHUANGHAOTANG
 */
public class EncryptRealm extends AuthenticatingRealm {

    @Autowired
    private UserService userService;

    @Override
    protected AuthenticationInfo doGetAuthenticationInfo(AuthenticationToken token) throws AuthenticationException {

        String username = ((UsernamePasswordToken)token).getUsername();
        User user = userService.findByOne(username);
        if(user == null){
            throw new UnknownAccountException();
        }else{
            //构造盐值
            ByteSource salt = ByteSource.Util.bytes(username);
            return new SimpleAuthenticationInfo(username, user.getPassword(),salt,this.getName());
        }
    }
}
*使用ByteSource.Util.bytes(String str)方法构造盐值,返回ByteSource类型.
<!-- 进行认证(加密)的Realm -->
<bean id="authenticationRealm" class="com.realm.AuthenticationRealm">
    <property name="CredentialsMatcher" >
       <!-- HashedCredentialsMatcher -->
       <bean class="org.apache.shiro.authc.Credential.HashedCredentialsMatcher">
        <!-- 支持md和sha系列 -->
        <property name="hashAlgorithmName" value="md5"/>
        <property name="hashIterations" value="1024"/>
       </bean>
     </property>
 </bean>
RememberMe
RememberMe就是cookie,如果是b/s架构,则cookie信息保存到客户端磁盘中.
*可以使用AuthenticationToken的setRememberMe(boolean is)方法设置该用户是否使用rememberMe, 当关闭浏览器(sessionId cookie失效)再访问服务器资源时属于rememberMe,使用Subject的isAuthenticated()方法会返回false,isRememberMe()返回true.
*可以通过SecurityManager的rememberMeManager属性的cookie属性的maxAge属性修改rememberMe的有效时间( 即cookie的有效时间,单位:秒)
<!-- 配置securityManager -->
<bean id="securityManager" class="org.apache.shiro.web.mgt.DefaultWebSecurityManager">
    <property name="realm" ref="authenticationRealm"/>
    <!-- 设置rememberMe的有效期 -->
    <property name="rememberMeManager.cookie.maxAge" value="604800"/>
</bean>
*rememberMe只能通过anno、user拦截器
2.授权
AuthorizingRealm抽象类声明了用于授权的方法:
//授权操作,PrincipalCollection封装了用户的身份信息,使用其getPrimaryPrincipal()方法获取当前登录用户的身份,返回Object类型.
protected abstract AuthorizationInfo doGetAuthorizationInfo(PrincipalCollection principals)
AuthorizationInfo接口用于封装用户的角色或行为信息,Shiro为AuthorizationInfo提供了以下实现类:

一般使用SimpleAuthorizationInfo实现类,其Set<String> roles属性用于存放用户拥有的角色或行为,只需根据用户的身份从数据库查询用户拥有的所有角色或行为进行封装返回即可.
/**
 * 认证和授权(角色)
 * @author ZHUANGHAOTANG
 *
 */
public class AuthorizationRealm extends AuthorizingRealm {

    @Autowired
    private UserService userService;

    @Autowired
    private RoleService roleService;

    //授权
    @Override
    protected AuthorizationInfo doGetAuthorizationInfo(PrincipalCollection principal) {
        //获取当前认证用户的身份
        String username = ((String)principal.getPrimaryPrincipal());
        //获取该用户拥有的角色
        Set<String> roles = roleService.findByUsername(username);
        //返回AuthorizationInfo实例
        return new SimpleAuthorizationInfo(roles);
    }

    //认证
    @Override
    protected AuthenticationInfo doGetAuthenticationInfo(AuthenticationToken token) throws AuthenticationException {
        //获取用户填写的用户名
        String username = ((UsernamePasswordToken)token).getUsername();
        //根据用户名查询数据库用户表的记录.
        User user = userService.findByOne(username);
        //若不存在此用户,则手动抛出未知身份异常.
        if(user == null){
            throw new UnknownAccountException();
        }else{
            //返回AuthencationInfo接口类型,使用SimpleAuthenticationInfo实现类,参数是Subject传递的用户名、通过用户名查询的密码、Realm的名称.
            return new SimpleAuthenticationInfo(username, user.getPassword(),this.getName());
        }
    }

}
<!-- 认证(加密)和授权的Realm -->
<bean id="authorizationRealm" class="com.realm.AuthorizationRealm">
      <property name="CredentialsMatcher" >
          <!-- HashedCredentialsMatcher -->
          <bean class="org.apache.shiro.authc.Credential.HashedCredentialsMatcher">
              <property name="hashAlgorithmName" value="md5"/>
              <property name="hashIterations" value="1024"/>
          </bean>
      </property>
</bean>
3.缓存

CachingRealm实现类中提供了私有的CacheManager属性且实现了CacheManagerAware接口,该接口声明了void setCacheManager(CacheManager cacheManager)方法.
DefaultSecurityManager组件会检测Realm是否实现了CacheManagerAware接口,若实现了则对其注入CacheManager.
*AuthenticatingRealm、AuthorizingRealm都会继承CachingRealm,因此认证和授权的Realm都有CacheManager属性,都将使用缓存.
*使用缓存时,会把第一次认证与授权后的AuthenticationInfo和AuthorizationInfo放到缓存,当SecurityManager再次用到时直接从缓存中获取.
在Spring中配置缓存管理器并把缓存管理器注入到SecurityManager的cacheManger属性中.
<!-- 配置securityManager -->
<bean id="securityManager" class="org.apache.shiro.web.mgt.DefaultWebSecurityManager">
    <!-- 注入realm -->
    <property name="realm" ref="authorizationRealm"/>
    <!-- 注入缓存管理器 -->
    <property name="cacheManager" ref="cacheManager"/>
</bean>


<!-- 配置缓存管理器 -->
<bean id="cacheManager" class="org.apache.shiro.cache.ehcache.EhCacheManager">
    <!-- 指定缓存配置文件的位置 -->
    <property name="cacheManagerConfigFile" value="classpath:ehcache.xml"/>
</bean>
*默认情况下Realm会使用ehcache.xml文件中默认的缓存配置,可以通过Realm的authenticationCacheName属性设置使用的缓存名称.
<bean id="authorizationRealm" class="com.realm.AuthorizationRealm">
  <property name="authenticationCacheName" value="authenticationCache" />
</bean>
4.4 注入Realm
单Realm
单realm情况下直接把realm实例注入到SecurityManager中的realm属性中.
<!-- 配置securityManager -->
<bean id="securityManager" class="org.apache.shiro.web.mgt.DefaultWebSecurityManager">
    <!-- 注入realm -->
    <property name="realm" ref="authorizationRealm"/>
</bean>

<!-- 注册Realm -->
<bean id="authorizationRealm" class="com.zhuanght.realm.AuthorizationRealm"/>
多Realm
用户可以通过用户名/密码、邮箱/密码、手机号/密码进行登录( 即可以有多种身份进行认证 ),或者用户的数据保存到不同数据库中,此时可以使用多Realm进行验证.
单Realm情况下:SecurityManager会使用SingleRealmAuthencator认证器对用户进行认证.
多Realm情况下:SecurityManager会使用ModularRealmAuthenticator认证器对用户进行认证.
将ModularRealmAuthenticator注入到SecurityManager的authenticator属性中,然后把所有的Realm注入到SecurityManager的Collection<Realm> realms属性中.
*SecurityManager内部最终将自身Collection<Realm> 中的reaml注入到ModularRealmAuthenticator的Collection<Realm> realms属性中
*使用多Realm的情况下,SecurityManager就会依次去各个realm中获取数据(认证与授权),此时也会涉及认证的策略.
多Realm情况下的认证策略:
//只要有一个Realm认证成功即可,只返回第一个Realm认证成功的信息,其他的忽略.
FirstSuccessfulStrategy

//至少有一个Realm认证成功即可,返回所有Realm认证成功的认证信息.
AtLeastOneSuccessfulStrategy

//所有Realm认证成功才算成功,返回所有Realm认证成功的信息.
AllSuccessfulStrategy
*ModularRealmAuthenticator默认是使用AtLeastOneSuccessfulStrategy认证策略,可以在ModularRealmAuthenticator的authenticationStrategy属性进行修改.
 <!-- 配置securityManager -->
 <bean id="securityManager" class="org.apache.shiro.web.mgt.DefaultWebSecurityManager">
     <property name="authenticator" ref="modularRealmAuthenticator"/>
     <property name="realms">
      <list>
        <ref bean="usernameRealm"/>
        <ref bean="emailRealm"/>
        <ref bean="phoneNumberRealm"/>
      </list>
     </property>
 </bean>

 <bean id="modularRealmAuthenticator" class="org.apache.shiro.authc.pam.ModularRealmAuthenticator">
    <!-- 修改认证策略 -->
    <property name="authenticationStrategy">
      <bean class="org.apache.shiro.authc.pam.FirstSuccessfulStrategy"/>
    </property>
 </bean>

 <!-- 根据用户名认证和授权的Realm -->
 <bean id="usernameRealm" class="com.realm.UsernameRealm">
    <property name="CredentialsMatcher" >
         <!-- HashedCredentialsMatcher -->
         <bean class="org.apache.shiro.authc.Credential.HashedCredentialsMatcher">
           <property name="hashAlgorithmName" value="md5"/>
           <property name="hashIterations" value="1024"/>
         </bean>
    </property>
 </bean>

 <!-- 根据邮箱认证和授权的Realm -->
 <bean id="emailRealm" class="com.realm.EmailRealm">
    <property name="CredentialsMatcher" >
         <!-- HashedCredentialsMatcher -->
         <bean class="org.apache.shiro.authc.Credential.HashedCredentialsMatcher">
           <property name="hashAlgorithmName" value="md5"/>
           <property name="hashIterations" value="1024"/>
         </bean>
    </property>
 </bean>

 <!-- 根据手机号码认证和授权的Realm -->
 <bean id="phoneNumberRealm" class="com.realm.PhoneNumberRealm">
      <property name="CredentialsMatcher" >
           <!-- HashedCredentialsMatcher -->
           <bean class="org.apache.shiro.authc.Credential.HashedCredentialsMatcher">
             <property name="hashAlgorithmName" value="md5"/>
             <property name="hashIterations" value="1024"/>
           </bean>
      </property>
 </bean>
*若SecurityManager中配置了多个Realm,那么只要其中有一个realm授权成功就算成功.
4.5 对资源设置权限
方法一:在ShiroFilterFactoryBean的filterChainDefinitions属性中使用Shiro提供的拦截器对资源设置权限( URL=拦截器 ),指定某些资源需要拥有特定的权限的用户才能访问.

<bean id="shiroFilter" class="org.apache.shiro.spring.web.ShiroFilterFactoryBean">
    <!-- 注入securityManager -->
    <property name="securityManager" ref="securityManager"/>
    <!-- 设置登录URL,当用户未认证,但访问了需要认证后才能访问的页面,就会自动重定向到登录URL -->
    <property name="loginUrl" value="/index.html"/>
    <!-- 设置没有权限的URL,当认证后的用户访问一个页面却没有权限时,就会自动重定向到没有权限的URL -->
    <property name="unauthorizedUrl" value="/unauthorized.html"/>
    <property name="filterChainDefinitions">
        <value>
            /login = anon
            /logout = logout
            /** = authc
        </value>
    </property>
</bean>
从数据库中初始化资源权限信息:
ShiroFilterFactoryBean中的filterChainDefinitions属性最终会把权限的配置以key-value的形式保存到LinkedHashMap实例中,其中key为url,value为拦截器,最后把该实例注入到ShiroFilterFactoryBean中的filterChainDefinitionMap属性中.
*因此可以从数据库中查询资源的权限分配信息并以key-value的形式保存进一个LinkedHashMap,最后把LinkedHashMap注入到ShiroFilterFactoryBean的filterChainDefinitionMap属性中.
*IOC容器中有两种bean,一种是普通的bean,一种是工厂bean.
<!-- 普通bean,IOC容器会自动调用类的构造方法创建一个实例 -->
<bean id="" class="" />

<!-- 工厂bean,IOC容器会调用指定工厂类的指定方法,方法会返回一个实例 -->
<bean id="" factory-bean="" factory-method=""/>
/**
 * @Description: 工厂类,返回LinkedHashMap
 * @author ZHUANGHAOTANG
 */
@Component
public class FilterChainDefinitionMapBuilder {

    @Autowired
    private FunctionService functionService;


    public LinkedHashMap<String,String> builderFilterChainDefinitionMap(){
        return functionService.findAuthResource();
    }

}
<bean id="shiroFilter" class="org.apache.shiro.spring.web.ShiroFilterFactoryBean">
    <!-- 注入securityManager -->
    <property name="securityManager" ref="securityManager"/>
    <!-- 设置登录URL,当用户未认证,但访问了需要认证后才能访问的页面,就会自动重定向到登录URL -->
    <property name="loginUrl" value="/index.html"/>
    <!-- 设置没有权限的URL,当认证后的用户访问一个页面却没有权限时,就会自动重定向到没有权限的URL -->
    <property name="unauthorizedUrl" value="/unauthorized.html"/>
    <property name="filterChainDefinitionMap" ref="linkedHashMap"/>
</bean>

<bean id="linkedHashMap" factory-bean="filterChainDefinitionMapBuilder" factory-method="builderFilterChainDefinitionMap"/>
方法二:使用Shiro提供的权限注解对资源设置权限,标注在Controller或Service中.

*若用户未认证但访问需要认证和授权的资源时,则会跳转到shiroFilter中loginUrl属性指定的URL.
*若用户已认证但访问其没有权限的资源时,则会跳转到shiroFilter中unauthorizedUrl属性指定的URL.
4.6 Session和SessionManager
Shiro中的Session与Java Web中的HttpSession区别:
相同点:
1.都表示客户端与服务器的一次会话.
2.HttpSession与Web环境下Shiro Session的属性是共通的,因为Session的setAttribute、getAttribute、removeArrtibute方法内部都是调用HttpSession的.
不同点:
1.Java Web中的HttpSession依赖于Servlet容器, Shiro中的Session不依赖于Web容器,可以在Web和JavaSE环境下使用.
2.HttpSession保存属性时,key只能是String类型,Shiro中的Session保存属性时key可以是任何类型.
3.HttpSession在首次调用request.getSession(true)时自动创建, Web环境下在用户首次进入shiroFilter时自动创建shiro Session,每次进入shiroFilter都会自动调用session.touch()方法去更新最后访问时间.
*当用户访问logout拦截器时,内部执行当前subject的logout方法 ,然后自动调用session的stop()方法来销毁会话,若HttpSession调用了invalidate()方法销毁,则Shiro Session也会自动调用stop()方法来销毁.
*在Controller层推荐使用HttpSession,在service层中使用Shiro的Session.
Session监听器
Shiro中提供了SessionListener监听器,用户监听Session的创建、过期以及销毁事件.
SessionListener中声明了3个事件方法:
//Session启动时自动触发
onStart(Session session )

//Session销毁时自动触发
onStop(Session session)

//Session超时时自动触发
onExpiration(Session session)
SessionManager
SessionManager用于管理Shiro的Session,可以设置Session的有效时间、监听器等,最后将SessionManager注入到SecurityManager中的sessionManager属性即可.
<!-- 配置securityManager -->
<bean id="securityManager" class="org.apache.shiro.web.mgt.DefaultWebSecurityManager">
   <property name="realm" ref="authenticationRealm">
   <property name="sessionManager" ref="sessionManager"></property>
</bean>

<bean id="sessionManager" class="org.apache.shiro.session.mgt.DefaultSessionManager">
   <!-- 设置全局的session超时时间 -->
   <property name="globalSessionTimeout" value="1800"/>
   <!-- 会话过期时删除过期的会话,默认为true -->
   <property name="deleteInvalidSessions" value="true"/>
   <!-- 开启会话的验证 -->
   <property name="sessionValidationSchedulerEnabled" value="true" />
   <!-- session监听器 -->
   <property name="sessionListeners" >
      <list>
       <ref bean="shiroListener"/>
      </list>
   </property>
</bean>


<!-- 注册监听器 -->
<bean id="shiroListener" class="com.listener.ShiroListener"/>
4.7 在Spring-framework.xml配置Shiro相关组件(完整配置)
 <!-- 配置securityManager -->
 <bean id="securityManager" class="org.apache.shiro.web.mgt.DefaultWebSecurityManager">
     <!-- 修改认证器 -->
     <property name="authenticator" ref="modularRealmAuthenticator"/>
     <!-- 注入多Realm -->
     <property name="realms">
        <list>
          <ref bean="usernameRealm"/>
          <ref bean="emailRealm"/>
          <ref bean="phoneNumberRealm"/>
        </list>
     </property>
     <!-- 注入缓存管理器 -->
     <property name="cacheManager" ref="cacheManager"/>
     <!-- 设置RememberMe Cookie的有效期 -->
     <property name="rememberMeManager.cookie.maxAge" value="604800"/>
     <!-- 注入SessionManager -->
     <property name="sessionManager" ref="sessionManager"/>
 </bean>

 <!-- 多Realm下的认证器 -->
 <bean id="modularRealmAuthenticator" class="org.apache.shiro.authc.pam.ModularRealmAuthenticator">
    <!-- 修改认证策略 -->
    <property name="authenticationStrategy">
      <bean class="org.apache.shiro.authc.pam.FirstSuccessfulStrategy"/>
    </property>
 </bean>

 <!-- 根据用户名认证和授权的Realm -->
 <bean id="usernameRealm" class="com.realm.UsernameRealm">
    <property name="CredentialsMatcher" >
         <!-- HashedCredentialsMatcher -->
         <bean class="org.apache.shiro.authc.Credential.HashedCredentialsMatcher">
           <property name="hashAlgorithmName" value="md5"/>
           <property name="hashIterations" value="1024"/>
         </bean>
    </property>
 </bean>

 <!-- 根据邮箱认证和授权的Realm -->
 <bean id="emailRealm" class="com.realm.EmailRealm">
    <property name="CredentialsMatcher" >
         <!-- HashedCredentialsMatcher -->
         <bean class="org.apache.shiro.authc.Credential.HashedCredentialsMatcher">
           <property name="hashAlgorithmName" value="md5"/>
           <property name="hashIterations" value="1024"/>
         </bean>
    </property>
 </bean>

 <!-- 根据手机号码认证和授权的Realm -->
 <bean id="phoneNumberRealm" class="com.realm.PhoneNumberRealm">
      <property name="CredentialsMatcher" >
           <!-- HashedCredentialsMatcher -->
           <bean class="org.apache.shiro.authc.Credential.HashedCredentialsMatcher">
             <property name="hashAlgorithmName" value="md5"/>
             <property name="hashIterations" value="1024"/>
           </bean>
      </property>
 </bean>


<!-- 配置缓存管理器 -->
<bean id="cacheManager" class="org.apache.shiro.cache.ehcache.EhCacheManager">
    <!-- 指定缓存配置文件的位置 -->
    <property name="cacheManagerConfigFile" value="classpath:ehcache.xml"/>
</bean>

<!-- SessionManager -->
<bean id="sessionManager" class="org.apache.shiro.session.mgt.DefaultSessionManager">
    <!-- 设置全局的session超时时间 -->
    <property name="globalSessionTimeout" value="1800"/>
    <!-- 会话过期时删除过期的会话,默认为true -->
    <property name="deleteInvalidSessions" value="true"/>
    <!-- 开启会话的验证 -->
    <property name="sessionValidationSchedulerEnabled" value="true" />
    <!-- session监听器 -->
    <property name="sessionListeners" >
       <list>
         <ref bean="shiroListener"/>
       </list>
    </property>
</bean>

<!-- SessionListener -->
<bean id="shiroListener" class="com.listener.ShiroListener"/>

<!-- 配置lifecycleBeanPostProcessor,shiro bean的生命周期管理器,可以自动调用Spring IOC容器中shiro bean的生命周期方法(初始化/销毁)-->
<bean id="lifecycleBeanPostProcessor" class="org.apache.shiro.spring.LifecycleBeanPostProcessor"/>

<!-- 为了支持Shiro的注解需要定义DefaultAdvisorAutoProxyCreator和AuthorizationAttributeSourceAdvisor两个bean -->

<!-- 配置DefaultAdvisorAutoProxyCreator,必须配置了lifecycleBeanPostProcessor才能使用 -->
<bean class="org.springframework.aop.framework.autoproxy.DefaultAdvisorAutoProxyCreator"  depends-on="lifecycleBeanPostProcessor"/>

<!-- 配置AuthorizationAttributeSourceAdvisor -->
<bean class="org.apache.shiro.spring.security.interceptor.AuthorizationAttributeSourceAdvisor">
    <property name="securityManager" ref="securityManager"/>
</bean>

<!-- 配置shiroFilterFactoryBean,bean的id默认情况下必须与web.xml文件中DelegatingFilterProxy过滤器的filter-name相同,可以通过filter的targetBeanName初始化参数进行修改 -->
<bean id="shiroFilter" class="org.apache.shiro.spring.web.ShiroFilterFactoryBean">
    <!-- 注入securityManager -->
    <property name="securityManager" ref="securityManager"/>
    <!-- 设置登录URL,当用户未认证,但访问了需要认证后才能访问的页面,就会自动重定向到登录URL -->
    <property name="loginUrl" value="/index.html"/>
    <!-- 设置没有权限的URL,当用户认证后,访问一个页面却没有权限时,就会自动重定向到没有权限的URL,若用户未认证访问一个需要权限的URL时,会跳转到登录URL -->
    <property name="unauthorizedUrl" value="/unauthorized.html"/>
    <!-- 配置哪些请求需要受保护,以及访问这些页面需要的权限 -->
    <property name="filterChainDefinitions">
       <value>
           /login = anon
           /registry = anno
           /logout = logout
           /** = authc
       </value>
   </property>
</bean>
以上是关于Shiro权限管理的主要内容,如果未能解决你的问题,请参考以下文章