Linux下使用FFmpeg实现采集摄像头数据
Posted LinOllie
tags:
篇首语:本文由小常识网(cha138.com)小编为大家整理,主要介绍了Linux下使用FFmpeg实现采集摄像头数据相关的知识,希望对你有一定的参考价值。
FFmpeg采集摄像头数据
文章目录
前言
博主对音视频蛮感兴趣的,学习了一段时间的FFmpeg。前几天,在逛博客的时候发现在Linux下使用FFmpeg采集摄像头的数据,由于这采集摄像头的数据没写过代码,于是复现了下人家的代码,是一个比较简单的demo程序,仅供参考。
一、查看Linux系统下的摄像头设备
前排提示:在看此博客的之前,需要在自己的Ubuntu环境中安装FFmpeg,若没安装FFmpeg,可以在网上搜教程(网上的教程还是蛮详细的)。
在Linux系统中,使用的是v4l2框架来驱动摄像头设备的。
使用FFmpeg的ffprobe命令来查看连接到Ubuntu系统中的摄像头设备,如下图。
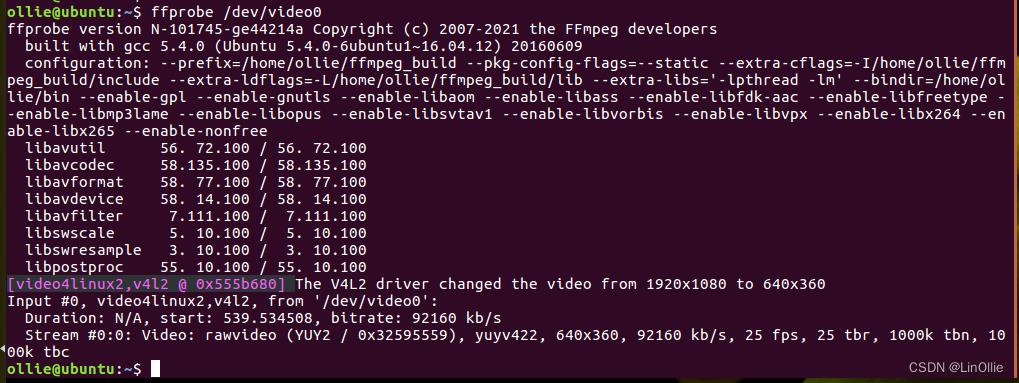
从图中可以看到,所使用摄像头的参数,从图中可以看出摄像头输出的原始参数是yuyv422的形式,一般我们使用的是yuv420p的数据,因此在保存摄像头数据的时候,先对yuyu422的格式进行变化,将其变换为yuv420p的格式,然后再进行编码保存为h264的文件。
二、代码
1.在main函数中,所需要用到的参数的声明
    int ret = 0;

    // 注册所有的设备
    avdevice_register_all();

    // 输入设备的相关参数
    AVFormatContext *inFmtCtx = avformat_alloc_context();
    AVCodec *inCodec = NULL;
    AVCodecContext *inCodecCtx = NULL;
    int inVideoSteamIndex = -1;
    struct SwsContext *img_ctx = NULL;
    AVFrame *yuvFrame = NULL;
    AVFrame *srcFrame = NULL;
    AVPacket *inPkt = av_packet_alloc();


    // 输出文件的相关参数
    AVFormatContext *outFmtCtx = avformat_alloc_context();
    AVOutputFormat *outFmt = NULL;
    AVStream *outStream = NULL;
    AVCodecContext *outCodecCtx=NULL;
    AVCodec *outCodec = NULL;
    AVPacket *outPkt = av_packet_alloc();
2.解码摄像头原始参数设置
        // 解码部分
        // 打开v4l2的相机输入
        AVInputFormat *inFmt = av_find_input_format("v4l2");
        if(avformat_open_input(&inFmtCtx,"/dev/video0",inFmt,NULL) < 0)
            fprintf(stderr,"Cannot open camera.\\n");
            return -1;


        // 查找流
        if(avformat_find_stream_info(inFmtCtx,NULL) < 0)
            fprintf(stderr,"Cannot find any stream in file.\\n");
            return -1;


        // 寻找视频流
        for(size_t i = 0;i < inFmtCtx->nb_streams;i++)
            if(inFmtCtx->streams[i]->codecpar->codec_type == AVMEDIA_TYPE_VIDEO)
                inVideoSteamIndex = i;
                break;


        // 没找到视频流
        if(inVideoSteamIndex == -1)
            fprintf(stderr,"Cannot find video stream in file.\\n");
            return -1;


        // 创建解码器的参数集
        AVCodecParameters* inVideoCodecPara = inFmtCtx->streams[inVideoSteamIndex]->codecpar;
        // 查找解码器
        if(!(inCodec = avcodec_find_decoder(inVideoCodecPara->codec_id)))
            fprintf(stderr,"Cannot find valid video decoder.\\n");
            return -1;


        if(!(inCodecCtx = avcodec_alloc_context3(inCodec)))
            fprintf(stderr,"Cannot alloc valid decode codec context.\\n");
            return -1;


        if(avcodec_parameters_to_context(inCodecCtx,inVideoCodecPara) < 0)
            fprintf(stderr,"Cannot initialize parameters.\\n");
            return -1;


        // 打开编解码器
        if(avcodec_open2(inCodecCtx,inCodec,NULL) < 0)
            fprintf(stderr,"Cannot open codec.\\n");
            return -1;


        img_ctx = sws_getContext(inCodecCtx->width,inCodecCtx->height,inCodecCtx->pix_fmt,
                                    inCodecCtx->width,inCodecCtx->height,AV_PIX_FMT_YUV420P,SWS_BICUBIC,NULL,NULL,NULL);

        // 获取图像的大小
        int num_bytes = av_image_get_buffer_size(AV_PIX_FMT_YUV420P,inCodecCtx->width,inCodecCtx->height,1);

        // 创建out_buffer缓冲区
        uint8_t *out_buffer = (unsigned char *)av_malloc(num_bytes*sizeof(unsigned char));
        yuvFrame = av_frame_alloc();
        srcFrame = av_frame_alloc();

        // 将yuvframe和out_buffer进行关联
        int ret = av_image_fill_arrays(yuvFrame->data,yuvFrame->linesize,out_buffer,AV_PIX_FMT_YUV420P,inCodecCtx->width,inCodecCtx->height,1);
        if(ret < 0)
            fprintf(stderr,"Fill arrays failed.\\n");
            return -1;
3.输出H264文件部分
// 输出文件,编码器部分
        const char* out_file = "output.h264";
        if(avformat_alloc_output_context2(&outFmtCtx,NULL,NULL,out_file)  < 0)
            fprintf(stderr,"Cannot alloc output file context.\\n");
            return -1;

        outFmt = outFmtCtx->oformat;

        // 打开输出文件
        if(avio_open(&outFmtCtx->pb,out_file,AVIO_FLAG_READ_WRITE) < 0)
            fprintf(stderr,"output file open failed.\\n");
            return -1;


        // 创建保存的H264流,并设置参数
        outStream = avformat_new_stream(outFmtCtx,outCodec);
        if(outStream == NULL)
            fprintf(stderr,"create new video stream fialed.\\n");
            return -1;


        //
        outStream->time_base.den = 30;
        outStream->time_base.num = 1;

        // 编码解码器相关的参数集
        // 设置分辨率和bit率
        AVCodecParameters *outCodecPara = outFmtCtx->streams[outStream->index]->codecpar;
        outCodecPara->codec_type=AVMEDIA_TYPE_VIDEO;
        outCodecPara->codec_id = outFmt->video_codec;
        outCodecPara->width = 640;
        outCodecPara->height = 360;
        outCodecPara->bit_rate = 92000;

        // 查找编码器
        outCodec = avcodec_find_encoder(outFmt->video_codec);
        if(outCodec == NULL)
            fprintf(stderr,"Cannot find any encoder.\\n");
            return -1;


        // 设置编码器内容
        outCodecCtx = avcodec_alloc_context3(outCodec);
        avcodec_parameters_to_context(outCodecCtx,outCodecPara);
        if(outCodecCtx==NULL)
            fprintf(stderr,"Cannot alloc output codec content.\\n");
            return -1;


        outCodecCtx->codec_id = outFmt->video_codec;
        outCodecCtx->codec_type = AVMEDIA_TYPE_VIDEO;
        outCodecCtx->pix_fmt = AV_PIX_FMT_YUV420P;
        outCodecCtx->width = inCodecCtx->width;
        outCodecCtx->height = inCodecCtx->height;
        outCodecCtx->time_base.num = 1;
        outCodecCtx->time_base.den = 30;
        outCodecCtx->bit_rate = 92000;
        outCodecCtx->gop_size = 10;

        // 根据编码器相关类型设置参数
        // 设置H264相关的参数,q的参数
        if(outCodecCtx->codec_id == AV_CODEC_ID_H264)
            outCodecCtx->qmin = 10;
            outCodecCtx->qmax = 51;
            outCodecCtx->qcompress = (float)0.6;

        else if(outCodecCtx->codec_id == AV_CODEC_ID_MPEG2VIDEO)
            outCodecCtx->max_b_frames = 2;

        else if(outCodecCtx->codec_id == AV_CODEC_ID_MPEG1VIDEO)
            outCodecCtx->mb_decision = 2;


        // 打开编码器
        if(avcodec_open2(outCodecCtx,outCodec,NULL) < 0)
            fprintf(stderr,"Open encoder failed.\\n");
            return -1;


        // 设置yuvframe
        yuvFrame->format = outCodecCtx->pix_fmt;
        yuvFrame->width = outCodecCtx->width;
        yuvFrame->height = outCodecCtx->height;

        // 写H264的文件头
        ret = avformat_write_header(outFmtCtx,NULL);
4.编解码开始部分
洗刷编码缓存区的代码
int flush_encoder(AVFormatContext *fmtCtx,AVCodecContext *codecCtx,int StreamaIndex)

    int ret = 0;
    AVPacket enc_pkt;
    enc_pkt.data = NULL;
    enc_pkt.size = 0;
    av_init_packet(&enc_pkt);

    printf("Flushing stream #%u encoder\\n",StreamaIndex);
    // 进行编码一个frame
    if(avcodec_send_frame(codecCtx,0) >= 0)
        while(avcodec_receive_packet(codecCtx,&enc_pkt) >= 0)
            printf("success encoder 1 frame.\\n");
            enc_pkt.stream_index = StreamaIndex;
            av_packet_rescale_ts(&enc_pkt,codecCtx->time_base,fmtCtx->streams[ StreamaIndex ]->time_base);
            // 将编码好的写入到H264的文件
            ret = av_interleaved_write_frame(fmtCtx, &enc_pkt);
            if(ret < 0)
                break;


    return ret;
编解码部分
int count = 0;
        // 读取一个frame的数据,放入pakcet中
        while(av_read_frame(inFmtCtx,inPkt) >= 0 && count < 50)
            // 判断是否是视频流
            if(inPkt->stream_index == inVideoSteamIndex)
                // 解码
                if(avcodec_send_packet(inCodecCtx,inPkt) >= 0)
                    // 判断是否解码完成
                    while((ret = avcodec_receive_frame(inCodecCtx,srcFrame)) >= 0)
                        if(ret == AVERROR(EAGAIN) || ret == AVERROR_EOF)
                            return -1;

                        else if(ret < 0)
                            fprintf(stderr, "Error during decoding\\n");
                            exit(1);

                        // 解码完成
                        // 进行转换,由于摄像头输入的yuyv422的格式,因此需要进行转换,转换到yuv420p的格式
                        sws_scale(img_ctx,(const uint8_t* const*)srcFrame->data,srcFrame->linesize,
                                    0,inCodecCtx->height,yuvFrame->data,yuvFrame->linesize);

                        yuvFrame->pts = srcFrame->pts;

                        // 解码完成之后进行编码
                        if(avcodec_send_frame(outCodecCtx,yuvFrame) >= 0)
                            if(avcodec_receive_packet(outCodecCtx,outPkt) >= 0)
                                printf("----encode one frame-----\\n");
                                ++count;
                                outPkt->stream_index = outStream->index;
                                av_packet_rescale_ts(outPkt,outCodecCtx->time_base,outStream->time_base);
                                outPkt->pos = -1;
                                av_interleaved_write_frame(outFmtCtx,outPkt);
                                av_packet_unref(outPkt);


                        // 短暂的延迟
                        usleep(1000 * 24);


                av_packet_unref(inPkt);


        // 洗刷编码区
        ret = flush_encoder(outFmtCtx,outCodecCtx,outStream->index);
        if(ret < 0)
            fprintf(stderr,"flushing encoder failed.\\n");
            return -1;


        // 写H264的文件尾
        av_write_trailer(outFmtCtx);
5.收尾部分
收尾部分,主要进行内存空间的释放。由于是demo程序,内存空间释放写的比较简陋,其实很多错误检查的时候,应该使用goto语句,然后进行内存空间的释放。
    av_packet_free(&inPkt);
    avcodec_free_context(&inCodecCtx);
    avcodec_close(inCodecCtx);
    avformat_close_input(&inFmtCtx);
    av_frame_free(&srcFrame);
    av_frame_free(&yuvFrame);

    av_packet_free(&outPkt);
    avcodec_free_context(&outCodecCtx);
    avcodec_close(outCodecCtx);
    avformat_close_input(&outFmtCtx);
6.源码
在这里贴出demo程序的源码。
#include <unistd.h>
#include "libavcodec/avcodec.h"
#include "libavdevice/avdevice.h"
#include "libswresample/swresample.h"
#include "libavutil/avutil.h"
#include "libavutil/frame.h"
#include "libavutil/samplefmt.h"
#include "libavutil/opt.h"
#include "libavutil/imgutils.h"
#include "libavutil/parseutils.h"
#include "libswscale/swscale.h"
#include "libavformat/avformat.h"


int flush_encoder(AVFormatContext *fmtCtx,AVCodecContext *codecCtx,int StreamaIndex)

    int ret = 0;
    AVPacket enc_pkt;
    enc_pkt.data = NULL;
    enc_pkt.size = 0;
    av_init_packet(&enc_pkt);

    printf("Flushing stream #%u encoder\\n",StreamaIndex);
    // 进行编码一个frame
    if(avcodec_send_frame(codecCtx,0) >= 0)
        while(avcodec_receive_packet(codecCtx,&enc_pkt) >= 0)
            printf("success encoder 1 frame.\\n");
            enc_pkt.stream_index = StreamaIndex;
            av_packet_rescale_ts(&enc_pkt,codecCtx->time_base,fmtCtx->streams[ StreamaIndex ]->time_base);
            // 将编码好的写入到H264的文件
            ret = av_interleaved_write_frame(fmtCtx, &enc_pkt);
            if(ret < 0)
                break;


    return ret;


int main(int argc, char* argv[])
    int ret = 0;

    // 注册所有的设备
    avdevice_register_all();

    // 输入设备的相关参数
    AVFormatContext *inFmtCtx = avformat_alloc_context();
    AVCodec *inCodec = NULL;
    AVCodecContext *inCodecCtx = NULL;
    int inVideoSteamIndex = -1;
    struct SwsContext *img_ctx = NULL;
    AVFrame *yuvFrame = NULL;
    AVFrame *srcFrame = NULL;
    AVPacket *inPkt = av_packet_alloc();


    // 输出文件的相关参数
    AVFormatContext *outFmtCtx = avformat_alloc_context();
    AVOutputFormat *outFmt = NULL;
    AVStream *outStream = NULL;
    AVCodecContext *outCodecCtx=NULL;
    AVCodec *outCodec = NULL;
    AVPacket *outPkt = av_packet_alloc();

    do

        // 解码部分
        // 打开v4l2的相机输入
        AVInputFormat *inFmt = 视频编码技术——Linux下ffmpeg编程实现摄像头捕捉


                    1 打开设备
对于FFMpeg编程,首先要打开相关设备,这里我们打开的是linux下的webCam,也就是笔记本摄像头 。在Linux下的ffmpeg里面,需要梳理两个东西:
a  Video4linux2(简称V4L2),是linux中关于视频设备的内核驱动
b  /dev/video0  /dev/video1 都是代表目标录制设备
其中帧率跟图像大小都是需要进行设置的,然后按照如下代码进行设备打开。
static AVFormatContext* open_dev()
	//注册所有设备
	avdevice_register_all();
	//获得格式
	const AVInputFormat* iformat = av_find_input_format("video4linux2");

	//打开设备
	AVFormatContext* fmt_ctx = NULL;
	//const char* device_name = "hw:0,0";//这个是音频
	const char* device_name = "/dev/video0";
	AVDictionary* options = NULL;

	//视频就需要做options了
	av_dict_set(&options, "video_size", "640*480", 0);
	av_dict_set(&options, "framerate", "30", 0);

	int ret = avformat_open_input(&fmt_ctx, device_name, iformat, &options);

	//判断是否成功
	char errors[1024] = 0, ;
	if(ret < 0)
		av_strerror(ret, errors, 1024);
		std::cout << "Faile to open Device : " <<errors<<std::endl;
		return NULL;

	std::cout<<"Success open Device"<<std::endl;
	return fmt_ctx;

2 进行录制保存
其中注意,在linux下直接用pkt的size是可以的。但是在很多系统上,比如mac,pkt的size会有些许变动,每个平台的实现都有不同,所以在遇到很多问题的时候,需要自己注意这点,可以用计算的每一帧数据大小代替

void record_video(AVFormatContext* fmt_ctx)
int ret = -1;
	//准备好文件
	FILE* out_file = fopen("video.yuv", "wb+");
	//读取数据
	AVPacket pkt;
	int count = 0;
	av_init_packet(&pkt);
	while((ret = av_read_frame(fmt_ctx, &pkt)) == 0)

		std::cout<<pkt.size<<std::endl;
		av_log(NULL, AV_LOG_INFO, "packet size is %d(%p), count = %d\\n",
				pkt.size, pkt.data, count);
		//写入文件
		fwrite(pkt.data, pkt.size, 1, out_file);
		//将文件缓冲区当中数据直接刷进去
		fflush(out_file);
		//每一次读取都会生成空间,所以需要release
		av_packet_unref(&pkt);
		if(count++ > 8000)
			break;


	fclose(out_file);


        以上是关于Linux下使用FFmpeg实现采集摄像头数据的主要内容,如果未能解决你的问题,请参考以下文章