数据库
Posted hsl520
tags:
篇首语:本文由小常识网(cha138.com)小编为大家整理,主要介绍了数据库相关的知识,希望对你有一定的参考价值。
oracle ocp数据库
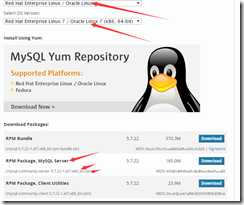
1、yum安装
[[email protected] ~]# yum install -y https://dev.mysql.com/get/mysql80-community-release-el7-1.noarch.rpm #安装源
[[email protected] ~]# yum install -y mysql-community-server.x86_64 #安装包社区版本
[[email protected] ~]# yum list | grep mysql-community-server #查看包
5.7版本安装
yum install -y mysql-community-server.x86_64 #安装
systemctl start mysqld.service #开启
grep ‘password‘ /var/log/mysqld.log #过滤密码
mysql -uroot -p‘Ff%=arFx9gU(‘ #登录
systemctl status mysqld.service #开机启动
mysql> ALTER USER ‘root‘@‘localhost‘ IDENTIFIED BY ‘[email protected]‘; ##修改密码
Query OK, 0 rows affected (0.00 sec)
注意:密码有强度策略
2、源码安装
yum -y install ncurses ncurses-devel openssl-devel bison gcc gcc-c++ make cmake #安装编译环境
开机启动
8.0版本数据库需要的boost库文件
笔记上的应该是5.7版本的
sell登录数据库
[[email protected] ~]# mysql -uroot -p‘[email protected]‘
DDL操作对象为库表以后有视图存储过程的索引
库
database创 create
create database houlei
进 use
use houlei
增
删 drop
drop database hl;
改
查
show databases查看库
~~~~~~~~~~~~~~~~~~~~~~~~~~~~~~~~~
表
创
create table houlei(hl int ,houlei int)
create table 表名(列)
~~~~~~~~~~~~~~~~~~~~~~~~~~~~~~~~~
mysql> desc student1;
+-------+---------------+------+-----+---------+-------+
| Field | Type | Null | Key | Default | Extra |
+-------+---------------+------+-----+---------+-------+
| id | int(11) | YES | | NULL | |
| name | varchar(50) | YES | | NULL | |
| sex | enum(‘m‘,‘f‘) | YES | | NULL | |
| gae | int(11) | YES | | NULL | |
+-------+---------------+------+-----+---------+-------+
4 rows in set (0.00 sec)
-----------------------------type--------------------------------------------------------
整数类型tinyint int
浮点类型float
时间类型date year time datetime timestamp
字符串类型测试char varchar
枚举型ENUM
集合型SET
----------------------------type---------------------------------------------------------
0填充zerofill
无符号,正数 unsigned
----------------------------key----------------------------------------------------------
唯一约束unique key(uk) uni#unique数据列唯一的特性可以为空,对存在的主键增加auto_increment ,modify不要增加添加主键命令即可添加上去。
主键约束primary key(pk) pri#唯一不能为空
复合主键约束 primary key(pk) pri#多列组合唯一primary key(host_ip,port)
外键约束foreign key(fk) #
-----------------------------null---------------------------------------------------------
空值not null
-----------------------------default-----------------------------------------------------
默认值default
-----------------------------extra-------------------------------------------------------
字段增加 auto_increment #必须配合主键使用
修改数据库引擎(了解)
mysql> alter table service engine=innodb;
//engine=myisam|memory|....
增
alter table hl add hsl int;
改
alter table 表名 rename 新名字
alter table student3 rename hl;
alter table hl modify hl int not null;增加一条覆盖原有的
alter table 表名 drop key 加列 唯一约束限制的字段
删
drop tables houlei1删表
delete from houlei删表信息
复制
create table new_service select * from service;结构和记录(key不会复制: 主键、外键和索引)
create table new1_service select * from service where 1=2; 复制结构
create table t4 like employees;所有包括key
查
mysql> show create table t2;查看表
desc houlei查看表信息
插入信息
insert into 表名(列名) values(111,111)
null
now()
insert into 表1 select * from 表2 where age>18 #插入表1必须列一样
查询表
修改密码
~~~~~~~~~~~~~~~~~~~~~~~~~~~~~~~~~
select user,host,authentication_string from mysql.user;
mysql> update mysql.user set authentication_string=password(‘[email protected]‘) where user==‘root‘ and host=‘localhost‘;
Query OK, 1 row affected, 1 warning (0.00 sec)
Rows matched: 1 Changed: 1 Warnings: 1
flush privileges;更新
~~~~~~~~~~~~~~~~~~~~~~~~~~~~~~~~~
mysql> update mysql.user set
-> authentication_string=passwd(‘[email protected]‘)
-> where user=‘root‘ and host=‘locahost‘;
~~~~~~~~~~~~~~~~~~~~~~~~~~~~~~~~~
例子:mysql> create table student.student4(
id int not null,
name varchar(50) not null,
sex enum (‘m‘,‘f‘) default ‘m‘ not null,
age int unsigned default 18 not null,
hobby set(‘music‘,‘disc‘,‘dance‘,‘book‘) default ‘book,dance‘
);
~~~~~~~~~~~~~~~~~~~~~~~~~~~~~~~~~
字段
删除
alter table 表名
drop hl;
看表的内容
select * from 表名;
select * from student1;
select id,name from student1;
DQL查询
备份和恢复

帮助
help create table;
~~~~~~~~~~~~~~~~~~~~~~~~~~~~~~~~~
DMl插入信息
insert into 表名 values(111,111)
SQL(DDL、DML、DQL、DCL)
名词解释
运行数据库的服务器
数据库表的管理单元
表记录数据的管理单元
管理字段单元
字段类型,约束,长度
字符,数字日期,日期
约束不能为空,自动增长(序列)

库
定义库
库名字不能为数字,区分大小写
创建库
create database xianyu 大写
查看库
show databases
进入库
use xianyu; 进入库大写
SELECT datebases 查看路径大写
DROP DATABASE删除
系统位置
/usr/local/mysql
/usr/local/mysql/data
练习
登录数据库
1、[[email protected] ~]# mysql -uroot -p‘[email protected]‘
查看数据库
2、mysql> SHOW DATABASES;
+--------------------+
| Database |
+--------------------+
| information_schema |
| mysql |
| performance_schema |
| sys |
+--------------------+
4 rows in set (0.00 sec)
创建库
mysql> CREATE DATABASE xianyu;
Query OK, 1 row affected (0.00 sec)
进入库
mysql> use xianyu
Reading table information for completion of table and column names
You can turn off this feature to get a quicker startup with -A
Database changed
查看当前库位置表
mysql> show tables;
+------------------+
| Tables_in_xianyu |
+------------------+
| test1 |
+------------------+
1 row in set (0.00 sec)
整数类型测试:tinyint,int
tinyint为127 7位2进制
INT有符号型最大2147483647
作用:用于存储用户的年龄、游戏的Level、经验值等。
1、创建一个表
mysql> create table test2(tinyint_test tinyint, int_test int );
创建一个表 test2(field列名 type字段类型 名字 type)
2、查看表结构
mysql> desc test2;
+--------------+------------+------+-----+---------+-------+
| Field | Type | Null | Key | Default | Extra |
+--------------+------------+------+-----+---------+-------+
| tinyint_test | tinyint(4) | YES | | NULL | |
| int_test | int(11) | YES | | NULL | |
+--------------+------------+------+-----+---------+-------+
2 rows in set (0.00 sec)
Field字段名称(列名) TYPE字段类型(字?数?日?) NULL KEY DEFAULT EXTRA 略
3、插入数值
mysql> insert into test1 values(111,111); 以此插入
Query OK, 1 row affected (0.00 sec)
插入不正常信息
mysql> insert into test1(tinyint_test) values(128); 指定插入了的数据
ERROR 1264 (22003): Out of range value for column ‘tinyint_test‘ at row 1
查看插入正常信息
mysql> select * from test1;
+--------------+----------+
| tinyint_test | int_test |
+--------------+----------+
| 111 | 111 |
+--------------+----------+
1 row in set (0.00 sec)
删除表名
drop table 表名
删除表内容
delete from 表名
约束条件unsigned限定只能存正值(无符号)
mysql> create table test2(tinyint_test tinyint unsigned,int_test int unsigned); #定义unsigned
Query OK, 0 rows affected (0.01 sec)
mysql> insert into test2(tinyint_test) values(255) #tianyint 为255因为unsigned占一位,原因8位2进制
Query OK, 1 row affected (0.00 sec)
mysql> insert into test2(int_test) values(2144444444); #insert之内
Query OK, 1 row affected (0.00 sec)
mysql和mariadb不同。
mysql提示输入错误
mariadb会输入0到表中。
但结果是肯定的,无符号只能输入正值
整数型只是显示宽度
mysql> create table t1 (id1 int, id2 int(6));
Query OK, 0 rows affected (0.02 sec)
mysql> insert into t1 values(222222222,222222222);#插入大于INT宽度限制的值,仍然可以存储。但是不能超过上限2147483647!!
数据零填充
mysql> create table t2( id1 int zerofill, in2 int(6) zerofill ); #添加表
mysql> insert into t2 values(2,222);#写入数据
mysql> select * from t2;#查看信息
+------------+--------+
| id1 | in2 |
+------------+--------+
| 0000000002 | 000222 |
+------------+--------+
1 row in set (0.00 sec)
浮点数类型测试:float
创建
mysql> create table test4(float_test float(5,2));#创建test表,一共5位,3位正数,小数2位
Query OK, 0 rows affected (0.02 sec)
查看
mysql> desc test4 ;#查看表类型
+------------+------------+------+-----+---------+-------+
| Field | Type | Null | Key | Default | Extra |
+------------+------------+------+-----+---------+-------+
| float_test | float(5,2) | YES | | NULL | |
+------------+------------+------+-----+---------+-------+
1 row in set (0.00 sec)
插入
mysql> insert into test4 values(111.258) ;
Query OK, 1 row affected (0.01 sec)
查询 数值会进位
mysql> select * from test4;
+------------+
| float_test |
+------------+
| 111.22 |
| 111.25 |
| 111.26 |
+------------+
3 rows in set (0.00 sec)
时间和日期类型测试:year、date、time、datetime、timestamp
作用:用于存储用户的注册时间,文章的发布时间,文章的更新时间,员工的入职时间等
日期date和时间time类型测试
创建
mysql> create table test_time( d date, t time ,dt datetime);
查看
mysql> desc test_time
-> ;
+-------+----------+------+-----+---------+-------+
| Field | Type | Null | Key | Default | Extra |
+-------+----------+------+-----+---------+-------+
| d | date | YES | | NULL | |
| t | time | YES | | NULL | |
| dt | datetime | YES | | NULL | |
+-------+----------+------+-----+---------+-------+
3 rows in set (0.00 sec)
插入
mysql> insert into test_time values(now(),now(),now()) #插入时间now
-> ;
Query OK, 1 row affected, 1 warning (0.01 sec)
查看
mysql> select * from test_time #字符断会相应截取时间date,time,datetime
-> ;
+------------+----------+---------------------+
| d | t | dt |
+------------+----------+---------------------+
| 2018-06-06 | 06:54:19 | 2018-06-06 06:54:19 |
+------------+----------+---------------------+
1 row in set (0.00 sec)
年YEAR类型测试
创建
mysql> create table t3(born_year year);
查看
mysql> desc t3 ;
+-----------+---------+------+-----+---------+-------+
| Field | Type | Null | Key | Default | Extra |
+-----------+---------+------+-----+---------+-------+
| born_year | year(4) | YES | | NULL | |
+-----------+---------+------+-----+---------+-------+
1 row in set (0.00 sec)
插入数据#12为20年,80为默认19年
mysql> insert into t3 values(12),(80);
Query OK, 2 rows affected (0.01 sec)
Records: 2 Duplicates: 0 Warnings: 0
查看
mysql> select * from t3;
+-----------+
| born_year |
+-----------+
| 2012 |
| 1980 |
+-----------+
2 rows in set (0.00 sec)
字符串类型测试:CHAR、VARCHAR
用于存储用户的姓名、爱好、发布的文章等
字符、变长字符
mysql> create table vc ( v varchar(4), c char(4) ); #
查看
mysql> desc vc
-> ;
+-------+------------+------+-----+---------+-------+
| Field | Type | Null | Key | Default | Extra |
+-------+------------+------+-----+---------+-------+
| v | varchar(4) | YES | | NULL | |
| c | char(4) | YES | | NULL | |
+-------+------------+------+-----+---------+-------+
2 rows in set (0.00 sec)
插入数据
mysql> insert into vc values(‘a‘,‘a‘);
Query OK, 1 row affected (0.00 sec)
mysql> insert into vc values(‘ab ‘,‘ab ‘);
Query OK, 1 row affected (0.01 sec)
查询
mysql> select * from vc;
+------+------+
| v | c |
+------+------+
| a | a |
| ab | ab |
+------+------+
2 rows in set (0.00 sec)
函数直观
mysql> select concat(v,‘=‘), concat(c,‘=‘) from vc;
+---------------+---------------+
| concat(v,‘=‘) | concat(c,‘=‘) |
+---------------+---------------+
| a= | a= |
| ab = | ab= |
+---------------+---------------+
2 rows in set (0.01 sec)
二进制字符 了解
字符串类型测试:BINARY、VARBINARY
BINARY 和 VARBINARY类似于CHAR 和 VARCHAR,不同的是它们包含二进制字符而不包含
非二进制字符串
mysql> create table binary_t (c binary(3));
Query OK, 0 rows affected (0.03 sec)
mysql> desc binary_t;
+-------+-----------+------+-----+---------+-------+
| Field | Type | Null | Key | Default | Extra |
+-------+-----------+------+-----+---------+-------+
| c | binary(3) | YES | | NULL | |
+-------+-----------+------+-----+---------+-------+
1 row in set (0.00 sec)
mysql> insert into binary_t set c=‘aaa‘;
Query OK, 1 row affected (0.00 sec)
mysql> select *,hex(c) from binary_t;
+------+--------+
| c | hex(c) |
+------+--------+
| aaa | 616161 |
+------+--------+
1 row in set (0.00 sec)
枚举类型、集合类型:ENUM类型,SET测试
创建表
mysql> use school
mysql> create table student3(
name varchar(50),
sex enum(‘m‘,‘f‘),
hobby set(‘music‘,‘book‘,‘game‘,‘disc‘)
);
Query OK, 0 rows affected (0.31 sec)
查看表
mysql> show create table student3G
*************************** 1. row ***************************
Table: student3
Create Table: CREATE TABLE `student3` (
`name` varchar(50) DEFAULT NULL,
`sex` enum(‘m‘,‘f‘) DEFAULT NULL,
`hobby` set(‘music‘,‘book‘,‘game‘,‘disc‘) DEFAULT NULL
) ENGINE=InnoDB DEFAULT CHARSET=latin1
1 row in set (0.00 sec)
添加数据
mysql> insert into student3 values (‘tom‘,‘m‘,‘book,game‘);
Query OK, 1 row affected (0.01 sec)
mysql> insert into student3 values(‘tom‘,‘m‘,‘film‘)
-> ;
查看
mysql> select * from student3;
+------+------+-----------+
| name | sex | hobby |
+------+------+-----------+
| tom | boy | book,game |
+------+------+-----------+
1 row in set (0.00 sec)
mysql -e
测试
TINYINT 127数字 7位2进程
INT 21亿 数字
创建表
create
show tables 查看
select * from xiany.test1插入数据
安全机制

~~~~~~~~~~~~~~~~~~~~~~~~~~~~~~~~~
global level超级管理员默认权限设置
select * from mysql.userG;
用户字段 root
权限字段 select_priv :y查看权限
Grant_priv: y授权给其他用户
安全密码字段 *B1DD4ADE47888D9AEC4D705C85230F1B52D2A817
资源控制字段y/n
~~~~~~~~~~~~~~~~~~~~~~~~~~~~~~~~~
database level 用户权限设置
select * from mysql.dbG;
1、create database ttt;
2、grant all on ttt.* to ‘u1‘@‘localhost‘ identified by ‘[email protected]‘;设置表权限及用户
3、查询库
select * from mysql.dbG;
4、mysql -u u1 -p‘[email protected]‘
show databases;
~~~~~~~~~~~~~~~~~~~~~~~~~~~~~~~~~
Table level
select * from mysql.tables_privG;
~~~~~~~~~~~~~~~~~~~~~~~~~~~~~~~~~
Column level
select * from mysql.columns_privG;
前提是有库,有表,有权限。
~~~~~~~~~~~~~~~~~~~~~~~~~~~~~~~~~
?
mysql 用户管理
grant all on *.* to ‘用户’@‘地址’ identified by ‘密码’刷新数据库(创建用户之后刷新)
flush privileges;
创建用户及权限
方法1、mysql> create user [email protected]‘localhost‘ identified by ‘[email protected]‘;普通用户
方法2、GRANT ALL ON *.* TO ‘user4‘@‘localhost‘ IDENTIFIED BY ‘[email protected]‘;必须掌握
创建用户给所有权限多次

grant权限
grant all on *.* to [email protected]‘%‘ identified by ‘[email protected]‘;所有权限、所有网段
GRANT ALL ON *.* TO [email protected]‘%‘ IDENTIFIED BY ‘[email protected]‘ WITH GRANT OPTION; 所有权限,所有网段,拥有赋权
GRANT ALL ON bbs.* TO [email protected]‘192.168.100.20‘ IDENTIFIED BY ‘[email protected]‘;库下
GRANT ALL ON bbs.user TO [email protected]‘%‘ IDENTIFIED BY ‘[email protected]‘;表下
GRANT SELECT(col1),INSERT(col2,col3) ON bbs.user TO [email protected]‘%‘ IDENTIFIED BY ‘[email protected]‘;查询段及插入字段
回收权限
REVOKE 权限列表 ON 数据库名 FROM 用户名@‘客户端主机’
REVOKE DELETE ON *.* FROM [email protected]’%’;

查看权限
SHOW GRANTSG 自己的权限
SHOW GRANTS FOR [email protected]‘%‘G 别人的权限
查看创建用户
mysql> select * from mysql.userG;
删除用户
1、DROP USER ‘user1‘@‘localhost‘;
2、DELETE FROM mysql.user WHERE user=‘user3‘ AND host=‘localhost‘;
修改密码
自己改自己:1、SET PASSWORD=password(‘密码‘);掌握
2、UPDATE mysql.user SET authentication_string=password(‘new_password’) WHERE user=’root’ AND host=’localhost’;
root改别人:1、SET PASSWORD FOR [email protected]’localhost’=password(‘new_password’);必须掌握
2、 UPDATE mysql.user SET authentication_string=password(‘new_password’) WHERE user=’user3’ AND host=’localhost’;了解
密码丢失修改
# vim /etc/my.cnf
[mysqld]
skip-grant-tables
# service mysqld restart
# mysql -uroot
mysql> UPDATE mysql.user SET authentication_string=password(‘new_password‘)
WHERE user=‘root‘ AND host=‘localhost‘;
mysql> FLUSH PRIVILEGES;
shell登录和退出
-h指定主机名 -pmysql数据库端口 -u用户 -p密码 mysql为指定登录的数据库 -e接sql语句
mysql -h‘localhost‘ -P 3306 -u‘root‘ -p‘[email protected]‘ mysql -e ‘show tables‘
改密码 mysqladmin -uroot -p‘123‘ password ‘new_password‘ //123为旧密码
~~~~~~~~~~~~~~~~~~~~~~~~~~~~~~~~~
查看帮助(了解)
help grant
Example 1: Create an account that uses the default authentication
plugin and the given password. Mark the password expired so that the
user must choose a new one at the first connection to the server:
CREATE USER ‘jeffrey‘@‘localhost‘
IDENTIFIED BY ‘new_password‘ PASSWORD EXPIRE;
Example 2: Create an account that uses the sha256_password
authentication plugin and the given password. Require that a new
password be chosen every 180 days:
CREATE USER ‘jeffrey‘@‘localhost‘
IDENTIFIED WITH sha256_password BY ‘new_password‘
PASSWORD EXPIRE INTERVAL 180 DAY;
CREATE USER ‘jeffrey‘@‘localhost‘ IDENTIFIED BY ‘mypass‘;
GRANT ALL ON db1.* TO ‘jeffrey‘@‘localhost‘;
GRANT SELECT ON db2.invoice TO ‘jeffrey‘@‘localhost‘;
ALTER USER ‘jeffrey‘@‘localhost‘ WITH MAX_QUERIES_PER_HOUR 90;
示例1:创建一个使用默认身份验证插件和给定密码的帐户。将密码标记过期,以便用户必须在第一个连接到服务器时选择一个新密码:创建用户‘Jeffrey’@‘localhost’,由‘New_Password’密码过期标识;
示例2:创建一个使用sha256_password身份验证插件和给定密码的帐户。
要求每180天选择一个新密码:
通过‘新_密码’密码过期180天创建用户‘Jeffrey’@‘localhost’标识为sha256_Password;
创建由‘mypass’标识的用户‘Jeffrey’@‘localhost’;
在DB1.*上将所有密码授予‘Jeffrey’@‘localhost’;
在db2上将SELECT授予‘Jeffrey’@‘localhost’;
将用户‘Jeffrey’@‘localhost’与Max_Query_per_Her_Her 90一起更改用户‘Jeffrey’@‘localhost’;
~~~~~~~~~~~~~~~~~~~~~~~~~~~~~~~~~
数据库日志

1、 错误日志 :启动,停止,关闭失败报错。rpm安装日志位置 /var/log/mysqld.log
开启/etc/my.cnf 开启log-error=/var/log/mysqld.log
2 、通用查询日志:所有的查询都记下来。
3 、二进制日志:实现备份,增量备份。只记录改变数据,除了select都记。
位置/var/lib/mysql/*bin*
开启/etc/my.cnf 添加log_bin及log_bin server -id=2集群问题,指定主机的序号
提示:重启截断、flush logs截断、mysql>reset master 删除无、
查看二进制文件mysqlbinlog -v /var/lib/mysql/localhost-bin.000001
4、 中继日志:读取服务器的binlog,在本地回放。保持一致。
5、slow log:慢查询日志,指导调优,定义某一个查询语句,定义超时时间,通过日志提供调优建议给开发人员。

6、DDL log: 定义语句的日志。
以上是关于数据库的主要内容,如果未能解决你的问题,请参考以下文章