Flume 日志聚合
Posted jhxxb
tags:
篇首语:本文由小常识网(cha138.com)小编为大家整理,主要介绍了Flume 日志聚合相关的知识,希望对你有一定的参考价值。
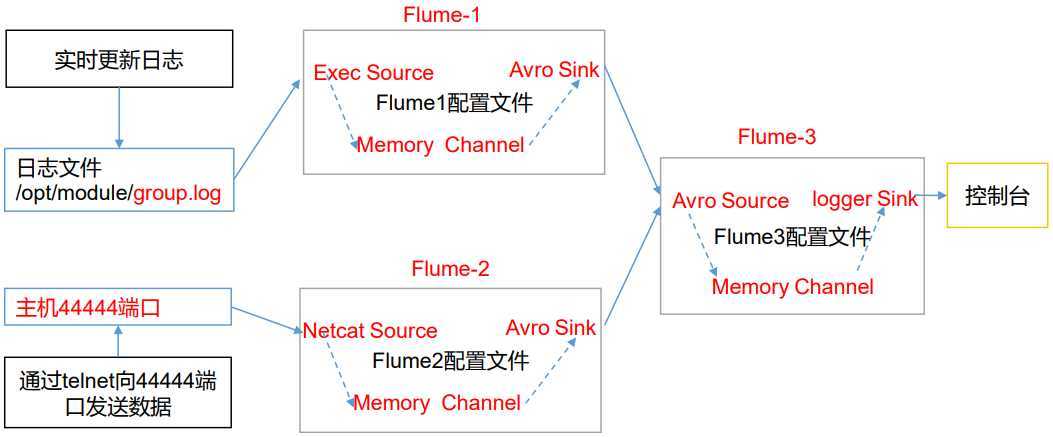
Flume-1 监控文件 /tmp/tomcat.log。
Flume-2 监控某一个端口的数据流。
Flume-1 与 Flume-2 将数据发送给 Flume-3,Flume-3 将最终数据打印到控制台。

一、创建配置文件
1.flume1-logger-flume.conf
配置 Source 用于监控 hive.log 文件,配置 Sink 输出数据到下一级 Flume。

# Name the components on this agent
a1.sources = r1
a1.sinks = k1
a1.channels = c1

# Describe/configure the source
a1.sources.r1.type = exec
a1.sources.r1.command = tail -F /tmp/tomcat.log
a1.sources.r1.shell = /bin/bash -c

# Describe the sink
a1.sinks.k1.type = avro
a1.sinks.k1.hostname = h136
a1.sinks.k1.port = 4141

# Describe the channel
a1.channels.c1.type = memory
a1.channels.c1.capacity = 1000
a1.channels.c1.transactionCapacity = 100

# Bind the source and sink to the channel
a1.sources.r1.channels = c1
a1.sinks.k1.channel = c1
2.flume2-netcat-flume.conf
配置 Source 监控端口 44444 数据流,配置 Sink 数据到下一级 Flume。

# Name the components on this agent
a2.sources = r1
a2.sinks = k1
a2.channels = c1

# Describe/configure the source
a2.sources.r1.type = netcat
a2.sources.r1.bind = h136
a2.sources.r1.port = 4444

# Describe the sink
a2.sinks.k1.type = avro
a2.sinks.k1.hostname = h136
a2.sinks.k1.port = 4141

# Use a channel which buffers events in memory
a2.channels.c1.type = memory
a2.channels.c1.capacity = 1000
a2.channels.c1.transactionCapacity = 100

# Bind the source and sink to the channel
a2.sources.r1.channels = c1
a2.sinks.k1.channel = c1
3.flume3-flume-logger.conf
配置 source 用于接收 flume1 与 flume2 发送过来的数据流,最终合并后 sink 到控制台。

# Name the components on this agent
a3.sources = r1
a3.sinks = k1
a3.channels = c1

# Describe/configure the source
a3.sources.r1.type = avro
a3.sources.r1.bind = h136
a3.sources.r1.port = 4141

# Describe the sink
a3.sinks.k1.type = logger

# Describe the channel
a3.channels.c1.type = memory
a3.channels.c1.capacity = 1000
a3.channels.c1.transactionCapacity = 100

# Bind the source and sink to the channel
a3.sources.r1.channels = c1
a3.sinks.k1.channel = c1
二、测试
flume3-flume-logger.conf 接收数据,需要先启动。
cd /opt/apache-flume-1.9.0-bin

bin/flume-ng agent --conf conf/ --name a3 --conf-file /tmp/flume-job/group4/flume3-flume-logger.conf -Dflume.root.logger=INFO,console
bin/flume-ng agent --conf conf/ --name a2 --conf-file /tmp/flume-job/group4/flume2-netcat-flume.conf -Dflume.root.logger=INFO,console
bin/flume-ng agent --conf conf/ --name a1 --conf-file /tmp/flume-job/group4/flume1-logger-flume.conf -Dflume.root.logger=INFO,console
向监控目录的文件和端口发送数据
echo ‘789qwewqe‘ >> /tmp/tomcat.log
echo ‘123cvbcvbcv‘ >> /tmp/tomcat.log
echo ‘456jkuikmjh‘ >> /tmp/tomcat.log

yum -y install nc
# 需要与配置中的参数一致,若配的是主机名就不能写 IP 地址
nc h136 4444

123456

以上是关于Flume 日志聚合的主要内容,如果未能解决你的问题,请参考以下文章
