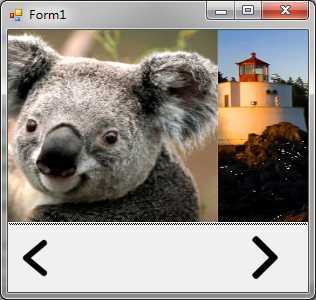
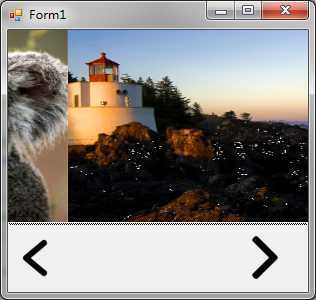
winform实现图片的滑动效果
Posted lu-yuan
tags:
篇首语:本文由小常识网(cha138.com)小编为大家整理,主要介绍了winform实现图片的滑动效果相关的知识,希望对你有一定的参考价值。
      使用winform实现图片的滑动效果(类似网站首页图片滑动切换效果),结果实现了,但是效果其实不是很理想。
也许有更好的方法。


     Timer timerSlide = null;

        //当前初始化的PictureBox
        PictureBox box = null;
        //当前PictureBox
        PictureBox curBox = null;
        //下一个PictureBox
        PictureBox nxtBox = null;
        //前进方向
        string direction = "";
        //当前图片的索引
        int curIdx = 0;

        //Panel1的宽度
        int width = 0;
        //当前图片x的坐标
        int curXPos = 0;

        public Form1()
        {
            InitializeComponent();
        }

        private void Form1_Load(object sender, EventArgs e)
        {
            Init();
        }

        private void Init()
        {
            width = splitContainer1.Panel1.Width;

            timerSlide = new Timer();
            timerSlide.Interval = 100;
            timerSlide.Tick += timerSlide_Tick;
            timerSlide.Enabled = false;

            //初始化Panel1
            box = new PictureBox();
            box.Size = new Size(splitContainer1.Panel1.Width, splitContainer1.Panel1.Height);
            box.SizeMode = PictureBoxSizeMode.StretchImage;
            box.Image = imageListContainer.Images[0];
            splitContainer1.Panel1.Controls.Clear();
            splitContainer1.Panel1.Controls.Add(box);

            curBox = box;
        }

        private void timerSlide_Tick(object sender, EventArgs e)
        {
            if (direction.Equals("right"))
            {
                splitContainer1.Panel1.Controls.Clear();
                splitContainer1.Panel1.Controls.Add(curBox);
                splitContainer1.Panel1.Controls.Add(nxtBox);
                curBox.Location = new Point(curXPos, 0);
                nxtBox.Location = new Point(width + curXPos, 0);
                if (Math.Abs(curXPos) == width)
                {
                    curXPos = 0;
                    timerSlide.Enabled = false;
                    curBox = nxtBox;
                }
                curXPos -= 30;
            }
            else if (direction.Equals("left"))
            {
                splitContainer1.Panel1.Controls.Clear();
                splitContainer1.Panel1.Controls.Add(curBox);
                splitContainer1.Panel1.Controls.Add(nxtBox);
                curBox.Location = new Point(curXPos, 0);
                nxtBox.Location = new Point(curXPos - width, 0);
                if (curXPos == width)
                {
                    curXPos = 0;
                    timerSlide.Enabled = false;
                    curBox = nxtBox;
                }
                curXPos += 30;
            }
            else
            {
                timerSlide.Enabled = false;
                return;
            }

            //timerSlide.Enabled = false;
        }

        private void lbLeft_Click(object sender, EventArgs e)
        {
            if (curIdx == 0)
            {
                curIdx = imageListContainer.Images.Count - 1;

                box = new PictureBox();
                box.Size = new Size(splitContainer1.Panel1.Width, splitContainer1.Panel1.Height);
                box.SizeMode = PictureBoxSizeMode.StretchImage;
                box.Image = imageListContainer.Images[curIdx];
                splitContainer1.Panel1.Controls.Clear();
                //splitContainer1.Panel1.Controls.Add(box1);

                //curIdx = imageListContainer.Images.Count - 1;
            }
            else
            {
                curIdx -= 1;

                box = new PictureBox();
                box.Size = new Size(splitContainer1.Panel1.Width, splitContainer1.Panel1.Height);
                box.SizeMode = PictureBoxSizeMode.StretchImage;
                box.Image = imageListContainer.Images[curIdx];
                splitContainer1.Panel1.Controls.Clear();
                //splitContainer1.Panel1.Controls.Add(box1);

                //curIdx -= 1;
            }
            direction = "left";
            nxtBox = box;
            //启动定时器
            timerSlide.Enabled = true;
        }

        private void lbRight_Click(object sender, EventArgs e)
        {
            if (curIdx == imageListContainer.Images.Count - 1)
            {
                curIdx = 0;

                box = new PictureBox();
                box.Size = new Size(splitContainer1.Panel1.Width, splitContainer1.Panel1.Height);
                box.SizeMode = PictureBoxSizeMode.StretchImage;
                box.Image = imageListContainer.Images[curIdx];
                splitContainer1.Panel1.Controls.Clear();
                //splitContainer1.Panel1.Controls.Add(box2);

                //curIdx = 0;
            }
            else
            {
                curIdx += 1;

                box = new PictureBox();
                box.Size = new Size(splitContainer1.Panel1.Width, splitContainer1.Panel1.Height);
                box.SizeMode = PictureBoxSizeMode.StretchImage;
                box.Image = imageListContainer.Images[curIdx];
                splitContainer1.Panel1.Controls.Clear();
                //splitContainer1.Panel1.Controls.Add(box2);

                //curIdx += 1;
            }
            direction = "right";
            nxtBox = box;
            //启动定时器
            timerSlide.Enabled = true;
        }
以上是关于winform实现图片的滑动效果的主要内容,如果未能解决你的问题,请参考以下文章