使用Runtime自定义KVO,原理浅析
Posted xyq-208910
tags:
篇首语:本文由小常识网(cha138.com)小编为大家整理,主要介绍了使用Runtime自定义KVO,原理浅析相关的知识,希望对你有一定的参考价值。
一、介绍
什么是KVO?全称key-value-observer,键值观察,观察者设计模式的另一种实现。其作用是通过观察者监听属性值的变化而做出函数回调。
二、原理
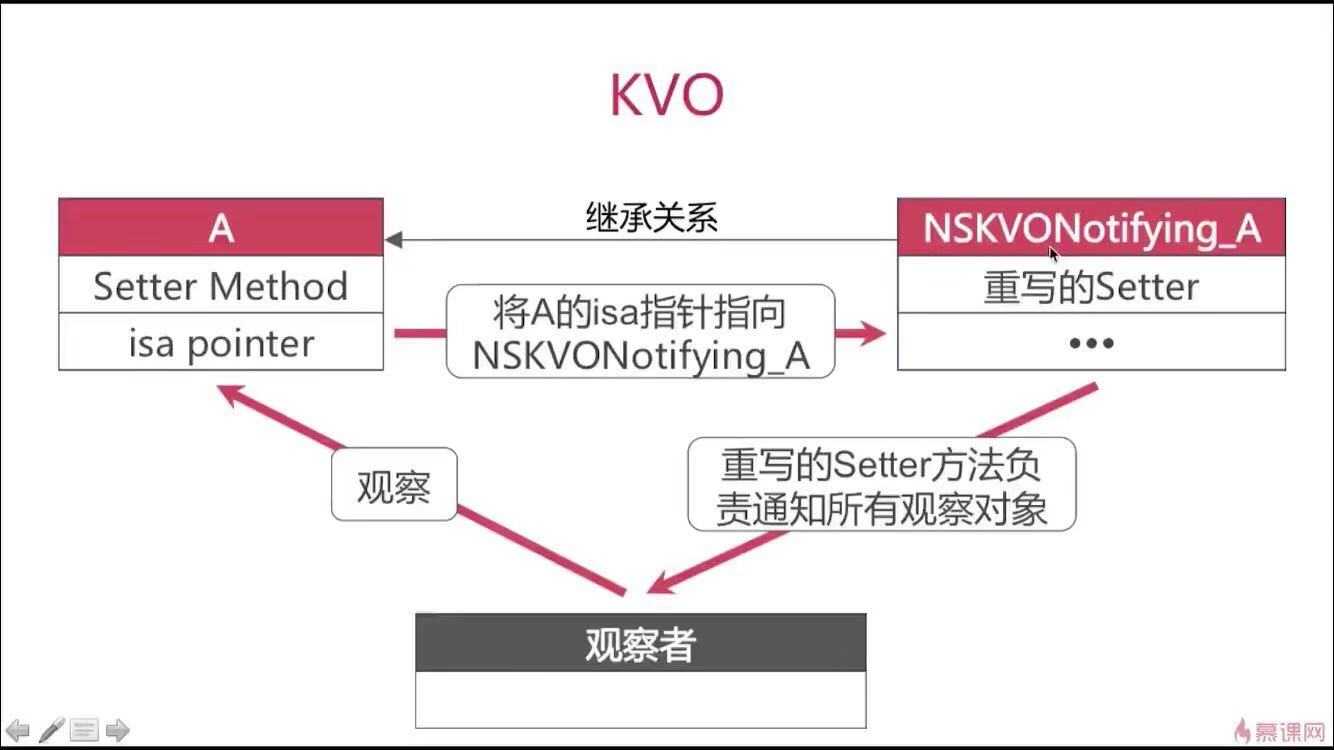
KVO基于Runtime机制实现,使用了isa的混写技术
监听者监听类A的某一个属性的变化,系统会动态为类A创建一个子类NSKVONotifying_A,并将类A的isa指针重新指向该子类
系统会重写类A的setter方法。( 赋值前后分别调用willChangeValueForKey和didChangeValueForKey跟踪新旧值 )
当类A的属性发生改变时,系统通知监听者,调用observeValueForKey:ofObject:change:context方法即可
三、图示

三、基本实现
Student类
//  Created by 夏远全 on 2019/10/12.

#import <Foundation/Foundation.h>

NS_ASSUME_NONNULL_BEGIN

@interface Student : NSObject
@property (nonatomic, copy) NSString *name;
@end
ViewController类
-(void)test_objc_KVO {

    //创建对象
    self.stu = [[Student alloc] init];
    self.stu.name = @"张三";

    //注册观察者
    [self.stu addObserver:self forKeyPath:@"name" options:NSKeyValueObservingOptionNew context:NULL];

    //修改值
    self.stu.name = @"李四";
}

-(void)observeValueForKeyPath:(NSString *)keyPath ofObject:(id)object change:(NSDictionary<NSKeyValueChangeKey,id> *)change context:(void *)context {

    NSLog(@"被观测对象:%@, 被观测的属性:%@, 值的改变: %@
", object, keyPath, change);

}
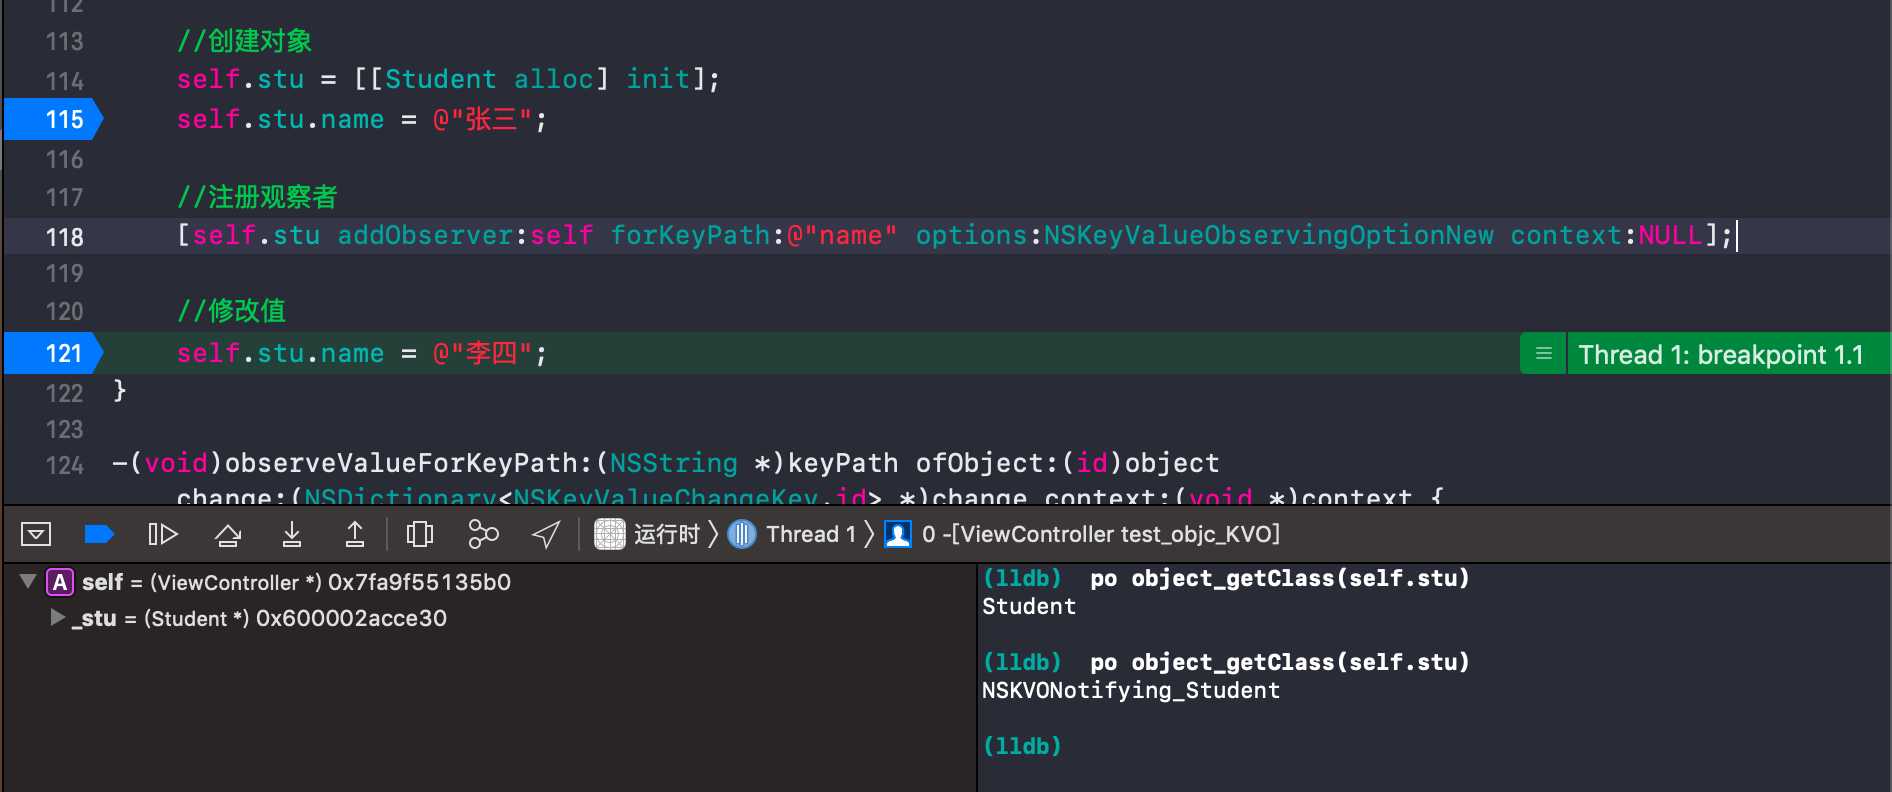
断点结果:监听前后,stu对象的类类型发生了变化,Student -> NSKVONotifying_Student

打印结果
2019-10-13 11:22:01.251412+0800 运行时[18494:3545181] 被观测对象:<Student: 0x600003d9f3c0>, 被观测的属性:name, 值的改变: {
    kind = 1;
    new = "U674eU56db";
}
四、自定义
(1)思想:
- 添加监听方法
- 创建一个子类
- 改写父类isa指针
- 关联观察者
- 重写setter方法
- 给父类发送setter消息
- 给观察者发送observeValueForKeyPath:ofObject:change:context:消息
(2)实现
Student类
//  Created by 夏远全 on 2019/10/12.

#import <Foundation/Foundation.h>

NS_ASSUME_NONNULL_BEGIN

@interface Student : NSObject
@property (nonatomic, copy) NSString *name;

///自定义的监听方法
-(void)xyq_addObserver:(NSObject *)observer forKeyPath:(NSString *)keyPath options:(NSKeyValueObservingOptions)options context:(nullable void *)context;

@end

NS_ASSUME_NONNULL_END
//
//  Student.m
//  运行时
//
//  Created by 夏远全 on 2019/10/12.
//

#import "Student.h"
#import <objc/message.h>

@implementation Student

void setterMethod(id self, SEL _cmd, NSString *name) {

    //5、调用父类的方法
    struct objc_super superClass =  {
        self,
        class_getSuperclass([self class])
    };
    objc_msgSendSuper(&superClass, _cmd, name);


    //6、通知观察者调用observeValueForKeyPath:ofObject:change:context:
    id observer = objc_getAssociatedObject(self, (__bridge const void *)@"observer");
    NSString *methodName = NSStringFromSelector(_cmd);
    NSString *key = getValueKey(methodName);
    objc_msgSend(observer, @selector(observeValueForKeyPath:ofObject:change:context:), key, self, @{key:name}, nil);

}

/// 通过setter方法截取属性名
NSString *getValueKey(NSString *setter){

    //去掉set
    if ([setter hasPrefix:@"set"]) {
        setter = [setter stringByReplacingOccurrencesOfString:@"set" withString:@""];
    }
    //去掉:
    if ([setter hasSuffix:@":"]) {
        setter = [setter stringByReplacingOccurrencesOfString:@":" withString:@""];
    }
    //首字母小写
    NSString *key = [setter stringByReplacingOccurrencesOfString:[setter substringToIndex:1] withString:[[setter substringToIndex:1] lowercaseString] options:0 range:NSMakeRange(0,1)];
    return key;
}


- (void)xyq_addObserver:(NSObject *)observer forKeyPath:(NSString *)keyPath options:(NSKeyValueObservingOptions)options context:(nullable void *)context {

    //1、生成子类
    const char * clazz = class_getName([self class]);
    NSString *className = [NSString stringWithCString:clazz encoding:NSUTF8StringEncoding];
    NSString *subClassName = [NSString stringWithFormat:@"NSKVONotifying_%@",className];
    Class subClass = objc_getClass(subClassName.UTF8String);
    subClass = objc_allocateClassPair([self class], [subClassName UTF8String], 0);
    objc_registerClassPair(subClass);

    //2、isa指向子类
    object_setClass(self, subClass);

    //3、关联观察者
    objc_setAssociatedObject(self, (__bridge const void *)@"observer", observer, OBJC_ASSOCIATION_RETAIN_NONATOMIC);

    //4、重写set方法
    NSString *setNameStr = [NSString stringWithFormat:@"set%@:",keyPath.capitalizedString];
    SEL setSelector = NSSelectorFromString(setNameStr);
    class_addMethod(subClass, setSelector, (IMP)setterMethod, "v@:@");
}

@end
ViewController类
-(void)test_objc_KVO {

    //创建对象
    self.stu = [[Student alloc] init];
    self.stu.name = @"张三";

    //注册观察者
    [self.stu xyq_addObserver:self forKeyPath:@"name" options:NSKeyValueObservingOptionNew context:NULL];

    //修改值
    self.stu.name = @"李四";
}

-(void)observeValueForKeyPath:(NSString *)keyPath ofObject:(id)object change:(NSDictionary<NSKeyValueChangeKey,id> *)change context:(void *)context {

    NSLog(@"被观测对象:%@, 被观测的属性:%@, 值的改变: %@
", object, keyPath, change);

}
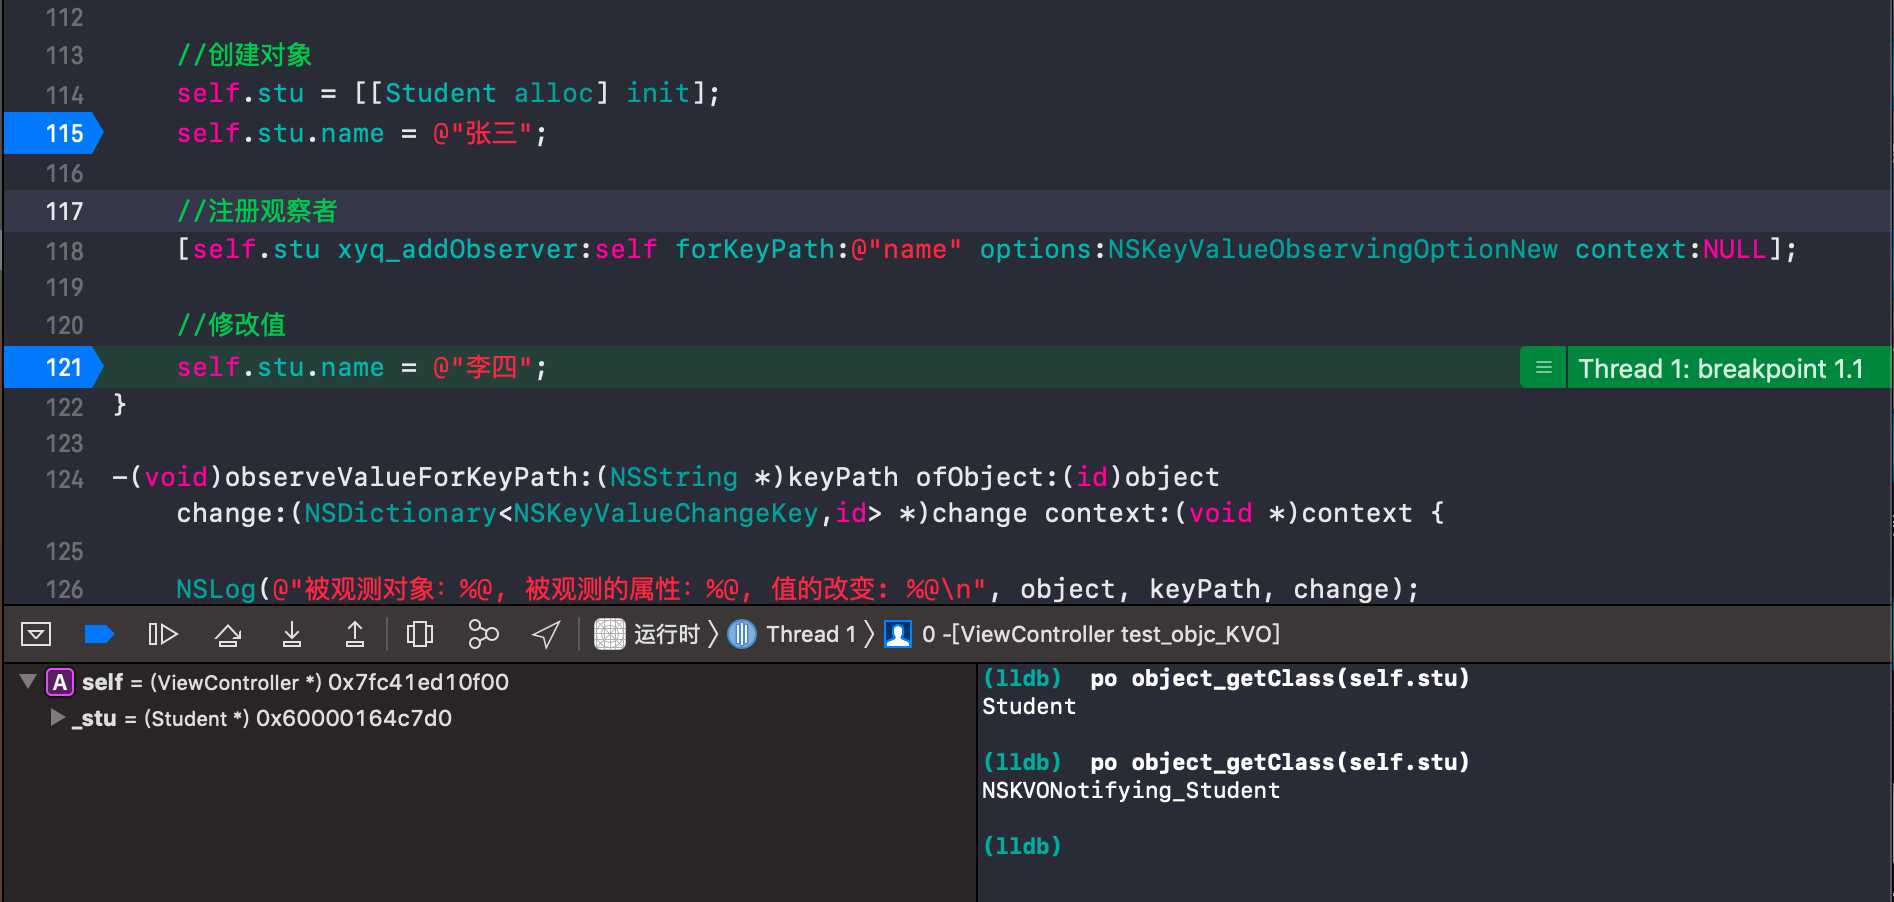
断点结果:监听前后,stu对象的类类型发生了变化,Student -> NSKVONotifying_Student

打印结果
2019-10-13 11:35:17.929772+0800 运行时[18720:3562649] 被观测对象:<NSKVONotifying_Student: 0x6000002e0420>, 被观测的属性:name, 值的改变: {
    name = "U674eU56db";
}
五、扩展
这个案例只是浅浅的探究了一下实现原理,其他这个还有更大的应用。
我们可以给NSObject创建一个分类NSObject(KVO),实现各种属性的监听实现。
具体操作自己动手去吧,不在本文做演示。
以上是关于使用Runtime自定义KVO,原理浅析的主要内容,如果未能解决你的问题,请参考以下文章