公众号后台开发
Posted qlqwjy
tags:
篇首语:本文由小常识网(cha138.com)小编为大家整理,主要介绍了公众号后台开发相关的知识,希望对你有一定的参考价值。
1.准备
1.准备服务
与微信对接的url要具备以下条件:
(1)在公网上能够访问
(2)端口只支持80端口
在这里如果是公网能够访问的服务最好,也可以通过花生壳或者其他外网映射工具进行映射,比如ngrok。
2.数据交互原理
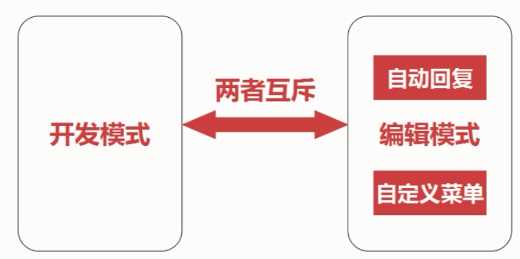
开发模式与编辑模式是互斥的,打开开发模式的时候,编辑模式的自动回复与自定义菜单失效;打开编辑模式的自动回复或者自定义菜单的时候开发模式会失效。
开发模式的数据交互原理如下:
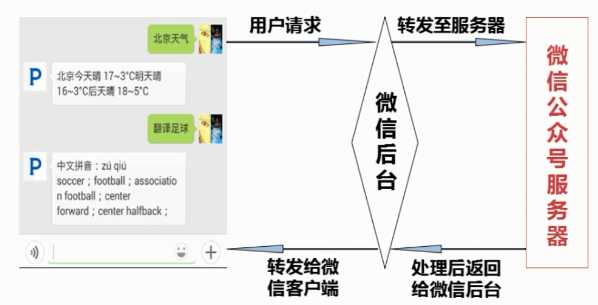
我们需要开发的任务就是维信公众号服务器,包括业务逻辑、身份验证等操作。
2.接入后台
参考公众号开发文档: 开发->开发者工具-》开发者文档,里面有类似于对接钉钉的文档,有接入指南以及其他接口文档。
https://developers.weixin.qq.com/doc/offiaccount/Getting_Started/Overview.html
1. 第一步:填写服务器配置
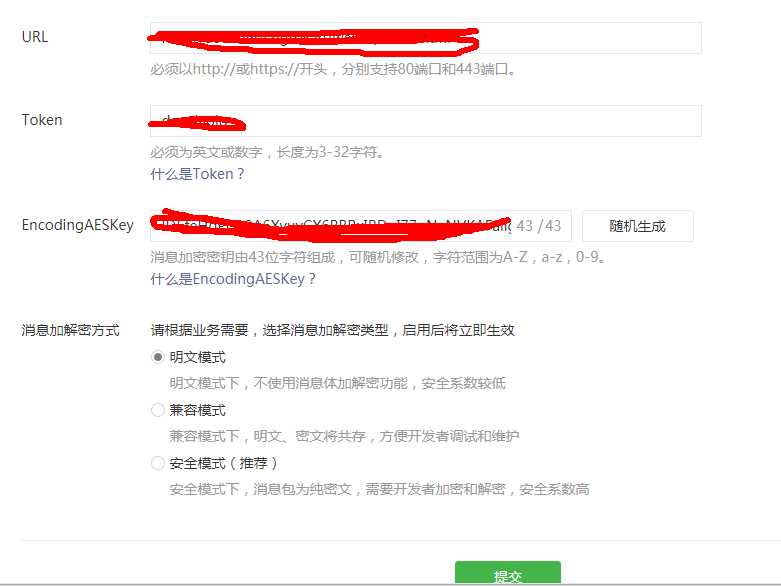
2 第二步:验证消息的确来自微信服务器(在自己的微信服务器进行验证)
开发者提交信息后,微信服务器将发送GET请求到填写的服务器地址URL上,GET请求携带参数如下表所示:
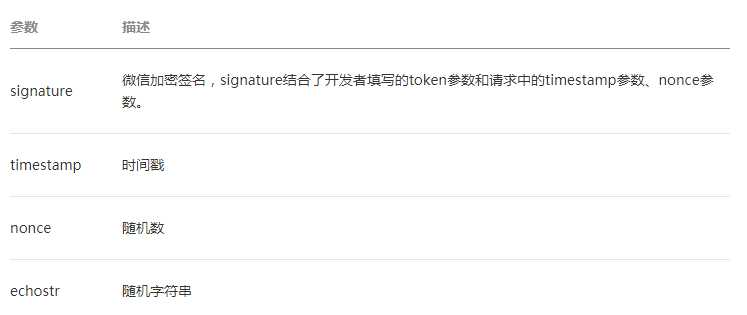
开发者通过检验signature对请求进行校验(下面有校验方式)。若确认此次GET请求来自微信服务器,请原样返回echostr参数内容,则接入生效,成为开发者成功,否则接入失败。加密/校验流程如下:
1)将token、timestamp、nonce三个参数进行字典序排序 2)将三个参数字符串拼接成一个字符串进行sha1加密 3)开发者获得加密后的字符串可与signature对比,标识该请求来源于微信
SpringMVC接收代码如下:
package cn.qlq.controller.weixin;

import org.apache.commons.lang3.StringUtils;
import org.slf4j.Logger;
import org.slf4j.LoggerFactory;
import org.springframework.stereotype.Controller;
import org.springframework.web.bind.annotation.RequestMapping;
import org.springframework.web.bind.annotation.RequestParam;
import org.springframework.web.bind.annotation.ResponseBody;

import cn.qlq.controller.UserController;
import cn.qlq.utils.weixin.WeixinCheckUtils;

@Controller
@RequestMapping("weixin")
public class WeixinController {

    private static final Logger logger = LoggerFactory.getLogger(UserController.class);

    @ResponseBody
    @RequestMapping("index")
    public String index(@RequestParam(required = false) String signature,
            @RequestParam(required = false) String timestamp, @RequestParam(required = false) String nonce,
            @RequestParam(required = false) String echostr) {

        logger.debug("signature: {}, timestamp: {}, nonce: {}, echostr: {}", signature, timestamp, nonce, echostr);

        if (StringUtils.isNoneBlank(signature, timestamp, nonce)
                && WeixinCheckUtils.checkSignature(signature, timestamp, nonce)) {
            return echostr;
        }

        return "error";
    }
}
验证工具如下:
package cn.qlq.utils.weixin;

import java.security.MessageDigest;
import java.util.Arrays;

public class WeixinCheckUtils {

    // token,与微信公众号后台的一致
    private static final String token = "devqiaolq";

    public static boolean checkSignature(String signature, String timestamp, String nonce) {
        String[] arr = new String[] { token, timestamp, nonce };

        // 排序
        Arrays.sort(arr);

        // 生成字符串
        StringBuffer content = new StringBuffer();
        for (int i = 0; i < arr.length; i++) {
            content.append(arr[i]);
        }

        // sha1加密
        String temp = getSha1(content.toString());
        return temp.equals(signature);

    }

    public static String getSha1(String str) {
        if (str == null || str.length() == 0) {
            return null;
        }

        char hexDigits[] = { ‘0‘, ‘1‘, ‘2‘, ‘3‘, ‘4‘, ‘5‘, ‘6‘, ‘7‘, ‘8‘, ‘9‘, ‘a‘, ‘b‘, ‘c‘, ‘d‘, ‘e‘, ‘f‘ };

        try {
            MessageDigest mdTemp = MessageDigest.getInstance("SHA1");
            mdTemp.update(str.getBytes("UTF-8"));

            byte[] md = mdTemp.digest();
            int j = md.length;
            char buf[] = new char[j * 2];
            int k = 0;
            for (int i = 0; i < j; i++) {
                byte byte0 = md[i];
                buf[k++] = hexDigits[byte0 >>> 4 & 0xf];
                buf[k++] = hexDigits[byte0 & 0xf];
            }
            return new String(buf);
        } catch (Exception e) {
            return null;
        }
    }
}
注意:如果有登录过滤器,记得在过滤器中放行微信请求.
3. 第三步:依据接口文档实现业务逻辑
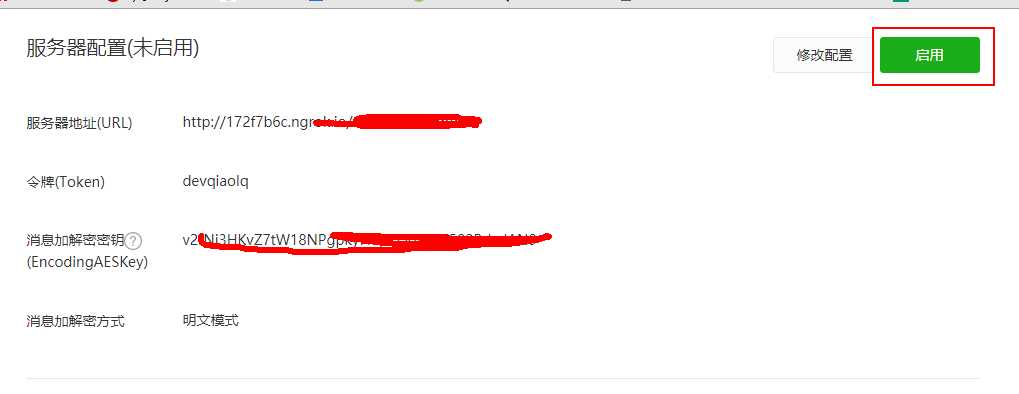
1. 首先需要启用开发者模式:(启用开发者模式之后自己的自定义菜单就不会生效)
2. 接收与响应文字消息
当普通微信用户向公众账号发消息时,微信服务器将POST消息的XML数据包到开发者填写的URL上。
文本消息的xml数据格式如下:
<xml>
  <ToUserName><![CDATA[toUser]]></ToUserName>
  <FromUserName><![CDATA[fromUser]]></FromUserName>
  <CreateTime>1348831860</CreateTime>
  <MsgType><![CDATA[text]]></MsgType>
  <Content><![CDATA[this is a test]]></Content>
  <MsgId>1234567890123456</MsgId>
</xml>
参数解释:
| 参数 | 描述 |
|---|---|
| ToUserName | 开发者微信号 |
| FromUserName | 发送方帐号(一个OpenID) |
| CreateTime | 消息创建时间 (整型) |
| MsgType | 消息类型,文本为text |
| Content | 文本消息内容 |
| MsgId | 消息id,64位整型 |
(1)建立后台对应的TextMessage实体类:
package cn.qlq.bean.weixin;

public class TextMessage {

    /**
     * 开发者微信号
     */
    private String ToUserName;

    /**
     * 发送方帐号(一个OpenID)
     */
    private String FromUserName;

    /**
     * 消息创建时间 (整型)
     */
    private long CreateTime;

    /**
     * text
     */
    private String MsgType;

    /**
     * 文本消息内容
     */
    private String Content;

    /**
     * 消息id,64位整型
     */
    private String MsgId;

    @Override
    public String toString() {
        return "TextMessage{" + "ToUserName=‘" + ToUserName + ‘‘‘ + ", FromUserName=‘" + FromUserName + ‘‘‘
                + ", CreateTime=" + CreateTime + ", MsgType=‘" + MsgType + ‘‘‘ + ", Content=‘" + Content + ‘‘‘
                + ", MsgId=‘" + MsgId + ‘‘‘ + ‘}‘;
    }

    public String getToUserName() {
        return ToUserName;
    }

    public void setToUserName(String toUserName) {
        ToUserName = toUserName;
    }

    public String getFromUserName() {
        return FromUserName;
    }

    public void setFromUserName(String fromUserName) {
        FromUserName = fromUserName;
    }

    public long getCreateTime() {
        return CreateTime;
    }

    public void setCreateTime(long createTime) {
        CreateTime = createTime;
    }

    public String getMsgType() {
        return MsgType;
    }

    public void setMsgType(String msgType) {
        MsgType = msgType;
    }

    public String getContent() {
        return Content;
    }

    public void setContent(String content) {
        Content = content;
    }

    public String getMsgId() {
        return MsgId;
    }

    public void setMsgId(String msgId) {
        MsgId = msgId;
    }

}
(2)编写工具类实现xml(接收的是xml格式的数据)转map和TextMessage对象转换成xml(响应数据格式为xml)
pom加入:
        <!--微信转换XML所需包 -->
        <dependency>
            <groupId>dom4j</groupId>
            <artifactId>dom4j</artifactId>
            <version>1.6.1</version>
        </dependency>
        <!-- https://mvnrepository.com/artifact/com.thoughtworks.xstream/xstream -->
        <dependency>
            <groupId>com.thoughtworks.xstream</groupId>
            <artifactId>xstream</artifactId>
            <version>1.4.10</version>
        </dependency>
工具类:
package cn.qlq.utils.weixin;

import java.io.IOException;
import java.io.InputStream;
import java.util.HashMap;
import java.util.List;
import java.util.Map;

import javax.servlet.http.HttpServletRequest;

import org.dom4j.Document;
import org.dom4j.DocumentException;
import org.dom4j.Element;
import org.dom4j.io.SAXReader;

import com.thoughtworks.xstream.XStream;

import cn.qlq.bean.weixin.TextMessage;

public class MessageUtils {

    /**
     * xml数据转map
     *
     * @param request
     * @return
     * @throws IOException
     * @throws DocumentException
     */
    public static Map<String, String> xmlToMap(HttpServletRequest request) throws IOException, DocumentException {
        Map<String, String> map = new HashMap<>();
        SAXReader reader = new SAXReader();

        InputStream inputStream = request.getInputStream();
        Document document = reader.read(inputStream);

        Element root = document.getRootElement();
        List<Element> list = root.elements();

        for (Element element : list) {
            map.put(element.getName(), element.getText());
        }

        inputStream.close();
        return map;
    }

    /**
     * 将文本消息对象转换成xml
     *
     * @param textMessage
     * @return
     */
    public static String textMessageToXml(TextMessage textMessage) {
        XStream xStream = new XStream();
        // 将xml的根元素替换成xml
        xStream.alias("xml", textMessage.getClass());
        return xStream.toXML(textMessage);
    }
}
(3)重写Controller接收消息和响应消息
package cn.qlq.controller.weixin;

import java.io.IOException;
import java.io.PrintWriter;
import java.util.Date;
import java.util.Map;

import javax.servlet.http.HttpServletRequest;
import javax.servlet.http.HttpServletResponse;

import org.apache.commons.lang3.StringUtils;
import org.dom4j.DocumentException;
import org.slf4j.Logger;
import org.slf4j.LoggerFactory;
import org.springframework.stereotype.Controller;
import org.springframework.web.bind.annotation.RequestMapping;
import org.springframework.web.bind.annotation.RequestMethod;

import cn.qlq.bean.weixin.TextMessage;
import cn.qlq.controller.UserController;
import cn.qlq.utils.weixin.MessageUtils;
import cn.qlq.utils.weixin.WeixinCheckUtils;

@Controller
@RequestMapping("weixin")
public class WeixinController {

    private static final Logger logger = LoggerFactory.getLogger(UserController.class);

    @RequestMapping(value = "index", method = { RequestMethod.GET, RequestMethod.POST })
    public void index(HttpServletRequest request, HttpServletResponse response) throws IOException {

        // 将请求、响应的编码均设置为UTF-8(防止中文乱码)
        request.setCharacterEncoding("UTF-8"); // 微信服务器POST消息时用的是UTF-8编码,在接收时也要用同样的编码,否则中文会乱码;
        response.setCharacterEncoding("UTF-8"); // 在响应消息(回复消息给用户)时,也将编码方式设置为UTF-8,原理同上;

        String method = request.getMethod().toLowerCase();
        logger.info("method: {}", method);

        // 验证是否是微信请求
        if ("get".equals(method)) {
            doGet(request, response);
            return;
        }

        // POST请求接收消息,且给客户响应消息
        doPost(request, response);
    }

    /**
     * Post请求用于接收消息且处理消息之后回传消息
     *
     * @param request
     * @param response
     * @throws IOException
     */
    private void doPost(HttpServletRequest request, HttpServletResponse response) throws IOException {
        PrintWriter out = response.getWriter();
        try {
            Map<String, String> map = MessageUtils.xmlToMap(request);
            String fromUserName = map.get("FromUserName");
            String toUserName = map.get("ToUserName");
            String msgType = map.get("MsgType");
            String content = map.get("Content");
            logger.info("map: {}", map);

            if (StringUtils.isNotBlank(content)) {
                System.out.println("接收的的消息为:" + content + ",你可以根据关键字进行搜索或者做其他");
            }

            String message = null;
            if ("text".equals(msgType)) {
                TextMessage textMessage = new TextMessage();
                // 回传消息,所以讲fromuser和toUser交换
                textMessage.setFromUserName(toUserName);
                textMessage.setToUserName(fromUserName);
                textMessage.setMsgType(msgType);
                textMessage.setCreateTime(new Date().getTime());
                textMessage.setContent("您发送的消息为: " + content);
                logger.info("textMessage: {}", textMessage);

                message = MessageUtils.textMessageToXml(textMessage);
            }

            out.print(message);// 把消息发送到客户端
        } catch (DocumentException e) {
            logger.error("dispose post request error", e);
        } finally {
            out.close();
        }
    }

    /**
     * Get请求用于微信配置验证
     *
     * @param request
     * @param response
     * @throws IOException
     */
    private void doGet(HttpServletRequest request, HttpServletResponse response) throws IOException {
        String signature = request.getParameter("signature");// 微信加密签名
        String timestamp = request.getParameter("timestamp");// 时间戳
        String nonce = request.getParameter("nonce");// 随机数
        String echostr = request.getParameter("echostr");// 随机字符串
        logger.info("signature: {}, timestamp: {}, nonce: {}, echostr: {}", signature, timestamp, nonce, echostr);

        if (StringUtils.isNoneBlank(signature, timestamp, nonce)
                && WeixinCheckUtils.checkSignature(signature, timestamp, nonce)) {
            response.getWriter().write(echostr);
        }
    }
}
测试:
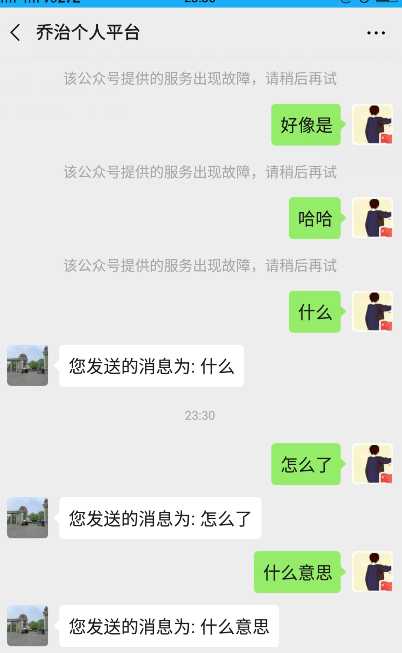
Java服务器日志如下:
2019-10-23 23:34:15.625 INFO 244500 --- [nio-8088-exec-9] cn.qlq.controller.UserController : method: post
2019-10-23 23:34:15.633 INFO 244500 --- [nio-8088-exec-9] cn.qlq.controller.UserController : map: {MsgId=22503405793257008, FromUserName=o_qAo0u6Snhoc7Z45RfSxYatMWpo, CreateTime=1571844638, Content=怎么了, ToUserName=gh_fc4bd5c2fda8, MsgType=text}
接收的的消息为:怎么了,你可以根据关键字进行搜索或者做其他
2019-10-23 23:34:15.635 INFO 244500 --- [nio-8088-exec-9] cn.qlq.controller.UserController : textMessage: TextMessage{ToUserName=‘o_qAo0u6Snhoc7Z45RfSxYatMWpo‘, FromUserName=‘gh_fc4bd5c2fda8‘, CreateTime=1571844855635, MsgType=‘text‘, Content=‘您发送的消息为: 怎么了‘, MsgId=‘null‘}
2019-10-23 23:34:20.288 INFO 244500 --- [nio-8088-exec-3] cn.qlq.controller.UserController : method: post
2019-10-23 23:34:20.295 INFO 244500 --- [nio-8088-exec-3] cn.qlq.controller.UserController : map: {MsgId=22503406289173072, FromUserName=o_qAo0u6Snhoc7Z45RfSxYatMWpo, CreateTime=1571844642, Content=什么意思, ToUserName=gh_fc4bd5c2fda8, MsgType=text}
接收的的消息为:什么意思,你可以根据关键字进行搜索或者做其他
2019-10-23 23:34:20.296 INFO 244500 --- [nio-8088-exec-3] cn.qlq.controller.UserController : textMessage: TextMessage{ToUserName=‘o_qAo0u6Snhoc7Z45RfSxYatMWpo‘, FromUserName=‘gh_fc4bd5c2fda8‘, CreateTime=1571844860296, MsgType=‘text‘, Content=‘您发送的消息为: 什么意思‘, MsgId=‘null‘}
以上是关于公众号后台开发的主要内容,如果未能解决你的问题,请参考以下文章