Flutter弹窗弹窗的快速上手使用和自定义Dialog
Posted Cartoon SuperMan
tags:
篇首语:本文由小常识网(cha138.com)小编为大家整理,主要介绍了Flutter弹窗弹窗的快速上手使用和自定义Dialog相关的知识,希望对你有一定的参考价值。
文章目录

前言
一、弹窗的作用
给用户提示,让用户做出选择,或者是实现部分内容
二、开始学习
dialog 都需要 showDialog 才能显示出来,可以使用button点击触发
showDialog :
barrierDismissible: 点击弹框外部区域是否返回默认是true
barrierColor: 屏障的颜色
barrierLabel: 'barrierLabel',//给屏障定义一个string name
anchorPoint: OffSet(1,2)  //锚点 可以使整个弹出框位置发生偏移
1.AlertDialog 提示框
代码如下(示例):
            ElevatedButton(
                onPressed: () async
                  // 等用户选择返回结果,点击空白区域返回null
                  var result = await showDialog(
                      barrierDismissible: true, //点击空白是否退出
                      context: context,
                      builder: (context)
                        return AlertDialog(
                          // titlePadding: EdgeInsets.all(10),
                          elevation: 10,
                          backgroundColor: Colors.pink, //背景颜色

                          shape: RoundedRectangleBorder(
                              borderRadius: BorderRadius.circular(20)), //设置形状

                          title: const Text('我是标题'),
                          // icon: Icon(Icons.work_rounded),
                          content: const Padding(
                            padding: EdgeInsets.all(8.0),
                            child: Text('我可以是文本内容我可以是文本内容我可以是文本内容我可以是文本内容'),
                          ),
                          contentTextStyle: const TextStyle(
                              color: Colors.black), //文本内容的text样式
                          actions: [
                            Padding(
                              padding: const EdgeInsets.all(8.0),
                              child: ElevatedButton(
                                  onPressed: ()
                                    Navigator.of(context).pop(true);
                                  ,
                                  child: const Text('确定')),
                            ),
                            Padding(
                              padding: const EdgeInsets.all(8.0),
                              child: ElevatedButton(
                                  onPressed: ()
                                    Navigator.of(context).pop();
                                  ,
                                  child: const Text('取消')),
                            ),
                          ],
                        );
                      );

                  print('result$result');
                ,
                child: Text('AlertDialog')),

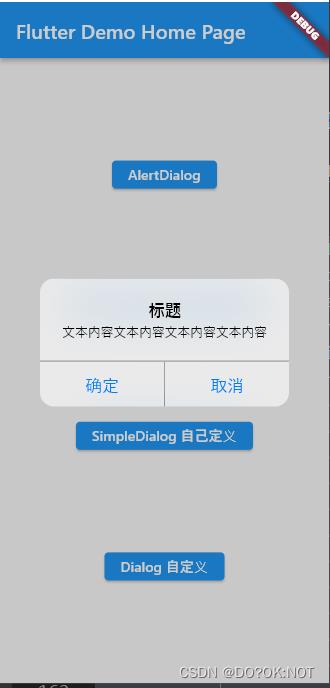
2.showCupertinoDialog 和 CupertinoAlertDialog
ios 风格的退出框,其他的工同上
代码如下(示例):
            ElevatedButton(
              onPressed: () async
                var resutl = await showCupertinoDialog(
                    context: context,
                    builder: (context)
                      return CupertinoAlertDialog(
                        title: Text('标题'),
                        content: Text("文本内容文本内容文本内容文本内容"),
                        actions: [
                          CupertinoDialogAction(
                              onPressed: ()
                                Navigator.of(context).pop(true);
                              ,
                              child: Text('确定')),
                          CupertinoDialogAction(
                              onPressed: ()
                                Navigator.of(context).pop();
                              ,
                              child: Text('取消')),
                        ],
                      );
                    );
                print('result$resutl');
              ,
              child: Text('CupertinoAlertDialog ios'),
            ),

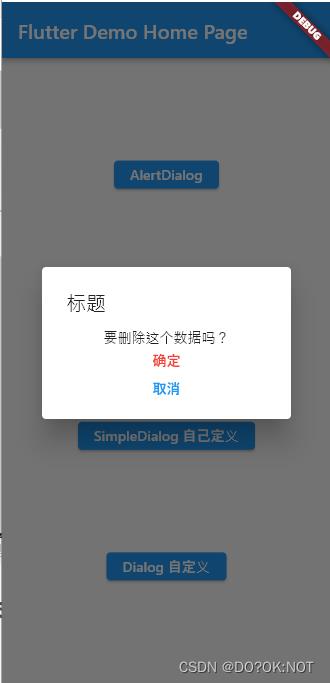
3.SimpleDialog一个简单的弹窗
            ElevatedButton(
              onPressed: () async
                var resutl = await showDialog(
                    context: context,
                    builder: (context)
                      return SimpleDialog(
                        title: const Text('标题'),
                        children: [
                          //这边自己定义widget内容
                          Center(
                            child: Text(
                              '要删除这个数据吗?',
                              style: Theme.of(context).textTheme.bodyMedium,
                            ),
                          ),
                          TextButton(
                              onPressed: ()
                                Navigator.of(context).pop(true);
                              ,
                              child: const Text(
                                '确定',
                                style: TextStyle(color: Colors.red),
                              )),
                          TextButton(
                              onPressed: ()
                                Navigator.of(context).pop();
                              ,
                              child: const Text(
                                '取消',
                              )),
                        ],
                      );
                    );
                print('result$resutl');
              ,
              child: Text('SimpleDialog 自己定义'),
            ),

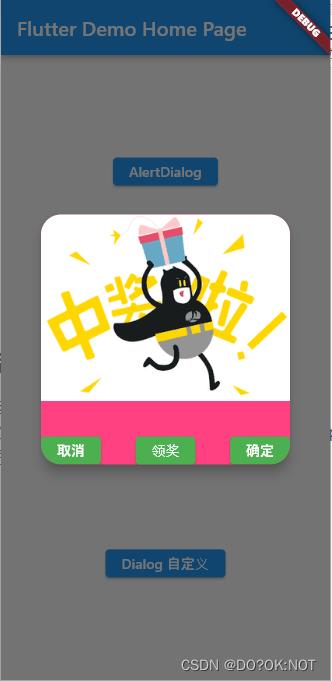
3.自己定义一个Dialog,可以加入gif 图片
Dialog 可以完全的自己定义一个弹出框,然后可以自己定义整个弹出框的内容,比如加入图片等等
// 使用dialog 来自己真正的定义一个对话框
  Widget myDialog()
    return Dialog(
      // insetPadding: EdgeInsets.all(10), //距离
      shape: const RoundedRectangleBorder(
          borderRadius: BorderRadius.all(Radius.circular(20))), //形状
      backgroundColor: Colors.pinkAccent,
      clipBehavior: Clip.antiAlias, //强制裁剪
      elevation: 10,
      child: SizedBox(
        //需要在内部限制下高度和宽度才能更好的显示
        height: 250,
        width: 300,
        child: Column(
          crossAxisAlignment: CrossAxisAlignment.center,
          mainAxisAlignment: MainAxisAlignment.spaceBetween,
          children: [
            // const Text('中奖拉'),
            Image.asset('assets/getit.gif'),
            Row(
              mainAxisAlignment: MainAxisAlignment.spaceBetween,
              children: [
                ElevatedButton(
                    style: ButtonStyle(
                        backgroundColor:
                            MaterialStateProperty.all(Colors.green)),
                    onPressed: ()
                      Navigator.of(context).pop();
                    ,
                    child: const Text('取消')),
                ElevatedButton(
                    style: ButtonStyle(
                        backgroundColor:
                            MaterialStateProperty.all(Colors.green)),
                    onPressed: () ,
                    child: const Text('领奖')),
                ElevatedButton(
                    style: ButtonStyle(
                        backgroundColor:
                            MaterialStateProperty.all(Colors.green)),
                    onPressed: ()
                      Navigator.of(context).pop(true);
                    ,
                    child: const Text('确定')),
              ],
            )
          ],
        ),
      ),
    );
            ElevatedButton(
              onPressed: () async
                var resutl = await showDialog(
                    context: context,
                    builder: (context)
                      return myDialog();
                    );
              ,
              child: Text('Dialog 自定义'),
            )

总结
全文代码如下:
import 'package:flutter/cupertino.dart';
import 'package:flutter/material.dart';
void main()
runApp(const MyApp());
class MyApp extends StatelessWidget
const MyApp(super.key);
Widget build(BuildContext context)
return MaterialApp(
title: 'Flutter Demo',
theme: ThemeData(
primarySwatch: Colors.blue,
),
home: const MyHomePage(title: 'Flutter Demo Home Page'),
);
class MyHomePage extends StatefulWidget
const MyHomePage(super.key, required this.title);
final String title;
State<MyHomePage> createState() => _MyHomePageState();
class _MyHomePageState extends State<MyHomePage>
// 使用dialog 来自己真正的定义一个对话框
Widget myDialog()
return Dialog(
// insetPadding: EdgeInsets.all(10), //距离
shape: const RoundedRectangleBorder(
borderRadius: BorderRadius.all(Radius.circular(20))), //形状
backgroundColor: Colors.pinkAccent,
clipBehavior: Clip.antiAlias, //强制裁剪
elevation: 10,
child: SizedBox(
//需要在内部限制下高度和宽度才能更好的显示
height: 250,
width: 300,
child: Column(
crossAxisAlignment: CrossAxisAlignment.center,
mainAxisAlignment: MainAxisAlignment.spaceBetween,
children: [
// const Text('中奖拉'),
Image.asset('assets/getit.gif'),
Row(
mainAxisAlignment: MainAxisAlignment.spaceBetween,
children: [
ElevatedButton(
style: ButtonStyle(
backgroundColor:
MaterialStateProperty.all(Colors.green)),
onPressed: ()
Navigator.of(context).pop();
,
child: const Text('取消')),
ElevatedButton(
style: ButtonStyle(
backgroundColor:
MaterialStateProperty.all(Colors.green)),
onPressed: () ,
child: const Text('领奖')),
ElevatedButton(
style: ButtonStyle(
backgroundColor:
MaterialStateProperty.all(Colors.green)),
onPressed: ()
Navigator.of(context).pop(true);
,
child: const Text('确定')),
],
)
],
),
),
);
Widget build(BuildContext context)
return Scaffold(
appBar: AppBar(
// Here we take the value from the MyHomePage object that was created by
// the App.build method, and use it to set our appbar title.
title: Text(widget.title),
),
body: Center(
// Center is a layout widget. It takes a single child and positions it
// in the middle of the parent.
child: Column(
mainAxisAlignment: MainAxisAlignment.spaceEvenly,
children: <Widget>[
ElevatedButton(
onPressed: () async
// 等用户选择返回结果,点击空白区域返回null
var result = await showDialog(
barrierLabel: 'barrierLabel', //给屏障定义一个string name
barrierDismissible: true, //点击空白是否退出
context: context,
builder: (context)
return AlertDialog(
// titlePadding: EdgeInsets.all(10),
elevation: 10,
backgroundColor: Colors.pink, //背景颜色
shape: RoundedRectangleBorder(
borderRadius: BorderRadius.circular(20)), //设置形状
title: const Text('我是标题'),
// icon: Icon(Icons.work_rounded),
content: const Padding(
padding: EdgeInsets.all(8.0),
child: Text('我可以是文本内容我可以是文本内容我可以是文本内容我可以是文本内容'),
),
contentTextStyle: const TextStyle(
color: Colors.black), //文本内容的text样式
actions: [
Padding(
padding: const EdgeInsets.all(8.0),
child: ElevatedButton(
onPressed: ()
Navigator.of(context).pop(true);
,
child: const Text('确定')),
),
Padding(
padding: const EdgeInsets.all(8.0),
child: ElevatedButton(
onPressed: ()
Navigator.of(context).pop();
,
child: const Text('取消')),
),
],
);
);
print('result$result');
,
child: Text('AlertDialog')),
ElevatedButton(
onPressed