WPF学习第十章 WPF布局示例
Posted peter-luo
tags:
篇首语:本文由小常识网(cha138.com)小编为大家整理,主要介绍了WPF学习第十章 WPF布局示例相关的知识,希望对你有一定的参考价值。
前几章用了相当大的篇幅研究有关WPF布局容器的复杂内容。在掌握了这些基础知识后,就可以研究几个完整的布局示例。通过研究完整的布局示例,可更好的理解各种WPF布局概念在实际窗口中的工作方式。
一、列设置
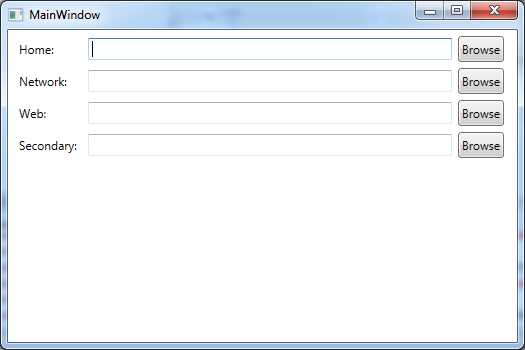
布局容器(如Grid面板)使得窗口创建整个布局结构变得非常容易。例如,分析如下显示的窗口及设置。该窗口在一个表格结构中排列各个组件——标签、文本框以及按钮。

为创建这一表格,首先定义网格的行和列。行定义足够简单——只需要将每行的尺寸设置为所含内容的高度。这意味着所有行都将使用最大元素的高度,在该示例中,最大的元素是第三列中的Browse按钮。
接下来需要创建列。第一列和最后一列的尺寸要适合其内容(分别是标签文本和Browse按钮)。中间列占用所有剩余空间,这意味着当窗口变大时,该列的尺寸会增加,这样可有更大的空间显示选择的文件夹(如果希望拉伸不超过一定的最大宽度,在定义列时可使用MaxWidth属性,就像对单个元素使用MaxWidth属性一样)。
现在已经具备了基本结构,接下来只需要在恰当的单元格中放置元素。然而,还需要仔细考虑边距和对其方式。每个元素需要基本的边距(3个单位较恰当)以在其周围添加一些空间。此外,标签和文本框的垂直方向上需要剧中,因为他们没有Browse按钮高。最后,文本框需要使用自动设置尺寸模式,这样它会被拉伸以充满整列。
示例完整的代码如下所示:
<Window x:Class="LayoutDemo.MainWindow"
        xmlns="http://schemas.microsoft.com/winfx/2006/xaml/presentation"
        xmlns:x="http://schemas.microsoft.com/winfx/2006/xaml"
        Title="MainWindow" Height="350" Width="525">
    <Grid Margin="3,3,10,3">
        <Grid.RowDefinitions>
            <RowDefinition Height="Auto"></RowDefinition>
            <RowDefinition Height="Auto"></RowDefinition>
            <RowDefinition Height="Auto"></RowDefinition>
            <RowDefinition Height="Auto"></RowDefinition>
        </Grid.RowDefinitions>
        <Grid.ColumnDefinitions>
            <ColumnDefinition Width="Auto"></ColumnDefinition>
            <ColumnDefinition Width="*"></ColumnDefinition>
            <ColumnDefinition Width="Auto"></ColumnDefinition>
        </Grid.ColumnDefinitions>
        <Label Grid.Row="0" Grid.Column="0" Margin="3" VerticalAlignment="Center">Home:</Label>
        <TextBox Grid.Row="0" Grid.Column="1" Margin="3" Height="Auto" VerticalAlignment="Center"></TextBox>
        <Button Grid.Row="0" Grid.Column="2" Margin="3" Padding="2">Browse</Button>
        <Label Grid.Row="1" Grid.Column="0" Margin="3" VerticalAlignment="Center">Network:</Label>
        <TextBox Grid.Row="1" Grid.Column="1" Margin="3" Height="Auto" VerticalAlignment="Center"></TextBox>
        <Button Grid.Row="1" Grid.Column="2" Margin="3" Padding="2">Browse</Button>
        <Label Grid.Row="2" Grid.Column="0" Margin="3" VerticalAlignment="Center">Web:</Label>
        <TextBox Grid.Row="2" Grid.Column="1" Margin="3" Height="Auto" VerticalAlignment="Center"></TextBox>
        <Button Grid.Row="2" Grid.Column="2" Margin="3" Padding="2">Browse</Button>
        <Label Grid.Row="3" Grid.Column="0" Margin="3" VerticalAlignment="Center">Secondary:</Label>
        <TextBox Grid.Row="3" Grid.Column="1" Margin="3" Height="Auto" VerticalAlignment="Center"></TextBox>
        <Button Grid.Row="3" Grid.Column="2" Margin="3" Padding="2">Browse</Button>
    </Grid>
</Window>
一个不是非常明显的事实是,因为使用了Grid控件,所以该窗口时非常灵活的。没有任何一个元素——标签、文本框以及按钮——时通过硬编码来定位和设置尺寸的。因此,可通过简单地修改ColumnDefinition元素来快速改变整个网络。甚至,如果添加了包含更长标签文本的行(迫使第一列更宽),就会调整整个网格使其保持一致,包括已经添加的行。如果希望在两行之间添加元素——例如,添加分割线以区分窗口的不同部分——可保持网格的列定义不变,但使用ColumnSpan属性拉伸某个元素,使其覆盖更大的区域。
二、动态内容
与上面的演示的列设置一样,当修订应用程序时,可方便地修改使用WPF布局容器的窗口并且可以很容易地时窗口适应对应用程序的修订。这样的灵活性不仅能使开发人员在设计时受益,而且如果需要显示在运行时变化很大的内容,这样是非常有用的。
一个例子是本地化文本——对于不同的区域,在用户界面中显示的文本需要翻译成不同的语言。在老式的基于坐标的应用程序中,改变窗口中的文本会造成混乱,部分原因是少了英语文本翻译成许多语言后会变得特别大。尽管允许改变元素的尺寸以适应更大的文本,但这样做警察会使整体窗口失去平衡。
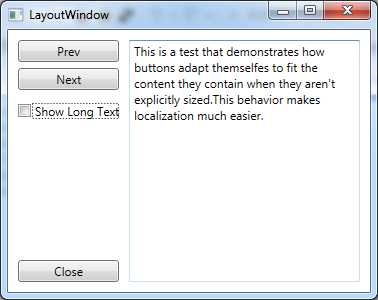
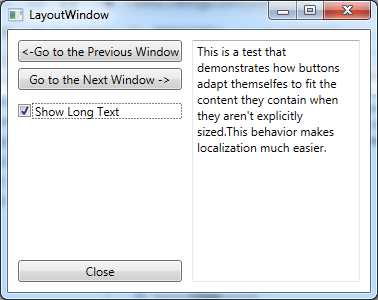
下图演示WPF布局控件时如何聪明地解决这一问题。在这个示例中,用户界面可选择短文本和长文本。当使用长文本时,包含文本的按钮会自动改变其尺寸,而对其他内容也会相应的调整位置。并且因此改变了尺寸的按钮共享同一布局容器(在该例中是一个表格列),所以整个用户界面都会改变尺寸。最终结果是所有按钮保持一致的尺寸——最大按钮的尺寸。


为实现这个效果,窗口使用一个具有两行两列的表格进行分割。左边的列包含可改变大小的按钮,而右边的列包含文本框。底行用于放置Close按钮,底行和顶行位于同一个表格中,从而可以根据顶行改变尺寸。
示例完整代码如下所示:
<Window x:Class="LayoutDemo.LayoutWindow"
        xmlns="http://schemas.microsoft.com/winfx/2006/xaml/presentation"
        xmlns:x="http://schemas.microsoft.com/winfx/2006/xaml"
        Title="LayoutWindow" Height="300" Width="300">
    <Grid>
        <Grid.RowDefinitions>
            <RowDefinition Height="*"></RowDefinition>
            <RowDefinition Height="Auto"></RowDefinition>
        </Grid.RowDefinitions>
        <Grid.ColumnDefinitions>
            <ColumnDefinition Width="Auto"></ColumnDefinition>
            <ColumnDefinition Width="*"></ColumnDefinition>
        </Grid.ColumnDefinitions>
        <StackPanel Grid.Row="0" Grid.Column="0">
            <Button Name="btnPrev" Margin="10,10,10,3">Prev</Button>
            <Button Name="btnNext" Margin="10,3,10,3">Next</Button>
            <CheckBox Name="chkLongText" Margin="10,10,10,10"  Checked="chkLongText_Checked" Unchecked="chkLongText_UnChecked">Show Long Text</CheckBox>
        </StackPanel>
        <TextBox Grid.Row="0" Grid.Column="1" Margin="0,10,10,10" TextWrapping="Wrap" Grid.RowSpan="2">
            This is a test that demonstrates how buttons adapt themselfes to fit the content they contain when they aren‘t explicitly sized.This behavior makes localization much easier.
        </TextBox>
        <Button Grid.Row="1" Grid.Column="0" Name="btnClose" Margin="10,3,10,10">
            Close
        </Button>
    </Grid>
</Window>
后台代码如下所示:
using System;
using System.Collections.Generic;
using System.Linq;
using System.Text;
using System.Windows;
using System.Windows.Controls;
using System.Windows.Data;
using System.Windows.Documents;
using System.Windows.Input;
using System.Windows.Media;
using System.Windows.Media.Imaging;
using System.Windows.Shapes;

namespace LayoutDemo
{
    /// <summary>
    /// LayoutWindow.xaml 的交互逻辑
    /// </summary>
    public partial class LayoutWindow : Window
    {
        public LayoutWindow()
        {
            InitializeComponent();
        }


        private void chkLongText_Checked(object sender, RoutedEventArgs e)
        {
            this.btnPrev.Content = "<-Go to the Previous Window";
            this.btnNext.Content = "Go to the Next Window ->";
        }

        private void chkLongText_UnChecked(object sender, RoutedEventArgs e)
        {
            this.btnPrev.Content = "Prev";
            this.btnNext.Content = "Next";
        }
    }
}
Visiblity属性是UIEelement基类的一部分,因此放置于WPF窗口中的任何内容都支持该属性。该属性可使用三个值,它们来自System.Windows.Visiblity枚举,如下表所示:
| 名 称 | 说 明 |
| Visible | 元素在窗口中正常显示 |
| Collapsed | 元素不显示,也不占用任何空间 |
| Hidden | 元素不显示,但仍为其保留空间(换句话说,会在元素可能先生和ide地方保留空白空间)。如果需要隐藏和显示元素,又不希望改变窗口布局和窗口中剩余元素的相对位置,使用该设置是非常方便的。 |
以上是关于WPF学习第十章 WPF布局示例的主要内容,如果未能解决你的问题,请参考以下文章