微服务之间的通讯安全-JWT优化之日志错误处理限流及JWT改造后执行流程梳理
Posted caofanqi
tags:
篇首语:本文由小常识网(cha138.com)小编为大家整理,主要介绍了微服务之间的通讯安全-JWT优化之日志错误处理限流及JWT改造后执行流程梳理相关的知识,希望对你有一定的参考价值。
前面我们已经完成了通过JWT的认证和授权的改造,可以看到我们的代码中没有认证和授权的过滤器(Filter)了,基本上由SpringSecurity的过滤器来接管了,接下来我们来看一下怎么在SpringSecurity的过滤器链上加上我们自己的逻辑,比如日志和限流。
1、在SpringSecurity过滤器链上添加审计过滤器
1.1、创建日志过滤器,因为我们根据我们之前审计机制的位置,要把日志过滤器放到认证之后,授权之前。认证的过滤器会把JWT令牌转化为Authentication,然后放到安全上下文中,getPrincipal()方法获取到的就是登陆的用户名。
/**
 * 审计过滤器
 *
 * @author caofanqi
 * @date 2020/2/9 22:06
 */
@Slf4j
public class GatewayAuditLogFilter extends OncePerRequestFilter {


    @Override
    protected void doFilterInternal(HttpServletRequest request, HttpServletResponse response, FilterChain filterChain) throws ServletException, IOException {

        String username = (String) SecurityContextHolder.getContext().getAuthentication().getPrincipal();

        log.info("1、create log for :{}",username);

        filterChain.doFilter(request,response);

        log.info("2、update log to success");

    }

}
1.2、将日志过滤器添加到SpringSecurity过滤器链上,要添加在认证之后授权之前。在安全配置类中,在SpringSecurity过滤器链上添加过滤器有四个方法,addFilterBefore添加在某个过滤器之前,addFilterAfter添加某个过滤器之后,addFilterAt替换掉某个过滤器,addFilter添加到链上。

因为SpringSecurity过滤器链上的过滤器执行时都是有固定的执行顺序的,我们把我们的日志过滤器添加在ExceptionTranslationFilter过滤器之前,这个过滤器是处理异常的过滤器,因为在最终的授权过滤器里,如果授权没过会抛出异常401,403异常由这个过滤器处理。
/**
 * 网关资源服务器配置
 *
 * @author caofanqi
 * @date 2020/2/8 22:30
 */
@Configuration
@EnableResourceServer
public class GatewayResourceServerConfig extends ResourceServerConfigurerAdapter {


    @Resource
    private GatewayWebSecurityExpressionHandler gatewayWebSecurityExpressionHandler;

    @Override
    public void configure(ResourceServerSecurityConfigurer resources) throws Exception {
        resources
                .resourceId("gateway")
                //表达式处理器
                .expressionHandler(gatewayWebSecurityExpressionHandler);
    }

    @Override
    public void configure(HttpSecurity http) throws Exception {
        http
                .addFilterBefore(new GatewayAuditLogFilter(), ExceptionTranslationFilter.class)
                .authorizeRequests()
                //放过申请令牌的请求不需要身份认证
                .antMatchers("/token/**").permitAll()
                //其他所有请求是否有权限,要通过permissionService的hasPermission方法进行判断
                .anyRequest().access("#permissionService.hasPermission(request,authentication)");
    }

}
1.3、启动项目测试,打印日志如下,记录日志时,知道当前用户是谁,所以是在认证之后,中间打印了,在授权处理时我们在PermissionService写的日志,所以添加到了授权之间,符合我们的预期。

2、403访问拒绝的处理
在SpringSecurity中,对于403访问拒绝是由AccessDeniedHandler接口的实现来处理的,在OAuth2中默认使用的是OAuth2AccessDeniedHandler,我们可以写一个自己的处理器,在这个处理器中,可以记录日志,可以自定义返回内容。
2.1、自定义AccessDeniedHandler
/**
 * 403 拒绝访问处理器
 *
 * @author caofanqi
 * @date 2020/2/9 22:37
 */
@Slf4j
@Component
public class GatewayAccessDeniedHandler extends OAuth2AccessDeniedHandler {

    @Override
    public void handle(HttpServletRequest request, HttpServletResponse response, AccessDeniedException authException) throws IOException, ServletException {

        log.info("2、update log to 403");
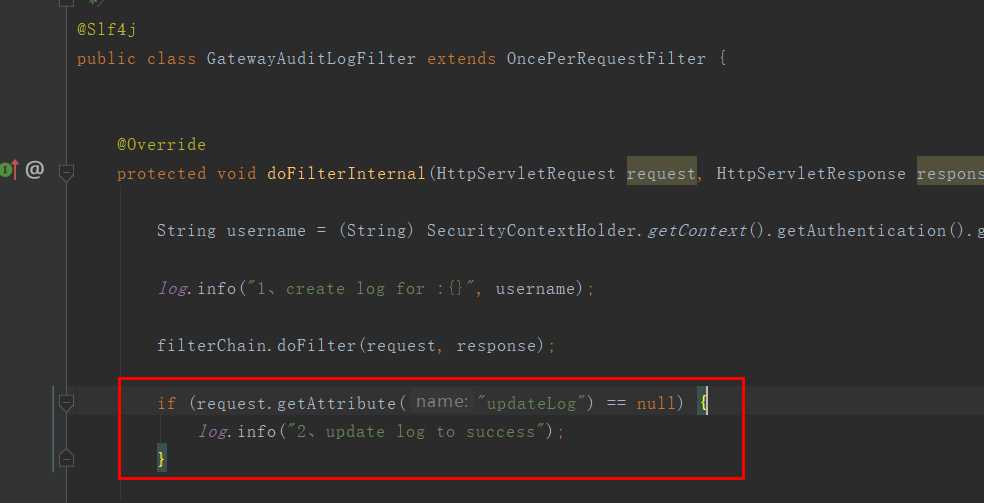
        //做一个标记,让日志过滤器知道已经更新日志了
        request.setAttribute("updateLog","yes");
        //这里可以自定义返回内容,我们就不改了,使用OAuth2AccessDeniedHandler默认的
        super.handle(request, response, authException);

    }
}
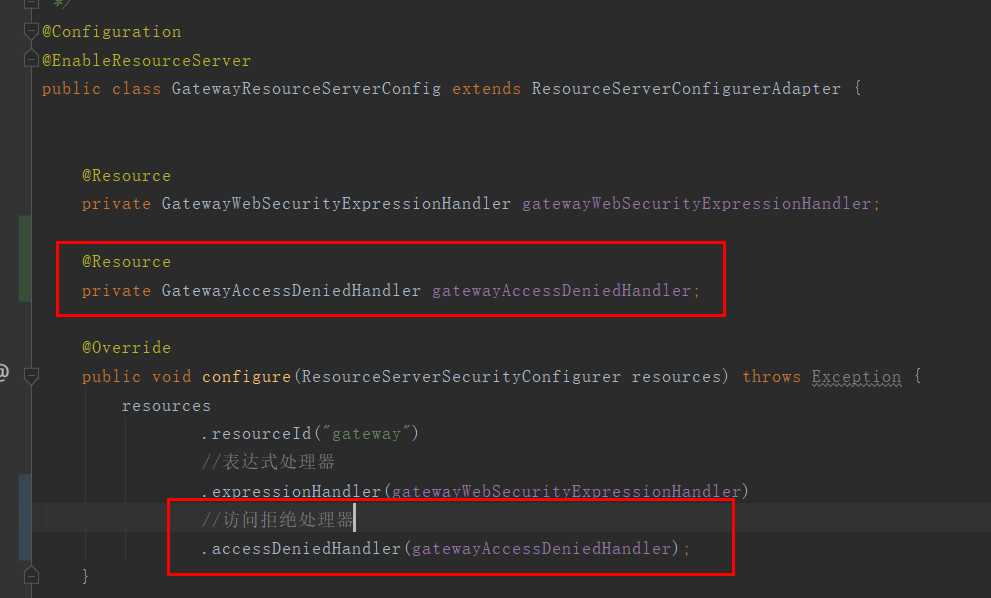
2.2、添加到ResourceServerSecurityConfigurer配置中
2.3、日志过滤器修改
2.4、测试访问拒绝时的控制台打印如下

3、401认证失败的处理
在SpringSecurity中,对于401身份认证的处理是由AuthenticationEntryPoint接口的实现来处理的,在OAuth2中默认使用的是OAuth2AuthenticationEntryPoint,同样,我们可以自定义AuthenticationEntryPoint接口的实现来记录日志,自定义返回内容的。需要注意的是如果传入错误的令牌,在认证过滤器就会认证失败,由AuthenticationEntryPoint来进行处理,这种情况请求不会经过日志过滤器。如果没有传令牌,认证过滤器会创建一个匿名的Authentication(AnonymousAuthenticationToken),继续往下走,至于是不是能够访问,由授权来决定。
3.1、首先修改一下PermissionService要求所有的请求都要经过身份认证
/**
 * 权限控制实现类
 *
 * @author caofanqi
 * @date 2020/2/9 14:51
 */
@Slf4j
@Service
public class PermissionServiceImpl implements PermissionService {

    /**
     * 在这里可以去安全中心,获取该请求是否具有相应的权限
     *
     * @param request        请求
     * @param authentication 认证相关信息
     */
    @Override
    public boolean hasPermission(HttpServletRequest request, Authentication authentication) {

        //这里我们就不写具体的权限判断了,采用随机数模拟,百分之50的机率可以访问
        log.info("request uri : {}", request.getRequestURI());
        log.info("authentication : {}", ReflectionToStringBuilder.toString(authentication));

        /*
         * 如果是没传令牌的话,Authentication 是 AnonymousAuthenticationToken
         * 如果传入令牌经过身份认证 Authentication 是 OAuth2Authentication
         */
        if (authentication instanceof AnonymousAuthenticationToken){
            //要求必须通过身份认证
            throw new AccessTokenRequiredException(null);
        }

        boolean  hasPermission =  RandomUtils.nextInt() % 2 == 0;
        log.info("hasPermission is :{}",hasPermission);
        return hasPermission;
    }

}
3.2、自定义AuthenticationEntryPoint
/**
 * 401身份验证处理
 *
 * @author caofanqi
 * @date 2020/2/9 23:13
 */
@Slf4j
@Component
public class GatewayAuthenticationEntryPoint extends OAuth2AuthenticationEntryPoint {


    @Override
    public void commence(HttpServletRequest request, HttpServletResponse response, AuthenticationException authException) throws IOException, ServletException {

        if(authException instanceof AccessTokenRequiredException){
            //是我们抛出的必须经过身份认证,说明没有传令牌,此时是匿名用户,请求经过了日志过滤器
            log.info("2、update log to 401");
        }else {
            //说明令牌是错误的,认证那里就不对,没有经过日志过滤器
            log.info("1、create log to 401");
        }

        //做一个标记,让日志过滤器知道已经更新日志了
        request.setAttribute("updateLog","yes");
        super.commence(request, response, authException);
    }
}
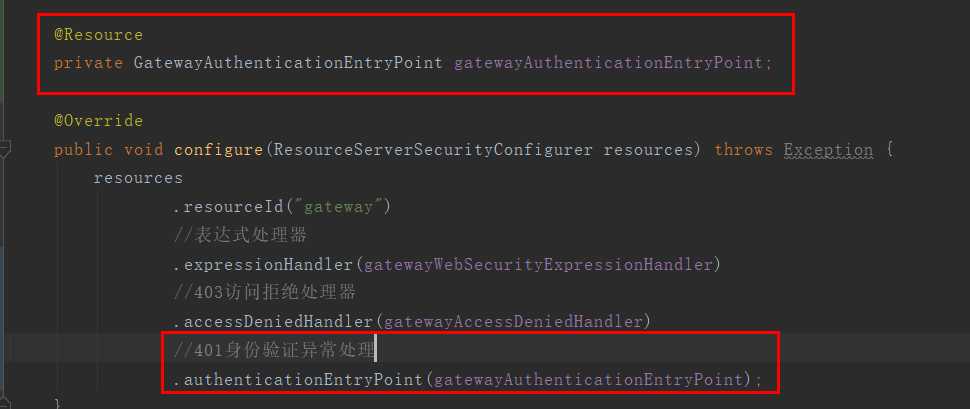
3.3、添加到ResourceServerSecurityConfigurer配置中
3.4、启动各项目测试
3.4.1、不传令牌进行测试

3.4.2、传入错误的令牌进行测试

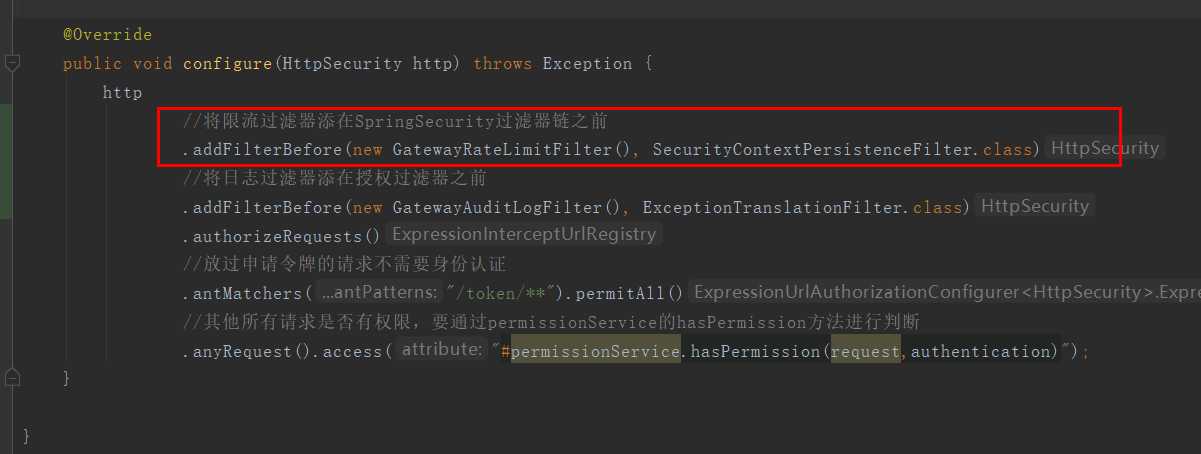
4、在SpringSecurity过滤器链上添加限流过滤器
4.1、导入guava依赖
        <dependency>
            <groupId>com.google.guava</groupId>
            <artifactId>guava</artifactId>
            <version>28.0-jre</version>
        </dependency>
4.2、编写限流过滤器
/**
 * 限流过滤器
 *
 * @author caofanqi
 * @date 2020/2/9 23:54
 */
public class GatewayRateLimitFilter extends OncePerRequestFilter {

    private RateLimiter rateLimiter = RateLimiter.create(1);

    @Override
    protected void doFilterInternal(HttpServletRequest request, HttpServletResponse response, FilterChain filterChain) throws ServletException, IOException {

        if (rateLimiter.tryAcquire()) {
            filterChain.doFilter(request, response);
        } else {
            response.setStatus(HttpStatus.TOO_MANY_REQUESTS.value());
            response.setContentType(MediaType.APPLICATION_JSON_VALUE);
            response.getWriter().write("{"error":"too many request"}");
            response.getWriter().flush();
        }

    }
}
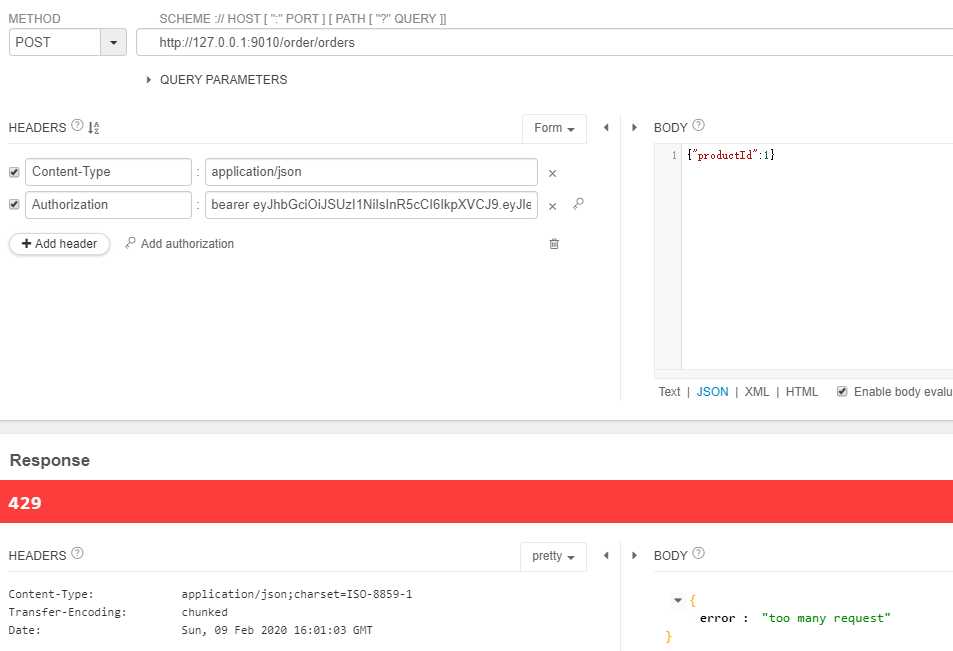
4.4、测试快速请求
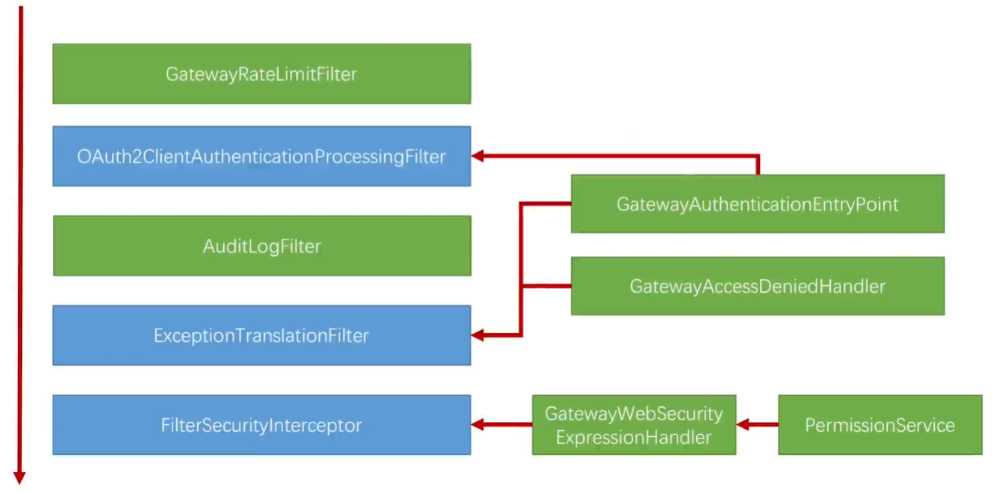
上图就是在我们写的安全机制中主要涉及的过滤器和组件,左边的都是过滤器(FilterSecurityInterceptor虽然不是以Filter结尾的,但也是过滤器),右边都自己写的组件,组件的作用是改变或增强过滤器的行为。其中绿色的都是我们自己写的,蓝色的都是SpringSecurity写的,SpringSecurity写的有它自己的默认行为,我们自己写的组件注入到SpringSecurity的过滤器里面,来改变或者增强SpringSecurity过滤器的行为。
执行的顺序就是左边从上到下,首先是GatewayRateLimitFilter我们自己写的用来限流的,然后第二个OAuth2ClientAuthenticationProcessingFilter作用是从令牌中将当前用户身份提取出来,下面是AuditLogFilter我们用来记录审计日志,后面ExceptionTranslationFilter是一个异常转换过滤器,本身没有任何业务逻辑,它作用就是cache后面FilterSecurityInterceptor抛出来的异常,FilterSecurityInterceptor的作用就是判断权限,我们写的PermissionService最终就是在这里生效的。
一个请求过来,就会按顺序执行这些过滤器(SpringSecurity还有一个其他的过滤器,但是跟我们的核心没有关系),我们会把自己写的权限判断逻辑放到PermissionService里,然后把PermissionService给到GatewayWebSecurityExpressionHandler表达式处理器,然后把表达式处理器给到FilterSecurityInterceptor,最终,我们在代码中写的表达式("#permissionService.hasPermission(request,authentication)")会由GatewayWebSecurityExpressionHandler处理,然后交给PermissionService。在FilterSecurityInterceptor中进行权限判断时,如果没有权限会抛出相应异常,会被ExceptionTranslationFilter捕获住,然后根据抛出的异常去调用相应的处理器,在安全的错误中,一共就两种异常,401和403。401交给GatewayAuthenticationEntryPoint来处理,403交给GatewayAccessDeniedHandler来处理,这两个组件都是注到ExceptionTranslationFilter中来进行相应的处理,同时GatewayAuthenticationEntryPoint也会被注入到OAuth2ClientAuthenticationProcessingFilter里面,因为如果令牌传的不对,OAuth2ClientAuthenticationProcessingFilter会直接抛出401的异常给GatewayAuthenticationEntryPoint处理。
这就是我们根据JWT改造完,在网关上所做的事情和逻辑。
项目源码:https://github.com/caofanqi/study-security/tree/dev-jwt-success
以上是关于微服务之间的通讯安全-JWT优化之日志错误处理限流及JWT改造后执行流程梳理的主要内容,如果未能解决你的问题,请参考以下文章
