2020-02-11
Posted chang1024
tags:
篇首语:本文由小常识网(cha138.com)小编为大家整理,主要介绍了2020-02-11相关的知识,希望对你有一定的参考价值。
庚子年 戊寅月 甲申日
描述
mybatis复习,微信项目搭建
技术总结:https://blog.csdn.net/qq_40674583/article/details/104272075
Ps:一开始写的没有保存,软件蹦了,写的全没了,难受。。。。。。。简单补一下
mybatis
Maven
<?xml version="1.0" encoding="UTF-8"?>
<project xmlns="http://maven.apache.org/POM/4.0.0"
         xmlns:xsi="http://www.w3.org/2001/XMLSchema-instance"
         xsi:schemaLocation="http://maven.apache.org/POM/4.0.0 http://maven.apache.org/xsd/maven-4.0.0.xsd">
    <modelVersion>4.0.0</modelVersion>

    <groupId>org.example</groupId>
    <artifactId>z_13_mybatis</artifactId>
    <version>1.0-SNAPSHOT</version>

    <dependencies>
        <dependency>
            <groupId>mysql</groupId>
            <artifactId>mysql-connector-java</artifactId>
            <version>5.1.48</version>
        </dependency>

        <dependency>
            <groupId>org.mybatis</groupId>
            <artifactId>mybatis</artifactId>
            <version>3.5.4</version>
        </dependency>

        <dependency>
            <groupId>junit</groupId>
            <artifactId>junit</artifactId>
            <version>4.13</version>
            <scope>test</scope>
        </dependency>
    </dependencies>

    <build>
        <resources>
            <resource>
                <directory> src/main/java </directory>
                <includes>
                    <include> **/*.properties </include>
                    <include> **/*.xml </include>
                </includes>
                <filtering> false </filtering>
            </resource>
        </resources>
    </build>

</project>
maven依赖和xml过滤
xml文件配置
mybatis-config.xml
<?xml version="1.0" encoding="UTF-8" ?>
<!DOCTYPE configuration
PUBLIC "-//mybatis.org//DTD Config 3.0//EN"
"http://mybatis.org/dtd/mybatis-3-config.dtd">
<!-- 根标签 -->
<configuration>
<properties>
<property name="driver" value="com.mysql.jdbc.Driver"/>
<property name="url" value="jdbc:mysql://127.0.0.1:3306/mybatis-110?useUnicode=true&characterEncoding=utf-8&allowMultiQueries=true"/>
<property name="username" value="root"/>
<property name="password" value="123456"/>
</properties>
<!-- 环境,可以配置多个,default:指定采用哪个环境 -->
<environments default="test">
<!-- id:唯一标识 -->
<environment id="test">
<!-- 事务管理器,JDBC类型的事务管理器 -->
<transactionManager type="JDBC" />
<!-- 数据源,池类型的数据源 -->
<dataSource type="POOLED">
<property name="driver" value="com.mysql.jdbc.Driver" />
<property name="url" value="jdbc:mysql://127.0.0.1:3306/mybatis-110" />
<property name="username" value="root" />
<property name="password" value="123456" />
</dataSource>
</environment>
<environment id="development">
<!-- 事务管理器,JDBC类型的事务管理器 -->
<transactionManager type="JDBC" />
<!-- 数据源,池类型的数据源 -->
<dataSource type="POOLED">
<property name="driver" value="${driver}" /> <!-- 配置了properties,所以可以直接引用 -->
<property name="url" value="${url}" />
<property name="username" value="${username}" />
<property name="password" value="${password}" />
</dataSource>
</environment>
</environments>
</configuration>
mapper.xml
<?xml version="1.0" encoding="UTF-8" ?>
<!DOCTYPE mapper
  PUBLIC "-//mybatis.org//DTD Mapper 3.0//EN"
  "http://mybatis.org/dtd/mybatis-3-mapper.dtd">
<!-- mapper:根标签,namespace:命名空间,随便写,一般保证命名空间唯一 -->
<mapper namespace="MyMapper">
   <!-- statement,内容:sql语句。id:唯一标识,随便写,在同一个命名空间下保持唯一
      resultType:sql语句查询结果集的封装类型,tb_user即为数据库中的表
    -->
   <select id="selectUser" resultType="com.zpc.mybatis.User">
      select * from tb_user where id = #{id}
   </select>
</mapper>
核心配置文件 和 映射文件 ------- 记得映射文件要在配置文件中注册
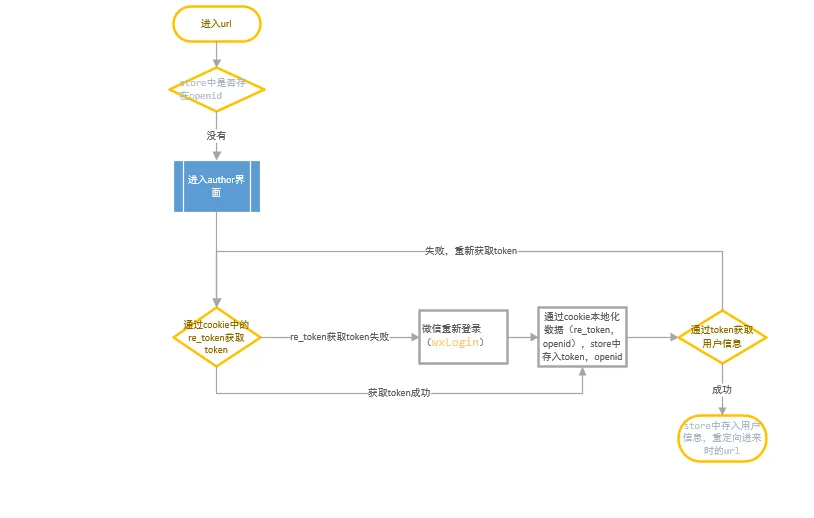
微信登录
思路
流程图

核心代理
##### 路由守卫
router.beforeEach((to,from,next) => {
  if(to.path == '/author' && store.state.wx.openid != ''){
    // 用户使用后退返回到授权页,则默认回到首页
    next('/wx/md/center')
    return false
  }
  if(store.state.wx.openid === '' && to.path != '/author'){
    // 之前有获取过授权
    Cookies.set('url', to.fullPath);
    next('/author')
    return false
  }
  next()
});
##### author.vue
<template>
    <div>
        <img src="https://timgsa.baidu.com/timg?image&quality=80&size=b9999_10000&sec=1580749534450&di=df7d5cccb9df655492e4ff11983d4289&imgtype=0&src=http%3A%2F%2Fn.sinaimg.cn%2Fsinacn16%2F133%2Fw640h1093%2F20180721%2F8c39-hfqtahi3500949.jpg" width="100%" height="100%"/>
    </div>
</template>

<script>
    import * as wx from '@/module/wxjw/api/wx'
    import {login} from "../module/wxjw/api/http";
    export default {
        data(){
            return{

            }
        },
        methods:{
            //第一次登录,没有re_token的情况,或者过期了
            wxLogin(){
                let code = wx.getCode();
                if (!code) {
                    wx.auth();
                } else {
                    //code存在,换取token
                    wx.getToken(code).then((res) => {
                        this.okLogin(res);
                    })
                }
            },
            // token有效性检测  更新用户信息
            isToken(token,openid){
                wx.isToken(token,openid).then(res => {
                    if(res.errcode === 0){
                        // 有效
                        wx.getUser(token,openid).then(res => {
                            console.log('登录成功:'+ res.openid);
                            this.$store.commit('setUser', res);
                        })
                    }else{
                        //无效
                        console.log('token失效:  '+token);
                        this.updataToken();
                    }
                });
            },
            //更新token
            updataToken(){
                //以前是否授权
                if(this.$cookies.isKey('wxuser')){
                    // re_token是否有效
                    let wxuser = this.$cookies.get('wxuser');
                    wx.getTokenByRetoken(wxuser.re_token).then( res => {
                        if(res.errcode == 40029||res.errcode == 40001||res.errcode == 40030){
                            // 无效,获取token失败,查询登录
                            this.wxLogin();
                        }else{
                            this.okLogin(res);
                        }
                    })
                }else{
                    // 第一次进入,重新授权
                    console.log('第一次进入')
                    this.wxLogin();
                }
            },
            // 本地化
            okLogin(res){
                //存cookie
                this.$cookies.remove('wxuser')
                this.$cookies.set('wxuser',{
                    re_token : res.refresh_token,
                    openid : res.openid
                });
                //更新token
                this.$store.commit('setToken', res.access_token);
                //更新用户信息
                this.isToken(res.access_token,res.openid);
                //登录完成,存入openID
                this.$store.commit('setOpenid', res.openid);
                // 转跳url
                let url = this.$cookies.get('url');
               if(this.$cookies.get('url')=='/'){
                   url = '/wx/md/center'
               }
                window.location.href = '/#'+ url;
                this.$cookies.remove('url');
            }
        },
        created(){
            this.updataToken();
        }
    }
</script>
<style scoped>

</style>
以上是关于2020-02-11的主要内容,如果未能解决你的问题,请参考以下文章